Keyboard or mouse not working after your PC wake up from sleep? When you’re charging your phone through an USB port, putting your PC into sleep mode will turn off the power to USB ports, and your phone will stop charging. In this tutorial we’ll show you 2 methods to set Windows to power on or off USB devices in sleep mode.
Method 1: Enable / Disable Power Saving on USB Ports
- Press the Windows key + R to open the Run box. Type devmgmt.msc and press Enter.
- When the Device Manager window opens, expand the Universal Serial Bus controllers branch, then right-click the USB Root Hub device and select Properties.
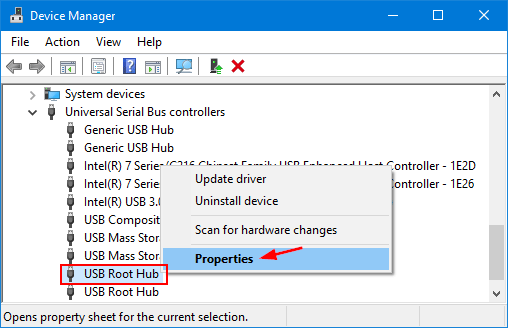
- Click the Power Management tab. If you want USB ports to keep supplying power in sleep mode, just uncheck “Allow the computer to turn off this device to save power“. Or check it to let Windows turn off USB ports to save power.
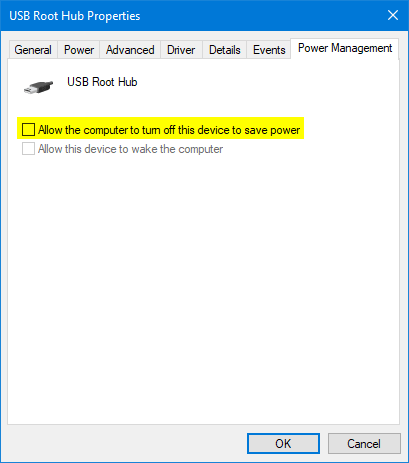
- Repeat steps 3 and 4 for all of the USB Root Hubs on the computer.
Note: Windows will clear the check box “Allow the computer to turn off this device to save power” when the device is unplugged from the USB port or the PC is restarted. To keep this from happening, use the method below to disable USB selective suspend setting.
Method 2: Enable / Disable USB Selective Suspend Setting
- Press the Windows key + R to open the Run box. Type powercfg.cpl and press Enter.
- When the Power Options window opens, click the Change plan settings link to the right of your current power plan.

- Click the “Change advanced power settings” link.

- Expand the “USB settings” and then expand “USB Selective suspend setting“. Set it to Disabled if you want to stop Windows from powering down any connected USB devices.
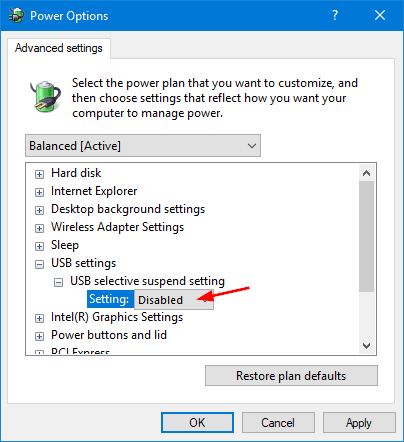
- Click Apply to save your changes.