Archive for February, 2018

Easy Ways to Open Character Map in Windows 10

February 28th, 2018 by Admin

How can I access Character Map in order to type a special character that is not shown on my keyboard? Character Map is the built-in utility for helping you insert all possible text symbols or special characters into your document. In this tutorial we’ll show you different ways to open Character Map in Windows 10.

Method 1: Open Character Map in Windows 10 via Run Command

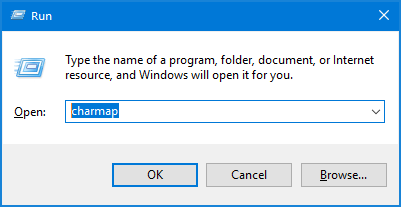
Press the Windows key + R on your keyboard to open Run command box, type charmap and press Enter.

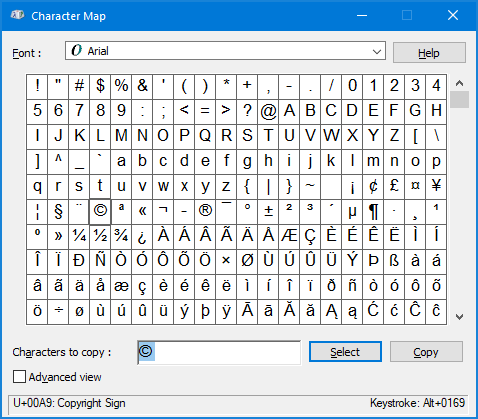
The Character Map utility will start. When you first using Character Map, you may be amazed at what characters you could insert into a document.

Method 2: Open Character Map in Windows 10 via Start Menu

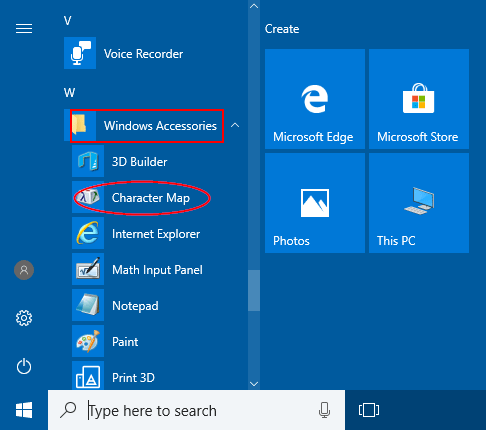
Click the Start button. When the Start Menu opens, scroll down to the Windows Accessories folder. Expand it and you’ll see the Character Map shortcut.

If you’re running Windows 7, you can access Character Map via Start > All Programs > Accessories > System Tools > Character Map.

Method 3: Open Character Map in Windows 10 via Cortana Search

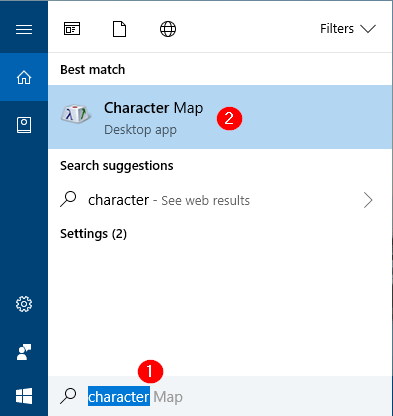
Simply type character into the Cortana Search box at the taskbar, then click the Character Map app appeared in the result list.

Method 4: Create a Character Map Shortcut on Your Desktop

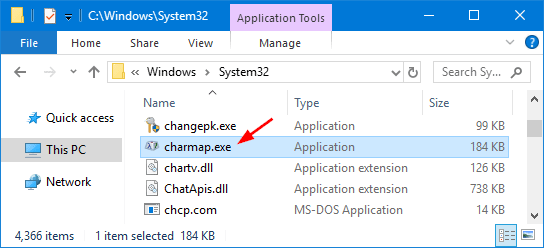
Open your Windows Explorer and browse to the C:\Windows\System32\ folder. Right-click on the charmap.exe file and then select “Send to” -> “Desktop (create shortcut)” from the context menu.

Once the shortcut is created on your desktop, you can rename it to “Character Map“. When you need to type special symbols, just double-click the Character Map shortcut to launch it quickly.

4 Ways to Enable or Disable Aero Peek in Windows 10 / 8 / 7

February 24th, 2018 by Admin

Aero Peek is a usability feature available since Windows 7, which allows you to temporarily view the desktop without having to minimize all the open windows. Just move the mouse at the far right end of the taskbar, it makes all the open windows go transparent and you can see the desktop. Move the mouse away to see your open windows again.

If you don’t like Aero Peek, you can disable it easily. In this tutorial we’ll show you 4 ways to enable or disable Aero Peek in Windows 10 / 8 / 7.

Updated: These methods don’t work with Windows 11. If you want to disable desktop peek in Windows 11, please check out this tutorial.

Method 1: Enable or Disable Aero Peek via Right-clicking “Show desktop” Button

Move your cursor over the “Show desktop” button, which can be found as a small rectangle present at the right corner of the taskbar. Right-click the “Show desktop” button, and then select “Peek at desktop” from the popup menu.

When Aero Peek is turned on, there should be a check mark next to the “Peek at desktop” option. Clicking that option again will then disable Aero Peek.

Method 2: Enable or Disable Aero Peek via Right-clicking Taskbar

Right click an empty space on the taskbar, and then select Taskbar settings from the popup menu.

On the Taskbar settings window, just toggle the “Use Peek to preview the desktop when you move your mouse to the Show desktop button at the end of the taskbar” option on or off to enable or disable Aero Peek.

If you’re running Windows 7, right-click on the taskbar and select Properties. You’ll get a similar option “Use Aero Peek to preview the desktop” that allows you to enable or disable Aero Peek.

Method 3: Enable or Disable Aero Peek via System Properties

  1. Press the Windows + R keyboard shortcut to open the Run dialog, then type sysdm.cpl and hit Enter.
  2. On the System Properties dialog box, select the Advanced tab. Click the Settings button under the Performance section.

  3. Select the Visual Effects tab, look for the option entitled “Enable Aero Peek” or “Enable Peek“, which allows you to turn the Aero Peek feature on or off.

  4. Click Apply and then OK.

Method 4: Enable or Disable Aero Peek via Registry Hack

  1. Open the Registry Editor and navigate to the following key:
    HKEY_CURRENT_USER\Software\Microsoft\Windows\CurrentVersion\Explorer\Advanced
  2. Double-click a DWORD value called DisablePreviewDesktop on the right pane, set its value to 0 if you want to enable Aero Peek, or change its value to 1 when you don’t use Aero Peek.

  3. Close Registry Editor. Restart or log off your system.

How to Disable Change Password Option from the CTRL + ALT + DEL Screen

February 23rd, 2018 by Admin

How to remove the “Change a password” option from the Ctrl+Alt+Del screen in Windows 10? When pressing the Ctrl+Alt+Delete keyboard combination, it will invoke the Windows Security Screen and users can change the login password there. Here’s how you can disable the ability of changing password from the Ctrl+Alt+Delete screen in Windows 10 / 8 / 7, through group policy or registry tweak.

Method 1: Disable Change Password Option from the CTRL+ALT+DEL Screen via Group Policy

  1. Press the Windows key + R keyboard shortcut, then type gpedit.msc into the Run command box and click OK.

  2. Once the Local Group Policy Editor opens, navigate to the following path:
    User Configuration > Administrative Templates > System > Ctrl+Alt+Del Option

    On the right, double-click the Remove Change Password policy.

  3. Select Enabled. Click Apply and reboot your computer.

    The next time you press the Ctrl + Alt + Del key combination, you should no longer see the “Change a password” option on the screen.

Method 2: Disable Change Password Option from the CTRL+ALT+DEL Screen via Registry Tweak

  1. Press the Windows key + R keyboard shortcut, then type regedit into the Run command box and click OK.

  2. In the Registry Editor window, browse to the following path:
    HKEY_CURRENT_USER\Software\Microsoft\Windows\CurrentVersion\Policies\System

    If the System key isn’t present, you have to create it. Right-click Policies key on the left, and select New -> Key, then name it System.

  3. Right-click blank area on the right side, select New -> DWORD (32-bit) Value. Name the key DisableChangePassword and set its value from 0 to 1.

  4. These changes require that you restart your computer. After that, the “Change a password” option will be missing from the screen when you press Ctrl + Alt + Del.

3 Ways to Enable or Disable Touch Feedback in Windows 10

February 21st, 2018 by Admin

When you tap or draw something on a touch screen, a round spot appears under your fingertip if you’ve enabled Touch Feedback in Windows 10. This provides you with visual feedback that your tap was recognized. In this tutorial we’ll show you 3 ways to enable or disable Touch Feedback in Windows 10.

Method 1: Enable or Disable Touch Feedback via Settings

  1. Use Windows + I keys on the keyboard to open the Settings, and then click Ease of Access.

  2. Select the “Other options” in the left menu. There you should see a setting for “Show visual feedback when I touch the screen” on the right.

  3. Toggle it off if you want to get rid of the annoying grey touch circle on your screen. Or toggle it on to enable Touch Feedback and optionally turn on “Use darker, larger visual feedback (ideal for presentations)“.

Method 2: Enable or Disable Touch Feedback via Control Panel

  1. Open the Control Panel in Large icons view, and click Pen and Touch.

  2. In the Pen and Touch window, click the Touch tab at the top. Check the option “Show visual feedback when touching the screen” to turn on Touch Feedback. If you want darker and larger visual feedback, check the “Optimize visual feedback for projection to an external monitor” box.

  3. If you want to turn off Touch Feedback, uncheck the option “Show visual feedback when touching the screen“. Once you have set the desired options, click Apply and then OK.

Method 3: Enable or Disable Touch Feedback via Registry Editor

  1. Open the Registry Editor and browse to the following registry location:
    HKEY_CURRENT_USER\Control Panel\Cursors
  2. There you should see two DWORD values “GestureVisualization” and “ContactVisualization” on the right. If you want to disable Touch Feedback, just set both of them to zero. If you want to enable Touch Feedback, set GestureVisualization to 31 in decimal, and set ContactVisualization to 1.

  3. If you to turn on “Darker, Larger Visual Feedback”, keep GestureVisualization as a decimal value 31 and set ContactVisualization to 2.
  4. Close Registry Editor and reboot your computer for the changes to take effect.

Fix: Windows 10 Requires Username and Password When Session is Locked

February 19th, 2018 by Admin

When a Windows 10 session is locked, it requires the username and password to unlock it. Previous versions of Windows only required the password. How can I change it to only ask me for password? Luckily there is easy fix that can get rid of the need to click or enter username, so you can unlock a locked Windows 10 session by entering password only.

Fix: Windows 10 Requires Username and Password When Session is Locked

  1. Press the Windows key + R to open the Run prompt. Type secpol.msc and press Enter.

  2. In the left pane of Local Security Policy Editor, expand Local Policies and click Security Options.

    Next, double-click the Interactive Logon: Display User Information when the session is locked policy in the right pane.

  3. Click the drop-down box to select “User display name, domain and user names“.

  4. Click Apply and then OK. You need to restart the machine for the change to take effect.
  5. After signing into your account, press the Windows + L to lock your session. The lock screen will now show your locked username so you can simply enter your password to unlock it.

If Local Security Policy Editor is not available in your system, you can also fix that issue with a registry hack: How to Hide User Name from Windows Lock Screen.

Fix: Windows 10 Thumbnail Cache Keeps Deleting Itself at Boot

February 4th, 2018 by Admin

When you open a folder containing images or video files, Windows will automatically create the thumbnail images for each file and store them in the cache, so that it can show thumbnails without any delay the next time you open the same folder.

Since Windows 10 Fall Creators Update, the thumbnail cache keeps deleting itself after a restart or a shutdown, and the system has to recreate the thumbnails again for the same folder. Luckily, there is registry trick that can stop Windows 10 from automatically deleting the thumbnail cache at boot.

How to Fix: Windows 10 Thumbnail Cache Keeps Deleting Itself at Boot

  1. Press the Windows key + R shortcut to open the Run command box. Type regedit and hit Enter.

  2. Navigate to the following registry location, and then double-click the Autorun DWORD value in the right pane.

    HKEY_LOCAL_MACHINE\SOFTWARE\Microsoft\Windows\CurrentVersion\Explorer\VolumeCaches\Thumbnail Cache

  3. Change the value from 1 to 0, and then click OK. Just close Registry Editor and restart Windows to allow the changes to take effect.

  4. Now you have stopped Windows 10 from auto-deleting the Thumbnail cache on reboot.

How to Clear the Thumbnail Cache in Windows 10

February 2nd, 2018 by Admin

Windows 10 thumbnails messed up? By default, Windows automatically creates thumbnails for every documents, videos and images on your PC, which gives you a preview of a folder/file before you open it. When Windows 10 doesn’t properly display thumbnails or the thumbnails are corrupted, here’s how to clear and rebuild the thumbnail cache in Windows 10.

Where does Windows 10 store the thumbnail cache?

The thumbnail cache is hidden and you can find it in the following location:
C:\Users\user_name\AppData\Local\Microsoft\Windows\Explorer

Here you will see a lot of files like thumbcache_2560.db. If you were to be able to delete them, Windows 10 will automatically re-create new thumbnails when required.

Method 1: Clear the thumbnail cache using Disk Cleanup

  1. Open File Explorer. Right-click on your system partition (C:\) and select Properties from the context menu.
  2. Under the General tab, click the Disk Cleanup button.

  3. Locate and check the Thumbnails option, and then click OK to delete / clear the thumbnail cache.

Method 2: Clear the thumbnail cache using Command Prompt

  1. Open the Command Prompt as administrator.
  2. Before clearing the thumbnail cache, you need to close File Explorer. Open Task Manager and switch to the Details tab, right-click on explorer.exe and select End task.

  3. Get back to the running Command Prompt. Type the following command and press Enter to delete all the thumbnail cache files.
    del %LocalAppData%\Microsoft\Windows\Explorer\thumbcache_*.db
    start explorer.exe

  4. Now you should be able to browse files and folders on your computer with thumbnail images showing up correctly.

How to Turn On / Off High Contrast in Windows 10 / 8 / 7

February 1st, 2018 by Admin

How can I remove High Contrast mode? Windows comes with several themes that provide high contrast and make it easier to read screens in bad lighting. This feature is really useful for users with visual impairment. Here are different ways to turn on / off High Contrast in Windows 10 / 8 / 7.

Method 1: Turn On / Off High Contrast Using Keyboard Shortcut

This keyboard shortcut (left Shift + left Alt + PrtScn) can be used as a toggle to turn a high-contrast theme on and off. If the keyboard shortcut is not working on your Windows, follow these steps:

  1. Open the Control Panel in Large icons view, and then click Ease of Access Center.

  2. Click the Set up High Contrast icon.

  3. select the “Turn on or off High Contrast when left ALT + left SHIFT + PRINT SCREEN is pressed” check box. Click Apply.

Method 2: Turn On / Off High Contrast from Windows 10 Settings

  1. Press the Windows key + I to open the Settings app, click Ease of Access icon.

  2. Select the Color & high contrast tab. Under Choose a theme, choose a high contrast theme from the drop-down menu, or select None to disable high contrast.

  3. Click Apply.

Method 3: Turn On / Off High Contrast in Windows 8 / 7

  1. Right click on an empty part of the desktop to bring up a menu and then select Personalize.

  2. Scroll down to the “Basic and High Contrast Themes” section and choose the theme of your choice. If you want to turn off high contrast, choose the theme under either “Aero themes” or “Basic themes”.

That’s it!