Archive for September, 2020

How to Show App Name without Combining Icons in Windows 10 Taskbar

September 29th, 2020 by Admin

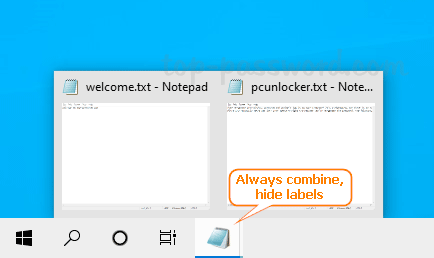
Is there a way to disable taskbar buttons combining in Windows 10? Can I get the taskbar to show the names of programs? By default, Windows 10 taskbar hides the labels next to the icons of running applications. If you open two instances of an application, they will be combined into a single icon in the taskbar, rather than displaying separate app icon for each instance.

How to Show App Name without Combining Icons in Windows 10 Taskbar

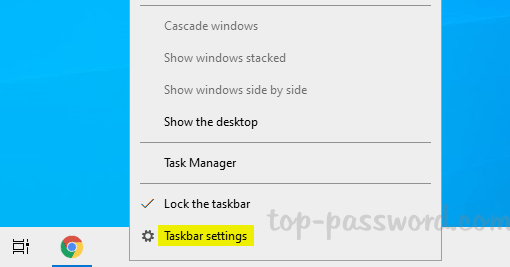
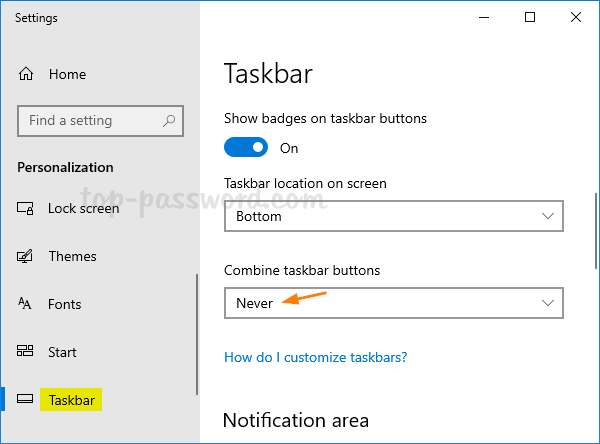
Right-click the blank area in the taskbar and select Taskbar settings from the pop-up menu.

In the Settings window, click the “Combine taskbar buttons” drop-down list and select Never.

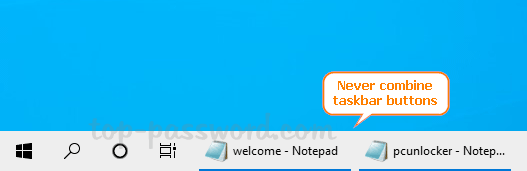
Now, you’ll see the title of each application or document you’re working on in the taskbar. The taskbar will never combine windows from the same program into one icon.

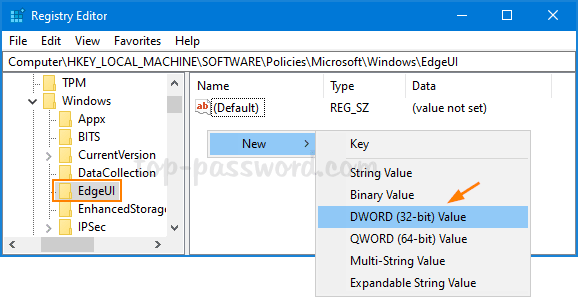
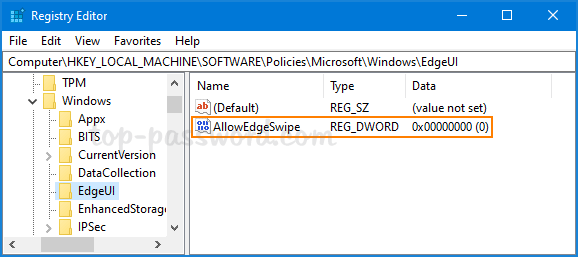
To prevent others from enabling taskbar buttons combining again, you can lock down the taskbar settings and the “Combine taskbar buttons” option will be greyed out.

How to Enable Sleeping Tabs in Microsoft Edge to Save Resources

September 25th, 2020 by Admin

Sleeping tabs is an experimental feature in Microsoft Edge, which can save resources by putting background tabs into sleep mode. This feature is currently available on Microsoft Edge Canary and Dev Channels, but it is disabled by default. In this tutorial we’ll show you the steps to enable sleeping tabs in Microsoft Edge on Windows 10.

How to Enable Sleeping Tabs in Microsoft Edge to Save Resources

  1. Open your Microsoft Edge browser. Copy and paste the following text into the address bar, hit Enter.
    edge://flags/#edge-sleeping-tabs

    Click and select Enabled next to the “Enable Sleeping Tabs” setting. This will make tabs go to sleep after 2 hours of inactivity. If you think the time interval is too long, click the “Enable immediate timeout for Sleeping Tabs” setting and set it to Enabled.

  2. Now you can restart Microsoft Edge and explore the sleeping tabs feature. All tabs except the active tab will fade to indicate they are sleeping.

  3. As soon as you move your mouse cursor over a sleeping tab, Microsoft Edge will show a pop-up which says “This tab is sleeping to save resources“.

    To resume a sleeping tab, simply click on it and your content will be loaded immediately.

  4. You can also add sites you never want to sleep to a block list by going to edge://settings/system.

That’s it!

How to Hide or Add Quota tab in Drive Properties in Windows 10

September 23rd, 2020 by Admin

The Quota tab is not shown or missing for all hard drives? Is there a way to remove the Quota tab as I don’t need to manage disk quota settings? In this tutorial we’ll show you how to hide or add Quota tab in the Drive Properties window in Windows 10.

Part 1: Hide or Remove Quota Tab

  1. Open Registry Editor. Copy and paste the following path in the address bar and hit Enter.
    HKEY_CLASSES_ROOT\Drive\shellex\PropertySheetHandlers\{7988B573-EC89-11cf-9C00-00AA00A14F56}

  2. It will take you to that location. In the left pane, right-click on the {7988B573-EC89-11cf-9C00-00AA00A14F56} subkey and then select Delete.

  3. Close Registry Editor. Right-click any drive in File Explorer and choose Properties, you’ll find that the Quota tab is successfully removed from the Drive Properties window.

Part 2: Add Quota Tab

  1. Open Registry Editor and navigate to the following location. Right-click on the PropertySheetHandlers key and select New -> Key.
    HKEY_CLASSES_ROOT\Drive\shellex\PropertySheetHandlers

  2. Rename the newly-created key to {7988B573-EC89-11cf-9C00-00AA00A14F56}.

  3. Close Registry Editor. Now the Quota tab will be visible in the Drive Properties window.

That’s it!

4 Ways to Find Hard Drive Serial Number in Windows 10

September 16th, 2020 by Admin

Is there a way to get the serial number of my hard drive without opening the case? A serial number is used by manufacturers to identify the device for warranty and replacement purposes. In this tutorial we’ll show you 4 methods to find hard drive serial number in Windows 10.

Method 1: Check the Sticker Label

Open the PC case and look for a sticker or label on your physical hard drive. The serial number is listed after the word “Serial No”, “S/N” or “SN”.

Some of hard drives have the QR code printed on the label. Just scan the QR code and you can find the unique serial number associated with your drive and check the warranty status.

Method 2: Using Command Prompt

Open an elevated Command Prompt and run the command:
wmic diskdrive get model,name,serialnumber

You will see the model, name, and serial number listed for all hard drives connected to your computer.

Method 3: Using Windows PowerShell

Open Windows PowerShell as admin, and execute this command to retrieve your hard drive’s serial number:
Get-PhysicalDisk | Select-Object FriendlyName,SerialNumber

The FriendlyName column can display the brand and model of your hard drive. This command also works with NVMe storage devices.

Method 4: Using Third-Party Software

Seagate has created a very simple tool called DriveDetect.exe, which will tell you the serial number and the model number of any and all Seagate, Samsung and Maxtor-brand drives connected to your computer.

That’s it!

How to Hide or Block Specific WiFi Network in Windows 10

September 15th, 2020 by Admin

Is there a way to block a nearby network from appearing on your Windows 10 system? When you click on the Wi-Fi icon in the system tray, you can see a long list of nearby wireless networks. Some of them are not secure or using offensive names, and you may want to get rid of them. In this tutorial we’ll show you the easy way to hide or block specific Wi-Fi network in Windows 10.

How to Hide or Block Specific WiFi Network in Windows 10

  1. Before getting started, click the Wi-Fi icon in the notification area and find the SSID of the Wi-Fi network you want to hide from the list.

  2. Open an elevated Command Prompt. Type the next command to hide or block any specific Wi-Fi network, replacing “WiFi_Name” with the SSID you found in the step above.
    netsh wlan add filter permission=block ssid="WiFi_Name" networktype=infrastructure

    Note: This command applies to your system so you only hide the Wi-Fi network for yourself.

  3. You can view all the blocked Wi-Fi networks by running this command:
    netsh wlan show filters

  4. To unhide a hidden / blocked Wi-Fi network, execute the following command to remove it from the blocked list.
    netsh wlan delete filter permission=block ssid="WiFi_Name" networktype=infrastructure

    Sometimes, you may want to configure Windows 10 to block all other Wi-Fi networks except your own SSID. To do so, run these commands:
    netsh wlan add filter permission=allow ssid="Your_Own_WiFi" networktype=infrastructure
    netsh wlan add filter permission=denyall networktype=infrastructure

That’s it!

Keep Notepad or Any Window Always On Top in Windows 10 / 8 / 7

September 13th, 2020 by Admin

Could I keep a browser window or Notepad on top of all other windows? Most of Windows programs don’t natively support “Always On Top” feature. Today we’ll show you an easy way to keep Notepad or any other window always on top in Windows 10 / 8 / 7.

How to Keep Notepad or Any Window Always On Top in Windows

  1. Before getting started, you need to download and install a lightweight, free software – AutoHotkey, which lets you create a simple script to make any window stay on top.
  2. After installing, right-click any blank area on the desktop or a File Explorer window, and then select New -> AutoHotkey Script from the context menu.

  3. Enter a meaningful name for the new script file. Right-click it and select Edit Script.

  4. Remove the auto-generated text, and then paste the following command. Save and close the script.

    ; Always on Top (CTRL + SPACE)
    ^SPACE:: Winset, Alwaysontop, , A

    Note: This command will make the active window always on top when you press Ctrl + Space. The “^” character represents the Ctrl key. If you want to assign a different keyboard combination, just refer to the AutoHotkey help page and edit your script.

  5. Next, double-click your script to run it. You’ll see a green “H” icon appear in the system tray.

  6. Now you can make any open window always stay on top. Just bring your target window to the foreground and then press the Ctrl + Space keyboard shortcut to keep it on top of all other windows.

    If you want to disable “Always On Top” for the current active window, just press Ctrl + Space again or exit the AutoHotkey app.

How to Make Windows 10 Calculator Always on Top

September 11th, 2020 by Admin

Is there a way to make the Windows 10 Calculator always on top? Always on Top is one of the most requested features and it is available for the new Calculator app since Windows 10 build 18956. In this tutorial we’ll show you how to make Windows 10 Calculator always stay on top of other windows so you can focus on calculations.

How to Make Windows 10 Calculator Always on Top

Open the Calculator app. If it is not running with the Standard mode, just click the “Open Navigation” button at the top left and select “Standard“.

Click on the “Keep on Top” icon next to the Standard mode name.

A compact view of Calculator will pop up and it always keeps on top of all open windows so you can immediate start with the calculation any time.

If you click the “Keep on Top” icon again, the Calculator app will return back to the Standard mode with a larger view. Note that the Always on Top feature works with Standard mode only. Hopefully the next version of the Calculator app will make that feature available for other modes like Scientific, Programmer.

Easy Ways to Change Windows Password from Remote Desktop Session

September 8th, 2020 by Admin

How can I change a Windows password before expiration on Remote Desktop session? Pressing Ctrl + Alt + Del doesn’t give you options to change the password in the remote session, as that command will execute on your local PC instead of the remote one. In this tutorial we’ll show you 4 easy ways to change Windows password from Remote Desktop session.

Method 1: Pressing Ctrl + Alt + End

While connected to Remote Desktop session, press the Ctrl + Alt + End keyboard combination and it will open the Windows Security Screen. You’ll see the option to change your Windows password.

Method 2: Using On-Screen Keyboard

From within the Remote Desktop session, press the Windows key + R to open the Run box. Type osk.exe to bring up the On-Screen Keyboard.

Hold down both Ctrl and Alt keys on your physical keyboard, and then click the Del key in the On-Screen Keyboard. This will also open up the Windows Security screen.

Method 3: Using Command Prompt

Open an elevated Command Prompt. Type the following command and press Enter.
explorer.exe shell:::{2559a1f2-21d7-11d4-bdaf-00c04f60b9f0}

The new screen will show the option to change the password. If you need to frequently change a Windows password from RDP, you can create a batch file or desktop shortcut to run the above command.

Method 4: Using Windows PowerShell

Open Windows PowerShell as admin, and then execute this command:
(New-Object -COM Shell.Application).WindowsSecurity()

This will bring up the Windows Security screen. There you can select “Change a password” to update your password.

Conclusion

In contrast to resetting Windows password, changing a password requires you to remember the current password. After changing your Windows password using the above methods, you should still have access to the EFS protected files.

Fix “The app you’re trying to install isn’t a Microsoft-verified app” in Windows 10

September 7th, 2020 by Admin

When you try to install an app or program in Windows 10, you may get the warning “The app you’re trying to install isn’t a Microsoft-verified app“.

Starting with Windows 10 build 15042, Microsoft has added a new setting which allows installing apps from Windows Store only. To get rid of the warning “The app you’re trying to install isn’t a Microsoft-verified app“, here are 3 methods to turn off app recommendations in Windows 10.

Method 1: Turn off App Recommendations via Settings

  1. Click the Start button and then click the gear icon to open the Settings app.

  2. Next, choose the Apps category.

  3. On the right side, click the “Choose where to get apps” drop-down list and change it from “The Microsoft Store only (Recommended)” to “Anywhere“.

  4. Close the Settings app and the warning will be gone away.

If the “Choose where to get apps” drop-down list is grayed out or missing, try to adjust the app installation policy using one of the following methods.

Method 2: Turn off App Recommendations via Group Policy

  1. Open Local Group Policy Editor and browse to: Computer Configuration -> Administrative Templates -> Windows Components -> Windows Defender SmartScreen -> Explorer.
  2. On the right pane, double-click on the “Configure App Install Control” policy to edit it.

  3. Select Enabled and then pick up the “Turn off app recommendations” setting from the drop-down list.

  4. Click Apply and then OK. Restart your PC and Windows 10 should never prevent you from installing third-party apps or softwares.

Method 3: Turn off App Recommendations via Registry Editor

  1. Open Registry Editor and navigate to: HKEY_LOCAL_MACHINE\SOFTWARE\Microsoft\Windows\CurrentVersion\Explorer. Look for a string named AicEnabled on the right pane, then double-click it and change its value from “StoreOnly” to “Anywhere”.

  2. Next, navigate to another key: HKEY_LOCAL_MACHINE\SOFTWARE\Policies\Microsoft\Windows Defender\SmartScreen. On the right side, double-click the string ConfigureAppInstallControl and change its value from “StoreOnly” to “Anywhere”.

  3. Close Registry Editor and reboot Windows 10 to apply the changes. The warning “The app you’re trying to install isn’t a Microsoft-verified app” will never appear again on the screen while you are installing any third-party software.

How to Disable Edge Swipe Gesture on Touch Screen in Windows 10

September 1st, 2020 by Admin

How to disable the swipe from any edge of the touch screen? Swipe from left edge can open up the Action Center in Windows 10, but some users may find this feature annoying as they end up swiping accidentally. In this tutorial we’ll show you 2 simple methods to disable edge swipe gesture on the touch screen in Windows 10.

Method 1: Disable Touchscreen Edge Swipe Using Group Policy

  1. Open Local Group Policy Editor and navigate to: Computer Configuration/Administrative Templates/Windows Components/Edge UI. In the right pane, double-click the on Allow edge swipe policy.

  2. To disable touchscreen edge swipe in Windows 10, select the Disabled option. Click Apply and then OK.

  3. Restart your computer to apply the changes. Now, if you swipe in from the left/right/top/bottom edge of your touch screen, nothing will open up.

Method 2: Disable Touchscreen Edge Swipe Using Registry Editor

  1. Open Registry Editor and browse to HKEY_LOCAL_MACHINE\SOFTWARE\Policies\Microsoft\Windows. On the left side, right-click on the Windows key and select New -> Key. Name the new key as EdgeUI.

  2. Next, select the newly-created EdgeUI key. On the right side, right-click the blank area and select New -> DWORD (32-bit Value).

  3. Name the new DWORD as AllowEdgeSwipe and leave its value data as 0 to disable edge swipe gesture.

  4. Close Registry Editor and reboot your system to make the changes take effect.

If you ever need to re-enable the screen edge swipe gesture, simply delete the AllowEdgeSwipe value and you’re done. That’s it!