Archive for September, 2018

How to Set .PS1 Script to Open with PowerShell By Default

September 30th, 2018 by Admin

When you double-click a .ps1 file from File Explorer, Windows 10 will open it in Notepad rather than executing the script with PowerShell. If you want to set .ps1 script to open with PowerShell by default, you have to change the file type association.

Method 1: Associate .PS1 to Open in PowerShell

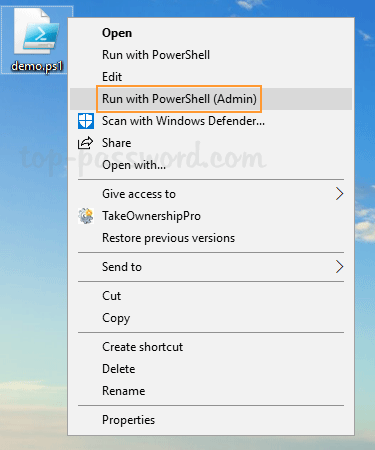
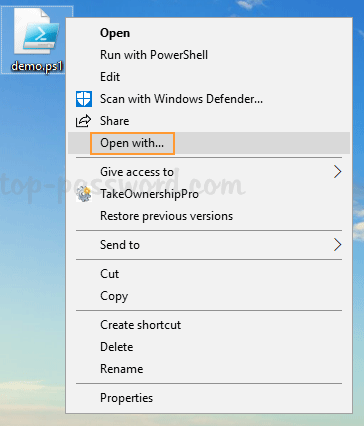
  1. Right-click any .ps1 file in File Explorer, and then select Open with from the context menu.

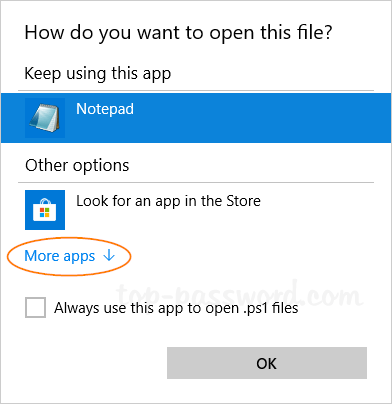
  2. If the PowerShell program isn’t listed, click on More apps.

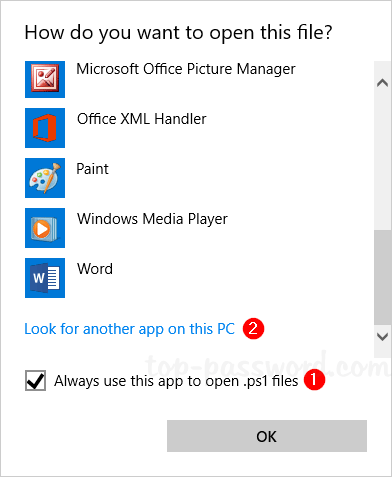
  3. Check the box labeled “Always use this app to open .ps1 files“, and click on “Look for another app on this PC“.

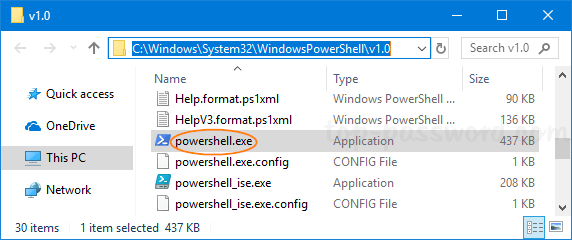
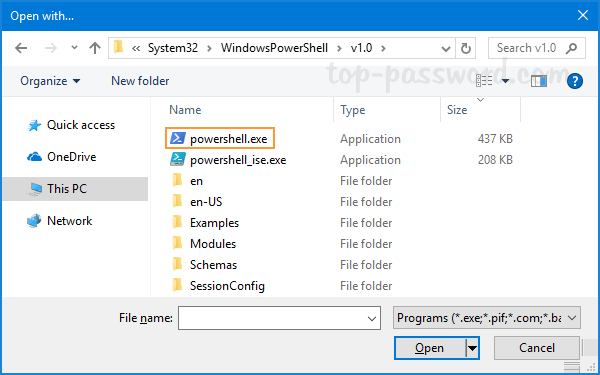
  4. When the Open with dialog box appears, drill down to the directory C:\Windows\System32\WindowsPowerShell\v1.0 and select the powershell.exe file. Click Open.

  5. Now you’ve successfully set PowerShell as the default program for opening .ps1 file type.

Method 2: Change Default Program for Opening PowerShell Script

Need to associate all types of PowerShell script (.ps1, .psm1, .psd1, etc.) to open with PowerShell by default? You can do it with a simple registry tweak.

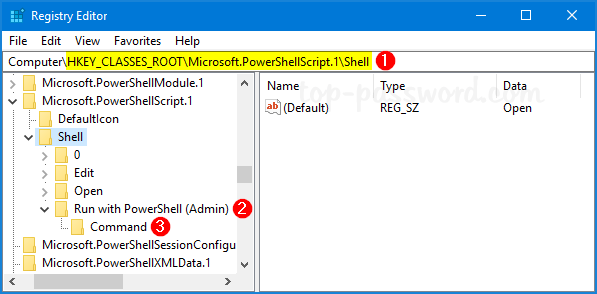
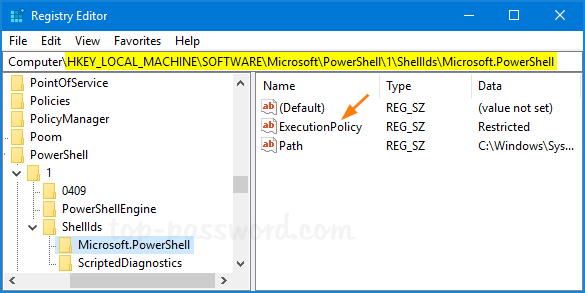
  1. Open the Registry Editor. Copy the following line and paste it into the address bar, then press Enter.

    HKEY_CLASSES_ROOT\Microsoft.PowerShellScript.1\Shell\Open\Command

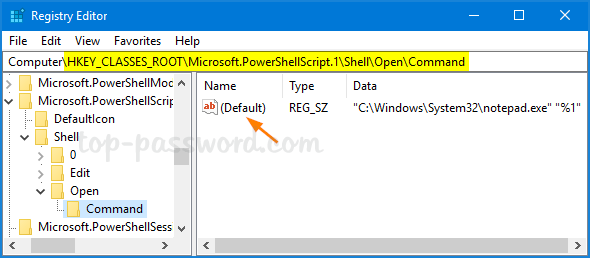
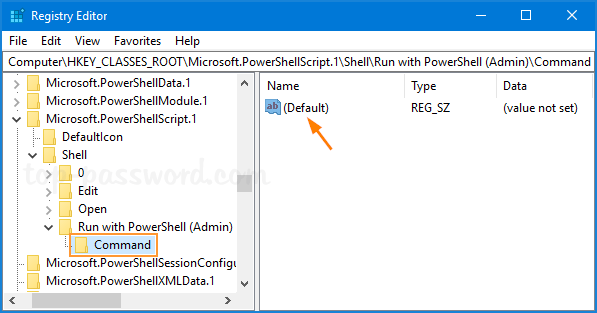
    Next, double-click the (Default) value in the right pane.

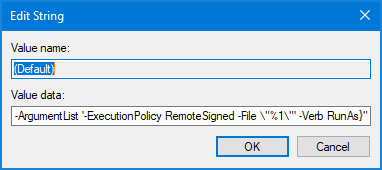
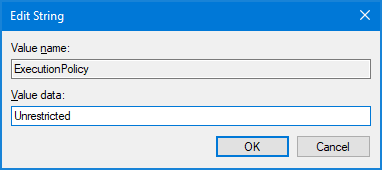
  2. In the Edit String window, copy and paste the following command into the Value data field. Click OK.

    "C:\Windows\System32\WindowsPowerShell\v1.0\powershell.exe" "%1"

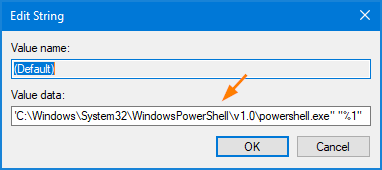
  3. Close Registry Editor. From now on, any file type of PowerShell script will be opened in PowerShell instead of the Notepad program.

Add “Run with PowerShell (Admin)” Context Menu for .PS1 Files

September 29th, 2018 by Admin

How to add “Run as administrator” to PS1 file context menu in Windows 10? Before you can run PowerShell script with admin rights, you have to launch the elevated PowerShell console firstly. To simplify this process, you can add “Run with PowerShell (Admin)” to the right-click context menu for .PS1 files.

How to Add “Run with PowerShell (Admin)” Context Menu for .PS1 Files

  1. Open the Registry Editor. Paste the following registry location into the address bar, and then press Enter.

    HKEY_CLASSES_ROOT\Microsoft.PowerShellScript.1\Shell

    Right-click on the Shell key and select New->Key, name it “Run with PowerShell (Admin)“. Underneath that, create another subkey called “Command“.

  2. Select the Command subkey in the left pane, and then double-click the “(Default)” string in the right pane.

  3. Copy and paste the following command into the Value data field, and click OK.

    "C:\Windows\System32\WindowsPowerShell\v1.0\powershell.exe" "-Command" ""& {Start-Process PowerShell.exe -ArgumentList '-ExecutionPolicy RemoteSigned -File \"%1\"' -Verb RunAs}"

  4. Close Registry Editor. Now you should see a new context menu entry called “Run with PowerShell (Admin)” when you right-click any .PS1 script.

Fix: Windows 10 Photos App Not Working

September 27th, 2018 by Admin

Unable to open the Photos app and it keeps crashing? The Photos app is the default photo viewer in Windows 10. If it has stopped working and you’re unable to open image files, try the following methods to fix the Photos app issues.

Method 1: Reinstall Windows 10 Photos App

If your Photos app doesn’t work normally or it can’t even start, getting the latest version of the Photos app may fix your issue. Follow these steps to reinstall the Photos app in Windows 10:

  1. Press the Windows key + X to open the Quick Link menu, and then select Windows PowerShell (Admin).

  2. Copy and paste the following command and then press Enter to uninstall the built-in Photos app:

    Get-AppxPackage *Microsoft.Windows.Photos* | Remove-AppxPackage

  3. Once done, you need to reinstall the Photos app. To do it, go to the Microsoft Store app and search for the “Photos” app, click on Get to download and install it on your computer.

Method 2: Restore Windows 10 to Previous State

If the Photos app was working prior to the issue, you can restore Windows 10 to a previous date before the issues began. Here’s how:

  1. Press the Windows key + R on your keyboard to open the Run command. Type SystemPropertiesProtection and press Enter.

  2. Once System Properties dialog is opened, click on System Restore.

  3. When you see the System Restore wizard, click on Next.

  4. Now you can view all recent system restore points available on your Windows 10 system. Choose the restore point before your Photos app stops working, and click on Next.

  5. Click on Finish to confirm your restore point and your PC will automatically reboot to begin the restore process.

That’s it!

How to Delete One or More System Restore Points in Windows 10

September 26th, 2018 by Admin

By default, Windows 10 will automatically create a restore point when you install a device driver or Windows update, so you can later reverse system changes if Windows 10 becomes unstable.

Restore points could take up a lot of disk space, so if your PC is running well, there’s not much sense in keeping many old restore points. In this tutorial we’ll show you 3 ways to delete one or more system restore points to save disk space in Windows 10.

Method 1: Delete All System Restore Points in System Protection

Use the Windows key + R keyboard shortcut to open the Run command. Type SystemPropertiesProtection and press Enter.

This will open the System Protection page in the System Properties window. Now select a drive you want to delete all old restore points from, and click on Configure.

Click on the Delete button. When the warning dialog pops up, click Continue to confirm.

Method 2: Delete All But the Most Recent Restore Point via Disk Cleanup

Right-click on a local drive and then select Properties from the context menu.

Under the General tab, click on Disk Cleanup.

Next, click on Clean up system files.

Go to the the More Options tab, click on the Clean up button under the “System Restore and Shadow Copies” section.

When the Disk Cleanup confirmation box opens, click on Delete and Windows 10 will delete all your restore points while keeping the most recent one.

Method 3: Delete Individual System Restore Point via Command Line

Open the Administrative Command Prompt. Execute the following command to list all system restore points created for all drives on your computer. Keep an eye on the creation date and shadow copy ID for each system restore point.
vssadmin list shadows

To delete a specific restore point, type the following command and press Enter.
vssadmin delete shadows /Shadow={shadow copy ID}

If you want to delete all restore points for all your drives, just run this command instead:
vssadmin delete shadows /all

That’s it!

Easy Ways to Open System Properties in Windows 10

September 25th, 2018 by Admin

The System Properties window is commonly used to configure options such as your computer name, system restore, remote desktop and so on. In this tutorial we’ll show you 3 easy ways to open System Properties in Windows 10.

Method 1: Open System Properties by Right-clicking This PC Icon

Right-click the This PC icon on your desktop and then select Properties.

Click Advanced system settings in the left menu.

Windows 10 will immediately open the System Properties window.

Method 2: Open System Properties via Cortana Search

On the Windows 10 taskbar, enter “advanced system” inside the Cortana search box. When the search results are loaded, click on “View advanced system settings“.

Method 3: Open System Properties via Run or Command Line

Press Windows + R keys together, type the command “sysdm.cpl” in the Run dialog box and press Enter. Alternatively, you can open Command Prompt and type the same command to open System Properties.

If you want to directly open any specific tabs in the System Properties window, just type one of the following commands:

  • SystemPropertiesComputerName
  • SystemPropertiesHardware
  • SystemPropertiesAdvanced
  • SystemPropertiesProtection
  • SystemPropertiesRemote

For example, if you execute the command “SystemPropertiesAdvanced” via Run or Command Prompt, it will open the Advanced tab in System Properties.

That’s it!

3 Ways to Fix Camera App Not Working in Windows 10

September 21st, 2018 by Admin

Can’t find or start the Camera app after Windows 10 update? If the Camera app stops working or there is something wrong, here are 3 simple ways to fix it and get the Camera app back to working.

Method 1: Change Privacy Settings for Camera App

If the Camera app is not working any more, you have to check out the privacy settings that might block the Camera app from accessing your webcam.

To do so, open the Settings app and click on the Privacy category. Select Camera under the App permissions section on the left. On the right panel, you have to turn on the setting “Allow apps to access your camera“. Scroll down to locate the Camera app and grant permission for it to access the webcam.

Method 2: Reinstall Camera App

Reinstalling the Camera app can restore anything to its initial state, and this may be the most effective way to fix the issue of Camera not working. To uninstall the Camera app, right-click on the Start button and choose Windows PowerShell (Admin). Enter the following command:
Get-AppxPackage *Microsoft.WindowsCamera* | Remove-AppxPackage

Once you’ve done this, re-download the Windows Camera app from the Store and see if it’s fixed.

Method 3: Roll Back or Update Webcam Driver

Incompatible or outdated driver could also cause the Camera app to not function. If the problem started after recent Windows 10 upgrade, try to roll back your webcam driver to the previous version:

  1. Just open the Device Manager, right-click on your webcam device and select Properties.

  2. Go to the Driver tab and then click on Roll Back Driver.

  3. Select the appropriate reason why you want to roll back to old drivers, and click Yes.

  4. Reboot your computer and check if the Camera app is working or not.

If rolling back doesn’t work, try to install the latest driver for your webcam. Here’s how:

  1. Right-click on the webcam in the Device Manager, and then select Update driver.

  2. Click the Search automatically for updated driver software option.

  3. It will download the latest version of the driver available and install it automatically. After completing the above steps, open the Camera app and hopefully this time it starts successfully.

That’s it!

4 Ways to Open the Camera App in Windows 10

September 20th, 2018 by Admin

Windows 10 has a built-in app called Camera that lets you use your webcam to take pictures and record videos. In this tutorial we’ll show you 4 easy ways to open the built-in Windows Camera app in Windows 10.

Method 1: Open Windows 10 Camera App via Cortana Search

Click on the Cortana search box from the taskbar and type in the word camera. You can then access the Camera app from the result.

Method 2: Open Windows 10 Camera App from Start Menu

Click the Start button to open the Start Menu. Scroll down the list of apps to the letter C and you can find the Camera app.

Method 3: Open Windows 10 Camera App via Run

Press the Windows key + R at the same time to bring up the Run command. Type microsoft.windows.camera: and press Enter.

This will open the built-in Camera app immediately.

Method 4: Open Windows 10 Camera App from Command Prompt

If you’re at the Command Prompt, just type the following command and hit Enter to launch the Camera app.
start microsoft.windows.camera:

Still Can’t Find or Start Camera App

If you’re unable to open the Camera app using the above methods, it’s possible that the Camera app was uninstalled from your computer. In that case, you then need to install a fresh copy from Windows Store.

That’s it!

3 Ways to Change PowerShell Execution Policy in Windows 10

September 19th, 2018 by Admin

PowerShell script cannot be loaded because the execution of scripts is disabled on this system? By default, Windows restricts running PowerShell scripts, as a security mechanism. To verify the PowerShell execution policy on your computer, you can use the Get-ExecutionPolicy cmdlet.

If the execution policy is displayed as Restricted, you can change it to other settings as shown below.

  • Restricted – No scripts can be run. Windows PowerShell can be used only in interactive mode.
  • AllSigned – Only scripts signed by a trusted publisher can be run.
  • RemoteSigned – Downloaded scripts must be signed by a trusted publisher before they can be run.
  • Unrestricted – No restrictions. All PowerShell scripts can be run.

In this tutorial we’ll show you how to change PowerShell execution policy in Windows 10 using command line, group policy or registry tweak.

Method 1: Change PowerShell Execution Policy with Command Line

Open the PowerShell as administrator. You can use the Set-ExecutionPolicy command to set the PowerShell execution policy as per your requirement.

Set-ExecutionPolicy Unrestricted

Method 2: Change PowerShell Execution Policy with Group Policy

Open the Local Group Policy Editor and navigate to Computer Configuration -> Administrative Templates -> Windows Components -> Windows PowerShell. Double-click a setting called “Turn on Script Execution” on the right pane.

Select the Enabled option. Beneath it, you can click the drop-down list to set the execution policy to “Allow all scripts“. Click OK to save your changes.

Method 3: Change PowerShell Execution Policy with Registry Editor

Open Registry Editor and browse to the following registry key by copying and pasting it in the address bar and pressing Enter. Next, double-click the string ExecutionPolicy on the right pane.

HKEY_LOCAL_MACHINE\SOFTWARE\Microsoft\PowerShell\1\ShellIds\Microsoft.PowerShell

Set the value data to one of the following values: Restricted, AllSigned, RemoteSigned, Unrestricted, Undefined. Click OK and then close Registry Editor.

That’s it!

How to Disable PowerShell with Software Restriction Policies GPO

September 18th, 2018 by Admin

Is there a way to block PowerShell from running through group policy? Windows PowerShell comes pre-installed in Windows 10 and it’s a command-line shell designed especially for programmers and IT professionals. If you’re a standard Windows user, you may want to get rid of it. In this tutorial we’ll show you how to disable PowerShell for all user accounts in Windows 10, using Software Restriction Policies GPO.

Part 1: Find the PowerShell Executable Program

  1. After launching Windows PowerShell, press the Ctrl + Shift + Esc keys simultaneously to bring up the Task Manager window. Go to the Details tab, scroll down to find the process called powershell.exe. Right-click on it and select “Open file location“.

  2. Windows Explorer will open the folder where the powershell.exe file is located. Note down the full path as we’ll need it later.

Part 2: Disable PowerShell with Software Restriction Policies

  1. Open the Local Group Policy Editor and navigate to:
    Computer Configuration > Windows Settings > Security Settings > Software Restriction Policies

    Right-click on Software Restriction Policies on the left console tree, and then select New Software Restriction Policies.

  2. Select the newly-created “Additional Rules” node. Right-click any empty space in the right pane and choose “New Hash Rule“.

  3. Click the Browse button to select the powershell.exe file we’ve located previously, and set the Security level to Disallowed. Click OK.

  4. If you also want to block the Windows PowerShell ISE from running, just repeat the above steps to add a new rule to block powershell_ise.exe.
  5. Reboot your computer for the policies to take effect. When you try to run PowerShell you should receive the following error message “This app has been blocked by your system administrator“.

    Renaming the PowerShell executable file couldn’t bypass the above message as well.

How to Find Apps by Alphabet in Windows 10 Start Menu

September 17th, 2018 by Admin

Start Menu in Windows 10 is completely different from the earlier versions. All the apps shown in the Start Menu are sorted with alphabets, so you can quickly find your desired app by clicking the first letter in Windows 10 Start Menu.

Find Apps by Alphabet in Windows 10 Start Menu

The following steps will demonstrate how to locate the built-in Camera app in Windows 10.

  1. Click the Start button to bring up the Start menu. You’ll see a long list of apps installed on your computer. Just click any letter (for example ‘A‘) to display the alphabet list.

  2. Next, click the letter that the name of the desired app begins with. Since the name of the “Camera” app starts with the letter ‘C’, we choose ‘C‘ in this case.

  3. You’ll be directed to a list of all programs that start with the letter you selected. From there you can launch your desired app with ease.

Adjust the Position of Any App in the Start Menu

If you want to bring your most used app to the top of the list in the Start Menu, here’s how to adjust its position:

  1. Use the Windows key + R keyboard combination to open the Run box, paste the following path and pass Enter to open the start menu folder.
    %AppData%\Microsoft\Windows\Start Menu\Programs
  2. Locate the shortcut of your most used app, rename it by adding the letter ‘A‘ to the beginning of the shortcut name.
  3. When you’re done, open the Start Menu and you should see the most used app shown in the top of the app list.