Archive for April, 2012

How to Change the Boot Sequence in the BIOS

April 28th, 2012 by Admin

Looking to change the boot order for your Windows XP or Vista machine? By changing the boot order, you can force your computer to boot from a CD/DVD drive, a USB flash drive, or even off the network.

Changing the boot order on a PC is mostly done in order to boot from a recovery disk or from an OEM disk to run some kind of Windows repair software, such as Windows password reset utility.

So here are the steps to change the boot sequence for a PC:

Step 1: The first thing you have to do is restart your computer and enter the BIOS. You can enter the BIOS when you see a message such as Press FX to enter setup or something similar.

On a Dell machine it’s usually F2, Toshiba is F1 or ESC, HP is F1 or F2, and IBMs usually require you to go to Start, Programs and then Thinkpad CFG to start up in the BIOS.

Step 2: Now that you are in the BIOS, the tough part is finding the boot order section. Note that there are not a ton of options in a BIOS, so just go through every page if you have to until you see something like First Boot Device, Boot Order, Boot Management, Boot Sequence, etc.
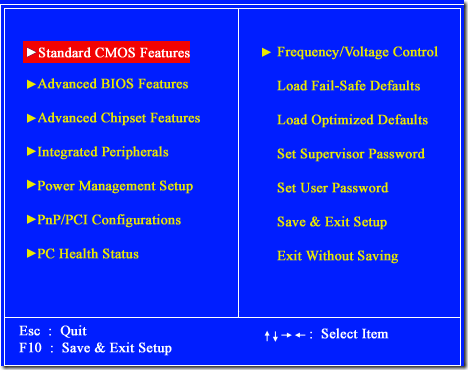
It may also be under Advanced BIOS Features or Advanced Boot Options. In the above screenshot, it’s under Advanced BIOS Features. Use the arrow keys to navigate.
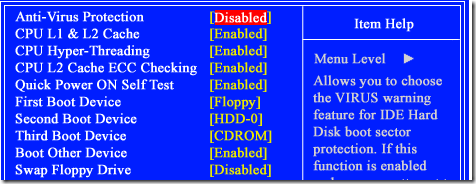
 

As you can see, there is a First, Second and Third Boot Device. Scroll down and use the arrow keys to change the device to HDD (hard drive), Removable Device (USB flash drive), CDROM, or Network. You could also have a BIOS that looks like this:
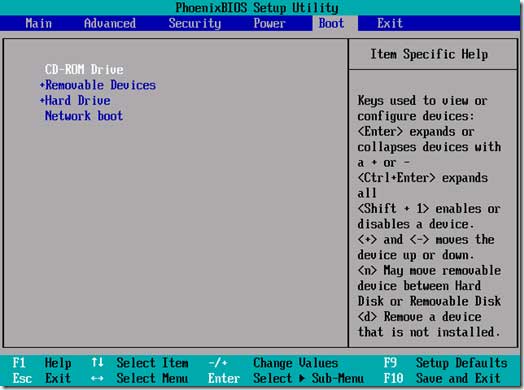
The instructions for changing the boot order are in the sidebar, but usually it requires pressing the + or – buttons to move items up and down in the order list. The first item in the list is what will be scanned first when booting. If boot media is not found, it will try the second device and so on.

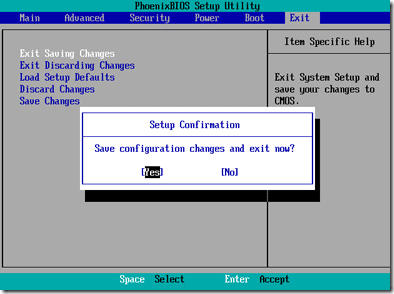
Finally, go to Exit and make sure you choose Yes to the Save configuration changes and exit now? question.
That’s pretty much it! If you have any questions or can’t get into the BIOS on your computer, post a comment here and I will try to help! Enjoy!
Forgot Active Directory Password? How to Reset It Easily

April 28th, 2012 by Admin

I have install first time Active Directory on my server 2003 and set the password within installation. And after this I forget password. Now I cannot logon even server 2003. Is there any possibility to logon my server and Active Directory or I need format & do installation again.If there is any way to out over this problem, tell me how to do this?

Forgot Active Directory password? The network administrator left without leaving the server password?  The problem may become quite tricky if there are a lot of domain accounts in it. You may couldn’t simply choose to reinstall Active Directory as there are many factors you need to consider. Fortunately there is an easy-to-use Windows password recovery software that can give you a hand. With Reset Windows Password utility, you can easily and quickly reset forgotten Active Directory password in minutes.

Let’s see how can you reset Active Directory password you forgot:

Step 1: Burn a bootable CD/DVD or USB flash drive

  1. Click here to download and save the Reset Windows Password self-extracting Zip file to a folder on your hard drive, then extract the ISO image file: ResetWindowsPwd.iso from it.
  2. Insert a blank CD/DVD or USB flash drive on your computer.
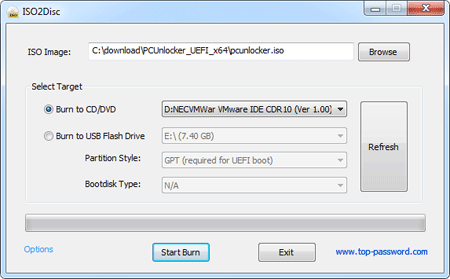
  3. Download and install the ISO2Disc utility, launch the program.
  4. Click the Browse button to locate your ISO image file, then click the Start Burn button to burn the ISO image to your CD/DVD or USB flash drive.

    Burn ISO Image to CD/DVD or USB flash drive

Step 2: Change BIOS Settings

  1. Boot your locked computer. When it is powered on, check the boot-screen for setup key (i.e. DELETE key, F8 key, F2 key) to enter BIOS Setup Utility.
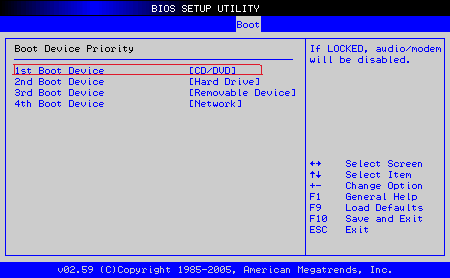
  2. Use the arrow keys to select the BOOT tab, then change the Boot Device Priority: Set 1st Boot Device to CDROM if you just created a bootable CD or DVD, or set 1st Boot Device to Removable Device if a bootable USB flash drive was created.

    BIOS Setting

  3. Press F10 to save your changes. Now your computer is able to boot from CD/DVD or USB flash drive.

Step 3: Reset Windows Active Directory Password

  1. Insert the newly burned CD/DVD or USB flash drive to your locked computer, then reboot your computer.
  2. Then you will see Reset Windows Password is initializing.

    Loading from the Reset Windows Password bootdisk

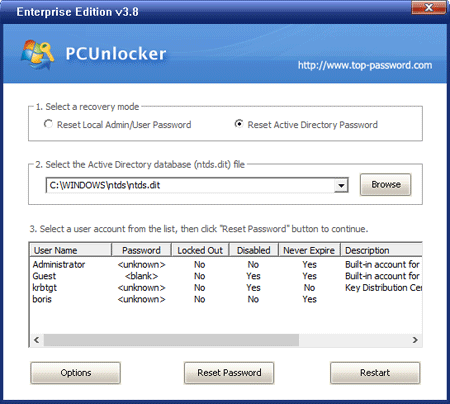
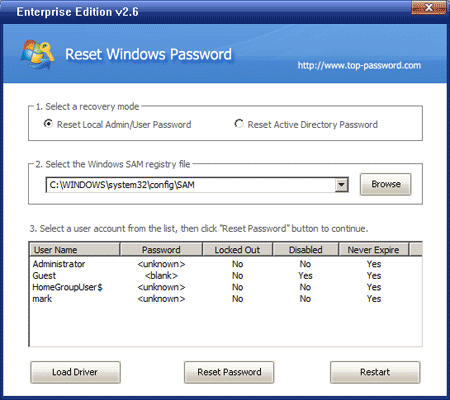
  3. Simply select the Active Directory database file (ntds.dit), the program will list all domain accounts for your domain controller. Select a user account and click the Reset button, the password will be changed to Password123.

    Reset Windows Password

  4. Click the Restart button to reboot the computer, you are able to log in to Active Directory (AD) server using the new password: Password123.

In addition, Reset Windows Password also enables you to reset Windows local administrator and user password on Windows 8, 7, 2008, Vista, 2003, XP, 2000.

How to Recover Acer eRecovery Password

April 26th, 2012 by Admin

Acer eRecovery is a vendor-specific method you can use to restore your computer to its original factory settings, or to custom settings you create and store on your hard drive or other removable media. eRecovery also contains a backup utility you can use to back up data to your hard drive or other removable media. Access to eRecovery requires you to use the default “000000” password or one you select. While it is important to store a custom password in a safe location, if you lose or forget it, there are steps you can take to recover your Acer eRecovery password.

Stage 1: Locate and Unhide Hidden Rescue Partition
Acer stores custom eRecovery passwords on your computer in PQService, a hidden rescue partition. We need to make this partition visible so that we can access it to recover eRecovery password.

1. Right click on My Computer icon and select Properties.
2. Under Computer Management, click Disk Management. In the right pane, you’ll see all drivers on your local computer, including the hidden partition PQService.
3. Right click on the PQService partition, and then click Change Drive Letter and Paths.
4. Click Change and then assign a drive letter to your PQService partition.

Now you should be able to open and view the PQService partition from Windows Exporer.

Stage 2: Reset eRecovery Password

1. Navigate to the drive containing PQService. Find the file aimdrs.dat. Right-click on the file and select Open with and then choose Notepad or another text editor you prefer.

2. Open the file with your text editor and locate the eRecovery password. Look for a line that reads, “Password=password name”, “Hint=the password hint”. Write down the password and close the file.

Now you can access Acer eRecovery with the recovered password.

Forgot Windows 8 Password? How to Reset Windows 8 Password Easily

April 24th, 2012 by Admin

Forgetting Windows password is one of the most common problems and it can become a critical problem if your system contains important data. Advanced users can easily remove passwords from the computer but average computer users don’t have any idea about password reset disk and other methods to reset the password in Windows 8 or any other Windows versions.

Things will become easier if you have created a password reset disk in Windows 8 beforehand. So in case you have not taken precautionary steps earlier and you forget the password, you can’t create any type of password reset disk without logging into Windows 8. Here, I am going to discuss most of methods to reset Windows 8 password if you have forgotten it.

Option 1: Login with Administrator Account

It is the best way to get Windows 8 password back as by using the Administrator account, you can login on the system and then reset the user password from User management. When you install Windows 8 for the first time, it asks you to create a new user account to use on the computer and once you create it, Windows setup automatically disables the Administrator account and you can’t access it in normal mode. The next time you forget your user password, you can go to Windows Safe Mode and login with Administrator account and reset the user password. By default, Administrator account is automatically enabled in Safe Mode. To open the Safe Mode of any Windows OS, press the F8 (Function key) and after closing the BIOS messages you will see all the available options in Safe Mode and from there select Safe Mode.

Option 2: Login with Hotmail ID and Password

It is well known that Windows 8 offers us multiple ways to log into Windows 8 like using normal username and password, using Hotmail ID and password and finally using PIN password. If you set your Hotmail ID and password for Windows 8 login then you have a chance to get your login details of Windows 8 back. Open your Hotmail email ID on another computer and then change its password with a new one. After changing the Hotmail password, try to login on Windows 8 using the new password and make sure that your Windows 8 is connected to internet during this time.

Option 3: Enter 4 Digit Windows PIN Code

If you have used this way on Windows 8 previously then you can use it again to login on Windows 8. I have mentioned all the possible ways to login on Windows 8 above but if none of them work for you, I have a another solution and that is a bootable password reset disk.

Option 4: Bootable Password Reset Utility

It is the ultimate solution with a 100% success rate. It is the only solution you need if you fail to log into Windows 8 after using all the above methods. Password Recovery Bundle can help us to create a bootable password reset disk on CD/DVD or USB flash drive, which can be used to reset lost Windows 8, 7, Vista, XP, 2000 and NT passwords easily. Once you boot and log in with its bootable disk, it will reset the Windows 8 password and make it blank. After that, you can log into Windows 8 without entering any password or you can set a different password after successfully logging into Windows 8 to prevent unauthorized access by someone else.

Access Password Recovery 1.5 Released

April 16th, 2012 by Admin

We just released an upgrade for Access Password Recovery program. We’ve improved Access Password Recovery program a lot. The old version can’t correctly decrypt the password for some MS Access databases. The new version 1.5 has fixed the problem. All the users who purchased Access Password Recovery program can update to 1.5 for free.

You can Click here to download the latest version of Access Password Recovery 1.5.

How to Turn On / Off Passcode In iPhone 4s

April 7th, 2012 by Admin

This article describes steps to enable Passcode for those who like it and steps to disable Passcode for those who don’t like it in iPhone 4s.

Passcode is a secure way in order to protect your iPhone from strangers. Meaning a security Passcode (something like password of accounts you have to remember) must be entered before accessing the device. Some people think this feature is useful and want to enable it but some think it’s annoyed and want to disable from their iPhone.

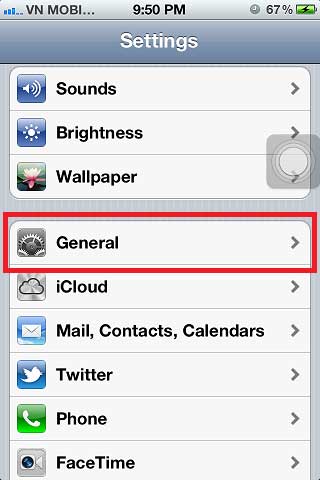
Before changing this configure, turn on your iPhone then tap on Settings icon at home screen. Then tap on General icon.

How to Turn On Passcode in iPhone 4s:

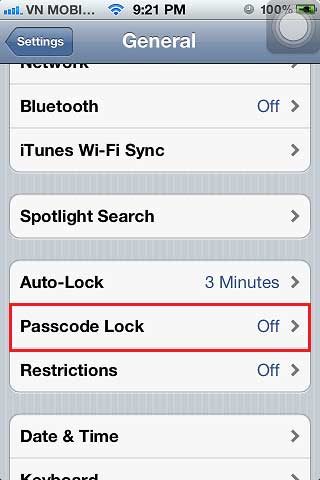
Passcode Lock should be Off status in this case:

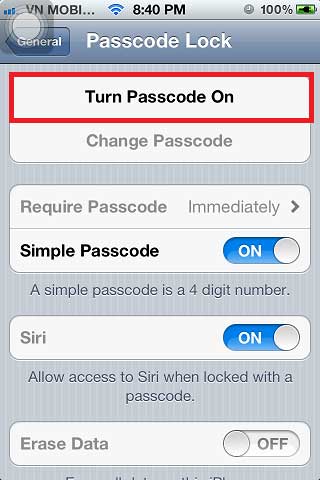
Tap on Passcode Lock menu in order to Turn Passcode On.

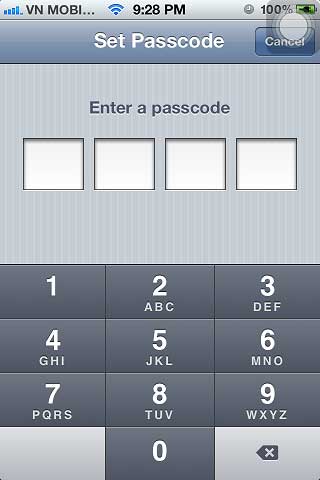
Simply type and re type (to confirm) 4 digits to set your Passcode.

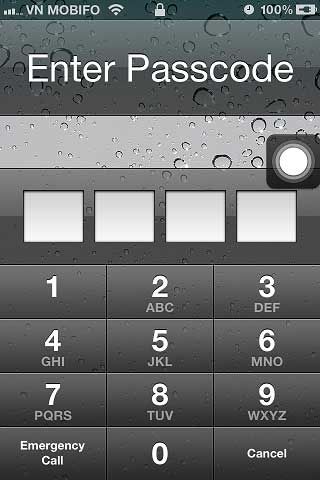
That’s all. Try to turn off or clock your iPhone then turn on again, you will be asked to enter passcode like this:

How to Turn Off Passcode in iPhone 4s:

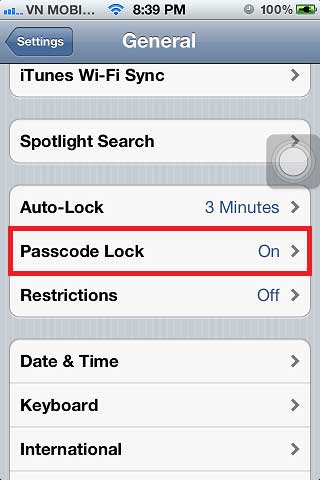
Passcode Lock should be On status in this case:

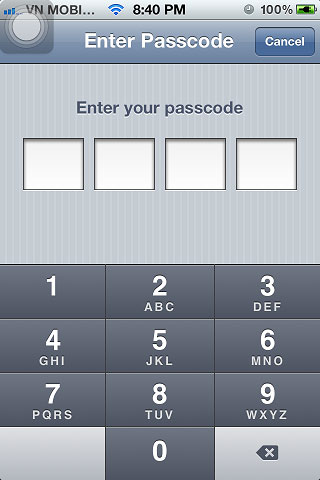
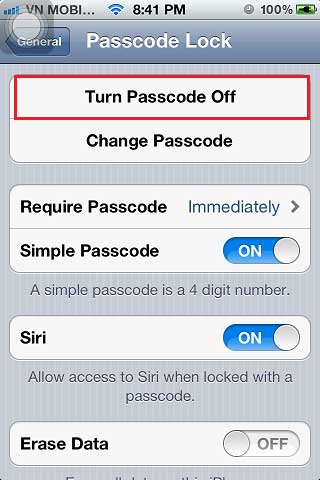
Tap on Passcode Lock menu in order to Turn Passcode Off. You will be asked to enter Passcode:

After entering right Passcode, tap on Turn Passcode Off menu to disable Passcode.

You will be asked to enter Passcode again in order to confirm disable Passcode.

How to Reset Lost Administrator Password on Windows 7, Vista and XP

April 5th, 2012 by Admin

Still trying to recall the administrator password to get into your computer and keep failing again and again? If you forgot Windows administrator password and don’t have a password reset disk, you won’t be able to get into your computer and reset the lost password. If there are no other user accounts on the computer, you can never use your computer again until you reinstall the system. That’s really depressing. If you have a Windows password recovery disk, things will become easier than you may think.

In this post we’ll show you how to easily reset lost administrator password on Windows 7, Vista and XP. You only need to burn the ISO image of Reset Windows Password to a blank CD, then set your locked computer to boot from the CD and it’ll guide you to reset the forgotten Windows password to blank. This CD can be used to reset lost password on any Windows system, While the password reset disk created by Windows built-in features works only on the specific computer it’s burned.

Reset Windows Password is a professional and powerful password recovery tool to help you get into the computer and reset forgotten Windows password as blank, and it is always the best way to reset lost administrator password on Windows 7, Vista and XP. Just follow this step-by-step guide:

Step 1: Create a Bootable Windows Password Reset CD

First download the .zip archive of Reset Windows Password to any accessible computer (not the computer you want to unlock). Unzip the download file, you’ll get the ISO image: ResetWindowsPwd.iso.

Then you’ll need to get a CD/DVD-recording software to burn the ISO image to a blank CD or DVD. We recommend you to use this freeware: BurnCDCC. Launch this program, point the File Image to ResetWindowsPwd.iso and select your CD-DVD Burner, then click Start to begin the creating of Windows password reset CD.

Step2: Reset Lost Windows Administrator Password

Insert the password reset CD into your locked computer. Turn on (or restart) your computer, and let’s it boot from the password reset CD. If it still boots from the local hard drive, you might need to change the BIOS setting and set CD-ROM as the first boot device.

When the boot procedure is complete, the Reset Windows Password program will automatically launch.

Select the administrator account, then click Reset to remove its password.

Eject the password reset CD and click on Restart to reboot the computer. Now you are able to log into your locked computer with the administrator account.

Note: This trick can be used to reset lost Windows administrator passwords on both 32-bit and 64-bit operating systems. With a password reset disk at hand, you can easily reset lost Windows passwords for any computer whose password you forgot.