Archive for July, 2019

Easy Ways to Fix “Enter Network Credentials” Error in Windows 10

July 31st, 2019 by Admin

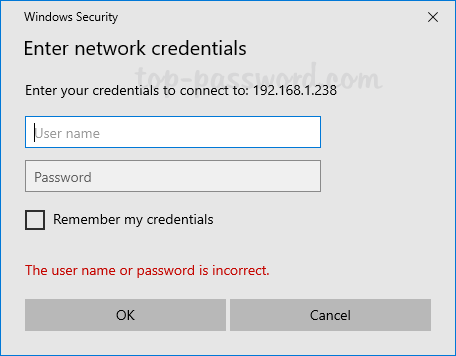
Can’t access shared resources on the network and the “Enter Network Credentials” dialog keeps saying the username or password is incorrect? If you are having problems entering network credentials in Windows 10, here are easy ways to fix it.

Method 1: Add Network Credentials to Credential Manager

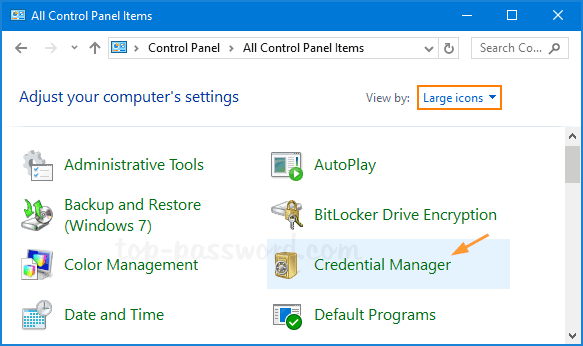
Open the Control Panel and set View by option to Large icons, then click on Credential Manager.

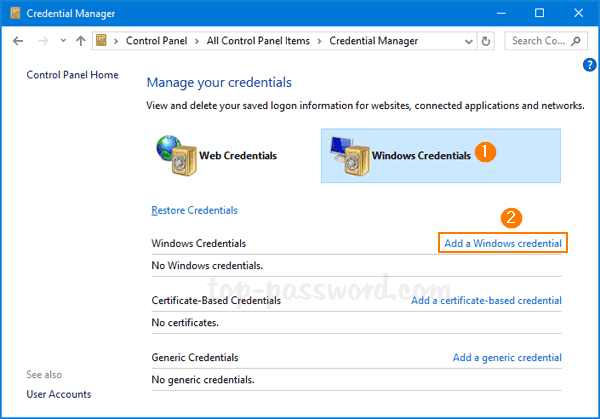
Make sure that Windows Credentials is highlighted, and click on Add a Windows credential.

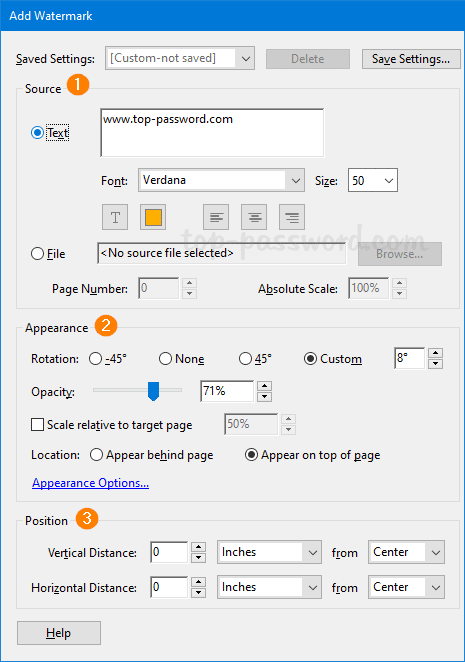
Fill in the IP address, user name and password of the network computer which you’re trying to access. Click OK to save your credentials. Note: You need to enter both IP address (or PC name) and the user name in the User name text box.

Now you should be able to access the shared resources from the network computer without being prompted to enter network credentials.

Method 2: Turn off Password Protected Sharing

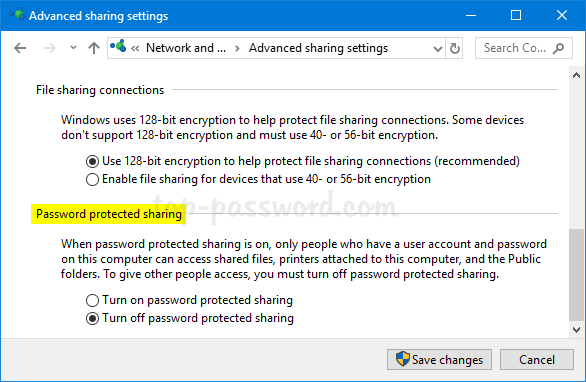
Sometimes you might be able to fix the “Enter network credentials error” by turning off password protected sharing on your network computer. When you’re in a safe network environment, you can disable password protected sharing so that anyone on the local network will be able to access your shared resources without entering network credentials.

Method 3: Network Reset & Change Network to Private

If none of the above methods work, a network reset might fix the “Enter network credentials error”. Check out the following article and you can reset the network settings to default with different ways.

How to Reset or Reinstall Network Adapter in Windows 10

Or change your network connection type from Public to Private, and see if it works.

3 Ways to Change Network Location to Public or Private in Windows 10

That’s all.

3 Methods to Hide All Desktop Icons in Windows 10

July 23rd, 2019 by Admin

When you need to give a presentation or capture screenshots, it’s good idea to temporarily hide all desktop items so others can’t see what’s on your desktop. In this tutorial we’ll show you 3 easy ways to hide all shortcuts, folders and files from your desktop in Windows 10.

Method 1: Hide All Desktop Icons via Desktop’s Context Menu

Right-click any blank area on your desktop, and choose View from the resulting context menu, then uncheck Show desktop icons. This will hide all icons, folders and files from your desktop immediately.

Method 2: Hide All Desktop Icons via Group Policy

  1. Open the Local Group Policy Editor and navigate to: User Configuration -> Administrative Templates -> Desktop. On the right panel, double-click on the policy called Hide and disable all items on the desktop.

  2. Select the Enabled option. Click Apply and then OK.

  3. After rebooting your PC, all the desktop icons will disappear and you’re unable to right-click on the desktop any longer. If you need to unhide the desktop icons later, just change the group policy setting back to Not Configured.

Method 3: Hide All Desktop Icons via Registry Tweak

  1. Open Registry Editor and browse to the following key:
    HKEY_CURRENT_USER\Software\Microsoft\Windows\CurrentVersion\Policies\Explorer

    If the Explorer key doesn’t key, you have to create it manually.

  2. Next, right-click on the Explorer key in the left-side panel, and select New -> DWORD (32-bit) Value.

  3. Name the DWORD NoDesktop and set its value to 1.

  4. Finally, close Registry Editor and reboot Windows 10 to apply the changes.

Conclusion

Using the above methods you can hide everything on your Windows 10 desktop with ease. If you need to hide certain desktop shortcuts, files or folders but allow others to remain visible on the desktop, try the third-party program – Protect My Folders, which lets you hide any confidential stuff on your desktop with a password.

How to Add Text or Image Watermark to PDF Document

July 22nd, 2019 by Admin

Watermark is mainly used to claim ownership of a document or a photo, which helps prevent illegal distribution. There are plenty of apps that can help you add watermark to PDF files. This step-by-step tutorial will show you how to add text or image watermark to your PDF document using Adobe Acrobat.

How to Add Text or Image Watermark to PDF Document

Open your PDF document using Adobe Acrobat, and then click the Edit PDF option in the Tools panel on the right side of your screen.

A new toolbar with a wide variety of editing tools will appear at the top, and you can choose Watermark -> Add.

Now, you can customize the watermark. First of all, type the text you want to use for the watermark in the box, or select a watermark image file (.jpg or .bmp). Then, you need to adjust the angle, opacity, scale and position of the watermark.

If you want to apply the watermark to any specific pages of your PDF document, click the Page Range Options link in the top right corner of the dialog box.

Select whether to add the watermark to all pages or a specified page range, and click OK.

Finally, save your changes by choosing File -> Save.

Easy Ways to Delete Blank Page in Word 2019 / 2016 Document

July 21st, 2019 by Admin

Is there a way to remove empty pages at the end or in the middle of a Word document? How to avoid printing blank pages out? In this tutorial we’ll show you 3 easy ways to delete blank page in Word 2019 / 2016 document.

Method 1: Delete Blank Page in Word Document Using Navigation Pane

Click the View tab on the Ribbon, and then check the box next to Navigation Pane in the Show group. A sidebar will appear on the left and the Pages tab will give you thumbnails of all the pages in your document.

Just select the thumbnail of any blank page in the left panel, and you can then press the Delete key to remove it.

Method 2: Delete Blank Page in Word Document By Removing Page Break

Blank pages are most often caused by manual page breaks. Page breaks are non-printing characters that are hidden by default, and you can make page breaks visible by clicking the Paragraph Markers icon on the Home tab in Microsoft Word. A page break looks like this:

To get rid of it, just double-click the page break so that it’s selected, and then press the Delete key.

If you need a quick way to remove all manual page breaks in a Word document, follow these steps:

  1. Select the Home tab in the Ribbon and click on Replace in the Editing group.

  2. When the Find and Replace dialog box appears, type ^m in the Find what box and then click on Replace All.

  3. It will remove all manual page breaks from your current Word document at once.

Method 3: Remove Extra Blank Page at the end of Word Document

Blank pages can appear at the end of your Word document because of non-printing characters. To delete those unnecessary characters, select the Home tab and click on the Paragraph Markers icon.

You may see a long list of formatting marks at the end of your document. Just select all of them and hit the Delete key. The extra blank pages will go away.

That’s it!

Easy Ways to Remove Header and Footer in Word 2019 / 2016

July 16th, 2019 by Admin

How can I remove footers from a Word document prior to printing? This header takes up too much space and you need to delete it? In this tutorial we’ll show you easy ways to remove header and footer in Microsoft Office Word 2019 / 2016.

Method 1: Remove Header or Footer in Word via Right-click

After opening your Word document, right-click on the footer at the bottom of any page. Next, click on the Edit Footer button that appeared.

Under the Header & Footer tab of the Ribbon, you will see the Header item and Footer item in the sub-item list. Just click on Footer and then choose Remove Footer from the drop-down menu.

Now, all text or other stuff in the footers section should disappear. You can use the similar methods to remove the headers from your Word document.

Method 2: Remove Header or Footer in Word Using Document Inspector

Open your Word document and go to the File tab of the Ribbon. From the Info pane, click on Check for Issues and then select Inspect Document from the pop-up menu.

When the Document Inspector dialog box appears, uncheck all boxes except Headers, Footers, and Watermarks. Click on Inspect.

Simply click on Remove All to delete all headers, footers and watermarks in your document. When you’re finished, close the Document Inspector dialog and save your changes.

That’s it!

How to Enable Focus Assist to Avoid Distracting Notifications in Windows 10

July 15th, 2019 by Admin

Focus Assist (previously known as Quiet hours) is designed to suppress distracting notifications in Windows 10 so you can use your PC without getting disturbed. In this tutorial we’ll show you different ways to turn on Focus Assist to avoid distracting notifications in Windows 10.

Method 1: Enable Focus Assist Using Action Center

Right-click the Action Center icon located on the right-hand side of the taskbar, and then select Focus assist. It lets you choose one of the following modes:

  • Off — Disable the Focus Assist feature, and you’ll get all notifications from apps and contacts.
  • Priority only — See only notifications from the priority list. The rest will go straight to action center.
  • Alarms only — Suppress all notifications, except for alarms.

Additionally, you can also enable Focus Assist by left-clicking the Action Center icon on the taskbar. When the Action Center panel pops up, you can click the Focus Assist button (small half-moon icon) to toggle between Off, Priority Only and Alarms Only.

If you don’t see that button, just click on the Expand link at the bottom.

Method 2: Enable Focus Assist Using the Settings App

Open the Settings app and navigate to System -> Focus assist. On the right pane, you can enable Focus Assist by selecting either Priority only or Alarms only.

Scroll down to the Automatic rules section, you can select the times and activities during which you don’t want to be bothered, and the Focus Assist feature will kick in automatically.

  • During these times – Choose to automatically turn on Focus Assist at certain times of day.
  • When I’m duplicating my display – Enable Focus Assist when you’re giving a presentation or sharing your screen.
  • When I’m playing a game – Enable Focus Assist when you’re playing a DirectX game on full screen.
  • When I’m using an app in full screen mode – Enable Focus Assist when you’re using a program in full screen, e.g. watching a movie.

That’s it!

3 Ways to Disable Screen Auto-Rotation in Windows 10

July 13th, 2019 by Admin

My screen keeps rotating automatically and it’s really annoying? If your tablet or laptop is equipped with gyroscope sensors, Windows 10 will automatically rotate the desktop to landscape or portrait mode automatically depending on the physical orientation of the screen. To lock the screen into your preferred orientation, here are 3 ways to disable screen auto-rotation in Windows 10.

Method 1: Disable Screen Auto-Rotation Using Action Center

To get started, you need to open the Action Center by either clicking the Action Center icon from the lower-right corner of the taskbar or pressing the Windows key + A shortcut.

When the Action Center pane appears, you can click the Rotation lock icon to lock your screen into its current orientation. Now your device won’t automatically rotate the screen any longer.

Method 2: Disable Screen Auto-Rotation Using Settings App

Press the Windows key + I to open the Settings app, navigate to System -> Display.

On the right pane, scroll down to find the option named “Rotation lock“. Just toggle it to On to disable screen auto-rotation. If you don’t see the option, it’s possible that your device doesn’t support the screen rotate feature at all.

Method 3: Disable Screen Auto-Rotation Using Registry Editor

Open Registry Editor and browse to the following key:
HKEY_LOCAL_MACHINE\SOFTWARE\Microsoft\Windows\CurrentVersion\AutoRotation

Look for the DWORD Enable in the right pane, then double-click it and set the value to 0. This will disable screen auto-rotation and prevent the screen from rotating automatically.

Close Registry Editor and reboot Windows 10 to apply your changes. If you need to enable screen auto-rotation again, just change the value of Enable to 1 and you’re done.

Disable Thumbnail Preview When You Snap a Window in Windows 10

July 9th, 2019 by Admin

When dragging a window to one side or corner of your screen, Windows 10 will display the thumbnail previews of other open windows to fill the other side of the screen. This looks like that Task View is activated but it’s actually a feature called Snap Assist. If you find the thumbnail previews are really annoying, you can disable Snap Assist using the Settings app in Windows 10.

How to Disable Snap Assist in Windows 10

  1. Press the Windows key + I shortcut to open the Settings app. Click on the System category.

  2. Select the Multitasking tab in the left menu. On the right side, uncheck the option labeled “When I snap a window, show what I can snap next to it“. This will disable Snap Assist thumbnail window only, and you can still snap a window with keyboard or mouse.

    If you want to disable snapping completely, just toggle the “Snap windows” option to Off.

That’s all there is to it.

How to Download and Install Latest Drivers for all Surface Devices

July 8th, 2019 by Admin

Have you experienced graphics problem with new Surface Pro tablet? Couldn’t update the drivers to the latest version through Windows Updates? In this tutorial we’ll walk you through the steps to manually download and install the latest drivers for all Surface devices.

How to Download and Install Latest Drivers for all Surface Devices

  1. Go to the page: Download drivers and firmware for Surface. Select your Surface model from the list and click the download link that appears underneath the model.

  2. Click on the red Download button.

  3. You’ll see a list of driver updates package for each build of Windows 10. Select the latest driver package that you need and click Next. For example, to install the drivers contained in SurfacePro4_Win10_18362_1902001_0.msi file you must have Windows 10 May 2019 Update v1903 (build number: 18362), or newer installed on your Surface Pro 4.

    If you need to determine the build of Windows 10 that is installed, please check out this article: 4 Ways to Find What Version & Build Number of Windows 10 You’re Running

  4. Once the download is complete, double-click on the .msi file to launch the driver installation wizard. Keep clicking Next until it is finished.

  5. When you’re prompted to restart your Surface device to finish installing the driver updates, click Yes.

  6. Now you’ve successfully installed the latest drivers on your Surface device. Whenever you want to roll back the Surface drivers you just installed, just open the Settings app and navigate to Apps > Apps & features. Look for the driver package with a name like “Surface Pro 4 Update xx_xxx_xx (64 bit)“, click it and you’ll see an option to uninstall it.

That’s it!

How to Restore Missing Power Plans in Windows 10 / 8

July 5th, 2019 by Admin

High Performance power plan missing after Windows 10 updates? Only balanced power plan is available on your DELL Inspiron laptop? By default, every Windows installation should come with three predefined power plans: Power Saver, Balanced, and High Performance. If any power plan is missing on your PC, here are easy ways to restore it.

Method 1: Disable Connected Standby

Connected Standby is a new feature introduced since Windows 8 that offers a fast sleep/wake. By default, Connected Standby is enabled and it will limit what power settings or plans are available to users. To restore your missing power plans, you may need to turn off Connected Standby using this registry tweak:

  1. Open Registry Editor and navigate to: HKEY_LOCAL_MACHINE\SYSTEM\CurrentControlSet\Control\Power. In the right pane, double-click on the DWORD CsEnabled to modify it.

  2. Change the value from 1 (enable) to 0 (disable), and click OK.

  3. Close Registry Editor. After rebooting you should have your default power plans back.

Method 2: Restore Missing Power Plans Using Command Prompt

  1. Open the Command Prompt as administrator.
  2. Copy and paste the command below for the missing power plan you want to restore into the Command Prompt, and hit Enter.

    • Power saver:
      powercfg -duplicatescheme a1841308-3541-4fab-bc81-f71556f20b4a
    • Balanced:
      powercfg -duplicatescheme 381b4222-f694-41f0-9685-ff5bb260df2e
    • High Performance:
      powercfg -duplicatescheme 8c5e7fda-e8bf-4a96-9a85-a6e23a8c635c
    • Ultimate Performance (available since Windows 10 April 2018 Update):
      powercfg -duplicatescheme e9a42b02-d5df-448d-aa00-03f14749eb61
  3. When done, open the Power Options and you can immediately access the missing power plans that you just added.

Conclusion

The above methods should work on most Windows 10/8 systems. If you still couldn’t get the power plans back, just open the Control Panel and add a new power plan for your own purpose.