Archive for November, 2020

How to Stop / Restart Print Spooler Service in Windows 10

November 25th, 2020 by Admin

How can I restart Print Spooler if it crashes, hangs or stops? Print Spooler is a built-in service in Windows that temporarily stores print jobs in the computer’s memory until the printer is ready to print them. If your documents get stuck in the printer queue or your system has difficulty sending a print job to a printer, you may need to stop or restart the Print Spooler service manually. In this tutorial we’ll show you different ways to stop, restart or disable Print Spooler service in Windows 10.

Method 1: Stop or Restart Print Spooler Service from Service Manager

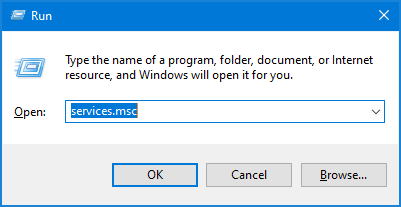
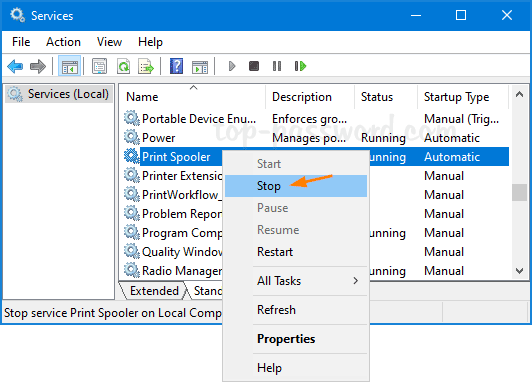
Press the Windows key + R to open the Run box, type services.msc and hit Enter.

In the Services window, scroll down the list of services and right-click on Print Spooler, you can then select either Stop or Restart option from the pop-up menu.

Method 2: Stop or Restart Print Spooler Service from Command Prompt

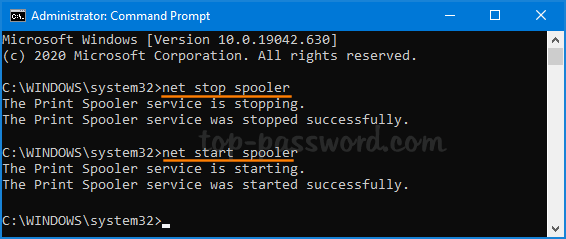
Open the elevated Command Prompt or PowerShell, run the following commands to stop or start the Print Spooler service.

net stop spooler
net start spooler

Method 3: Use a Batch File to Stop or Restart Print Spooler Service

Create a blank text file and rename the extension from .txt to .bat, then open it with Notepad and paste the following:
@echo off
NET stop spooler
NET start spooler

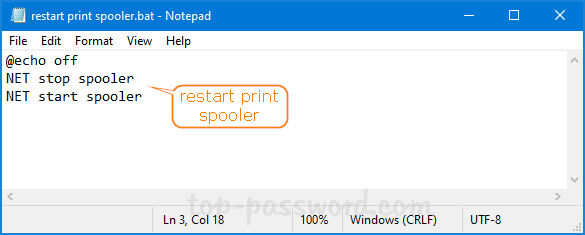
When it’s saved, right-click on the batch file and select “Run as administrator“. It will restart the Print Spooler service immediately.

Method 4: Enable or Disable Print Spooler Service from System Configuration

Press the Windows key + R to open the Run box, type msconfig and hit Enter.

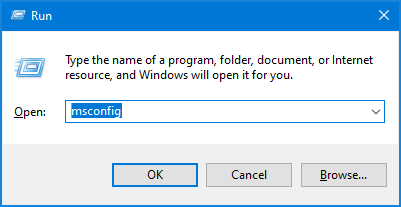
When the System Configuration utility launches, select the Services tab. To disable Print Spooler service, uncheck the box next to Print Spooler. Or check that box to enable Print Spooler service.

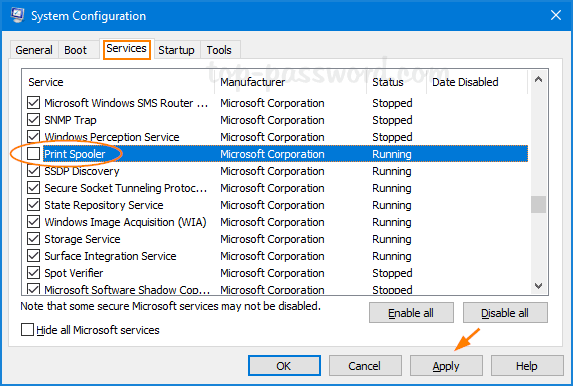
Click Apply and then OK. Restart the system to apply the changes.

Fix: “Single-click to open an item” is Greyed out in Folder Options

November 20th, 2020 by Admin

How to disable single click to open folders / files in Windows Explorer? Can’t change single click to double click? In order to change the behavior to open files with a single click or double click, you have to open the Folder Options. But what to do if you find the option “Single-click to open an item (point to select)” is greyed out? To fix this issue, you have to turn off Classic Shell group policy for Windows Explorer.

Method 1: Turn off Classic Shell Using Group Policy

  1. Open Local Group Policy Editor and browse to: User Configuration -> Administrative Templates -> Windows Components, then click on “File Explorer” (or “Windows Explorer” for Windows 7/Vista/XP).

    In the right side, double-click on the “Turn on Classic Shell” policy to edit it.

  2. Select either Not Configured or Disabled. Click OK.

  3. Exit the Local Group Policy Editor and restart Windows. After that you can open Folder Options and enable single-click or double-click for opening folders / files.

Method 2: Turn off Classic Shell Using Registry Editor

  1. Open Registry Editor and navigate to: HKEY_CURRENT_USER\SOFTWARE\Microsoft\Windows\CurrentVersion\Policies\Explorer. In the right pane, locate the DWORD ClassicShell and right-click it, then select Delete from the pop-up menu.

  2. Use the same method to delete the ClassicShell value if it also exists under HKEY_LOCAL_MACHINE\SOFTWARE\Microsoft\Windows\CurrentVersion\Policies\Explorer.
  3. Close Registry Editor and restart your computer for the changes to take effect. You should then be able to select or deselect “Single-click to open an item (point to select)” setting in Folder Options.

How to Fix a Bug Causing Windows 10 v2004 to Forget Saved Passwords

November 16th, 2020 by Admin

Windows 10 forgetting the saved passwords for installed apps including Outlook after a reboot? Microsoft is aware of this bug and has posted a new support article about Outlook on November 6th:

“After installing Windows 10 Version 2004 Build 19041.173 and related updates you find that Outlook and other applications do not remember your password anymore.”

According to some reports, the problem happens when certain scheduled tasks enable the “Do not store password” option in the Task Scheduler. It can cause Windows 10 to forget passwords saved in Microsoft Edge, Google Chrome, Outlook, OneDrive and Office 365. Thankfully, Microsoft has come up with a workaround to resolve this issue before rolling out a patch.

How to Fix a Bug Causing Windows 10 v2004 to Forget Saved Passwords

  1. Open Windows PowerShell as administrator. Copy and paste the following command into PowerShell and hit Enter:
    Get-ScheduledTask | foreach { If (([xml](Export-ScheduledTask -TaskName $_.TaskName -TaskPath $_.TaskPath)).GetElementsByTagName("LogonType").'#text' -eq "S4U") { $_.TaskName } }

    It will list any tasks that are configured with the “Do not store password” option in the Task Scheduler. Note down the task names you see in the PowerShell output.

  2. Now, you need to disable those tasks you found from the above command. Open Task Scheduler and expand the “Task Scheduler Library” folder, right-click on each target task and select Disable.

  3. Reboot your computer. You need to re-enter the missing passwords one more time for Microsoft Edge, Google Chrome, Outlook, OneDrive and Office 365. The saved passwords should no longer disappear every time Windows restarts.

How to Backup or Reset Taskbar Toolbars in Windows 10

November 13th, 2020 by Admin

How can I backup taskbar toolbars before reinstalling Windows? Is there a way to reset taskbar toolbars to the default settings? Windows allows you to add Address, Links, Desktop and custom folders to the taskbar for quick access. However, if your toolbars are removed or become cluttered, you have to add or rearrange them again from the beginning.

In this tutorial we’ll show you how to backup, restore or even reset taskbar toolbars in Windows 10.

Part 1: Backup Taskbar Toolbars in Windows 10
Open Registry Editor and browse to the key: HKEY_CURRENT_USER\Software\Microsoft\Windows\CurrentVersion\Explorer\Streams\Desktop. Right-click on the Desktop key in the left side and select Export.

Your taskbar toolbars settings will be saved in .reg format. Select the desired location and enter a file name, then click on Save.

Part 2: Restore Taskbar Toolbars in Windows 10

Just double-click on the .reg file that you saved earlier. Click Yes when UAC asks for confirmation.

A confirmation box will open and ask if you want to add this reg file to the registry. Click Yes.

Last but not least, in order to make the changes take effect, you need to restart File Explorer rather than rebooting Windows. Just open Task Manager and select the Users tab. Click the small arrow next to your current account to expand a list of all processes.

Choose the “Windows Explorer” process and click on Restart.

After a while, your taskbar toolbars will be restored successfully.

Part 3: Reset Taskbar Toolbars to Defaults

If your taskbar toolbars are messed up, you can reset them to system defaults with ease. Just open Registry Editor and navigate to: HKEY_CURRENT_USER\Software\Microsoft\Windows\CurrentVersion\Explorer\Streams\Desktop.

On the right pane, right-click on the binary value named TaskbarWinXP and select Delete. Restart File Explorer and your taskbar toolbars will be restored to system defaults.

How to Encrypt Your Hard Disk or USB Drive Using VeraCrypt

November 11th, 2020 by Admin

What is the best way to protect sensitive data from being stolen? Can’t enable BitLocker without TPM? VeraCrypt is a good alternative to BitLocker, which lets you create a virtual disk image for securing your sensitive files with password. In this tutorial we’ll walk you through the steps of encrypting files on your hard disk or USB drive in Windows 10 using VeraCrypt.

Part 1: Download VeraCrypt

VeraCrypt is a free open source software for real-time disk encryption, which is available for Windows, Mac OSX and Linux. Just download VeraCrypt (about 34.5Mb) from its official website. The installation is as easy as clicking Next a bunch of times.

Part 2: Create a Protected Virtual Disk Image

  1. When you open up VeraCrypt, you’ll see a listing of unused drive letters. To start, we need to create a protected virtual disk image (aka “encrypted file container”). Click on the Create Volume button.

  2. Choose “Create an encrypted file container” and click on Next.

  3. VeraCrypt supports two different types of encrypted volumes. Here we select “Standard VeraCrypt volume“.

  4. Next, use the “Select File” button to pick a name and location for the virtual disk image you wish to create. This image can be stored on a local drive or an external USB drive.

  5. Choose your encryption options. The default settings of AES and SHA-512 are good enough for most purposes.

  6. Enter your volume size. It must be large enough to hold your sensitive files.

  7. Enter a volume password which will be later used for mounting this virtual disk image.

  8. Select what file system you want to use. It is recommended to choose NTFS so you will be able to use files bigger than 4GB. In order to generate strong encryption keys, simply move your mouse randomly until the blue bar reaches the end. Click on Format.

  9. Once the volume has been successfully created, click on Exit.

  10. Your volume is actually a disk image file which you can view from File Explorer.

Part 3: Mount the Virtual Disk Image

  1. Open up VeraCrypt again, select an unused drive letter and click on “Select File” to locate your protected virtual disk image, and click on Mount.

  2. Enter your password and click OK.

  3. Your protected virtual disk image will be mounted as a new drive. Open File Explorer and you can move your sensitive files onto that drive.

Part 4: Dismount the Volume

Don’t forget to dismount the VeraCrypt volume when you no longer need to work with it. From within the VeraCrypt interface, select the drive letter of your mounted volume and click on Dismount.

Your VeraCrypt volume will be automatically dismounted after you restart or shut down your computer, so your sensitive files will remain protected.

That’s it!

How to Turn on Virtual Touchpad in Windows 10 Tablet / Laptop

November 9th, 2020 by Admin

What to do if your touchpad is out of work and no mouse is available? In case you’re experiencing problems with your mouse and touchpad, you can still move the cursor or click using the virtual touchpad. In this tutorial we’ll show you how to turn on virtual touchpad in Windows 10 tablets or laptops.

How to Turn on Virtual Touchpad in Windows 10

To enable the virtual touchpad, right-click an empty area in the taskbar and select “Show touchpad button” from the context menu. If your mouse or touchpad doesn’t work properly, using a finger to tap the touch screen and hold for a few seconds will trigger a right-click.

You’ll see a touchpad icon in the notification area of the taskbar. Click it to open up the virtual touchpad. It looks like a physical trackpad, which includes the left and right click buttons at the bottom of the window. You can move the cursor by swiping your finger in the large area.

Note that this virtual touchpad feature is only available for Windows 10 tablets or laptops which has a touch screen.

Press a Key to Open Right-Click Context Menu in Windows 10

November 3rd, 2020 by Admin

How to right-click without a mouse on your laptop? Just hold down the SHIFT key and then press F10 and it will bring up the right-click context menu, but using that keyboard shortcut is still not fast or easy when you need to access the right-click menu frequently. In this tutorial we’ll show you how to assign right-click function to a keyboard key in Windows 10, so you can press a single key to open right-click context menu.

How to Map a Key to Open Right-Click Context Menu in Windows 10

  1. Before getting started, download Microsoft’s new PowerToys app from Github and install it on your computer. On the first launch, you should toggle “Always run as administrator” on, and turn on “Run at startup” to let the app run in the background.

  2. Select Keyboard Manager from the left-hand column. On the right side, click on the “Remap a key” button.

  3. The “Remap keys” window will pop up. Click the plus sign (+) to add a new key mapping.

  4. Under the “Key:” column, click on the Type button.

  5. Press a key you want to use for calling up the right-click context menu, and click OK. I recommend you use a rarely used key (the CTRL or ALT key on the right side of the keyboard) so it doesn’t conflict with any keyboard shortcut.

  6. Under the “Mapped To:” column, click the drop-down list to select “Apps/Menu“. When it’s done, click OK at the top right corner.

  7. Click on Continue Anyway.

  8. Now, go to the Desktop or File Explorer, press your mapped Menu key and it will open up the right-click context menu quickly.

    As long as PowerToys is running in the system tray, the key mapping will work all the time. If you want to undo the changes, just launch PowerToys and delete the key mapping.

How to Change the Default “New folder” Name in Windows 10

November 2nd, 2020 by Admin

When you create a new folder or a text file in Windows 10, it’s named “New folder” or “New Text Document” by default. If you prefer, you can customize and change the default name template for newly-created folders or files in Windows 10 using a registry tweak.

How to Change the Default “New folder” Name in Windows 10

  1. Open Registry Editor. Copy the following path and paste it into the Address Bar at the top and hit Enter.
    HKEY_CURRENT_USER\SOFTWARE\Microsoft\Windows\CurrentVersion\Explorer

    In the left-side pane, right-click on the “Explorer” key and select New -> Key.

  2. Name the new key “NamingTemplates” and make sure it’s selected. In the right-hand pane, right-click the blank area and select New -> String Value.

  3. Name the new string “RenameNameTemplate” and double-click it to modify. In the Value data field, enter the new default name you want to use for newly-created folders/files, and click OK. Note: Do not use any of the following characters in the default name:
    \ / ? : * " > < | " ' *

  4. Close Registry Editor. Try to create a new folder in File Explorer and it will be named with your new default name instead of “New folder”.

  5. Whenever you need to restore the default “New folder” name, just change the value of the string “RenameNameTemplate” to %s or simply delete the string altogether.