Archive for December, 2016

How to View or Restrict the Number of Connections in SQL Server

December 30th, 2016 by Admin

SQL Server allows a maximum of 32,767 user connections. In this tutorial we’ll show you how to find out the number of connections to a database in SQL Server, and restrict the number of connections to a SQL Server instance.

Part 1: View Total Number of Connections in SQL Server

Need to check the number of active connections for each database? This can be done easily using the following script. The script displays the databaseName, the number of connections and the login name:

SELECT DB_NAME(dbid) as DBName,
loginame,
COUNT(dbid) as NumberOfConnections
FROM sys.sysprocesses
WHERE dbid > 0
GROUP BY dbid, loginame

If you’re running SQL Server 2012, 2014 or 2016, run this script instead:

SELECT DB_NAME(database_id) as DBName,
login_name,
COUNT(session_id) as NumberOfConnections
FROM sys.dm_exec_sessions
GROUP BY database_id, login_name

Part 2: Restrict Concurrent Database Connections in SQL Server

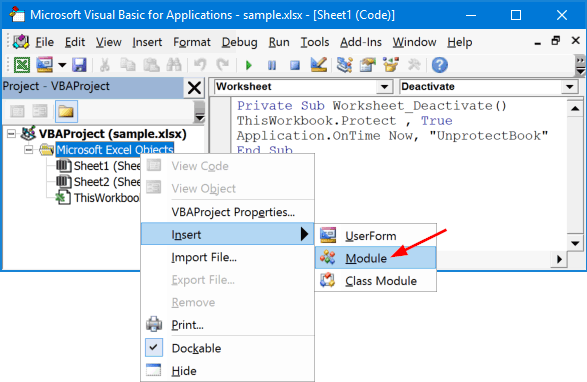
To configure the maximum user connections, open SQL Server Management Studio and connect to your database, then follow these steps:

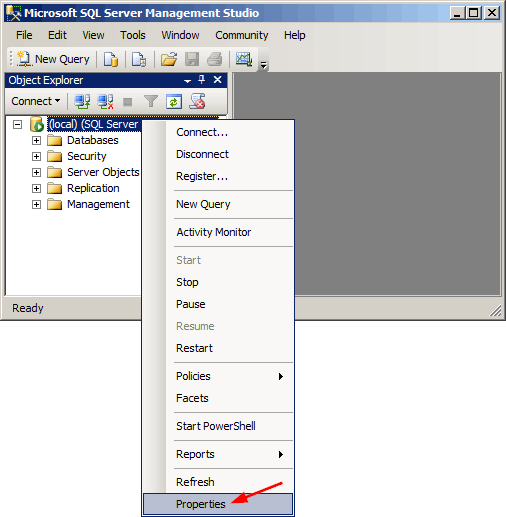
  1. In Object Explorer, right-click a server and click Properties.

    sql-server-properties

  2. Click the Connections node on the left page.
  3. Under Connections, in the Maximum number of concurrent connections box, type or select a value from 0 through 32767 to set the maximum number of users that are allowed to connect simultaneously to the instance of SQL Server.

    max-connections-in-sql-server

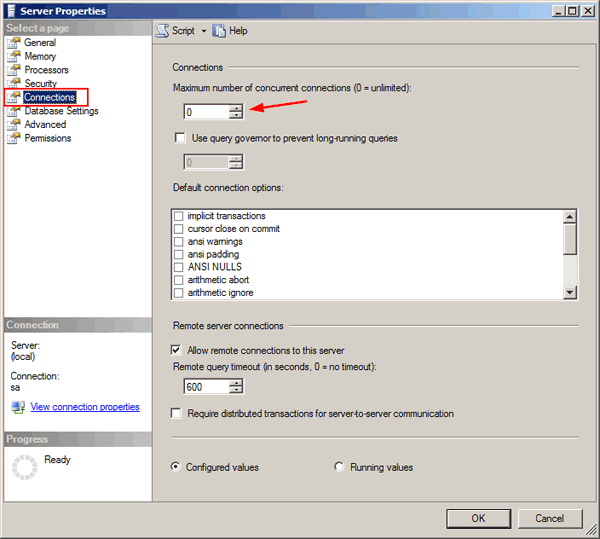
  4. Click OK. Restart SQL Server to apply your changes.

5 Ways to Open Run Command Box in Windows 10

December 30th, 2016 by Admin

The Run command box provides the quickest way to launch programs (for instance, Registry Editor, Group Policy Editor) or open folders and documents. In this tutorial we’ll show you 5 ways to open Run command box in Windows 10.

run-command-box

Method 1: Open Run Command Box by Pressing WIN + R

Just press the Windows key and the R key at the same time, it will open the Run command box immediately. This method is the fastest and it works with all versions of Windows.

Method 2: Open Run Command Box from Start Menu

Click the Start button (the Windows icon in the lower-left corner). Select All apps and expand Windows System, then click Run to open it.

open-run-from-start-menu

Method 3: Open Run Command Box Using Cortana Search

Type the word run inside Cortana’s search box in the taskbar, and then click Run from the search result.

open-run-via-cortana-search

Method 4: Open Run Command Box from Power User Menu

Press the Windows key + X keyboard shortcut (or right-click on the Start button). When the Power User menu appears, click Run.

open-run-from-winx-menu

Method 5: Open Run Command Box from Command Prompt

Open a Command Prompt in Windows 10. Copy and paste the following command and press Enter.
explorer.exe Shell:::{2559a1f3-21d7-11d4-bdaf-00c04f60b9f0}

open-run-from-cmd

It will show the Run dialog box immediately.

Fix: “User must change password at next logon” option greyed out in Windows

December 29th, 2016 by Admin

When you try to change or reset the password of a user account, you might find the checkbox “User must change password at next logon” is greyed out, so you can’t choose this option.

user-must-change-password-next-logon

In this tutorial we’ll show you how to enable the “User must change password at next logon” option that is greyed out for Windows local or domain user account.

For Windows Local Accounts:

Open the Computer Management. Expand System Tools, then Local Users and Groups, then Users. Right-click on your local account and select Properties from the context menu.

local-account-properties

This will open the Properties dialog box. Uncheck the “Password never expires” box and you’ll then find the “User must change password at next logon” option is enabled. Click Apply and then OK.

windows-password-never-expires

For Active Directory User Accounts:

In Windows Server with Active Directory installed, open the Active Directory Users and Computers MMC snap-in (start->run->dsa.msc). Right-click on your domain user and select Properties.

domain-account-properties

Click the Account tab. Under the Account options section, uncheck the “Password never expires” checkbox and click OK.

domain-password-never-expires

Now you should be able to reset the password and force the domain user to change it at next login.

3 Ways to Change Network Location to Public or Private in Windows 10

December 27th, 2016 by Admin

The first time you connect to a network, you’ll be prompted to turn on sharing and connect to devices. Turn on this settings will set your network location to private. A private network makes your computer discoverable to other PCs. If you don’t want to share musics, pictures, videos or even printers with other PCs on the network, you should set the network type to public. In this tutorial we’ll show you 3 ways to change network location to public or private in Windows 10.

network-location-type

Method 1: Change Windows 10 Network Location Using Group Policy

  1. Press the Windows key + R to open the Run box. Type secpol.msc and press Enter.

    secpol

  2. When the Local Security Policy window opens, click Network List Manager Policies in the left pane. Double-click on the name of the current network connection in the right pane.

    network-list-policies

  3. Click the Network Location tab at the top. Under the Location type, you can choose either Private or Public.

    private-public-network-location

  4. Click Apply and then OK to save your change.

Method 2: Change Windows 10 Network Location Using Registry Editor

  1. Press the Windows key + R to open the Run box. Type regedit and press Enter.
  2. In the left pane of Registry Editor, navigate to the key:
    HKEY_LOCAL_MACHINE\SOFTWARE\Microsoft\Windows NT\CurrentVersion\NetworkList\Profiles
  3. Expand the Profiles key in the left pane. Click on each subkey and have a look if the ProfileName matches the name of your current network connection.

    network-profile-name

  4. If you have found the right subkey, double-click the Category in the right pane and edit the DWORD to the value you want. Public: 0, Private: 1, Domain: 2.

    network-profile-category

  5. Reboot your computer to apply the new network location.

Method 3: Change Windows 10 Network Location Using PowerShell

  1. Open PowerShell in Administrator mode.
  2. Type or paste the following command in the PowerShell and press Enter. It will list the name and properties of your active network connection. In my example, the network name is TLRouter.
    Get-NetConnectionProfile

    get-network-profile

  3. Type the following command and press Enter to change your network location to private. Replace TLRouter with your network name.
    Set-NetConnectionProfile -Name "TLRouter" -NetworkCategory Private

    change-network-location-via-powershell

    If you want to change the network location to public, type this command instead:
    Set-NetConnectionProfile -Name "TLRouter" -NetworkCategory Public

5 Ways to Boot Windows 10 into Advanced Startup Options

December 26th, 2016 by Admin

Advanced Startup Options lets you boot Windows in troubleshooting mode. If you want to reset, refresh, restore your computer or get into Safe Mode, you have to access the Advanced Startup Options. In this tutorial we’ll show you 5 ways to boot Windows 10 into Advanced Startup Options.

If you Windows 10 doesn’t start, use method 4. If you can’t log on to your PC when you forgot Windows 10 password, method 3 will be the easiest way to access Advanced Startup Options.

Method 1: Boot into Advanced Startup Options Using Settings App

  1. Open the Settings app by clicking the Settings icon on the Start Menu, or pressing the Windows key + I keyboard shortcut.

  2. Click Update & security.

    update-security

  3. Click the Recovery tab on the left, and then click Restart now under Advanced startup.

    advanced-startup

  4. The computer will log you off and bring up the Choose an option screen.

Method 2: Boot into Advanced Startup Options Using Command Prompt

  1. Press the Windows key + X keyboard shortcut to bring up the Power User menu, and select the Command Prompt from the list.

    command-prompt-admin

  2. Type or paste the following command in the Command Prompt, and press Enter.
    shutdown.exe /r /o

    boot-into-advanced-startup-via-cmd

  3. You are about to be signed off. Windows 10 will reboot automatically and you can see the Advanced Startup Options.

Method 3: Boot into Advanced Startup Options from Windows Login Screen

  1. At Windows 10 sign-in screen, click on the Power button in the lower right hand corner to bring up the Power menu.

  2. Hold down the Shift key on the keyboard, and then click Restart from the Power menu. This will bring up the Choose an option screen.

Method 4: Boot into Advanced Startup Options Using Windows Install Disk

  1. Start your computer with Windows 10 installation media (or Windows RE). You can read this previous Windows 10 guide to create bootable USB drive for Windows 10 Setup.
  2. When you see the Windows Setup screen, click Next.

  3. Click Repair your computer. You can then see the Choose an option screen.

Method 5: Create Advanced Startup Options Shortcut

  1. Right-click an empty area on your desktop, and select New -> Shortcut.
  2. In the Create Shortcut wizard, copy and paste the following command into the location box and click Next.
    %windir%\system32\shutdown.exe /r /o /f /t 00

  3. Type Advanced Startup for the shortcut name, and click Finish.

  4. Right-click on the newly-created shortcut on your desktop and select Properties. In the Properties dialog, go to the Shortcut tab and click the Change Icon button.

  5. In the Change Icon window, copy and paste the following in the “Look for icons in this file” field, and press Enter. Highlight the icon and click OK.
    %windir%\System32\bootux.dll

  6. You’re almost done! Just double-click the desktop shortcut and you can boot Windows into Advanced Startup Options immediately.

3 Ways to Turn On / Off UAC in Windows 10

December 15th, 2016 by Admin

When you try to install programs in administrator mode or make any system change, a UAC prompt will pop up that alerts you to confirm your changes or operations. As a personal computer user, you may not want to disable these UAC prompts. In this tutorial we’ll show you 3 ways to turn on or off UAC (User Account Control) in Windows 10.

uac-prompt

Method 1: Turn On / Off UAC in WIndows 10 via Control Panel

  1. Open the Control Panel in Windows 10. Set the View by option to Large icons, and then click User Accounts.

    user-accounts

  2. Click on the Change User Account Control settings link.

    change-uac-settings

  3. In order to turn off UAC, move the slider to the bottom (Never Notify) and click OK. If you want to turn on UAC, move the silder to the top (Always notify).

    uac-settings

  4. If prompted by UAC, click on Yes to continue. Reboot your computer for the change to take effect.

Method 2: Turn On / Off UAC in WIndows 10 via Registry Editor

  1. Open Registry Editor by pressing Windows + R key combination, type in regedit and press Enter.

    regedit-via-run

    If prompted by UAC, click on Yes to continue.

  2. In the left-side pane of Registry Editor, navigate to the following key:
    HKEY_LOCAL_MACHINE\SOFTWARE\Microsoft\Windows\CurrentVersion\Policies\System

    EnableLUA

    In right-side pane, double-click EnableLUA to modify.

  3. In the Value data box, type 0 if you want to turn off UAC, or type 1 to turn on UAC. Click OK.

    disable-uac-registry

  4. Exit Registry Editor and reboot your computer.

Method 3: Turn On / Off UAC in WIndows 10 via Command Line

  1. Press the Windows + X key combination, and then select “Command Prompt (Admin)” from the popup menu. When prompted by UAC, click Yes.
  2. To turn off UAC, copy and paste the following command in the Command Prompt, and press Enter.
    reg.exe ADD HKLM\SOFTWARE\Microsoft\Windows\CurrentVersion\Policies\System /v EnableLUA /t REG_DWORD /d 0 /f

    disable-uac-via-cmd

    To turn on UAC, paste the following command into Command Prompt and press Enter.
    reg.exe ADD HKLM\SOFTWARE\Microsoft\Windows\CurrentVersion\Policies\System /v EnableLUA /t REG_DWORD /d 1 /f

  3. After you enable or disable UAC, you will have to reboot your computer for the changes to take effect.

Windows 10 Fix: This app has been blocked for your protection

December 14th, 2016 by Admin

When you try to install a driver or application in Windows 10, you might get the following UAC error message:

This app has been blocked for your protection. An administrator has blocked you from running this app. For more information, contact the administrator.

app-blocked-for-protection

Even if you run the application with administrative rights, you’ll get the exact same error. This problem happens when your application was digitally signed with a revoked or untrusted certificate. In this tutorial we’ll show you 2 ways to fix the issue “This app has been blocked for your protection” in Windows 10.

Method 1: Install the Application from Elevated Command Prompt

To get around the error “This app has been blocked for your protection”, you can run the application from an elevated Command Prompt. Follow these steps:

  1. Open File Explorer and locate the application (.exe) in question. Right-click on it and select Properties.
  2. When the Properties dialog box opens, note down the full path that you need later. In my example, the path is C:\Users\pcunlocker\Downloads\uTorrent_3.2_build_27568.

    application-full-path

  3. Now open an elevated Command Prompt. This can be done by pressing the Windows key + X and then selecting “Command Prompt (Admin)“.

    winx

  4. At the Command Prompt, type the full path of the application that you want to install and press Enter.

    install-app-from-command-prompt

Method 2: Tweak Local Security Policy

To fix the error “This app has been blocked for your protection” permanently in Windows 10, you have to tweak the local security policy:

  1. Press the Windows key + R to open the Run box. Type gpedit.msc and press Enter to open the Local Group Policy Editor.

    gpedit

  2. In the left pane, navigate to:
    Computer Configuration -> Windows Settings -> Security Settings -> Local Policies -> Security Options

    local-security-options

    Look at the right pane and double-click the policy “User Account Control: Run all administrators in Admin Approval Mode“.

  3. Change the security setting to Disabled and click OK.

    run-administrators-in-approval-mode

  4. Close Local Group Policy Editor and restart your computer. After logging in, you can install the application without encountering the error “This app has been blocked for your protection”.

Note: tweaking the policy above will also cause UAC to be turned off automatically. But just turning off UAC won’t fix the error “This app has been blocked for your protection”.

2 Ways to Hide or Unhide Worksheet in Excel 2016 / 2013 / 2010 / 2007

December 14th, 2016 by Admin

Is there a way to prevent others from viewing a sheet in an Excel workbook? If you don’t want people to change data or formula in a cell, you can hide the sheet. But this shouldn’t be used as a security measure. In this tutorial we’ll show you 2 ways to hide / unhide worksheet in Excel 2016 / 2013 / 2010 / 2007.

Note: Excel doesn’t let you hide all sheets in a workbook. At least one has to be displayed.

Method 1: Hide/Unhide Excel Worksheet with GUI

  1. Right-click on the worksheet you want to hide, select Hide from the pop-up menu. Your worksheet will no longer be visible, however, the data contained in a hidden worksheet can still be referenced on other worksheets.

    hide-sheet

  2. To unhide a worksheet, just right-click on any visible worksheet and select Unhide.

    unhide-sheet

  3. In the Unhide dialog box, you can see all of the currently hidden sheets in the list box. Select a sheet you want to unhide and click OK.

    excel-hidden-sheets

Method 2: Hide/Unhide Excel Worksheet with VBA

Excel has a more secure setting known as “Very Hidden”. A very hidden worksheet can’t be unhidden using the Excel user interface because it doesn’t appear in the Unhide dialog box. Here’s how to hide / unhide a worksheet with VBA editor:

  1. To open the VBA editor, press the Alt+F11 keyboard shortcut, or right-click on any worksheet and select View Code.

    excel-view-code

  2. From the Project window in the upper left pane, you can see all hidden and visible sheets in your workbook. Select a sheet you want to hide.
  3. In the lower left pane, you can see all properties of your selected worksheet. In the Visible drop-down list, select xlSheetVeryHidden.

    xlSheetVeryHidden

  4. Close the VBA editor. Your worksheet will no longer be visible. When the Very Hidden attribute is set on a worksheet, the Hide option is greyed out.

    excel-unhide-greyed

  5. Very hidden sheets can only be made visible through the VBA editor. If you want to unhide a very hidden sheet, open the VBA editor and change the Visible attribute back to xlSheetVisible.

2 Ways to Prevent Excel Sheet from Being Deleted

December 13th, 2016 by Admin

How can I protect an Excel worksheet from being deleted? Looking for a way to prevent sheets from being deleted while still allowing them to be hidden or rearranged? In this tutorial we’ll show you 2 ways to protect a particular or all sheets from being deleted in Excel 2016/2013/2010/2007.

Tips: If you want to protect an Excel file (.XLS, .XLSX) from being deleted accidentally, please try the Protect My Folders program which can lock any folders or files with password.

Method 1: Protect Entire Workbook Structure with Password

  1. Open your Excel workbook. Select “Review” Ribbon menu and click “Protect Workbook” from the changes group.

    protect-workbook

  2. A Protect Structure and Window dialog box opens. Make sure the Structure option is checked. Type your password and click OK.

  3. Reenter the password and click OK.
  4. Now all your sheets in the workbook are protected. You cannot insert, delete, rename, move, copy, hide or unhide worksheets anymore.

Method 2: Protect A Particular Sheet from Being Deleted Using VBA

If you just want to prevent users from deleting a particular sheet you designate, try this solution. This works flawlessly for me on a test workbook in Excel 2016.

  1. Right-click on any sheet tab and select View Code from the popup menu. This will open the Visual Basic Editor (ALT+F11).

    sheet-view-code

  2. You’ll see a list of worksheets on the left. Double-click on every sheet you want to protect from being deleted, copy and paste the following code into the large white area on the right.

    Private Sub Worksheet_Deactivate()
    ThisWorkbook.Protect , True
    Application.OnTime Now, "UnprotectBook"
    End Sub

    sheet-vba-code

  3. Right-click on Microsoft Excel Objects on the left, select Insert -> Module.

    insert-excel-module

  4. Double-click on the newly-created module on the left. Copy and paste the following code into the right pane.

    Sub UnprotectBook()
    ThisWorkbook.Unprotect
    End Sub

    module-vba-code

  5. Click Save and you’re done. If you’re using a macro-free workbook, you’ll get the warning message “The following features cannot be saved in macro-free workbook“. Click No.

    cannot-macro-free-workbook

  6. In the Save As dialog box, select “Excel-Macro Enabled Workbook (*.xlsm)” and click Save.

    macro-enabled-workbook

  7. When you see the popup message “Be careful! Parts of your document may include personal information that can’t be removed by the Document Inspector“, click OK.

    document-inspector-warn

  8. Close all of your opened windows. Open the .xlsm file in Excel, right-click your protected sheet tab and select Delete, next click Delete to confirm, you’ll see the failure message: Workbook is protected and cannot be changed.

    workbook-is-protected

  9. That’s all there is to it.