Archive for October, 2015

Block Read / Write Access to USB or CD Drive in Windows 10 / 8 / 7

October 29th, 2015 by Admin

There are situations where you might want to disable USB/CD device access in your computer, if someone wants to copy your files to removable devices (USB stick or CD). In this tutorial we’ll show you 2 ways to block read/write access to USB/CD drive in Windows 10, 8 and 7.

Method 1: Using Group Policy

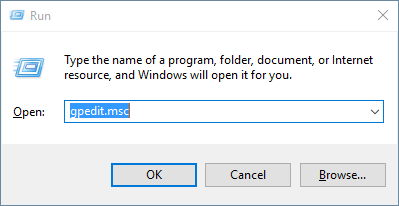
  1. Open up the Run box by press the Windows key + R. Type gpedit.msc and press Enter.

    gpedit

  2. When the Local Group Policy Editor opens, navigate to the following location:
    User Configuration -> Administrative Templates -> System -> Removable Storage Access

    If you want to block access to removable devices for ALL Windows accounts, navigate to this location instead:
    Computer Configuration -> Administrative Templates -> System -> Removable Storage Access

  3. In the right pane, there are lots of settings for denying read/write access to removable disk, CD and DVD. If you want to deny read access to all external removable hard drive or USB flash drive, just double-click on the policy “Removable Disks: Deny read access“, and set it to Enabled.

    usb-storage-access

  4. In order to make your changes take effect immediately, open an administrative Command Prompt and run the following command:
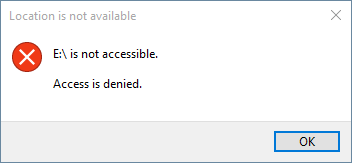
    gpupdate /force
  5. Once your group policy takes effect, a user will see the following message box whenever they attempt to open a removable storage device.

    usb-access-is-denied

Method 2: Using Registry Trick

However, not all editions of Windows has a Group Policy Editor (gpedit.msc). If you’re using a Home edition of Windows, you have to use this registry trick to disable the USB/CD drive access. Here’s how:

  1. Press the Windows key + R to open the Run box. Type regedit and hit Enter.
  2. In the Registry Editor, navigate to the following key:
    HKEY_CURRENT_USER\SOFTWARE\Policies\Microsoft\Windows\RemovableStorageDevices

    If you want to block access to removable devices for ALL Windows accounts, navigate to this key instead:
    HKEY_LOCAL_MACHINE\SOFTWARE\Policies\Microsoft\Windows\RemovableStorageDevices

  3. In the left pane, right-click on RemovableStorageDevices, select New -> Key and type in {53f5630d-b6bf-11d0-94f2-00a0c91efb8b}.

    {53f5630d-b6bf-11d0-94f2-00a0c91efb8b} is GUID of the generic USB storage device. If you want to block CD/DVD access, type the GUID {53f56308-b6bf-11d0-94f2-00a0c91efb8b} instead.

  4. In the right pane, right-click on an empty area and select New -> DWORD (32-bit) Value and type Deny_Read and press Enter, modify its value to 1.

    usb-deny-read

    If you want to deny write access, create a new value Deny_Write and set its value to 1.

  5. Close the Registry Editor. Restart your computer to apply changes.

4 Ways to Lock Your Computer in Windows 10

October 24th, 2015 by Admin

Locking your computer screen is a secure way to prevent unauthorized access to your files or running applications when you walk away. This feature is really useful especially when you need to leave your computer in a hurry but you don’t want to shut down or log off. Here we’ll show you 4 ways to lock your computer in Windows 10.

Method 1: Lock Windows 10 Computer with keyboard shortcut – Windows key + L

Press the Windows key + L at the same time to lock your screen quickly. The Windows key is the one on the bottom row of keys that looks like the logo for Windows. This method also works with Windows 8.1, 8, 7 and Vista computers.

Method 2: Lock Windows 10 Computer with Ctrl+Alt+Delete

Press Ctrl+Alt+Delete on your keyboard at the same time then click Lock.

ctrl-alt-del-screen

Method 3: Lock Windows 10 Computer from Start Menu/Screen

Click on the Start button to open the Start menu. At the top of the Start menu, you can click your user icon and it’ll give you an option to lock the machine.

lock-windows-from-start-menu

If your computer is running in tablet mode, click the Start button to open the Start screen. Next click the small hamburger icon (three horizontal lines) present at the top-left corner. From the drop-down menu, you can click your user icon and select Lock.

lock-windows-from-start-screen

Method 4: Lock Windows 10 Computer with Command Prompt

Open up the Command Prompt or press the Windows key + R shortcut to launch the Run box, then type the following command and press Enter.
Rundll32.exe user32.dll,LockWorkStation

Your computer will be locked down in no time.

Windows 10: Switch Between Tablet Mode and Desktop Mode

October 22nd, 2015 by Admin

Tablet mode makes every application (including Start Menu) run in full screen, which provides a more touch-friendly experience. If you have a 2-in-1 tablet, Windows 10 asks you if you want to enter tablet mode when you detach a tablet from its base or dock. In this tutorial we’ll show you 3 simple ways to turn on / off tablet mode, switch between tablet mode and desktop mode in Windows 10.

Method 1: Turn On / Off Tablet Mode from Action Center

Click on the Action Center icon in the taskbar notification area. At the bottom of the Action Center, click on the Tablet mode button to toggle it on (blue) or off (gray) for what you want.

tablet-mode-in-action-center

Method 2: Turn On / Off Tablet Mode from PC Settings

  1. To open the PC Settings, click the Settings icon from the Start Menu, or press the Windows + I hotkey.

    open-settings-app

  2. Select the System option.

    system-settings

  3. Choose Tablet in the left-hand navigation pane. Click the When I sign in drop-down list, choose Never use tablet mode to enable desktop mode, or select Always use tablet mode to enable tablet mode.

    If you need to permanently disable tablet mode, proceed to click the “Change additional tablet settings” link below. In the next window, you can turn off tablet mode completely.

Method 3: Turn On / Off Tablet Mode Using Registry Hack

  1. Press the Windows key + R to open the Run box. Type regedit and press Enter.

    regedit-via-run

  2. Navigate to the following key in the Registry Editor:
    HKEY_CURRENT_USER\SOFTWARE\Microsoft\Windows\CurrentVersion\ImmersiveShell
  3. In the right pane, you should see a DWORD value named TabletMode. In order to turn off tablet mode, double-click on TabletMode and set it to 0. Or set it to 1 if you want to turn on tablet mode.

    tablet-mode-registry

  4. Restart your computer for your changes to take effect.