Archive for the ‘Windows Vista’ category

How to Extract Drivers or Files from .MSI without Installing

January 13th, 2025 by Admin

How could I extract drivers from a MSI file without installing them to a machine? Need to get files inside a .msi package? Yesterday I got a help request from a client who wanted to import Surface laptop drivers into PCUnlocker, and the driver packages from Microsoft are in .msi format. When opening a single .msi file using the freeware 7-Zip, we found the filenames are totally unreadable.

Eventually we found the solution. In this tutorial we’d like to share the correct method of extracting drivers or files from a .MSI package without installing them to your system.

How to Extract Drivers or Files from .MSI without Installing

  1. Right-click the Start button in the taskbar and select Terminal (Admin).

  2. To extract files from a .msi package, type the following command and press Enter. Make sure you replace path_to_msi_file with the path of your .msi file, and replace path_to_output_folder with your destination folder.
    MSIEXEC /a path_to_msi_file /qb TARGETDIR=path_to_output_folder

  3. The installer will display a simple progress UI while unpacking.

  4. When the unpacking is done, just open File Explorer and browse to your destination folder. You can then find the extracted drivers or files there.

That’s it!

Fix: “Single-click to open an item” is Greyed out in Folder Options

November 20th, 2020 by Admin

How to disable single click to open folders / files in Windows Explorer? Can’t change single click to double click? In order to change the behavior to open files with a single click or double click, you have to open the Folder Options. But what to do if you find the option “Single-click to open an item (point to select)” is greyed out? To fix this issue, you have to turn off Classic Shell group policy for Windows Explorer.

Method 1: Turn off Classic Shell Using Group Policy

  1. Open Local Group Policy Editor and browse to: User Configuration -> Administrative Templates -> Windows Components, then click on “File Explorer” (or “Windows Explorer” for Windows 7/Vista/XP).

    In the right side, double-click on the “Turn on Classic Shell” policy to edit it.

  2. Select either Not Configured or Disabled. Click OK.

  3. Exit the Local Group Policy Editor and restart Windows. After that you can open Folder Options and enable single-click or double-click for opening folders / files.

Method 2: Turn off Classic Shell Using Registry Editor

  1. Open Registry Editor and navigate to: HKEY_CURRENT_USER\SOFTWARE\Microsoft\Windows\CurrentVersion\Policies\Explorer. In the right pane, locate the DWORD ClassicShell and right-click it, then select Delete from the pop-up menu.

  2. Use the same method to delete the ClassicShell value if it also exists under HKEY_LOCAL_MACHINE\SOFTWARE\Microsoft\Windows\CurrentVersion\Policies\Explorer.
  3. Close Registry Editor and restart your computer for the changes to take effect. You should then be able to select or deselect “Single-click to open an item (point to select)” setting in Folder Options.

3 Ways to Configure Windows to Create Crash Dumps on BSOD

May 19th, 2020 by Admin

The blue screen of death (BSOD) usually happens when a critical error occurs and Windows is unable to recover and repair it automatically. In order to identify the cause of the blue screen, you need to configure Windows to create minidump on every crash.

Method 1: Enable Minidump Creation Using System Properties

  1. Press the Windows key and R to bring up the Run box, and type SystemPropertiesAdvanced and hit Enter to open the System Properties window.

  2. Click on the Settings button under the “Startup and Recovery” section.

  3. The memory dump options are in the “Write debugging information” section. By default, it is Automatic memory dump. Just change it to “Small memory dump (256 KB)” and click OK.

  4. Whenever your PC presents a blue screen, it will automatically collect some diagnostic information and store them in a minidump file which you can find under the directory C:\Windows\Minidump.

Method 2: Enable Minidump Creation Using Registry Tweak

  1. Open Registry Editor and browse to the following location:
    HKEY_LOCAL_MACHINE\SYSTEM\CurrentControlSet\Control\CrashControl
  2. On the right side, double-click on the 32-bit DWORD CrashDumpEnabled and change its value from the default value 7 to 3.

    • 0x0: None
    • 0x1: Complete memory dump
    • 0x2: Kernel memory dump
    • 0x3: Small memory dump (64 KB)
    • 0x7: Automatic memory dump
  3. You must restart Windows in order for your registry changes to take affect.

Method 3: Enable Minidump Creation Using Command Prompt

  1. Open the Command Prompt as administrator. Enter the following command to find out which type of memory dumps you are using.
    wmic RECOVEROS get DebugInfoType

  2. If you want to enable minidump creation, run the below command:
    wmic RECOVEROS set DebugInfoType = 3

  3. When it’s done, reboot your computer.

Minidump file is stored in a binary format. In order to view and analyze its content, you need to use the third-party software like WinDbg or BlueScreenView.

How to Create System Restore Points with Command Prompt or PowerShell

January 6th, 2020 by Admin

By default, Windows will automatically create a restore point before you make a major change to the OS, such as installing a new driver or app. In order to make more frequent backup, you need to create restore points manually or schedule the task to run daily or weekly. In this tutorial we’ll show you how to create system restore points in Windows 10 using Command Prompt or PowerShell.

Part 1: Turn On System Protection

Before getting started, you need to check if system protection is enabled. Press the Windows key + R to open the Run box and type “sysdm.cpl” to open the System Properties window.

Go to the System Protection tab and click on the Configure button.

Select “Turn on system protection” and click OK.

Part 2: Disable System Restore Point Frequency

By default, Windows allows you to create only one restore point every 24 hours. To remove this limitation, open Registry Editor and navigate to: HKEY_LOCAL_MACHINE\SOFTWARE\Microsoft\Windows NT\CurrentVersion\SystemRestore. Right-click on the SystemRestore key in the left pane and select New ->DWORD (32-bit) Value.

Give the new DWORD a name SystemRestorePointCreationFrequency and leave its value data to 0.

Part 3: Create System Restore Point with CMD or PowerShell

Open an elevated Command Prompt and type the following command:
wmic.exe /Namespace:\\root\default Path SystemRestore Call CreateRestorePoint "MyRestorePoint", 100, 7

or launch Windows PowerShell as administrator and enter:
powershell.exe -ExecutionPolicy Bypass -NoExit -Command "Checkpoint-Computer -Description "MyRestorePoint" -RestorePointType "MODIFY_SETTINGS""

Once pressing Enter, a new system restore point will be created immediately. You can use Task Scheduler to make your system run the above command to create restore points automatically during startup.

2 Ways to Run a Windows Program in Compatibility Mode

December 19th, 2019 by Admin

Your old program doesn’t work properly or can’t run at all after upgrading to Windows 10? To get some older programs to run on a modern version of Windows, you may need to turn on compatibility mode. In this tutorial we’ll show you 2 simple methods to run a Windows program in compatibility mode.

Method 1: Enable Compatibility Mode for a Program in Properties

Right-click your program’s shortcut or the .exe file, and then select Properties from the context menu.

Under the Compatibility tab, check the “Run this program in compatibility mode for” option, and then choose which version of Windows you want to use.

For example, if your program doesn’t run properly on Windows 10 but did run properly on Windows 7, then select “Windows 7” from the drop-down menu. This will force the program to run in Windows 7 compatibility mode.

Method 2: Enable Compatibility Mode for a Program Using Command Prompt

First of all, you need to know which compatibility mode you want your program to run with. The following tables show the values for different compatibility modes.

Description Value Data
Windows 8 WIN8RTM
Windows 7 WIN7RTM
Windows Vista SP2 VISTASP2
Windows Vista SP1 VISTASP1
Windows Vista VISTARTM
Windows XP SP3 WINXPSP3
Windows XP SP2 WINXPSP2
Windows 98 WIN98

Next, Open an elevated Command Prompt and run the following command. Replacing "D:\PSTools\PsExec.exe" with the full path of your .exe file, and “WIN7RTM” with your desired compatibility mode.

reg.exe Add "HKLM\Software\Microsoft\Windows NT\CurrentVersion\AppCompatFlags\Layers" /v "D:\PSTools\PsExec.exe" /d "WIN7RTM"

Once this is done, your program will run in compatibility mode by default.

What is difference between a BIOS password and a Windows password?

March 12th, 2019 by Admin

Can’t get past the password screen while the computer is booting? When you ran into this situation, it’s possible that you forgot the BIOS password or Windows password on your PC. In order to determine which type of password it is, you need to know the differences between a BIOS password and a Windows password.

BIOS Password:

BIOS (or UEFI) is non-volatile firmware used to perform hardware initialization before calling the boot loader to start the OS. BIOS has a setup utility which provides the ability to view and manage your computer’s hardware settings, such as changing the boot order or enabling CPU virtualization.

Through the BIOS Setup Utility, you can set up two different types of passwords:

  • Setup password: The computer will prompt for this password only when you are trying to access the BIOS Setup Utility. This password is also called “Admin password” or “Supervisor password” which is used to prevent others from changing your BIOS settings.
  • System Password: This will be prompted before the operating system can boot up. This password might also be called “User password” or “Power-on password” and it can stop someone powering up your computer.

If you forget any of these passwords, the reset process can be difficult or impossible. Depending on the motherboard of the computer in question, you can clear a lost BIOS password through jumper settings or removing the CMOS battery.

Windows Password:

Windows allows you to create separate accounts for different people to share a single PC. Each person can set a unique Windows password for their accounts to prevent unauthorized access.

If you forgot your Windows password and can’t log in to your PC, just boot your PC with PCUnlocker Live CD or USB and you can remove the password with ease.

Conclusion

BIOS password adds a hardware-level layer of security and locks the early stages of the startup process. After the BIOS passes the control to OS, you’ll see the Windows logo displayed on the screen. When your PC boots to the welcome/lock screen, you can click on the user name and sign in with a Windows password.

How to Prevent Windows Users from Changing Date and Time

May 21st, 2018 by Admin

How to block access to changing the time for Windows 10? Is there a way to lock the system date and time on a public or shared computer? Here’s how to use group policy to prevent users from changing date and time in Windows 10 / 8 / 7 / Vista / XP.

How to Prevent Windows Users from Changing Date and Time?

By default, only administrative accounts are able to change the system time. Follow these steps to prevent specific user or even administrators from changing date and time in Windows 10 / 8 / 7 / Vista / XP.

  1. Press the Windows key + R together to open the Run command. Type secpol.msc and hit Enter to open the Local Security Policy window.

  2. On the left-hand side, drill down to Local Policies -> User Rights Assignment. On the right, double-click the “Change the system time” setting to modify.

  3. In the Properties window, select any specific user or group that you want to block from changing the system date / time, and click on Remove.

  4. Click Apply and then OK. Restart your computer for this policy to take effect. The next time you try to change the date and time from Control Panel, you’ll get the error message “Unable to continue. You do not have permission to perform this task.

    This setting will also prevent you from changing the system date/time using the Settings app in Windows 10. If you’re running Windows 10 Home, you have to add Local Group Policy Editor to Windows 10 Home before running the secpol.msc command.

How to Check if I Have Windows Administrator Rights?

May 7th, 2018 by Admin

Do I have local admin rights? Before you can make system-wide changes to the system, such as install software or run elevated command prompt, you’ll need to log into Windows as a user with administrative rights. Here’s how to quickly check if a user account is an administrator or not in Windows 10 / 8 / 7 / Vista / XP.

Method 1: Check for Administrator Rights Using Control Panel

  1. Open the Control Panel in Large icons view, and then click User Accounts.

  2. Click the Manage another account link.

  3. You should see all the accounts on your computer. If your account has admin rights, you can see the word “Administrator” under your account name.

    As you can see from the screenshot above, pcunlocker is an administrator while david is a standard/limited user.

Method 2: Check for Administrator Rights Using Command Prompt

  1. Press the Windows key + R keys on the keyboard to open the Run box. Type cmd and press Enter.

  2. In the Command Prompt, type the following command and hit Enter.
    net user account_name

  3. You’ll get a list of attributes of your account. Look for the “Local Group Memberships” entry. If your account belongs to the “Administrators” group, it should have admin rights.

That’s it!

Fix: Can’t Type Special Characters on Windows Login Screen

March 5th, 2018 by Admin

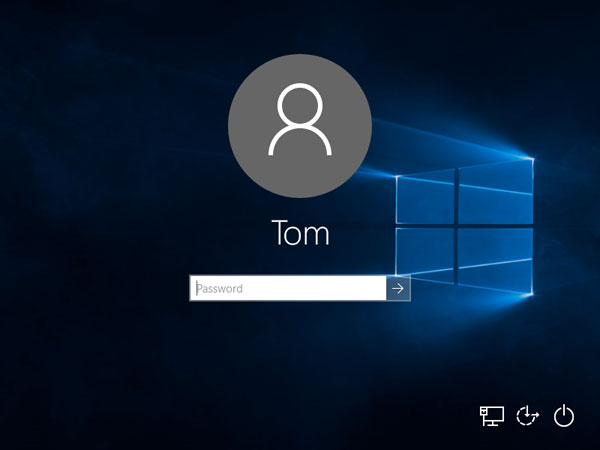
Can’t log into Windows if your password contains certain special characters? If you’re concerned about the security of your Windows account, you may use some ultra complex password generated from password manager. When setting up password via Control Panel, you can input special characters with a copy and paste operation, or using the built-in Character Map utility. The problem is that these ways don’t work on the Windows login screen.

In this tutorial we’ll explain how you can enter special characters on Windows login screen, or simply remove your password to unlock your computer.

Method 1: Type Special Characters on Windows Login Screen

To insert the special character (such as #, &, @, {,}, [,],) shown on the upper part of a key, just hold down SHIFT and press the desired key to type it. If your desired characters (such as ©,®,∆,√) that are not on the keyboard, you can type it using Alt key codes:

  1. Place your cursor in the location where you wish to insert a special character.
  2. When the NUM LOCK key is on, press and hold down the Alt key, then tap the numbers (ALT code) on the numeric keypad at the right side of your keyboard.
  3. Release the Alt key, the desired character will appear.

For example, let’s say you want to type the copyright symbol ©. It’s ALT code is 0169. With Num Lock enabled, hold down Alt key and tap the sequence of numbers (0, 1, 6, 9) on the numpad, then release the Alt key.

The following is the ALT codes for the most common characters:

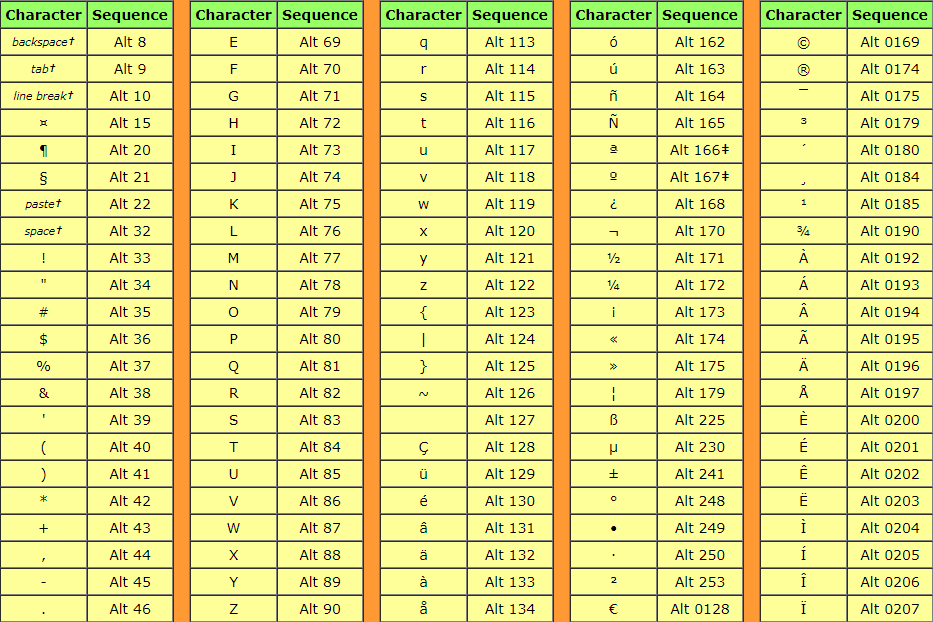
Note: You must use the numeric keypad to type the ALT code. However, most laptops and tablets don’t have the traditional numeric keypad. To type special characters, you may have to add an external USB keyboard with embedded numeric keypad.

Method 2: Remove Windows Password to Bypass the Login Screen

If you’re still unable to type special characters on the login screen, you may be completely locked out of Windows admin account. In order to regain access to your system, you can use PCUnlocker to remove the login password before Windows loads up.

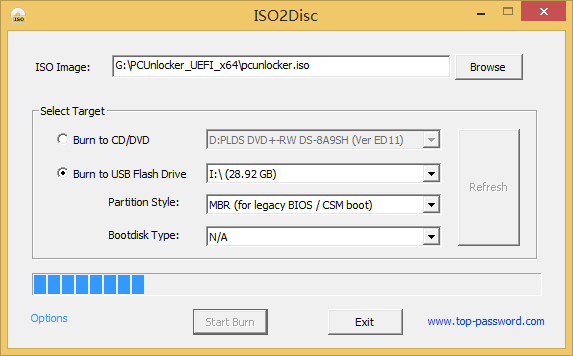
  1. To start, use a second computer to download the ISO image of PCUnlocker. Run the ISO2Disc utility and browse for the ISO file you just downloaded, just select your USB drive and start the process to create a bootable PCUnlocker USB drive.

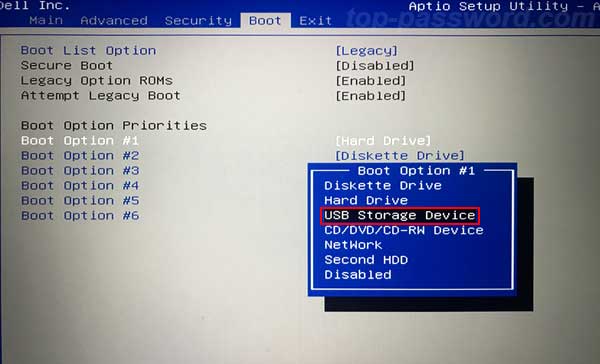
  2. Plug the USB drive into your locked computer. Enter into the BIOS setup and change the boot sequence to force your computer to boot from USB drive first.

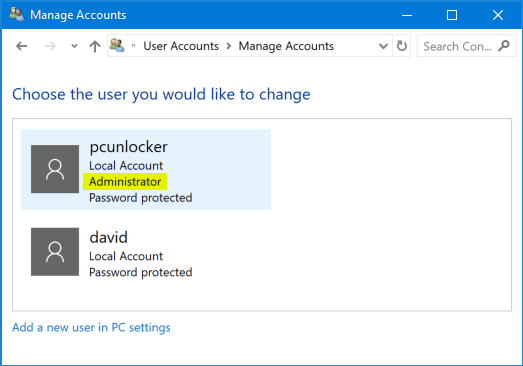
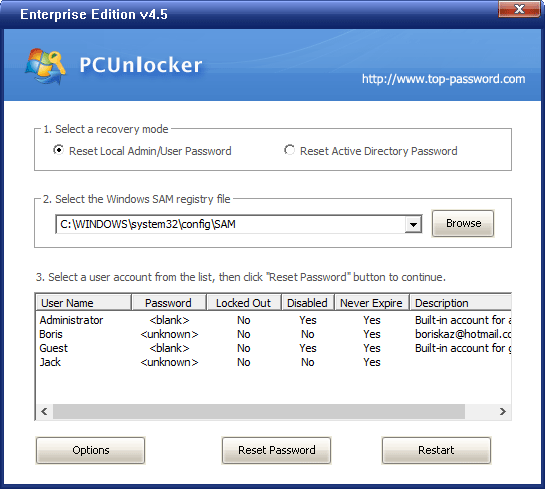
  3. After PCUnlocker loads from the USB drive, you can see all local accounts found on your computer. Just select your admin account and click on Reset Password button. This lets you remove / delete the Windows password that you’re unable to type on the login screen.

  4. Reboot your computer and restore the BIOS boot sequence to boot from hard drive. Windows will log in to your local admin account without prompting you to type password any longer. Done!

How to Change RDP Port for Windows Remote Desktop Connection

October 25th, 2017 by Admin

By default, Windows uses TCP/IP port 3389 for remote desktop connection. Since this port is well known and it could pose a security risk, you’d better change remote desktop RDP port for your Windows computer as an added security measure. The following method works with Windows 10, 8, 7 and Windows Server.

How to Change RDP Port for Windows Remote Desktop Connection?

  1. Press the Windows + R keys to open the Run command box. Type regedit and press Enter.

  2. On the left-side of Registry Editor, navigate to the following key:
    HKEY_LOCAL_MACHINE\System\CurrentControlSet\Control\TerminalServer\WinStations\RDP-Tcp\PortNumber

    Scroll down on the right until you see the PortNumber value, and then double-click it to modify.

  3. Click Decimal, and type in the new port number that you want to use for remote desktop and click OK.

  4. Close the Registry Editor and reboot the computer. Note that the next time you connect to your PC with RDP you will need to add a colon followed by the port number to the IP address.

That’s it!