Archive for July, 2015

How to Decrypt BitLocker-Encrypted Drive from Command Line

July 30th, 2015 by Admin

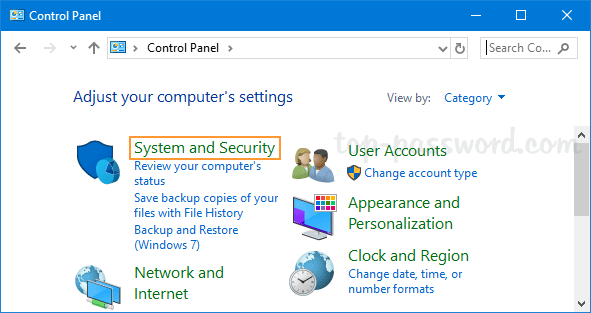
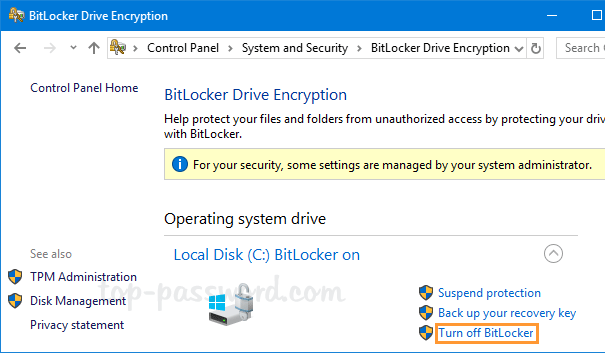
If you still have admin access to your Windows computer, you can decrypt the BitLocker-encrypted drive easily from the Control Panel:

  1. After opening up the Control Panel, click the System and Security link.

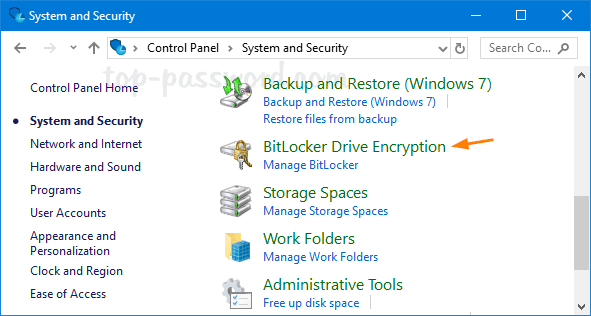
  2. click on BitLocker Drive Encryption to launch the BitLocker configuration panel.

  3. Find the drive on which you want BitLocker Drive Encryption turned off, and click Turn off BitLocker.

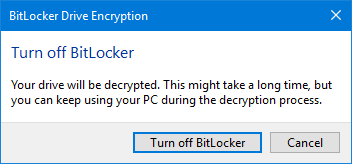
  4. A message is displayed, informing you that the drive will be decrypted and that decryption may take some time. Click on Turn off BitLocker to begin the decryption process.

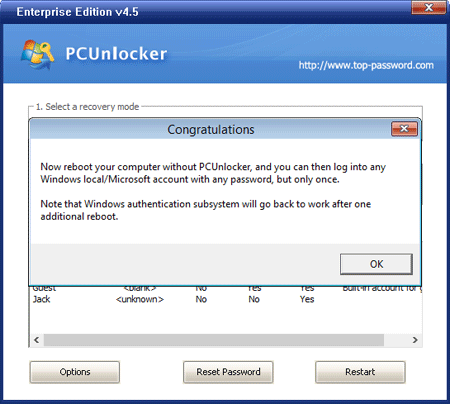
Sometimes things would get a bit tricky if your computer won’t start or you lost admin access to your Windows account. You might need to boot off your PC from a WinPE bootable disc and decrypt the hard drive through the command line utility – manage-bde. Here’s how:

  1. Open the Command Prompt as administrator.
  2. Type the following command to unlock your BitLocker drive with 48-digit recovery key:
    manage-bde -unlock D: -RecoveryPassword YOUR-BITLOCKER-RECOVERY-KEY-HERE

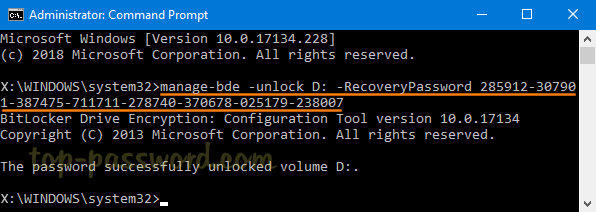
    If your BitLocker recovery key is stored in a file on an external drive, then use this command:
    manage-bde -unlock D: -RecoveryKey "PATH_OF_YOUR_BITLOCKER_RECOVERY_KEY_FILE"

    If you can remember your BitLocker user password, type the following command. After pressing Enter, you’ll be prompted to enter the user password.
    manage-bde -unlock D: -Password

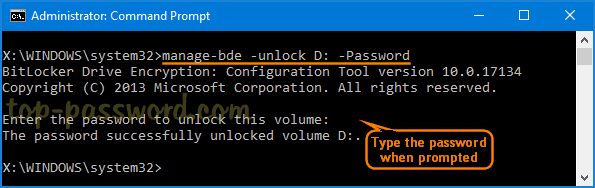
  3. Next turn off BitLocker Encryption:
    manage-bde -off D:

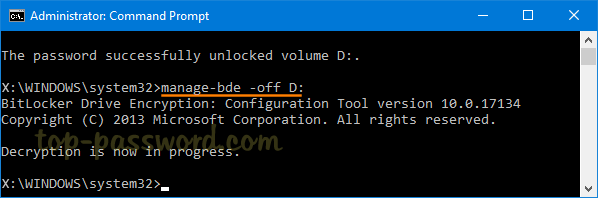
  4. Now you have unlocked and disabled BitLocker.

Problem with Using Chntpw to Reset Password

July 29th, 2015 by Admin

I tried to reset the password of Windows 7 Using chntpw command in Ubuntu. The program appears to work exactly as expected, and doesn’t display any errors, and acts like it’s done everything properly when blanking or changing a password. However, when Windows is loaded, no change has been made – the password has not been blanked or changed.

Chntpw, also known as Offline NT Password & Registry Editor, is a free Linux tool that allows you to reset or edit Windows user passwords stored in the SAM database. Here are a list of problems you might experienced when using chntpw to reset a lost Windows password:

  • Chntpw boots for a short while and ends up in a kernel panic “Kernel panic – not syncing: Attempted to kill init! And then it stops booting.
  • Failed to blank or change password. Chntpw said successfully clear the password. But when you try to login from Windows it does not seem to be changed.
  • Unable to mount the hard drive that that contains the Windows registry hives. Get the mount issue “Windows is hibernated, refused to mount. NTFS: Yes, but hibernated.“, or crash with “VFS: Unable to mount root fs on unknown-block.
  • Chntpw: Unable to open/read a hive, exiting..
  • Chntpw hangs in a loop, or fail to boot even if your computer is configured with UEFI and Secure Boot.

What to do if chntpw doesn’t work on your computer? You can get around all these issues with the third-party Windows password bypass tool – PCUnlocker, or use the following methods:

2 Options to Add a User to Local Administrators Group

July 13th, 2015 by Admin

Only an administrator can perform the administration tasks such as installing a driver or an application. If you have an existing standard or limited account, you can grant it administrator privileges by adding it to the built-in Administrators group. Here are two options to add a user to the local Administrators group in Windows 10, 8, 7, Vista or XP.

Option 1: Computer Management

The easier way to add a user to the local Administrators group is to use the Computer Management app. Here’s how:

  1. To open the Computer Management, right-click on My Computer icon on your desktop and then select Manage. Another method is to press the Windows key + R to bring up the Run box, then type compmgmt.msc and hit Enter.
  2. When the Computer Management window opens, expand Local Users And Groups in the left pane, and click on Users (Please skip to the option 2 below if you don’t see Local Users and Groups.)

    local-users-and-groups

  3. Double-click your desired user account in the right hand side.
  4. In the User Properties window, click the Add button.

    account-properties

  5. In the Select Groups dialog, type the name of your administrators group. Click Check Names, and then click OK.

    select-groups

    If you don’t know the name of your administrator group, click Advanced and next click Find Now.

Option 2: Command Prompt

However, not every edition of Windows have the Local Users and Groups entry in the Computer Management (for example, Windows 8 Home and domain controller). This method will work on all editions of Windows.

  1. Open an elevated Command Prompt. In Windows 10 or 8, press the Windows key + X and then click “Command Prompt (Admin)“. In Windows 7 or Vista, go to Start > All Programs > Accessories, then right-click on Command Prompt shortcut and select “Run as Administrator“.
  2. To see a list of local groups available, just type:
    net localgroup
  3. You can add a user to the built-in Administrators group by running the following command:

    net localgroup Administrators [username] /add

    For example, add a user named test to the administrators group, we can run the below command.
    net localgroup Administrators test /add

    add-user-to-group

How to Bypass the Password on Any Windows Version

July 6th, 2015 by Admin

There are lots of people that for some reason forget the login password on their Windows computers. Most of the answers they find all over the Internet is to reinstall or reset the password. This is not the answer you’ll get here. Today I’ll share with you how to bypass the password on any Windows version, not just reset it.

How to Bypass the Password on Any Windows Version?

  1. Download the required password bypassing tool – PCUnlocker. Once it’s finished, double-click the zip file to extract it. You will then need to burn the ISO file to a writable CD using a program like ISO2Disc.

  2. Insert the CD into the computer that needs its password bypass and boot from it. You may have to change the computer’s boot order in the BIOS in order to boot from the CD.

  3. If you boot from the CD successfully, it will run the Windows PE environment from memory. When the PCUnlocker application opens, you’ll see a list of Windows user accounts that are discovered on your computer.
  4. Here we’re not going to reset the user password, so don’t click the “Reset Password” button. At the bottom-left side of your screen, there is an Options button. Click on Options and select “Bypass Windows Password”.

  5. Confirm your password bypass operation and click OK to proceed.

  6. When you see the Congratulations dialog box, you’re almost done!

    Restart your compute and take out the CD. When it boots to the Windows login screen, click the icon of any User account (supporting Windows 8 Microsoft account) and you can login with arbitrary password.

I have tested this procedure on Windows 10, 8.1, 8, 7, Vista, XP and it works fine, so if yours somehow does not work, go back through the steps again and make sure you have not missed any step. Or check out the boot up toubleshooting guide for PCUnlocker.

3 Ways to Turn off Windows Defender in Windows 10 or 8

July 5th, 2015 by Admin

Windows Defender is a built-in antivirus software comes with Windows 10 and Windows 8. While Windows Defender provides very baseline protection, it slows down your PC considerably. Users who prefer using third-party security solution like Kaspersky, McAfee or Norton might want to completely disable Windows Defender. Here are 3 ways to turn off Windows Defender in Windows 10 or 8.

Method 1: Permanently Turn off Windows Defender with Group Policy

  1. Press the Windows key + R to bring up the Run box. Type gpedit.msc and hit Enter.

  2. In the left pane of Local Group Policy Editor, navigate to the following location:
    Computer Configuration -> Administrative Templates -> Windows Components -> Windows Defender Antivirus -> Real-time Protection

    In the right pane you will see a policy labeled “Turn off real-time protection“. Double-click on it to modify.

  3. Select Enabled. Click Apply and then OK.

  4. You have to restart the computer to allow this policy to take place. When you try to turn on real-time protection again in Windows Defender, you’ll get a message that saying “This setting is managed by your administrator“.

Method 2: Permanently Turn off Windows Defender with Command Prompt

  1. Open the Command Prompt as administrator. Type the following command and press Enter.
    reg add "HKEY_LOCAL_MACHINE\SOFTWARE\Policies\Microsoft\Windows Defender\Real-Time Protection" /v DisableRealtimeMonitoring /t REG_DWORD /d 1 /f

  2. Restart your computer to apply the changes, and then Windows Defender should now be disabled.

Method 3: Temporarily Turn off Real-time Protection from Windows Defender

  1. After opening up Windows Defender, navigate to Virus & threat protection tab. Under the “Virus & threat protection settings” section, click on the Manage settings link.

  2. Turn off the Real-time protection toggle switch.

  3. Windows Defender will disable its real-time protection temporarily. The next time you restart your computer Windows Defender will re-enable automatically.

Reset Windows 8 or 7 Password with the Freeware NTPasswd

July 3rd, 2015 by Admin

“My laptop was installed with Windows 7 with only one account, but no reset disk was created. Now I had forgotten my administrator password and don’t know how to reset it.

Had tried Ophcrack to burn its ISO into a flash drive, but failed to recover my password. Is there any way to reset my password without formatting my whole system disk?”

Fortunately, if you have lost your Windows password, there are several approaches you can take for either recovering or resetting the forgotten password. In this tutorial we’ll show you how to reset Windows 8 or 7 password with the freeware NTPasswd (Offline NT Password & Registry Eidtor). NTPasswd is a small Linux tool that allows you to reset Windows admin/user password on a computer where you forgot your password.

How to Reset Windows 8 or 7 Password with NTPasswd?

  1. First go to the official website of NTPasswd and grab a copy of the bootable CD image. To install NTPasswd onto a blank CD, Right-click on the ISO file and then click “Burn disc image” option. If your system doesn’t have built-in support for burning, you can take use of the free burning tool ISO2Disc.
  2. When the bootable NTPasswd CD is ready, it’s time to reset your lost Windows password. Insert the CD into the optical drive and restart the target computer. You might have to adjust the BIOS to allow booting from the CD.
  3. After booting to the NTPasswd tool, you have to select which partition that has Windows installed. In most cases, there will be only one partition so you can just hit Enter to use the default value.

    select-partition

  4. Next, select which part of registry to load, press Enter to leave it as default option which is “Password reset [sam]”.

    load-sam

  5. When you see the chntpw Main Interactive Menu, press Enter to select “Edit user data and passwords” option.

    ntpasswd

  6. Choose the user account where you want to reset the password. You can find the RID, which you have to enter now, to the left of the username.

    select-account

  7. On User Edit Menu, type 1 and press Enter to select “Clear (blank) user password”.

    clear-password

  8. If there is nothing wrong, you should see a message Password cleared!. Then, type q and press Enter to quit editing the user.

    quit-ntpasswd

  9. Next type q to quit the NTPasswd tool and type y to save your password reset changes. Press Ctrl + Alt + Del to restart your computer. You should be able to login to Windows without any problems — remember to change the password to something complex that you can still recall easily.

Note that NTPasswd could be used to reset password for local account only. If you need to bypass Windows 8 Microsoft account, or reset domain user password, you might need to take use of the commercial software PCUnlocker.

How to Show Hidden Files in Windows 11, 10, 8, 7 and Vista

July 1st, 2015 by Admin

One accidental deletion of a single system file can render your computer unusable. By default, Windows hides certain system files from view in Windows Explorer. This protects important files from being accidentally deleted, modified or altered.

But there are times when it’s necessary to view the hidden files and folders when coming to troubleshoot Windows problems. Here’s how to show hidden files in Windows 11, 10, 8, 7 and Vista.

How to Show Hidden Files in Windows 11, 10, 8, 7 and Vista?

  1. Open up a Windows Explorer window, choose Organize -> Folder and search options.

    win7-folder-options

    In Windows 10 or 8, click on the View tab at the top of Windows Explorer, and then click Options.

    win8-folder-options

    In Windows 11, open File Explorer and click on the See more button (three dots) on the right side of the toolbar, and then select Options.

  2. From the opened Folder Options box, go to View tab.
  3. Under the Advanced settings section, click to select “Show hidden files, folders, and drives” radio button. If you are trying to get into the Windows directories, you might want to also remove the checkbox from “Hide protected operating system files (Recommended)” as well.

    show-hiden-files

  4. When you are done, just click Apply and OK, and your changes will take effect immediately.