Archive for October, 2019

3 Ways to Limit Windows Defender CPU Usage in Windows 10

October 28th, 2019 by Admin

Windows Defender service is using high CPU all the time? If you have real-time protection enabled, Windows Defender will do the scan in the background and this can cause high CPU usage. To prevent Windows Defender from using the CPU too much, you can use the following methods to limit Windows Defender CPU usage in Windows 10.

Method 1: Limit Windows Defender CPU Usage via PowerShell

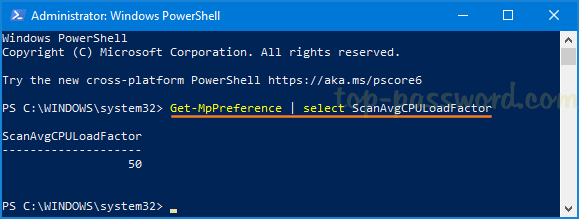
  1. Open Windows PowerShell as admin and execute the following command. It will display the current maximum CPU usage limit for Windows Defender.
    Get-MpPreference | select ScanAvgCPULoadFactor

  2. When you need to reduce CPU usage, type the following command and hit Enter. Windows Defender will not use up more than 30% of your CPU.
    Set-MpPreference -ScanAvgCPULoadFactor 30

Method 2: Limit Windows Defender CPU Usage via Group Policy

  1. Open the Local Group Policy Editor and browse to: Computer Configuration -> Administrative Templates -> Windows Components -> Microsoft Defender Antivirus -> Scan. On the right pane, double-click on the “Specify the maximum percentage of CPU utilization during a scan” policy.

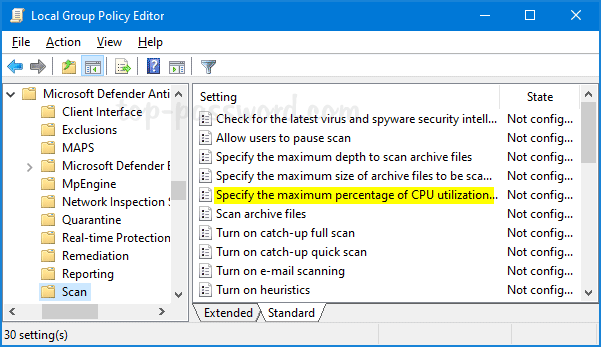
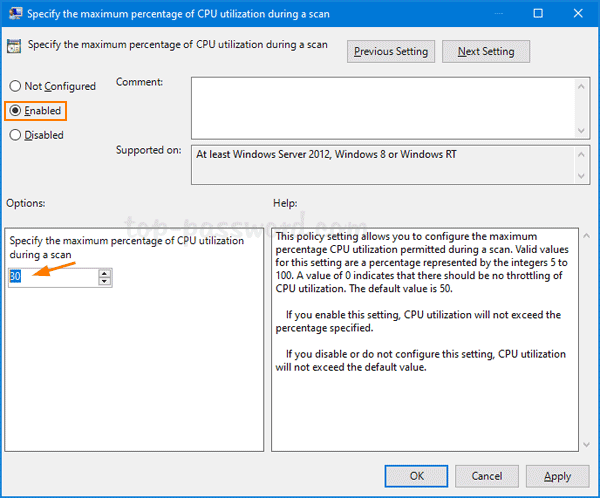
  2. Select the Enabled option and you limit the CPU usage of Windows Defender to 30% or any percentage you like, Click Apply and then OK.

  3. Restart your computer to apply the changes.

Method 3: Limit Windows Defender CPU Usage via Registry Editor

  1. Open Registry Editor and navigate to: HKEY_LOCAL_MACHINE\SOFTWARE\Policies\Microsoft\Windows Defender. Right-click on the “Windows Defender” key and select New -> Key. Name it Scan.

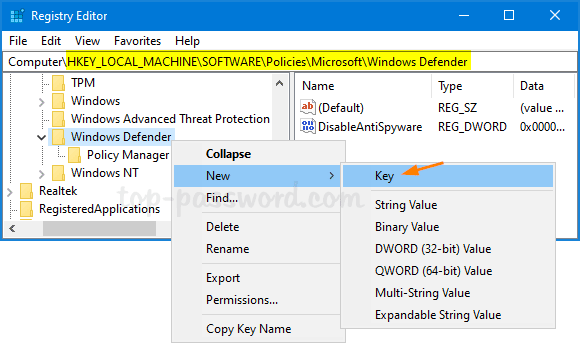
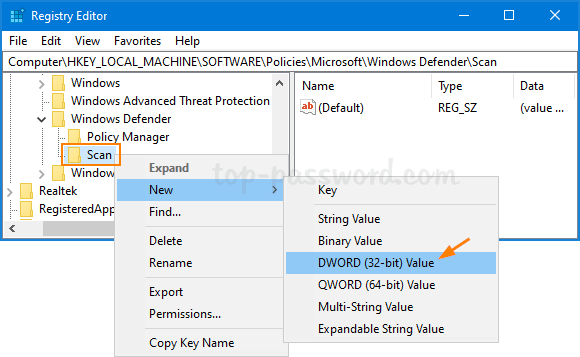
  2. Next, right-click on the newly-created Scan subkey and select New -> DWORD (32-bit) Value.

  3. Name the DWORD AvgCPULoadFactor, and then double-click it to specify the maximum CPU percentage for Windows Defender.

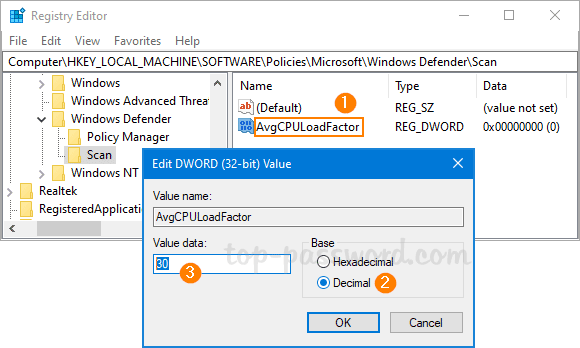
  4. Close Registry Editor. Reboot your computer and check if Windows Defender still has high CPU usage.

Configure Chrome / Firefox / Edge to Automatically Clear Cookies on Exit

October 24th, 2019 by Admin

After surfing the Web, your cookies and browsing history can remain on your computer even after the browser is closed. This can pose a potential security and privacy risk. In this tutorial we’ll show you how to set Chrome, Firefox and Microsoft Edge to automatically clear cookies, browsing history and cache when you close it.

Chrome:

  1. Open up your Chrome browser and type the following URL in the address bar and hit Enter.

    chrome://settings/content/cookies

  2. This will bring up the Cookies section. Just turn on the option named “Clear cookies and site data when you quit Chrome” or “Keep local data only until I quit my browser” depending on your Chrome version.

  3. Every time you close Chrome, it will now automatically clear your cookies and browsing data.

Firefox:

  1. After opening Firefox, click on the three-line icon in the top-right corner. In the drop-down menu, select Options.

  2. Select the Privacy & Security tab. Under History, click the drop-down menu next to “Firefox will:” and select “Use custom settings for history“.

  3. Check the option “Clear history when Firefox closes“, and then click on the Settings button.

  4. Choose what you want Firefox to automatically clear on exit, and click OK.

  5. When you exit your FireFox browser, your cookies and browsing history will automatically be deleted.

Microsoft Edge:

  1. Click on the three-dot icon in the top right-hand corner of your Microsoft Edge browser, and then select Settings from the drop-down menu.

  2. Choose the Privacy & security tab and click on the button “Choose what to clear“.

  3. Check the boxes for the types of browsing data you want to clear when you exit Edge. Then, turn on the option “Always clear this when I close the browser“.

  4. From now on, Microsoft Edge will automatically delete your browsing data like cookies, browsing / download history, autofill data, and other things when you close it.

How to Remove Quick Access from Navigation Pane in Windows 10 File Explorer

October 21st, 2019 by Admin

The Quick Access section is available at the left side of the navigation pane in File Explorer, which gives you an easy way to access your frequently used folders or files. But if you don’t like Quick Access or you’d prefer to see a traditional navigation pane, you can hide or remove it entirely. In this tutorial we’ll show you 2 simple ways to remove Quick Access from File Explorer’s navigation pane in Windows 10.

Method 1: Remove Quick Access from File Explorer in Windows 10 v1607 or Higher

  1. Open Registry Editor. Just copy the below registry location and paste it in the address bar and then press the Enter key to get there.

    HKEY_LOCAL_MACHINE\SOFTWARE\Microsoft\Windows\CurrentVersion\Explorer

  2. In the left-side pane, right-click on the Explorer key and then select New -> DWORD (32-bit) Value.

  3. Name the new DWORD as HubMode, and then double-click on it and change its value data to 1. Click OK.

  4. Now, close all File Explorer windows and re-launch File Explorer. The Quick Access section should be gone from the left navigation pane.

Method 2: Remove Quick Access from File Explorer in Windows 10 v1511 or Higher

  1. Open Registry Editor and navigate to: HKEY_CURRENT_USER\SOFTWARE\Classes\CLSID. Right-click on the CLSID key in the left pane and then select New -> Key.

  2. Name the new key {679f85cb-0220-4080-b29b-5540cc05aab6}.

  3. Right-click the new key you just created and use the same method to create a new subkey named ShellFolder.

  4. Next, right-click on the ShellFolder key in the left pane, and select New -> DWORD (32-bit) Value.

  5. Name the new DWORD Attributes and double-click it to modify. In the pop-up dialog box, select the Hexadecimal option and enter 88000 in the Value data box. Click OK.

  6. Close Registry Editor and reboot your computer. When you open File Explorer next time, Quick Access should be gone.

How to Clear or Flush DNS Cache in Windows 10, 8, 7

October 18th, 2019 by Admin

Have you ever encountered the error DNS_PROBE_FINISHED_NXDOMAIN or ERR_NAME_NOT_RESOLVED when accessing a website? Your browser displays a 404 error or tell you “The site can’t be reached“? These problems usually happen when your DNS cache is corrupted or out of update, so Windows can’t resolve the domain name of the website you’re visiting into IP address correctly. Clearing the DNS cache is the most effective way to resolve DNS related problems. Here’s how you can view, clear / flush DNS cache in Windows 10, 8, 7.

Part 1: View DNS Cache

Open an elevated Command Prompt and run the following command:
ipconfig /displaydns >C:\dnscache.txt

The above command will export the local DNS cache to a text file: C:\dnscache.txt. Just open it with Notepad and you can see the IP addresses for the respective domains or hosts you’ve ever visited.

As you can see in the above screenshot, Windows will check the DNS cache and send my request to the IP address 172.217.11.68 when I try to visit google.com.

Part 2: Clear or Flush DNS Cache

When you need to clear or flush DNS cache, just open the Command Prompt as administrator and type this command:
ipconfig /flushdns

Once pressing Enter, the DNS Resolver cache will be cleared immediately. Windows will start creating new and up-to-date DNS records for any websites you visit thereafter.

3 Methods to Check Your Motherboard Model in Windows 10

October 17th, 2019 by Admin

Is there a way to identify the motherboard (mainboard) so I can update my BIOS or upgrade the RAM? How could I find my motherboard model without opening the case? In this tutorial we’ll show you 3 simple ways to check the motherboard model on your Windows 10 computer.

Method 1: Check Motherboard Model Using Command Prompt

Open the Command Prompt and type the following command:
wmic baseboard get product,manufacturer,version,serialnumber

Press Enter and you will get all the basic information about your motherboard, such as manufacturer name, model number, serial number (if available) and version.

Method 2: Check Motherboard Model Using Microsoft’s System Information Tool

Press the Windows key + R keyboard shortcut to open the Run box, then type msinfo32 and hit Enter to launch Microsoft’s System Information Tool.

In the System Summary section, look for the the “BaseBoard” entries and they will give you the manufacturer name, model number and version for the motherboard.

Method 3: Check Motherboard Model Using Third-Party Software

There are also many third-party softwares which can help you check the motherboard model on your Windows PC, one of the best and popular ones is CPU-Z. When launching the program, it will take a while to gather all the details about the hardware of your system. You can click on the “Mainboard” tab to view your motherboard’s model.

That’s it!

3 Ways to Log off Another User in Windows 10

October 14th, 2019 by Admin

How do I sign out other user accounts without restarting the computer? When someone forgets to log out of a public or shared PC, their account still consumes RAM in the background. To free up the resources being used by other logged-in accounts, you can log them off using Task Manager, Command Prompt and PowerShell.

Method 1: Log Off Another User Using Task Manager

Press the Ctrl + Shift + Esc keyboard shortcut to launch Task Manager. Go to the Users tab, it will list all users that are currently signed in to your system. Right-click on the user you want to log off and select the Sign off option.

You will get a warning that says the user’s unsaved data might be lost. Click on Sign out user when you need to proceed.

Method 2: Log Off Another User Using Command Prompt

Open the Command Prompt with administrative rights, run the query session command to see all users currently logged into the computer. Take note of the session ID of the user you want to sign out.

Next, run the following command to log off your desired account by specifying the session ID.
logoff ID

This method doesn’t give you any alert or confirmation that the user you’re signing out will lose unsaved work.

Method 3: Log Off Another User Using PowerShell

Open Windows PowerShell with administrative rights, and type the following commands. Replace “Server01” with your computer’s name and substitute “pcunlocker” with the name of the account you want to log out.
$server = 'Server01'
$username = 'pcunlocker'
$sessionId = ((quser /server:$server | Where-Object { $_ -match $userName }) -split ' +')[2]
logoff $sessionId /server:$server

Once logged off, the user account is no longer listed in Task Manager. Signing a user out this way has the same risk of losing all unsaved data as the above method.

Fix: Windows 10 Keeps Going to Sleep After 2 Minutes

October 12th, 2019 by Admin

Windows 10 keeps going to sleep after approximately 1-2 minutes idle? This problem may happen even if an affected user changes all the display and sleep settings to “Never”.

To fix such sleep mode problem, you have to tweak a hidden system setting in the Power Options called “System unattended sleep timeout”.

How to Fix: Windows 10 Keeps Going to Sleep After 2 Minutes

  1. Press the Windows + R keys together, type regedit in the Run box and hit Enter to open the Registry Editor.

  2. Copy the following registry location and paste it in the address bar of the Registry Editor, and pressing Enter will take you to that location. In the right pane, double-click on the DWORD Attributes.

    HKEY_LOCAL_MACHINE\SYSTEM\CurrentControlSet\Control\Power\PowerSettings\238C9FA8-0AAD-41ED-83F4-97BE242C8F20\7bc4a2f9-d8fc-4469-b07b-33eb785aaca0

  3. Change the value from 1 to 2 and click OK. This will make the “System unattended sleep timeout” setting appear in the Power Options control panel.

  4. Close Registry Editor. Open the advanced settings of your current power plan, the “System unattended sleep timeout” setting should appear under the Sleep option. By default, it’s set to 2 minutes. You can change this to a longer period of time or 0 (Never idle to sleep).

That’s it!

The Easy Way to Disable or Enable Guest Browsing Mode in Chrome

October 8th, 2019 by Admin

Chrome’s guest mode is a nice feature that lets you surf the web without leaving any browsing history or cookies on the computer. You can download files as usual in guest mode, but you cannot add bookmarks or install extensions. In this tutorial we’ll show you how to disable or enable guest browsing mode in Chrome for Windows 10 / 8 / 7.

How to Disable or Enable Guest Browsing Mode in Chrome

  1. Press the Windows key + R keyboard combination to open the Run dialog box. Type in regedit and hit Enter to open Registry Editor.

  2. In the left-hand pane, navigate to HKEY_LOCAL_MACHINE\SOFTWARE\Policies\Google\Chrome. By default, both the “Google” and “Chrome” keys don’t exist. You have to create them manually.
  3. While the “Chrome” key is selected, right-click on the blank area in the right-hand pane, and create a 32-bit DWORD BrowserGuestModeEnabled and leave its value data to 0.

  4. Now, you’ve successfully turned off guest mode in Chrome. Relaunch your Chrome browser and you’ll unable to open a Guest windows any longer.

  5. Whenever you need to force Chrome to always start in guest mode, just open the same registry key and change the value of BrowserGuestModeEnabled to 1.

If you don’t want to manage the guest mode settings later, just delete the DWORD BrowserGuestModeEnabled and you’re done.

2 Ways to Open Chrome in Guest Browsing Mode on Windows 10

October 6th, 2019 by Admin

Chrome browser can be started in guest mode so you don’t leave any traces like cookies, cache or browsing activities on the computer. This is useful when you need to use a public computer for private browsing. In this tutorial we’ll show 2 different ways to launch Chrome in guest browsing mode on Windows 10.

Method 1: Open a Guest Window from within Chrome

Launch the Chrome browser. Click on the Profile icon in the top right corner and then select Open Guest window.

A new window will pop up in guest mode and you can browse privately.

Method 2: Create a Shortcut to Always Start Chrome in Guest Mode

The above method requires so many steps to open a guest window. If you need to use guest mode frequently, it’s a good idea to create a desktop shortcut for launching Chrome in guest mode by default. Follow these steps:

Right-click on the Chrome desktop shortcut and select Properties from the context menu.

Switch to the Shortcut tab. Add “ --guest” at the end of the string present in the Target text box, and then click Apply.

When Chrome asks for administrator permission, click on Continue.

Now, double-click on the Chrome desktop shortcut and it will open a guest window directly.