Archive for August, 2016

3 Ways to Run App as Different User in Windows 10

August 29th, 2016 by Admin

How can you run a script or application as another user? In this tutorial we’ll show you 3 ways to run apps as different user in Windows 10.

Method 1: Shift + Right-Click Context Menu

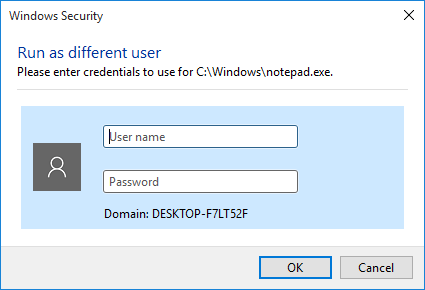
Open File Explorer and browse to the executable file you wish to run as different user. Simply hold down the Shift key and right-click on the executable file, select Run as different user from the context menu.

shift-run-as-different-user

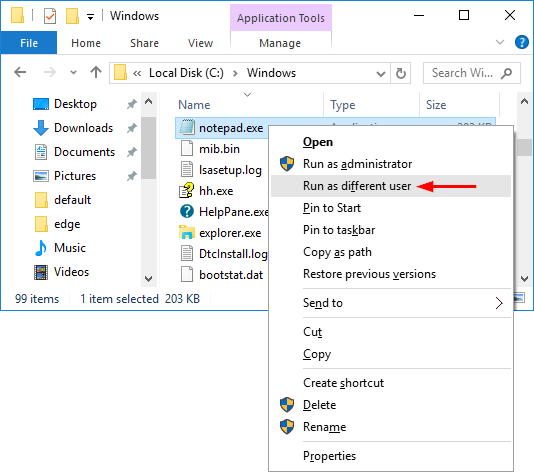
Next you have to enter the user name and the password of the user which we want use to open the application.

enter-user-credentials

Method 2: Run as Different User via Command Line

Runas is a very useful command in Windows. This command allows to run applications under a different user account, even as an Administrator. To use the Runas command, you need to provide a different user’s credentials and the full path of the application you want to run.

For example, if you want to open Notepad as your Windows user Bob, the command line would be as below.
runas /user:Bob “C:\Windows\notepad.exe”

runas-cmd

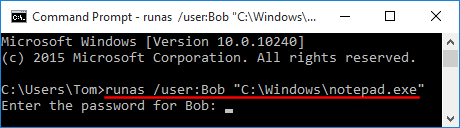
After running the above command, you will be asked to enter the password of Bob account. After password validation, Notepad will be opened with the specified account credentials.

Method 3: Run as Different User via Start Menu

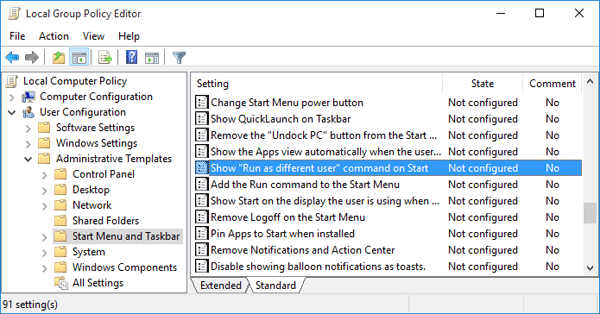
If you want to run apps as different user from Start Menu in Windows 10, you need to tweak the Group Policy setting.

  1. Press the Windows + R key combination to bring up the Run box, type gpedit.msc and hit Enter.
  2. In the Local Group Policy Editor window, navigate to:
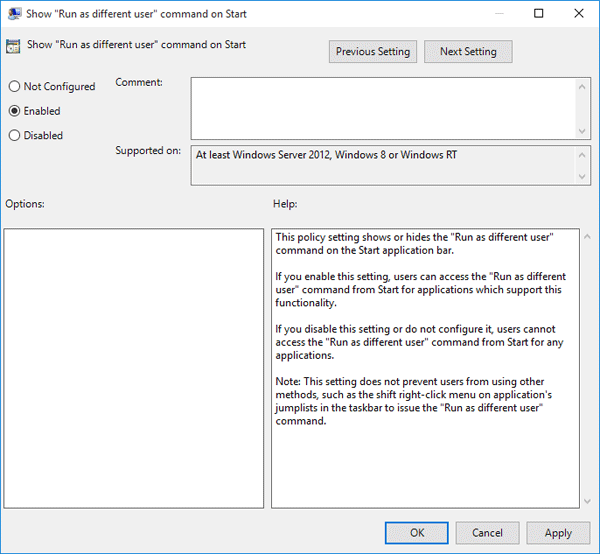
    User Configuration\Administrative Templates\Start Menu and Taskbar
  3. In right-side pane, double-click on the policy called Show “Run as different user” command on Start.

    run-as-different-user-gpo

  4. Set the policy to Enabled, then click OK to save your changes.

    show-run-as-different-user

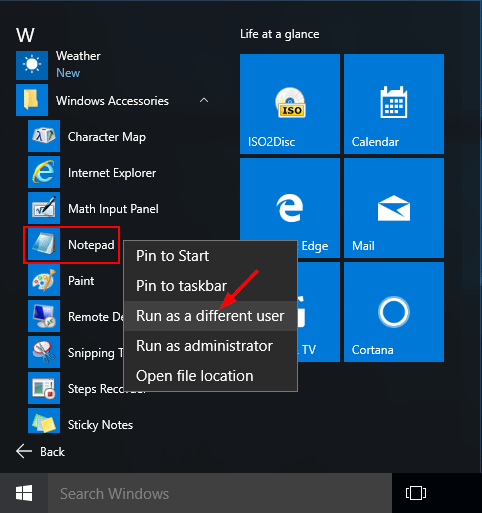
  5. Reboot your computer. Right-click any application on the Start Menu, you’ll see a new option “Run as different user” for quick access.

    rus-as-user-via-start

How to Change or Restore Desktop Icons in Windows 10

August 28th, 2016 by Admin

Do you want to customize your desktop icons and make your PC uniquely yours? Or all desktop icons were messed up and want to restore them to default? In this article we’ll show you how to change or restore desktop icons (such as This PC, Network, Control Panel, Recycle Bin, and your user profile icon) in Windows 10.

restore-desktop-icons

Part 1: Change Desktop Icons in Windows 10

  1. Right-click on any empty place of your desktop. Select Personalize from the context menu.

    personalize

  2. From the Personalization window, select the Themes tab on the left-side menu, and then click Desktop icon settings.

    desktop-icon-settings

  3. Select the icon you wish to change. As shown in the picture below, I want to customize the icon for “This PC” shortcut, so I choose the This PC icon and click the Change Icon button.

    change-desktop-icon

  4. In the Change Icon window, you can see a list of built-in system icons. If you don’t like them, you can click the Browse button to find the icon you’ve downloaded or created by yourself. Click OK once choosing your new icon.

    choose-desktop-icon

  5. Click OK and then Apply. You will see the new desktop icon that you have chosen on the desktop.

Part 2: Restore Desktop Icons to Default

  1. Right-click on any empty place of your desktop. Select Personalize from the context menu.
  2. From the Personalization window, select the Themes tab on the left-side menu, and then click Desktop icon settings.
  3. Select the icon you wish to restore, and click the Restore Default button. Here you can restore all your desktop icons one by one.

    restore-default-icon

  4. When it’s done, click OK and then Apply. Now you’ve successfully reset your desktop icons to default.

How to Change & Reset Default Apps in Windows 10

August 27th, 2016 by Admin

Windows 10 comes with a number of built-in apps such as Mail, Groove Music, Photos, Movies & TV, and Microsoft Edge. When you double-click on a video file, the system will open it using the default video player – Movies & TV. How can I change the default video player or email client? In this tutorial we’ll show you the simple way to change & reset default apps in Windows 10.

How to Change & Reset Default Apps in Windows 10?

  1. Press Win + I keys together to open the Settings app. You can also access it by clicking on Start button and selecting Settings.
  2. On the Settings window, click on System.

    settings

  3. Click Default apps in the left pane. From the right pane, you can pick which email app or application to use by default, which maps app to use, which music player to set as your default, and much more.

    change-default-app

    For example, I want to change the default video player from Movies & TV to Windows Media Player, so I click Movies & TV and pick Windows Media Player from the app list.

  4. The default type of apps you can change includes
    • Web browser
    • Email
    • Music player
    • Video player
    • Photo viewer
    • Calendar
    • Maps

    reset-default-apps

    Simply clicking Reset button will restore everything back to the default recommended by Microsoft.

  5. If you just want to set the default app for a single file type, just click the “Choose default apps by file type” option.

    default-apps

  6. Here you’ll be greeted by a two-tiered menu, the first containing every file type that Windows 10 is designed to handle, and the second with the list of apps you currently have installed on the machine.

    change-default-app-by-filetype

    For example, if you want to open .asmx files in Notepad, just scroll down to “.asmx” on the left, and once selected, choose the application on the right that you want to set as the default. That’s it!

Enable or Disable Adobe Flash Player in Microsoft Edge

August 26th, 2016 by Admin

Windows 10 comes with Adobe Flash Player built right into the operating system and its Edge browser. Users cannot uninstall Adobe Flash Player but there is built-in option to enable / disable Adobe Flash Player in Microsoft Edge. Here’s how:

  1. Open the Edge browser. Click on the More actions button (three dots) in the top right corner and select Settings.

    edge-settings

  2. Scroll down the settings and click on View advanced settings button.

    edge-advanced-settings

  3. In Advanced settings, scroll down to Use Adobe Flash Player. Turn the toggle On/Off (blue toggle means On). From there you can also set Edge to block pop ups too if you wish.

    use-adobe-flash-player

  4. Reload or Refresh the web page to apply the settings.

How to Turn On or Off Quiet Hours in Windows 10

August 26th, 2016 by Admin

Get annoyed by app notifications popping up in the lower-right corner of your screen? If you do not want to be disturbed or interrupted by notifications, you can enable the Quiet Hours feature while keeping the notifications open. In this tutorial we’ll show you how to turn on or off Quiet Hours in Windows 10.

How to Turn On or Off Quiet Hours in Windows 10?

In the right side of the taskbar, right-click on the Action Center icon (looks like a speech bubble) and select “Turn on quiet hours“. To Turn off Quiet Hours, make a right click on the Action Center icon once more. Click “Turn off quiet hours” this time.

turn-on-quiet-hours

You can also turn on/off Quiet Hours through Action Center. Just press Win + A keys together or click on the Action Center icon on the taskbar, the Action Center panel will open up from the right side of the screen.

action-center

From there, click on the Quiet hours button to turn on/off Quiet Hours in Windows 10. That’s it!

Fix Operating System Not Found When Booting Windows 10 / 8

August 19th, 2016 by Admin

While booting Windows 10 or 8 computer, you might receive the following error message:

“Operating system not found. Reboot and select proper boot device.”

This issue can be caused by various reasons, such as MBR (Master Boot Record) or DBR (DOS Boot Record) is damaged, the BCD (Boot Configuration Database) is corrupt, or your system partition is not active. In this tutorial we’ll guide you how to troubleshoot the problem of operating system not found / missing in Windows 10 or 8.

Solution 1: Enable / Disable UEFI Secure Boot

Most Windows 10/8 computers come with UEFI firmware and Secure Boot enabled. The operating system installed on a GPT partition can only be booted in UEFI mode. If you configure a UEFI system to boot in Legacy mode, you’ll get the error message that saying operating system is missing or not found. If you installed Windows 10/8 on a MBR disk, it also cannot boot in UEFI mode.

When you get the error message “Operating system not found or missing” during boot, try to change the boot mode from Legacy to UEFI, or turn off UEFI and Seure Boot, it might fix your problem. To learn more about how to change the boot mode, please check these articles:

Solution 2: Fix MBR/DBR/BCD

To fix the corrupted MBR, DBR or BCD, you just need your Windows installation DVD. Follow these steps:

  1. Start your problematic PC, insert your Windows DVD and hit a key when you are asked to to boot from DVD. It is possible that you have to change the boot order in your BIOS to boot from DVD.
  2. After a few minutes, you’ll see the Windows Setup screen for specifying your keyboard and language settings, just click Next.

    windows-setup

  3. On the next screen, click “Repair your computer” in the lower left.

    repair-windows-10

  4. When the Choose an option screen appears. Click Troubleshoot.

    troubleshoot

  5. Click Advanced options.

    advanced-options

  6. Click Command Prompt in the Advanced options screen.

    command-prompt

  7. At the Command Prompt, enter the following commands one after the other and hit Enter after each:
    bootrec.exe /fixmbr
    bootrec.exe /fixboot
    bootrec.exe /rebuildbcd

    fix-os-not-found

  8. Reboot your computer. This should hopefully make your problem go away!

Solution 3: Mark Windows Partition Active

When the computer is turned on, the BIOS will look for an active partition to boot. If your system partition is not marked as active, you’ll also receive the error message “Operating system not found or missing”. Here’s how to make your Windows partition as active:

  1. Boot your computer from Windows installation DVD. Open the Command Prompt again by the above method.
  2. At the Command Prompt, type diskpart and press Enter. Then type list disk. You will see the list of disk currently attached to your computer. Now type in select disk n, where n is the disk number. In my example, I would type select disk 0.

    diskpart

  3. Now type list volume to get a list of all the partitions on your selected disk. Find the partition where your Windows is installed and type select volume n, where n is number of your Windows partition.

    list-volume

  4. To mark your selected partition as active, just type active and press Enter.

    mark-volume-active

  5. Close the Command Prompt and reboot your computer. Hopefully your problem has been resolved now!

2 Ways to Set Windows 10 PC to Never Sleep

August 12th, 2016 by Admin

It could be quite annoying if your computer goes to sleep at all the wrong times or if you have trouble coming out of sleep state. In this tutorial we’ll show you 2 ways to put your computer to never sleep & disable sleep mode in Windows 10.

Method 1: Set Windows 10 PC to Never Sleep Using Control Panel

  1. Open the Control Panel in Windows 10. Change your view to either Large icons or Small icons. Look for and click on the Power Options.

    power-options

  2. This will bring you to a place where you can choose your power plan. From the left hand side of the window, select Change when the computer sleeps.

    change-when-pc-sleep

  3. From the drop down box next to Put the computer to sleep, select the amount of time you would like Windows 10 to wait before entering sleep state. If you want to stop Windows 10 from going to sleep, select Never from the list. From there, you can also see an option for making your computer never turn off monitor display.

    put-pc-never-to-sleep

  4. When done, click the Save changes button to exit.

Method 2: Set Windows 10 PC to Never Sleep Using Settings App

  1. To get started, open the Settings app by pressing Win + I keys together, or clicking on the Start button and selecting Settings.
  2. From the Settings window, click on System.

    settings

  3. Select Power & sleep on the left pane. Under the Sleep option, select Never from the drop-down list. You can also click the Screen drop-down list and then select Never if you want your PC to never turn off screen display.

    set-pc-never-to-sleep

  4. That’s it! Your PC will never go to sleep mode again.

6 Ways to Open Registry Editor in Windows 10

August 9th, 2016 by Admin

Most PC troubleshooting tasks can be done by tweaking the registry settings. To access Windows registry, you need to open the built-in tool – Registry Editor. In this tutorial we’ll show you 6 common ways to open Registry Editor in Windows 10.

Method 1: Open Registry Editor via Run

Press the Windows key + R to open the Run box. Type regedit and press Enter.

regedit-via-run

This should be the simplest and quickest way to open Registry Editor in all versions of Windows.

Method 2: Open Registry Editor Using Command Prompt

Press Win + X keys. Choose Command Prompt (Admin) from the given options.

command-prompt-admin

Type regedit at the Command Prompt and press Enter. It will launch Registry Editor immediately.

regedit-via-cmd

Method 3: Open Registry Editor Using Cortana Search

Click inside the Cortana Search box from the taskbar, type regedit and press Enter.

regedit-via-search

Click regedit from the search result.

Method 4: Open Registry Editor Using PowerShell

Open Windows PowerShell. This can be done by pressing Win + R keys to open Run and then type powershell in the box given.

regedit-via-powershell

Type regedit and press Enter. Click Yes when the UAC confirmation box is displayed.

Method 5: Open Registry Editor via File Explorer

Open File Explorer in Windows 10. Browse to the system32 folder: C:\Windows\System32.

right-click-regedit

Locate the regedt32.exe file. Right-click on it and select Run as administrator.

Method 6: Open Registry Editor By Creating Desktop Shortcut

If you need to access Registry Editor frequently, you can create a desktop shortcut for quick access. Follow these steps:

  1. Right-click on any empty area of your desktop, select New -> Shortcut.

    create-desktop-shortcut

  2. This will open the Create Shortcut wizard. It will ask you the location of the item you want to create a shortcut for. Type %windir%\regedit.exe and click Next.

    regedit-shortcut

  3. Give your shortcut any name you prefer and click Finish.

    type-name-for-shortcut

  4. You’ll see the shortcut on the desktop. Double-click on it and you can open Registry Editor quickly.

How to Edit Offline Windows Registry from WinPE

August 7th, 2016 by Admin

When your computer no longer boots up or you’re unable to login to Windows, a registry hack might fix your problem. To access the registry for an unbootable Windows installation, you should use a WinPE bootdisk. In this tutorial we’ll walk you through the steps to load / edit offline registry hive from WinPE.

Before get started, we need to know the locations of Windows registry hives:

HKEY_LOCAL_MACHINE\SYSTEM: %windir%\system32\config\SYSTEM
HKEY_LOCAL_MACHINE\SAM: %windir%\system32\config\SAM
HKEY_LOCAL_MACHINE\SECURITY: %windir%\system32\config\SECURITY
HKEY_LOCAL_MACHINE\SOFTWARE: %windir%\system32\config\SOFTWARE
HKEY_USERS\.DEFAULT: %windir%\system32\config\DEFAULT

How to Edit Offline Windows Registry from WinPE?

  1. Boot your computer into WinPE. Open a Command Prompt and run regedit.exe to open the Registry Editor.

    command-prompt-from-winpe

  2. In the left pane of Registry Editor, highlight the HKEY_LOCAL_MACHINE hive (or HKEY_USERS).

    highlight-registry-key

  3. Click the File menu and select Load Hive.

    load-hive

  4. Browse to your Windows partition and select the registry hive which you wish to load. In my example, the registry hives are located in the directory D:\Windows\System32\Config.

    select-registry-hive

  5. Type a key name whatever you like (e.g. “OfflineReg“) and click OK. The name will be used to create a new node in the tree so one can browser the offline registry.

    enter-key-name-for-loading

  6. Now under the HKEY_LOCAL_MACHINE key, you should see a new key named after the name you typed previously.

    offline-registry

  7. Expand the new key, browse to the desired key or value for editing. In my example, I browse to OfflineReg\Software\Microsoft\IdentityCRL\StoredIdentities and delete its subkey.

    modify-offline-registry

  8. When you finish with the modifications, highlight the key you created previously (e.g. “OfflineReg“). Click the File menu and select Unload Hive.

    unload-hive

  9. This will unload the hive and all changes made will be saved to the offline registry.