Archive for July, 2018

3 Ways to Disable Game Bar and Game DVR in Windows 10

July 31st, 2018 by Admin

Windows 10 has a native feature called Game DVR which lets you use the Game Bar to record game clips in the background. However, Game DVR is turned on by default and it could slow your computer performance and lower your FPS. If you experience FPS issue or crash in your game, here are 3 ways to disable Game Bar and Game DVR in Windows 10.

Method 1: Disable Game Bar and Game DVR via Settings App

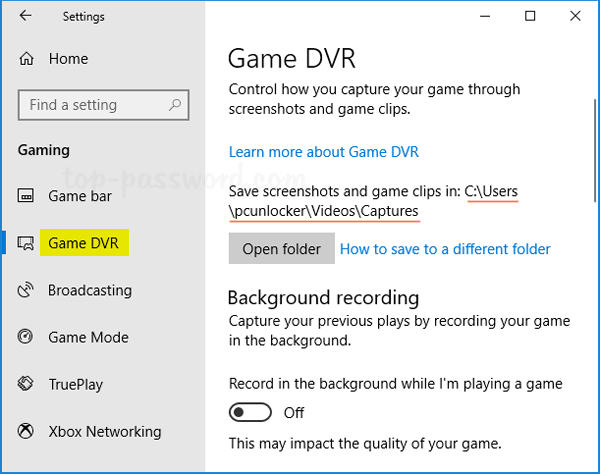
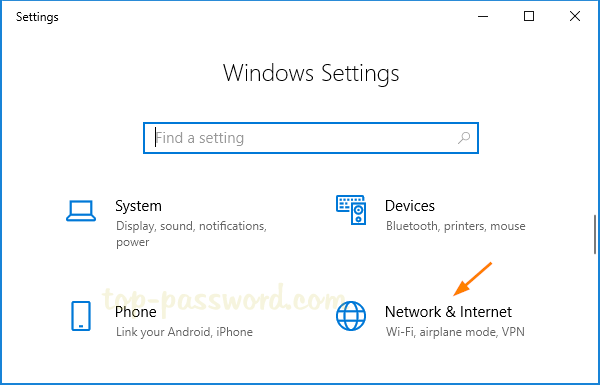
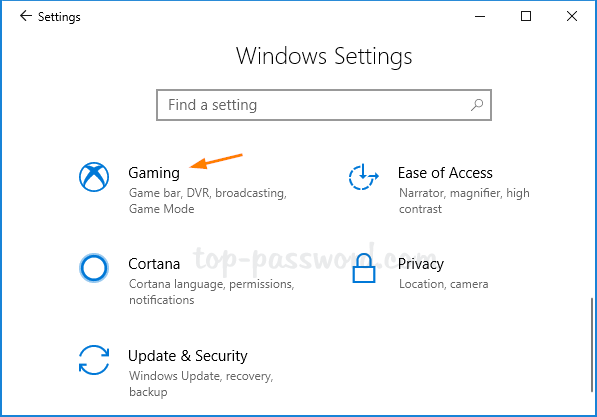
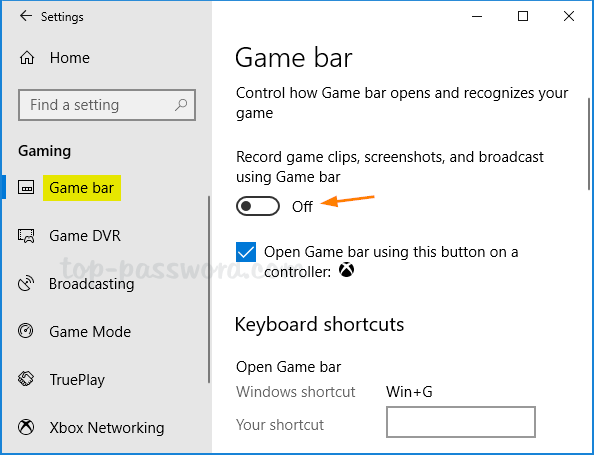
  1. Open the Settings app by pressing the Windows key + I on your keyboard. Then click on Gaming.

  2. Select the Game bar menu on the left. Ensure the “Record game clips, screenshots, and broadcast using Game bar” is set to Off.

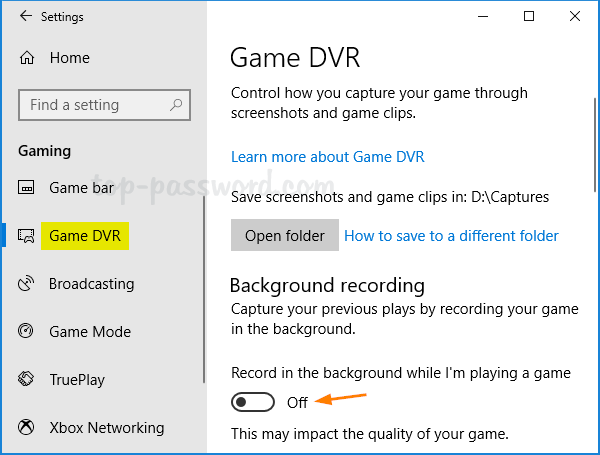
  3. Next, switch to the Game DVR menu and Set the “Record in the background while I’m playing a game” to Off.

Method 2: Disable Game Bar and Game DVR using Registry Editor

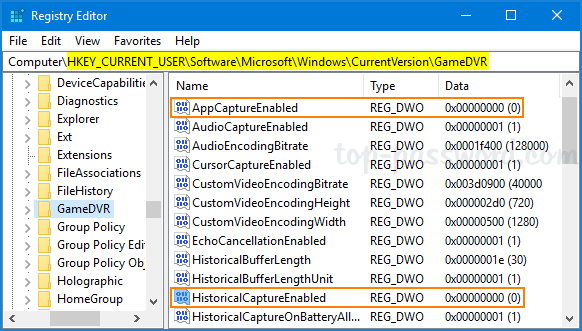
  1. Open the Registry Editor and navigate to the following key:
    HKEY_CURRENT_USER\Software\Microsoft\Windows\CurrentVersion\GameDVR
  2. In order to turn off Game Bar, double-click the DWORD entry AppCaptureEnabled on the right pane, and set its value data to 0. A value of 1 will enable it.
  3. Next, double-click the DWORD HistoricalCaptureEnabled and change the value data to 0 for turning off Game DVR. A value of 1 will enable it.

Method 3: Disable Game Bar and Game DVR via Group Policy

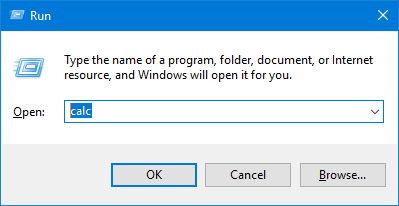
  1. Press the Windows key + R to open the Run command dialog. Type gpedit.msc and hit Enter.

  2. In the Local Group Policy Editor window, expand to Computer Configuration\Administrative Templates\Windows Components\Windows Game Recording and Broadcasting.

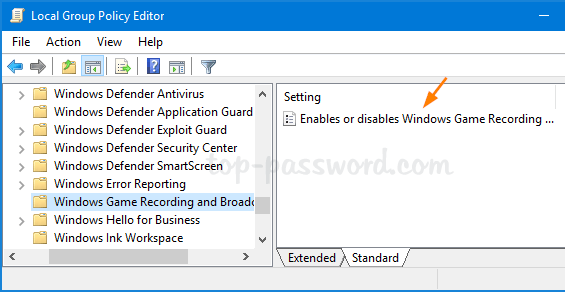
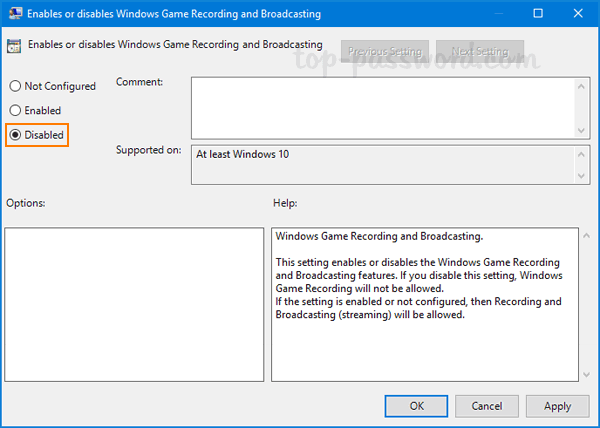
    Double-click the “Windows Game Recording and Broadcasting” policy on the right to modify.

  3. Select Disabled and click OK.

  4. Restart or log off for your GPO settings to take effect.

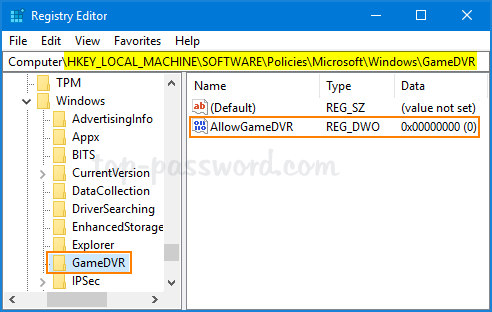
If you’re running Windows 10 Home edition, Local Group Policy Editor is not available. But you can apply the same GPO by making changes to the registry:

Open Registry Editor and go to HKEY_LOCAL_MACHINE\SOFTWARE\Policies\Microsoft\Windows. Create a subkey named GameDVR, and then create a DWORD (32-bit) entry called AllowgameDVR, and set the value data to 0.

That’s it!

How to Record Games or Apps Using Windows 10’s Game DVR

July 30th, 2018 by Admin

Windows 10 has a hidden, built-in video capture tool that can record a game, or even record your screen inside regular apps as well. In this tutorial we’ll show you how to use Game DVR to record games or apps in Windows 10.

How to Record Games or Apps Using Windows 10’s Game DVR?

While the game or app you want to record is in focus, press the Windows key + G to bring up the Game bar. Select the “Yes, this is a game” check box if prompted.

Now you can click the Record button to start your recording session, or you can use the keyboard shortcut – Windows key + Alt + R.

A small timer will appear at the top-right corner of the screen to indicate that you’re recording and display the elapsed time. To stop the recording, press the Windows key + Alt + R again and click on the Stop button.

You will now see a ‘Game clip recorded‘ notification letting you know where your recorded video is stored.

By default, Game DVR automatically saves the videos in the default location: C:\Users\username\Videos\Captures. When running out of disk space on system(C:), you can move the Game DVR Captures folder to another location.

How to Find and Change Game DVR Save Location in Windows 10

July 29th, 2018 by Admin

Game DVR is part of the Xbox app on Windows 10, intended for recording games. By default, the game clips and screenshots you made with Game DVR are stored in the “Captures” folder inside “Videos” in your account. In this tutorial we’ll show you how to find and change the default save location for Game DVR in Windows 10.

Part 1: Find the Default Location of Game DVR Captures Folder

Press the Windows logo key + I to launch the Settings app, then click on Gaming.

Select the “Game DVR” category at the left side. You can then see the default location where the Game DVR tool will save your screenshots and game clips. By default, it should be C:\Users\username\Videos\Captures.

Part 2: Change the Save Location for Windows 10’s Game DVR

Open File Explorer and browse to the default save location you’ve found with the above steps. Then right-click the Captures folder and select Properties.

Select the Location tab and click on the Move button.

Select a new location for the Captures folder.

Click Apply.

You will be prompted whether you would like to move the screenshots and game clips from the old location to the new location. Simply click Yes to confirm.

Now you’ve successfully changed the default Game DVR save location.

How to Forget a WiFi Network Saved in Windows 10

July 25th, 2018 by Admin

How to force Windows 10 to ask for a WiFi password? After changing the password for your wireless network via the router, your computer may not be able to connect to the WiFi network automatically. Because it’s still using an out-dated password, and you have to forget it now. In this tutorial we’ll walk you through the simple steps to forget a WiFi network saved in Windows 10.

How to Forget a WiFi Network Saved in Windows 10?

  1. Open the Settings app by pressing the Windows key + I keyboard combination. Click on Network & Internet.

  2. Select Wi-Fi in the left-hand pane. There you will see a link “Manage known networks“. Click on it.

  3. You’ll see a complete list with all the Wi-Fi networks you’ve ever connected to. Just click the network you want to forget.

  4. Click Forget from the popup menu.

    This will remove your selected network profile and forget the saved WiFi password. You can repeat the same steps to forget other WiFi networks.

The next time you connect to a WiFi network, Windows 10 will prompt you for its password and set up the network profile from scratch. If you want to forget a network using Command Prompt or Registry Editor, please check out How to Delete Wireless Network Profiles in Windows 10 / 8 / 7. That’s it!

Tutorial: Reset Windows 10 / 8 / 7 Password with Knoppix

July 22nd, 2018 by Admin

There could be a number of scenarios that might cause a Windows system to be locked down, some of them are:

  • Can’t log in to Windows or you do not have any clue what the password is?
  • You’re given a computer without knowing the password?
  • Someone changed your Windows password without your knowledge?

The only ways to “break into” a Windows system is to boot with a Live CD so you can access the SAM database and reset the stored login credentials. In this tutorial we’ll show you how to reset forgotten Windows 10 / 8 / 7 password with Knoppix, a free Linux CD based on Debian designed to repair unbootable or damaged PC.

How to Reset Windows 10 / 8 / 7 Password with Knoppix?

Boot your Windows PC with Knoppix Live CD. Press Enter at the boot prompt.

When you reach the Knoppix desktop, use the built-in file manager to find the SAM file located under /Windows/System32/config. Make a note of the full path to the SAM file.

Click the “K” button in the bottom left corner, and then select System Tools and click LXTerminal.

Now, load the SAM file by running the built-in utility – chntpw.

In order to reset Windows local Administrator password, type 1 and hit Enter. You’ll see the message “Password cleared!

Type q and then type y to save your changes.

Reboot and eject Knoppix Live CD, your computer should automatically log in as you have a blank password on the local Administrator account.

How to Factory Reset Windows 10 from Settings App

July 20th, 2018 by Admin

If your Windows 10 computer starts to run slow or crash frequently, an easy solution is to simply reset your PC to factory default that will quite often solve the issue. This tutorial will walk you through all the steps necessary to perform a factory reset of Windows 10 from the Settings app.

How to Factory Reset Windows 10 from Settings App

Press the Windows + I keys to launch the Settings app, then click Update & Security.

In the left pane, select the Recovery tab. In the right pane, click Get started under the “Reset this PC” heading.

You’ll see a blue dialog box that gives you two choices:

  • Keep my files – This option will remove all apps and settings but keep your personal files intact.
  • Remove everything – This option will format / erase your hard drive so you’ll lose all files and apps.

Keep My Files

If you’ve chosen the “Keep my files” option, it will not only remove all your apps installed from Windows Store, but also uninstall the programs shown on the screen. Click Next to confirm.

The final step is to click on Reset. Your PC will then reboot automatically and begin the factory reset process.

Remove Everything

If you’ve chosen the “Remove everything” option, the next screen will let you choose to remove everything from the drive where Windows is installed, or all drives connected to your PC.

After choosing the drive, you will be asked to “Just remove my files” or “Remove files and clean the drive“. The second option will securely erase your drives and make your files unrecoverable, and it’s a good option if you plan to sell or give away your PC. If you keep the computer, choose the first option for speed.

This is your last chance before your computer is wiped. Click on Reset and Windows will then restart and begin the factory reset process immediately.

That’s it!

Easy Ways to Open Calculator in Windows 10

July 19th, 2018 by Admin

How can I create a keyboard shortcut to open the Calculator? Calculator is the built-in app included in all versions of Windows, which lets you quickly calculate the numeric value of expressions. There are many easy ways to open Calculator in Windows 10 — use the Start menu, Cortana, Command Prompt, keyboard shortcut, or pin Calculator to the taskbar.

Method 1: Open Calculator via Run or Command Prompt

Press the Windows key + R together to open the Run box, type calc and hit Enter. The Calculator app will run immediately.

You can also open Calculator by executing the calc command in a Command Prompt window.

Method 2: Open Calculator via Start Menu

Click the Start button. Scroll down to the “C” section in the All Apps list, and you can then access the Calculator program.

In Windows 7 or earlier versions, you can find the Calculator program under the the Accessories folder on the Start menu.

Method 3: Open Calculator via Cortana Search

Click the Cortana Search box in the taskbar, type calc and you can open Calculator from the search result.

If Calculator is one of the most frequently used apps, you can right-click on it and pin it to the Start Screen or the taskbar.

Method 4: Create a Desktop Shortcut to Open Calculator

  1. Right-click any empty space on your desktop and then select New -> Shortcut.

  2. Paste the following into the location box an click Next.
    %WinDir%\System32\calc.exe

  3. Give a name for the Calculator shortcut, and click Finish.

  4. From now on, you can use the newly-created desktop shortcut to open Calculator.

Method 5: Create a Keyboard Shortcut to Open Calculator

Before getting started, make sure you have created a desktop shortcut for Calculator using the Method 4 above.

  1. Right-click the Calculator shortcut on your desktop, and then select Properties.

  2. A Properties window will open. Under the Shortcut tab, click the textbox next to Shortcut key and then tap ‘C‘ on your keyboard. The new shortcut will appear as Ctrl + Alt + C. Click Apply and then OK.

  3. Now, you can press the Ctrl + Alt + C keyboard combination to quickly open Calculator in Windows 10.

4 Ways to Make Your Program Always Run as Administrator

July 18th, 2018 by Admin

Could I force a program to always run as an administrator? Is it possible to automatically open a batch file as admin when you double-click on it? Many old programs need to be run as administrator in order to function properly on Windows 10 / 8 / 7. In this tutorial we’ll show you 4 methods to make your program always run as administrator by default.

Method 1: Always Run as Administrator from Program Shortcut

  1. Right-click on the shortcut of your program, and then select Properties from the context menu.
  2. In the Properties window, select the Shortcut tab, and click on the Advanced button.

  3. Check the box next to Run as administrator and click OK.

  4. Every time you double-click the shortcut it will always run your program as administrator by default.

Method 2: Always Run as Administrator in Compatibility Mode

  1. Right-click on your application or its shortcut, and then select Properties in the context menu.
  2. Under the Compatibility tab, check the “Run this program as an administrator” box and click OK.

  3. From now on, double-click on your application or shortcut and it should automatically run as administrator.

Method 3: Always Run as Administrator Using Registry Hack

  1. Open the Registry Editor and browse to the following key:
    HKEY_CURRENT_USER\Software\Microsoft\Windows NT\CurrentVersion\AppCompatFlags\Layers

    Right-click blank area in the right pane, and then select New -> String Value.

  2. Rename the String value to the full path of the program you want to always run as administrator, and then double-click it to modify.

  3. Type ~ RUNASADMIN in the “Value data” field and click OK.

  4. Close Registry Editor. The program will now open in administrator mode when you double-click it.

Method 4: Create a Batch to Always Run Program as Administrator

  1. Open Notepad (or your favorite text editor), copy and paste the following batch script:
    @echo off :: BatchGotAdmin :------------------------------------- REM --> Check for permissions >nul 2>&1 "%SYSTEMROOT%\system32\cacls.exe" "%SYSTEMROOT%\system32\config\system" REM --> If error flag set, we do not have admin. if '%errorlevel%' NEQ '0' ( echo Requesting administrative privileges... goto UACPrompt ) else ( goto gotAdmin ) :UACPrompt echo Set UAC = CreateObject^("Shell.Application"^) > "%temp%\getadmin.vbs" set params = %*:"="" echo UAC.ShellExecute "C:\Program Files (x86)\Top Password\ISO2Disc.exe", "", "", "runas", 1 >> "%temp%\getadmin.vbs" "%temp%\getadmin.vbs" del "%temp%\getadmin.vbs" exit /B :gotAdmin pushd "%CD%" CD /D "%~dp0" :--------------------------------------

    The above script will make the ISO2Disc utility to always run as administrator. You need to replace the full path of ISO2Disc with your desired application.

  2. Next, save the file by clicking File -> Save. Give it any name you like, but replace the default .txt file extension with the .bat extension.

  3. Now, double-click the batch file and it will then launch your program as administrator.

Disable Internet Explorer Enhanced Security Configuration in Windows Server 2016 / 2012

July 17th, 2018 by Admin

Internet Explorer Enhanced Security Configuration (IE ESC) is enabled by default, which can secure Windows Server against browser-based attacks. However, when you visit a website you trust, you’ll get security warning all the time that asks you to add every new URL to the IE trusted sites zone.

This feature can drive me insane. In this tutorial we’ll show you how to disable Internet Explorer Enhanced Security Configuration (IE ESC) in Windows Server 2016 / 2012.

How to Disable Internet Explorer Enhanced Security Configuration?

  1. Click the Start Button and launch Server Manager.

  2. In the Server Manager dashboard, click on Local Server on the left side. In the right pane, click the On link next to IE Enhanced Security Configuration.

  3. Select Off for both Administrators and Users, and click OK.

  4. Restart your Internet Explorer and you can now visit all websites without being prompted to add them to IE trusted sites zone.