Archive for January, 2022

Fast Ways to Open Command Prompt in Windows 11

January 28th, 2022 by Admin

Windows 11 brings Windows Terminal to the forefront and you may find that it’s not easy to access the classic Command Prompt. If you get accustomed to using Command Prompt, here are the fastest ways to open Command Prompt in Windows 11.

Method 1: Open Command Prompt in Windows 11 via Run

Press the Windows key + R together on your keyboard to open the Run dialog box. Type cmd and press ENTER to launch a regular Command Prompt window.

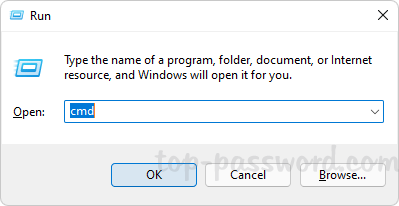
or type cmd, and then press CTRL + SHIFT + ENTER keyboard shortcut to open an elevated Command Prompt.

Method 2: Open Command Prompt in Windows 11 via Search

Click the Search button in the taskbar. Type cmd in the search box at the top. The Command Prompt app will appear under Best Match section.

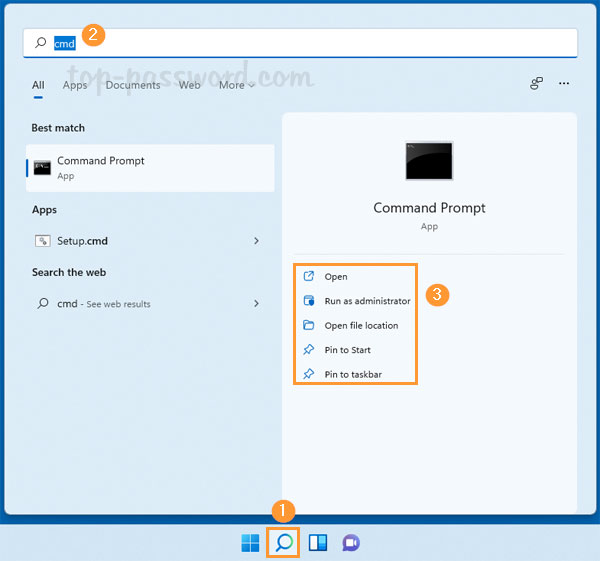
You can click Open or “Run as administrator” to launch a Command Prompt window, or pin it to the Start menu or taskbar for quick access.

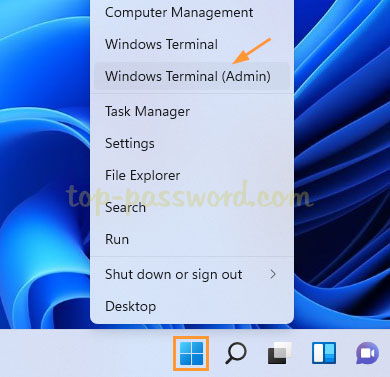
Method 3: Open Command Prompt in Windows 11 via Start

Right-click the Start button in the taskbar and choose Windows Terminal. If you’re going to open Command Prompt as administrator, click the “Windows Terminal (Admin)” option instead.

When the Terminal app opens, click on the down-facing arrow in the title bar and select “Command Prompt“.

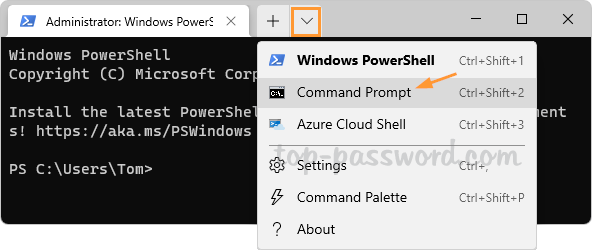
It will open the Command Prompt immediately.

Method 4: Open Command Prompt in Windows 11 via Task Manager

Open Task Manager. Click the File menu and select “Run new task“.

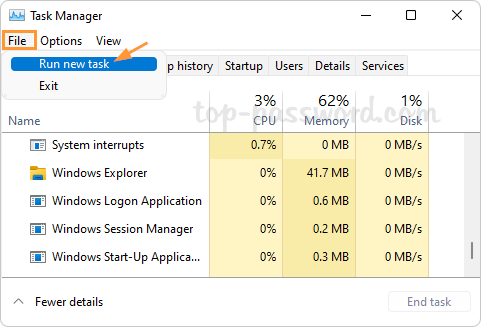
Type cmd in the Open box, tick the “Create this task with administrative privileges” option if you want to open an elevated Command Prompt.

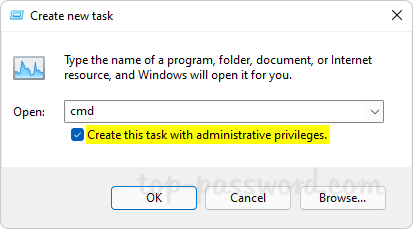
Once you click OK, the Command Prompt will immediately open up.

Step-by-Step Tutorial to Enable DNS over HTTPS in Windows 11

January 25th, 2022 by Admin

Windows 11 comes with built-in support for DNS over HTTPS (DoH), which lets you encrypt all DNS requests between your PC and the DNS server to improve your online privacy and security. In this tutorial we’ll walk you through the steps to enable DNS over HTTPS for all programs (including browsers) on your Windows 11 computer.

How to Enable DNS over HTTPS in Windows 11

  1. Press the Windows key + I to open the Settings app. Choose “Network & internet” from the sidebar. On the right side, click on “Advanced network settings“.

  2. You’ll see a list of installed network adapters. Click on Wi-Fi or Ethernet to expand the settings, depending on your active internet connection.

  3. Click on the “View additional properties” link.

  4. click on Edit next to “DNS server assignment”.

  5. In the window that pops up, make sure the “Edit DNS settings” drop-down list is set to Manual. Turn on IPv4 and enter the primary and secondary DNS server addresses which support DoH. Select the “Encrypted only (DNS over HTTPS)” option for both DNS servers.

    Here are the public DNS servers which support DoH:

    Google
    IPv4: 8.8.8.8, 8.8.4.4      
    IPv6: 2001:4860:4860::8888, 2001:4860:4860::8844
    
    Cloudflare
    IPv4: 1.1.1.1, 1.0.0.1      
    IPv6: 2606:4700:4700::1111, 2606:4700:4700::1001
    
    Quad9
    IPv4: 9.9.9.9, 149.112.112.112     
    IPv6: 2620:fe::fe, 2620:fe::fe:9
  6. After clicking Save, Windows 11 will automatically start encrypting DNS requests for all your programs and web browsers.

2 Methods to Hide “Pin to taskbar” from Context Menu in Windows 11

January 21st, 2022 by Admin

Is it possible to hide “Pin to taskbar” or “Unpin from taskbar” context menu for programs or apps? If you don’t allow users to remove pinned apps from the taskbar or pin new programs to the taskbar, here are 2 simple methods to disable or hide “Pin to taskbar” option from right-click context menu in Windows 11.

Method 1: Hide “Pin to taskbar” from Context Menu Using Group Policy

  1. Open Local Group Policy Editor and expand to: User Configuration -> Administrative Templates -> and Start Menu and Taskbar. Double-click the “Do not allow pinning programs to the Taskbar” policy on the right pane.

  2. Select the Enabled option. Click Apply and then OK.

  3. Sign out of your account or restart your computer. You’ll find the “Pin to taskbar” option is already removed from right-click context menu. When you right-click any pinned apps on the taskbar, the “Unpin from taskbar” option will not show up any more.

Method 2: Hide “Pin to taskbar” from Context Menu Using Group Policy

  1. Open Registry Editor and browse to HKEY_CURRENT_USER\Software\Policies\Microsoft\Windows in the left pane. Right-click the Windows key and select New -> Key.

  2. Name the new key as Explorer, and click to select it. On the right pane, right-click any blank area and choose New -> DWORD (32-bit) Value.

  3. Name the new DWORD as NoPinningToTaskbar. Next, double-click it and change its value data to 1. Click OK. This will hide “Pin to taskbar” and “Unpin from taskbar” context menu for apps in Windows 11.

    Whenever you need to restore the missing “Pin to taskbar” option or revert back to the previous settings, just delete the DWORD “NoPinningToTaskbar” and you’re done.

  4. Close Registry Editor. Log out and log back in again to make these changes take effect.

How to Disable or Enable Memory Compression in Windows 11 / 10

January 18th, 2022 by Admin

Memory compression is a new feature introduced in Windows 10, which can store more data in your RAM than it otherwise could, by storing part of the memory pages in RAM in a compressed form. For example, if your applications need to store 4 GB of data in the RAM at the same time, Windows might have 3 GB of uncompressed data and 0.5 GB of compressed data that actually takes up 1 GB in RAM.

With memory compression, Windows can compress a fraction of the memory in order to reduce page swap out. This is very useful when your PC doesn’t have enough physical memory. In this tutorial we’ll show you how to disable or enable memory compression in Windows 11 / 10.

Part 1: Check if Memory Compression is Enabled

Open up Task Manager. Go to the Performance tab and select Memory on the left sidebar. You will see how much memory is compressed under the “In use (Compressed)” section. As you can see in the following screenshot, 2.3 GB of memory is in use, and of that 80.9 MB is compressed.

If the compressed memory is shown as 0 MB, it’s likely that the memory compression feature is disabled on your system.

Part 2: Disable or Enable Memory Compression

  1. Right-click on the Start button in the taskbar and select Windows Terminal (Admin). If you’re running Windows 10, open Windows PowerShell as administrator.

  2. Then run the Disable-MMAgent -mc command to disable memory compression, and afterwards execute the command Get-MMagent to check if memory compression is disabled successfully.

  3. If you need to turn on or enable memory compression, enter this command and press Enter.
    Enable-MMAgent -mc

  4. Reboot your computer to apply the changes. The next time you log in to your system, you can launch Task Manager and check if memory compression is running or not.

2 Methods to Disable Windows Insider Program Settings in Windows 11

January 16th, 2022 by Admin

How can I prevent other users from joining or leaving the Windows Insider Program? As a system administrator, you may need to prevent users from getting Insider Preview builds on a shared computer. In this tutorial we’ll show you 2 methods to disable Windows Insider Program settings in Windows 11.

Method 1: Disable Windows Insider Program Settings Using Group Policy

  1. Open the Local Group Policy Editor and browse to: Computer Configuration -> Administrative Templates -> Windows Components -> Data Collection and Preview Builds. On the right pane, find a policy named “Toggle user control over Insider builds” and then double-click it to modify.

  2. Select the Disabled option, click Apply and then OK.

  3. Restart your computer. The next time you open the Settings app and navigate to: Windows Update -> Windows Insider Program, you’ll find that most settings are no longer available to users.

Method 2: Disable Windows Insider Program Settings Using Registry Editor

  1. Open Registry Editor and navigate to: HKEY_LOCAL_MACHINE\SOFTWARE\Policies\Microsoft\Windows. Right-click on the Windows key in the left pane, and select New -> Key.

  2. Name the new key as PreviewBuilds, and then right-click it and select New -> DWORD (32-bit) Value.

  3. Name the DWORD as AllowBuildPreview. Leave its value data as 0.

    Whenever you need to enable Windows Insider Program settings again, just set the value data of AllowBuildPreview to 1 or delete AllowBuildPreview.

  4. Close Registry Editor and reboot your system to apply the changes.

How to Use the Microsoft Remote Desktop App to Access Remote PC

January 11th, 2022 by Admin

When you need to access a remote Windows computer, the first tool that comes to mind should be the built-in Terminal Services Client (mstsc.exe).

Starting with Windows 10, you can download a modern app called “Microsoft Remote Desktop” which allows you to connect to a remote Windows PC from Mac, PC, your iPhone or Android device. In this tutorial we’ll walk you through the steps of using the Microsoft Remote Desktop app to access your remote Windows PC.

How to Use the Microsoft Remote Desktop App to Access Remote PC

Before getting started, make sure you’ve turned on the Remote Desktop feature on your remote computer. So you can then start a remote connection from your local PC using the Microsoft Remote Desktop app.

  1. Download the Microsoft Remote Desktop app from Microsoft Store, Apple’s App Store or Microsoft’s official website, and then install it on your local device.
  2. Open the Remote Desktop app, click the Add button in the top-right corner, and then choose the “PCs” option from the pop-up menu.

  3. Enter the IP address of the remote computer you want to connect to, and click on Save.

    If you would like to save the login credentials, click the plus (+) icon next to the “User account” field. It will let you enter the username and password that you use to connect to the remote computer.

  4. Under the “Saved Desktops” section, click the icon for the remote PC to start a remote desktop connection.

  5. You’ll be prompted to enter your username and password if your login credentials are not saved by the Remote Desktop app.

  6. Tick the “Don’t ask about this certificate again” checkbox and click on “Connect anyway“.

  7. You’re now connected to the remote PC. The magnifier icon at the top-middle toolbar lets you zoom in and out, while the three-dotted button allows you to terminate the session, or switch between full screen and window mode.

That’s it!

How to Enable Remote Desktop on Windows 11

January 10th, 2022 by Admin

Remote Desktop Connection is a built-in feature that comes with Windows 11 Professional and Windows 11 Enterprise, which lets you remotely connect to your PC from another device. In this tutorial we’ll walk you through the steps of turning on Remote Desktop on Windows 11.

How to Enable Remote Desktop on Windows 11

  1. To begin, press the Windows key + I on your keyboard to launch the Settings app. Choose System on the left and click Remote Desktop on the right-hand pane.

  2. Turn on the Remote Desktop toggle switch.

  3. You will then receive a confirmation pop-up. Click Confirm to proceed.

  4. Next, click the arrow icon next to the toggle switch. Tick the checkbox “Require devices to use Network Level Authentication Connect (Recommended)” which adds security to remote desktop connection. However, if you need to connect to this PC from an older version of Windows which doesn’t support Network Level Authentication, like Windows XP or Vista, you have to uncheck this option.

  5. By default, all user accounts in the Administrators group can remotely access this PC. If you want to grant remote access to non-administrative users, click the “Remote Desktop users” option. When the Remote Desktop Users dialog box appears, you can click the Add button to add other user accounts.

  6. Now you’ve successfully turned on Remote Desktop. Windows 11 will automatically open the RDP port and allow Remote Desktop through firewall. Additionally, you can also enable Remote Desktop using Command Prompt, PowerShell or a registry tweak.

3 Ways to Turn on / off Toggle Keys Sound in Windows 11

January 6th, 2022 by Admin

How can I mute the beeping sound on Caps Lock, Num Lock or Scroll Lock keys? The Num Lock, Caps Lock and Scroll Lock keys are toggle keys which are used to switch between two functions. After turning on Toggle Keys feature, you will hear a sound every time a toggle key is pressed. In this tutorial we’ll show you 3 simple methods to turn on or off toggle keys sound in Windows 11.

Method 1: Turn on / off Toggle Keys Sound via Settings App

Press Windows logo key + I on the keyboard to open Settings. Select the Accessibility tab from the left-hand pane, then click Keyboard on the right.

You can then click the toggle button to turn on or off the Toggle keys feature.

Method 2: Turn on / off Toggle Keys Sound via Control Panel

Open the Control Panel in Large icons view, and click on Ease of Access Center.

Click the “Make the keyboard easier to use” link.

Scroll down to the “Make it easier to type” section, you can check or uncheck the “Turn on Toggle Keys” option to enable or disable toggle keys sound. Click OK to save your changes.

Method 3: Turn on / off Toggle Keys Sound via Registry Editor

Open Registry Editor and navigate to: HKEY_CURRENT_USER\Control Panel\Accessibility\ToggleKeys. Double-click on the string Flags on the right pane.

Enter 63 in the Value data box if you want to turn on Toggle Keys feature, or enter 62 for disabling toggle keys sound. Click OK.

Close Registry Editor. The changes will take effect on the next login, and you can then check if Windows will play a sound when you press Caps Lock, Num Lock, or Scroll Lock.

2 Methods to Switch from Light Mode to Dark Mode in Windows 11

January 4th, 2022 by Admin

Light mode is activated by default on Windows 11. If you need to work continuously in a low-light environment, then switching to dark mode can help you read better and keep your eyes healthy. In this tutorial we’ll show you 2 methods to switch from light mode to dark mode in Windows 11.

Method 1: Switch to Dark Mode in Windows 11 via Settings App

  1. Press the Windows key + I together to launch the Settings app. Select the “Personalization” tab from the left sidebar, and then click Colors on the right pane.

  2. You can switch to dark mode by selecting Dark from the “Choose your mode” drop-down menu.

    If you choose the Custom option, it will let you separately configure light or dark mode for apps (including File Explorer, Settings app) and windows background (taskbar).

Method 2: Switch to Dark Mode in Windows 11 via Registry Editor

  1. Open Registry Editor and navigate to: HKEY_CURRENT_USER\Software\Microsoft\Windows\CurrentVersion\Themes\Personalize. On the right pane, you need to edit the DWORD value for both AppsUseLightTheme and SystemUsesLightTheme. If they are not present, you need to create them first.

  2. To turn on dark mode completely, just change the value data of both AppsUseLightTheme and SystemUsesLightTheme to 1.

    When you need to use light mode again, just set their value data to 0. The DWORD AppsUseLightTheme is used for configuring your default Windows mode, while SystemUsesLightTheme is for configuring your default app mode.

  3. Close Registry Editor. Log off your account or restart Windows 11 to apply your changes.

Conclusion

That’s how you can easily turn on dark mode for all apps and Windows taskbar on the entire system level. You can also switch to dark mode by applying a dark theme. More and more apps will allow you to customize the dark mode from within the app itself.