Archive for August, 2022

3 Quick Ways to Turn on or off Wi-Fi in Windows 11

August 31st, 2022 by Admin

What can I do to turn Wi-Fi completely off on my Lenovo laptop? Look for an easy way to disable the Wi-Fi to save power? In this tutorial we’ll show you 3 quick methods to turn on or off Wi-Fi in Windows 11.

Method 1: Turn on or off Wi-Fi via Settings App

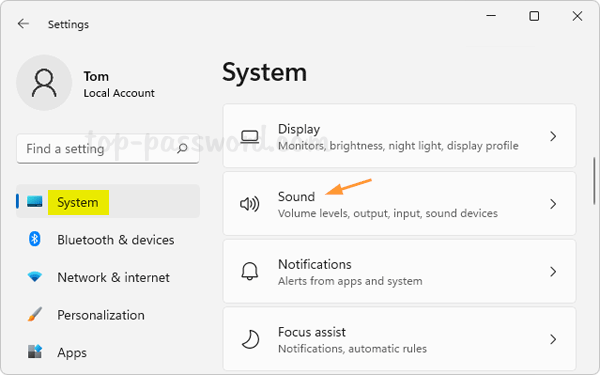
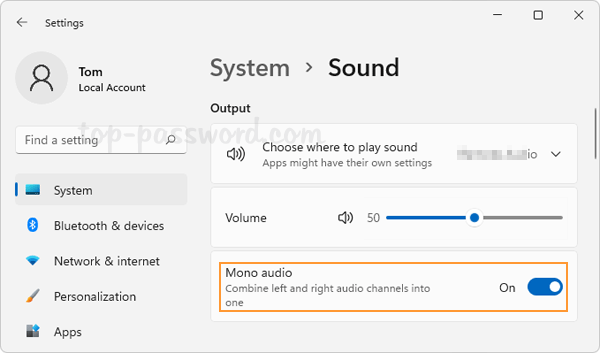
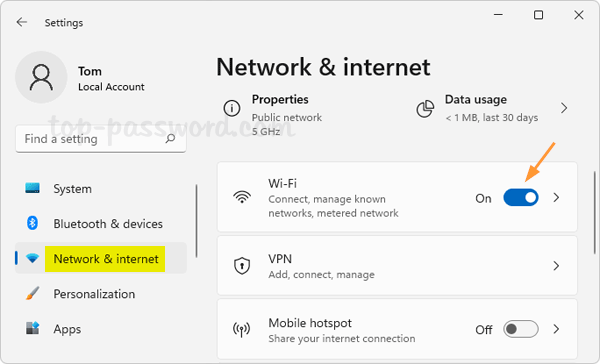
Press the Windows key + I keyboard shortcut to open the Settings app. Click the Network & internet category on the left side. On the right pane, you can turn on or off the Wi-Fi toggle switch.

Method 2: Turn on or off Wi-Fi via Quick Settings

In order to open the Quick Settings pane, press the Windows key + A keyboard shortcut or click the the network, volume or battery icon in the system tray.

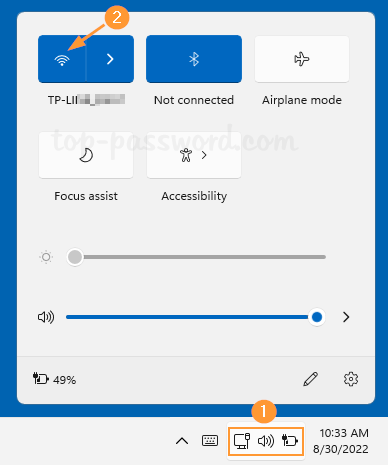
You can then click the Wi-Fi icon to enable or disable Wi-Fi connections.

Method 3: Turn on or off Wi-Fi via Registry Editor

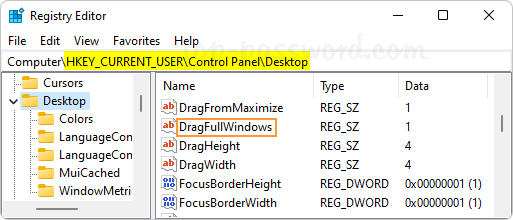
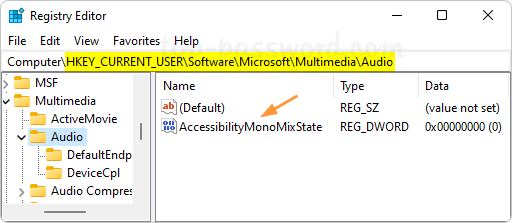
  1. Open Registry Editor. Copy-paste the following location in the address bar of the Registry Editor and press Enter.

    HKEY_LOCAL_MACHINE\SOFTWARE\Microsoft\PolicyManager\default\Wifi\AllowWiFi

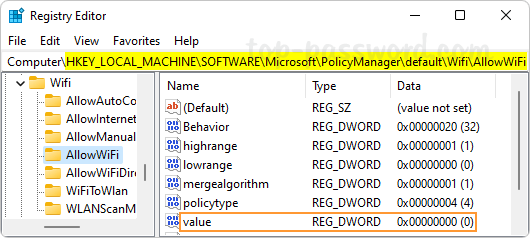
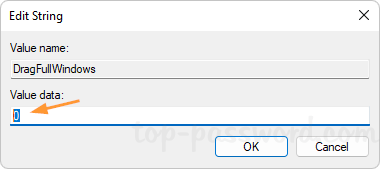
  2. On the right pane, double-click the “value” entry and change its value data to 1 for turning on Wi-Fi, or set the data to 0 for disabling Wi-Fi.

  3. Close Registry Editor and reboot the system to apply the changes.

That’s it!

How to Disable Show Window Contents while Dragging in Windows 11 / 10

August 22nd, 2022 by Admin

How can I make Windows 11 not show the contents of a window while I move it around on the screen? Is there a weird window dragging lag on your PC? By default, Windows will show the full contents of the window when you drag it. In order to reduce CPU/GPU usage, you can configure Windows to show only the frame (a rectangle) while dragging a window.

In this tutorial we’ll show you 2 methods to disable show window contents while dragging in Windows 11 / 10.

Method 1: Disable Show Window Contents while Dragging in Visual Effects

  1. Press the Windows key and R to bring up the Run box, type sysdm.cpl and hit Enter to open the System Properties dialog.

  2. Choose the Advanced tab, and then click the Settings button under the Performance section.

  3. Uncheck the “Show window contents while dragging” option and click OK. Note that this change applies to your current Windows account only.

Method 2: Use Registry Editor to Disable Show Window Contents while Dragging

  1. Open Registry Editor and navigate to: HKEY_CURRENT_USER\Control Panel\Desktop. In the right pane, double-click the string DragFullWindows.

  2. Set its value to 1 to enable “Show window contents while dragging”. A value data of 0 will disable it.

  3. Close Registry Editor. Reboot your computer to make the change take effect.

That’s it!

2 Easy Methods to Enable Mono Audio on Windows 11

August 21st, 2022 by Admin

I prefer some games with mono audio but I don’t see an option anywhere for it? How can I activate mono if one side of your earphones is broken? Windows users can turn on mono audio so that you can hear both the left and right audio tracks through one ear. In this tutorial we’ll show you 2 easy methods to enable mono audio on Windows 11.

Method 1: Enable Mono Audio on Windows 11 Using Settings App

  1. Open the Settings app and click System on the left sidebar. On the right pane, click Sound.

  2. Click the Mono audio toggle switch to turn on mono audio.

    Additionally, you can also enable mono audio by opening the Settings app and navigate to: Accessibility -> Audio.

Method 2: Enable Mono Audio on Windows 11 Using Registry Editor

  1. Open Registry Editor and navigate to the following location, then double-click the DWORD AccessibilityMonoMixState on the right pane.
    HKEY_CURRENT_USER\Software\Microsoft\Multimedia\Audio

  2. Change its value data to 1 for turning on mono audio.

    If you later want to disable mono audio and play stereo audio again, just return here and set the value data back to 0.

  3. Close Registry Editor and restart your PC to apply the changes.

That’s it!

How to Mount a Folder as Virtual Drive in Windows 11 / 10

August 16th, 2022 by Admin

Is it possible to mount a directory as a drive in Windows 11? You can use the built-in command subst in Windows to mount any folder as a drive, so you can access the contents of that folder from either the original location or your virtual drive. In this tutorial we’ll show you how to mount a folder as virtual drive in Windows 11 / 10, without using third-party software.

How to Mount a Folder as Virtual Drive in Windows 11 / 10

  1. Right-click the blank area of desktop and choose New -> Shortcut.

  2. In the location box, enter the following command. Replace folder_location with the full path of the folder which you would like to mount and Z: with the letter of the virtual drive.
    subst Z: "folder_location"

  3. Type the shortcut name of your choice, and click Finish.

  4. Double-click the newly-created desktop shortcut, and a virtual drive will appear in File Explorer.

Dismount the Virtual Drive

When you log off your user account or restart the computer, the virtual drive will dismount automatically. The next time you sign into Windows, the virtual drive will not show up and you need to double-click the desktop shortcut you created earlier to mount the folder as a virtual drive.

If you need to dismount the virtual drive immediately, follow these steps:

  1. Right-click the Start button in the taskbar and select Windows Terminal.

  2. Execute the following command. Replace Z: with the letter of your virtual drive.
    subst Z: /d

    Note: If you open Windows Terminal as administrator, you’ll get the error message “Invalid parameter” when you run the above command.

That’s it!

4 Steps to Embed Fonts in a Microsoft Word Document

August 10th, 2022 by Admin

Microsoft Word allows you to embed fonts in a Word document, so the recipient can view and print your document on another PC that doesn’t have the font installed. In this tutorial we’ll walk you through the steps to embed your fonts in a Microsoft Word document on Windows 11 / 10.

4 Steps to Embed Fonts in a Microsoft Word Document

  1. When working with your document in Microsoft Word, click the File menu in the upper left corner.

  2. Click Options at the bottom of the left column.

  3. When the Word Options dialog box opens, choose the Save tab in the left pane. Under Preserve fidelity when sharing this document, check the “Embed fonts in the file” option. Click OK.

  4. Save your document as normal, the fonts used in the document will be automatically embedded in the file and the file size will increase subsequently.

That’s it!

2 Methods to Reverse Print a Word Document on Windows 11 / 10

August 5th, 2022 by Admin

Your printer always prints a document from the first page instead of from the last page? How can I print Word document pages in reverse order? If you’re using Microsoft Word to print a word document, here’s 2 simple methods to print pages in reverse order on Windows 11 / 10.

Method 1: Temporarily Print Word Document in Reverse Order

  1. When you’re using Microsoft Word, click the File menu in the Ribbon. Next, click the Print tab on the left.
  2. The printing settings will appear on the right side. Simply click the Pages text box and enter your desired page range in reverse order. For example, if want to print pages 1 to 5 of a Word document, enter “5-1” as below

  3. To begin printing, click the Print button at the top.

Method 2: Always Print Word Document in Reverse Order

  1. Open Microsoft Word, click the File menu in the Ribbon. Next, click the Options tab on the left side.

  2. The Word Options dialog box will appear. Choose the Advanced tab on the left side. Scroll down the right side until you see the Print section. Check the Print pages in reverse order option and click OK.

  3. From now on, Microsoft Word will always print all your documents in reverse order by default.

That’s it!

2 Methods to Start Microsoft Edge in Full Screen

August 1st, 2022 by Admin

Any way to start up Microsoft Edge always in full screen mode? In Windows 11, you can use Microsoft Edge in full-screen mode, hiding the toolbars, URL address and status bar together. In this tutorial we’ll show you 2 simple methods to start Microsoft Edge in full screen on Windows 11

Method 1: Start Microsoft Edge in Full Screen via three-dot Menu

  1. Once Microsoft Edge is open, click the three-dot icon in the top right corner. When the drop-down menu appears, click the “Full Screen” button which is at the right of the Zoom option.

  2. It will activate a full-screen browsing experience. To exit full screen mode, move your mouse near top of the screen or simply press F11.

Method 2: Start Microsoft Edge in Full Screen with Kiosk

If you want to make Microsoft Edge automatically open a web page in full-screen, kiosk mode can be of help. Follow these steps:

  1. Right-click the Microsoft Edge shortcut on your desktop, and then select Properties from the context menu.
  2. Under the Shortcut tab, append the following string to the end of the Target text box. Replace www.top-password.com with the URL of the website you want to open.
    --kiosk www.top-password.com --edge-kiosk-type=fullscreen

  3. Click OK. The next time you double-click the Microsoft Edge shortcut and it will always start Microsoft Edge in full screen by default. To exit kiosk mode at any time, press Ctrl + Alt + Delete.

Another way of launching Microsoft Edge in kiosk mode is to press the WIN + R keys together, then run the following command:
msedge.exe --kiosk www.top-password.com --edge-kiosk-type=fullscreen

That’s it!