Archive for June, 2021

How to Update BIOS / UEFI from Windows on Your DELL Computer

June 28th, 2021 by Admin

Experience any compatibility problem with your BIOS? How can I update UEFI firmware to fix security vulnerabilities? In this tutorial we’ll walk you through the steps of updating BIOS/UEFI from Windows 10 / 8 / 7 on your DELL computer.

How to Update BIOS / UEFI from Windows on Your DELL Computer

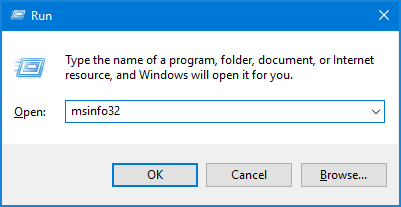
  1. Before getting started, you can check BIOS version on your current system. Press the WIN + R keys together to open the Run box, then type msinfo32 and hit Enter.

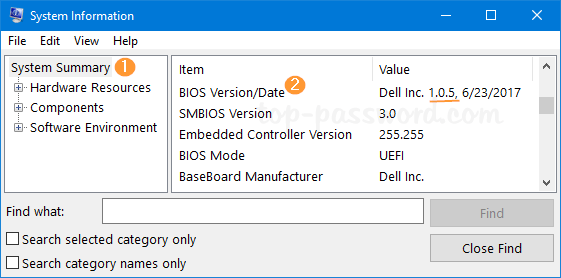
    When the System Information tool opens, select the System Summary tab in the left navigation window. Look for BIOS Version/Date in the right window. In my case, the current BIOS version is 1.05.

  2. Open up your Web browser and access the Dell Drivers & downloads page. Enter the service tag of your DELL computer and click on Search.

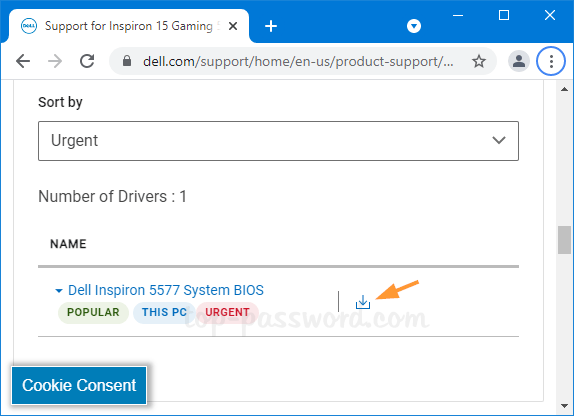
  3. In the pull-down Category menu, choose BIOS. Click the download link next to the most recent BIOS update.

  4. You will notice that the download is a Windows executable. Double-click it to run as administrator. If there is no other program interfaces with the BIOS update progress, click OK.

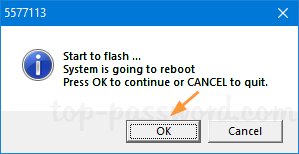
  5. Click OK to proceed. The system will reboot and start to flash your BIOS. It will take you a minute or less to complete.

  6. After successfully updating BIOS, you can log back into your Windows account and check if the BIOS version is updated.

That’s it!

3 Ways to Remove or Disable News and Interests in Windows 10 Taskbar

June 23rd, 2021 by Admin

Starting with Windows 10 version 20H1, Microsoft has added a new button on the right side of the taskbar, which shows the weather and news for your area.

If don’t like this feature or want to save internet bandwidth, here are 3 ways to remove, hide or completely disable the “News and Interests” button in Windows 10 taskbar.

Method 1: Remove or Hide the News and Interests Button via Windows 10 Taskbar

Right-click any blank area in the taskbar and then select News and interests -> Turn off.

The “News and Interests” button will no longer appear on your taskbar.

Method 2: Remove or Hide the News and Interests Button via Registry Editor

Open Registry Editor and navigate to: HKEY_CURRENT_USER\Software\Microsoft\Windows\CurrentVersion\Feeds. On the right side, double-click on ShellFeedsTaskbarViewMode to modify the value data.

Enter 2 in the Value data box and click OK.

  • 0 = Show icon and text
  • 1 = Show only icon
  • 2 = Hide everything

Close Registry Editor. Log off and then log back in, and the “News and Interests” button will gone.

Method 3: Disable or Turn off News and Interests via Group Policy

Open Local Group Policy Editor and browse to: Computer Configuration -> Administrative Templates -> Windows Components -> News and interests. On the right pane, double-click on the “Enable news and interests on the taskbar” policy.

Choose the Disabled option. Click Apply and then OK.

Now you’ve completely turned off News and Interests in Windows 10. Close Local Group Policy Editor and restart your computer.

2 Ways to Disable Deleting Diagnostic Data in Windows 10

June 17th, 2021 by Admin

By default, Microsoft collects diagnostic data anonymously from your Windows 10 system. Starting with Windows 10 version 1809, you can use a group policy to allow or deny the ability to delete diagnostics data. In this tutorial we’ll show you 2 ways to disable deleting diagnostic data in Windows 10.

Method 1: Disable Deleting Diagnostic Data in Windows 10 via Group Policy

Open Local Group Policy Editor and browse to: Computer Configuration -> Administrative Templates -> Windows Components -> Data Collection and Preview Builds. Next, double-click on the “Disable deleting diagnostic data” policy in the right pane.

Select the Enabled option if you want to prevent users from deleting diagnostic data. Click Apply and then OK.

If you open the Settings app and navigate to: Privacy -> Diagnostics & feedback, you’ll find the “Delete” button is greyed out.

Method 2: Disable Deleting Diagnostic Data in Windows 10 via Registry Editor

Open Registry Editor and navigate to: HKEY_LOCAL_MACHINE\SOFTWARE\Policies\Microsoft\Windows\DataCollection. In the right pane, right-click the blank area and select New -> DWORD (32-bit) Value.

Name the newly-created DWORD as DisableDeviceDelete, and then double-click it to change the value data to 1.

Close Registry Editor. Now you can check if the option of deleting diagnostic data is disabled in the “Diagnostic & feedback” Settings page.

How to Reset Forgotten WordPress Password from phpMyAdmin

June 3rd, 2021 by Admin

Forgot the admin password of your WordPress blog? If you are locked out of your WordPress dashboard and couldn’t log back in, here is a simple way to reset forgotten WordPress password from phpMyAdmin. It works with all versions of WordPress.

How to Reset Forgotten WordPress Password from phpMyAdmin

  1. Before getting started, you need to login to cPanel of your WordPress hosting account. Click on the phpMyAdmin icon under the Databases section.

  2. When the phpMyAdmin app opens, expand your WordPress database on the left side, and then click on the wp_users table.

  3. On the right side, you’ll see a list of registered users on your WordPress site. Click on the Edit button next to your WordPress admin user.

  4. Look for the user_pass row. Remove the old password hash from the Value column and then type a new password (in plain text). Select MD5 from the “Function” drop down menu.

  5. Click on the Go button to save your changes. You can then log in to your WordPress dashboard with the new password. Upon your first successful login, WordPress will use the most up-to-date method instead of MD5 to encrypt your password again, and the hashed password stored in the database will update as well.

That’s it!