Archive for February, 2021

Easy Way to Run File Explorer with Admin Rights in Windows 10

February 25th, 2021 by Admin

How can I run File Explorer elevated if I don’t want to bother with the UAC prompt? By default, Windows 10 will launch File Explorer with the least privileges. Even if you right-click on explorer.exe and select “Run as administrator“, it will not run in elevated mode any longer.

If you work in a role such as system administrator, you may need to frequently run File Explorer as admin. In this tutorial we’ll show you the easiest way to run File Explorer with admin rights in Windows 10.

How to Run File Explorer with Admin Rights in Windows 10

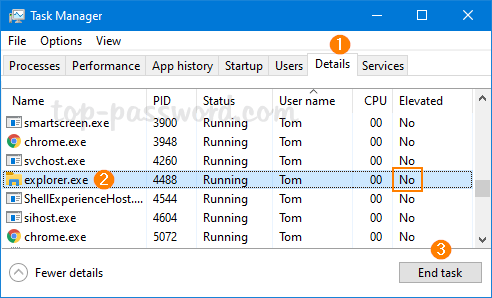
  1. Open up Task Manager and go to the Details tab. Select the explorer.exe process and click on the End task button at the bottom right corner.

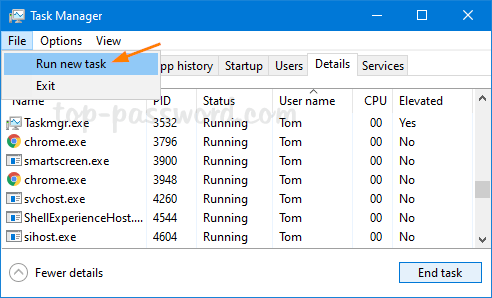
  2. Click the File menu and select Run new task.

  3. When the Create new task dialog opens, enter the following command and check the “Create this task with administrative privileges” box and click OK.
    explorer.exe /nouaccheck

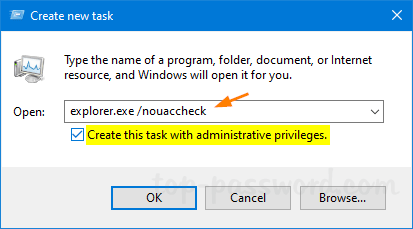
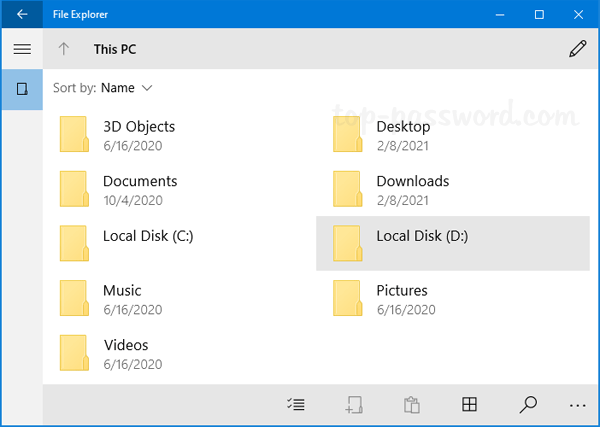
  4. It will open File Explorer with admin / elevated rights.

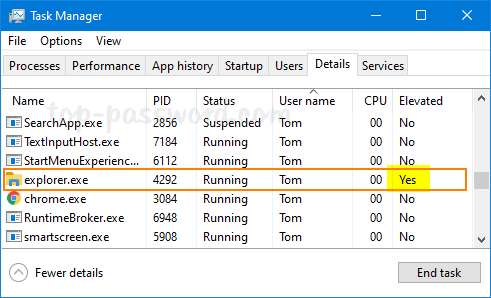
    If the Elevated column is not shown, right-click on any column header and choose “Select columns“, then check the “Elevated” option and click OK.

After File Explorer is running in the elevated mode, you can then launch other programs without UAC warning, and access system files without permission issues. For example, you can edit hosts file without getting the “You don’t have permission to save in this location” error.

Make sure you log off or restart your computer as soon as you no longer need to run File Explorer elevated. When you log back into your account, File Explorer will run in the standard mode again.

2 Methods to Clear Recent Documents in Office Word 2019 / 2016

February 22nd, 2021 by Admin

How do I clear recent files history from Office Word home page? Word keeps track of documents you’ve recently opened. When you click the Open menu, it will display a list of recently-opened documents.

You can choose to hide recent documents from the list. To do it, click the File menu and click Options at the bottom left. When the Word Options dialog opens, select the Advanced tab. On the right, scroll down to the Display section and set the “Show this number of Recent Documents” option to 0. After that, the recent documents list should be empty. However, if you revert the setting, all previously-displayed documents will be shown again.

To better protect your privacy, you should clear recent documents instead of just hiding them. In this tutorial we’ll show you 2 methods to clear recent documents or folders in Office Word 2019 / 2016.

Method 1: Clear Recent Documents or Folders from Word GUI

  1. Open Microsoft Word. Click the File menu on the top-left corner.

  2. Select the Open tab, click on Recent and then Documents. Right-click on any document in the recent list, and then choose the “Clear unpinned items” option.

  3. Click Yes to confirm.

  4. Your recent documents list will be cleared permanently. If you go to Open -> Recent -> Folders, it will display the recent folders list. You can use the similar way to clear the history as well.

Method 2: Clear Recent Documents or Folders in Word Using Registry Editor

  1. Open Registry Editor and browse to the following location. The x.0 placeholder represents the version of Word that you’re using (Word 2019/2016 = 16.0, Word 2013 = 15.0, Word 2010 = 14.0, Word 2007 = 12.0).
    HKEY_CURRENT_USER\Software\Microsoft\Office\x.0\Word\FileMRU
  2. On the right pane, select all available entries that are numbered from Item 1 to Item 50, then right-click them and select Delete. This will clear recent documents history.

  3. Next, navigate to the below location. Delete the entries named Item 1Item 50, which contains the full folder of your recently opened documents.
    HKEY_CURRENT_USER\Software\Microsoft\Office\x.0\Word\Place MRU

  4. Close Registry Editor. Now your list of recent documents and folders in Word 2019 / 2016 should be empty.

That’s it!

Steps to Insert Clickable Checkbox in Office Word 2007

February 16th, 2021 by Admin

In order to create a fillable form, you may need to add clickable check boxes. In this tutorial we’ll walk you through the steps to insert a clickable checkbox in Office Word 2007.

How to Insert Clickable Checkbox in Office Word 2007?

  1. Open up Office Word 2007. Click the Microsoft Office button in the upper left corner, and then click Word Options.

  2. Select the Popular tab. On the right side, check the “Show Developer tab in the Ribbon” and click OK.

  3. The Developer tab will now appear on the Ribbon. Under the Developer tab, click Legacy Tools button in Controls group and select the “Check Box Form Field” control.

  4. It will insert a clickable checkbox at your cursor’s location. By default, the checkbox is unchecked. To check or tick the checkbox, just double-click it.

  5. In the pop-up window, select the “Checked” option under Default value. Click OK to save your changes.

That’s it!

How to Open the New UWP-based File Explorer in Windows 10

February 9th, 2021 by Admin

Starting with the Creators update (v1703), Windows 10 includes a hidden File Explorer which is based on the UWP (Universal Windows Platform). It is a touch-optimized app which might replace the classic File Explorer in the near future. In this tutorial we’ll show you how to open the new File Explorer in Windows 10.

How to Open the New UWP-based File Explorer in Windows 10

  1. Right-click on any blank space on the desktop. Select New and then click Shortcut.

  2. Copy and paste the following command in the location box and click Next.
    explorer.exe shell:AppsFolder\c5e2524a-ea46-4f67-841f-6a9465d9d515_cw5n1h2txyewy!App

  3. Type a meaningful name for the shortcut and click on Finish.

  4. Double-click on the newly-created desktop shortcut and you can access the UWP-based new File Explorer.

  5. Compared to the classic File Explorer, the modern File Explorer includes most of basic functionality and it provides a seamless experience for touch device users.

That’s it!