Posts Tagged ‘windows 7’

How to Create a Virtual Hard Drive (VHD) in Windows 11/10/8/7

October 8th, 2012 by Admin

Have you ever wished you had an extra hard drive or partition to setup a dual-boot or multi-boot operating system? You can shrink your existing partition to create a new partition but it always carries some risk of data loss. Beginning with Windows 7, you can create a virtual hard drive (VHD) which acts as a separate hard drive in your computer.

The virtual hard drive (VHD) is stored as a .vhd or .vhdx file on your physical disk. By mounting a virtual hard drive, you can easily copy files to and from the virtual disk. Additionally, Windows 11/10/8/7 can be configured to boot from a VHD. In this tutorial we’ll go through the steps of creating a virtual hard drive (VHD) in Windows 11/10/8/7.

How to Create a Virtual Hard Drive (VHD) in Windows 11/10/8/7?

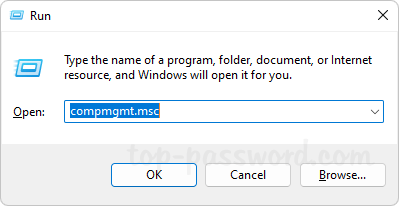
  1. Press the Windows + R key combination to bring up a Run box, type compmgmt.msc and hit Enter.

  2. The Computer Management dialog opens, click Disk Management in the left pane of the window and wait until you see all currently installed disks in the right pane.
  3. Right-click Disk Management and then select Create VHD.

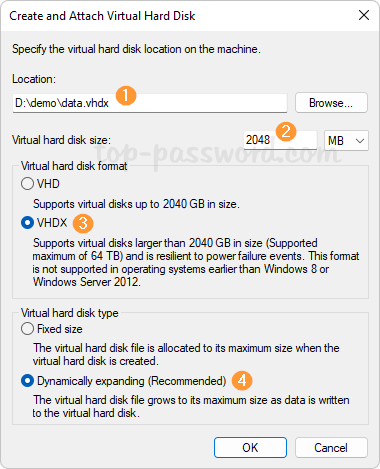
  4. Click Browse to choose the location where you want your VHD stored, and give it a descriptive name. Choose the size you want it to be, and select dynamic or a fixed. If you want the disk to expand in size as you add files to it, then pick Dynamically expanding. Check Fixed size if you want a specific size and for it to stay that way. Click OK.

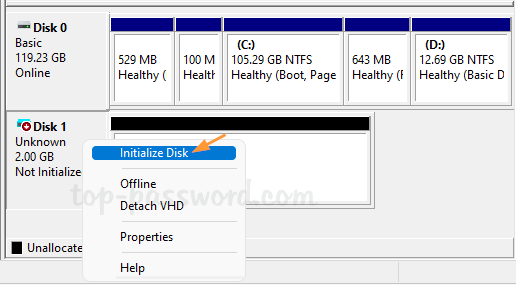
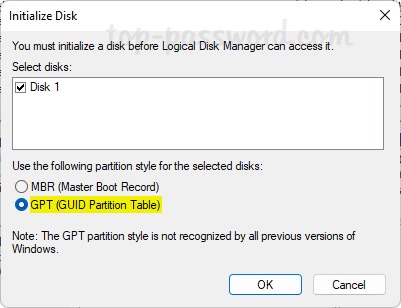
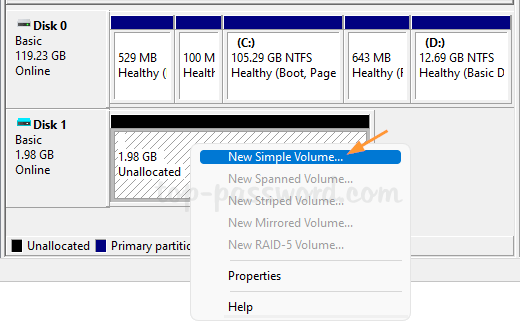
  5. You will see the virtual hard drive listed as unallocated space in Disk Management. Right click on the virtual hard drive (Disk 1) and select Initialize Disk.

  6. Press OK in the Initialize Disk box.

  7. Now it is time to create a volume by right-clicking the unallocated space and select New Simple Volume.

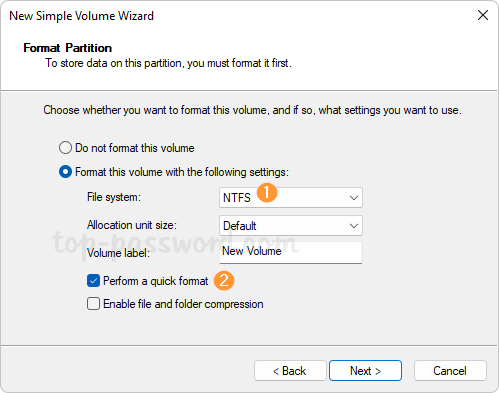
  8. The New Simple Volume Wizard starts up and just press Next until the wizard is complete.

  9. Now the new virtual disk is ready to be used, just like any other disk. You can see the virtual hard drive on your computer.

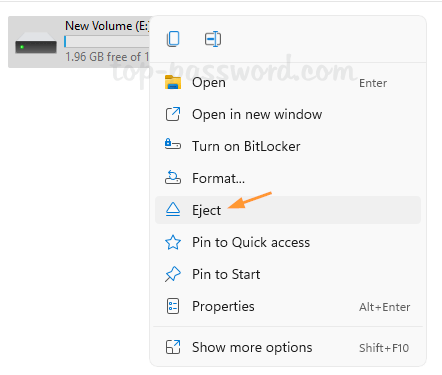
    Windows will automatically dismount the virtual hard drive after a restart. You can also manually dismount the drive by right-clicking it in File Explorer and selecting Eject.

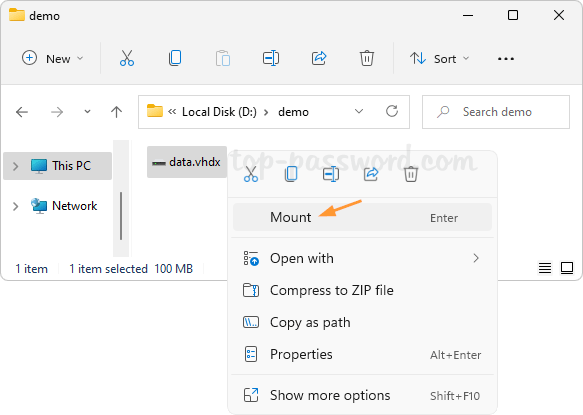
  10. Whenever you need to mount a vhd/vhdx file as a virtual hard disk, just right-click it in File Explorer and choose Mount.

How to Dual Boot Windows 8 and Windows 7

October 7th, 2012 by Admin

Want to install Windows 8 and explore the new features but don’t want to overwrite your current Windows setup? You can easily create a dual boot setup of Windows 8 along with your current Windows 7 or Vista system.

Note: Since the boot manager of Windows 7/Vista is not well compatible with Windows 8, please make sure that you install 7/Vista before installing Windows 8. If you install Windows 8 first and then install the old versions of Windows, the Windows 8 boot menu will be lost in the dual-boot menu and you won’t be able to boot into Windows 8 anymore.

How to Dual Boot Windows 8 and Windows 7?

Follow this guide to configure your Windows 7 or Vista system to dual-boot Windows 8. The whole procedure can be divided into 3 steps: Create a new partition, Install Windows 8 and optionally set default boot operating system.

Step 1: Create A New Partition

You need to create a new partition of at least 16GB ( 20GB for 64-bit Windows 8 ) for your Windows 8 installation. If there is already a free partition up to the requirement, just skip this step. Otherwise you need to shrink the existing partition to create unallocated disk space, from which you create a new partition during the installation of Windows 8.

  1. Open the Start Menu and right click on the Computer option. Click Manage, and in the window that appears, click on Disk Management in the left sidebar.
  2. Right-click the volume you want to shrink, and then click Shrink Volume.
  3. Shrink it down so you have at least 16GB of space left on the end of the drive, and click OK.

Step 2: Install Windows 8

Create a Windows 8 installation disk, boot from it and start the Windows 8 setup. Follow this step-by-step guide: How To Install Windows 8 from USB Flash Drive.

For a dual-boot setup, the steps are the same as in that guide. The only difference is that when you are asked to select where to install Windows 8, select the partition that you created and make sure you don’t select the partitions where other operating systems are installed.

Step 3: Set Default Boot Operating System

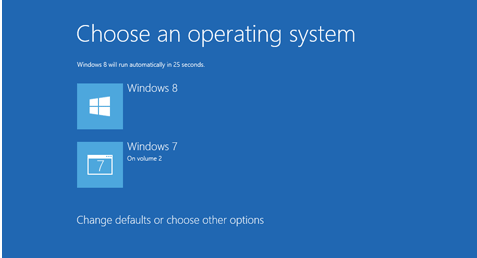
When the installation is complete, Windows Setup will reboot your system and you will then see the new Windows 8 style dual boot screen shown as follow.

As you can see, Windows 8 is set as your default boot operating system.If you plan to use it as a secondary operating system and change the default boot operating system, you can click the Change defaults or choose other options at the bottom of the boot screen.

How to Find HomeGroup Password in Windows 7

August 15th, 2012 by Admin

Have you ever used the HomeGroup feature in Windows 7? It’s a great way to share files and printers between all your Windows 7 computers. To setup a new computer into your HomeGroup, you need to know the HomeGroup password. If you have forgotten your HomeGroup password then there is no need to worry as Windows 7 gives an option to view HomeGroup password. To get into the way to find HomeGroup password in Windows 7, follow the steps:

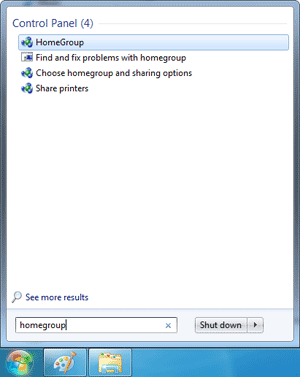
Click on Start button and type HomeGroup in search box, click HomeGroup from search results.

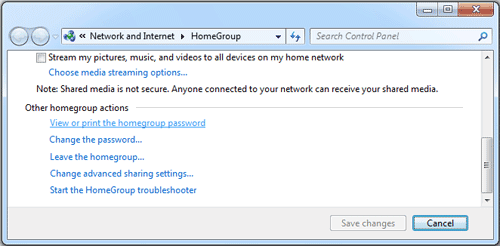
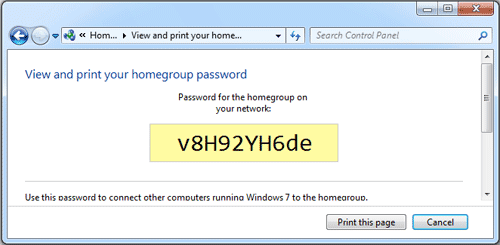
Under “Other homegroup actions” options, you’ll see the “View or print homegroup password” link.

Click on the “View or print homegroup password” link, this will find your HomeGroup password immediately.

Lastly, remember in order to make HomeGroup to work you need at least two or more computers that are connected in the same network. Once you find out the password, type the password in another computer and you’ll see a list of users that are currently in your HomeGroup. Depending on the settings you set to share which folder you can now easily access files between others.

How to Stop Programs from Accessing the Internet on Windows 7

May 6th, 2012 by Admin

If you have installed a lot of applications on your computer,  you might wish to stop and block some programs from accessing the Internet on your Windows 7 operating system. In this way you will be able to better control your computer, decide which applications really need to gain access to the Internet and know what it is going on in your computer background, while you are writing a document or watching a movie, for example. Being in charge of your computer  background processes is also a way to prevent being hacked by  spyware and malware which often attempt to connect to the Web in order to allow hackers  to steal your private file or inject viruses .

  1. Click Start.
  2. Click Control Panel.
  3. Click Windows Firewall.
  4. On the Firewall section, on the left pane, click the  Allow a Program or a Feature through the Windows Firewall.
  5. Click the Change Settings button on the right side of the window, right above the list of programs which have got Internet access.
  6. Untick all applications or those suspicious features you want to check, control or know what they are for. This will stop them from accessing to the Internet.
  7. Click the OK button at the end of the list.
  8. Next time these applications will need to gain access to the Web they will need your approval.