Archive for April, 2022

How to Enable or Disable Inactive Window Scrolling in Windows 11

April 27th, 2022 by Admin

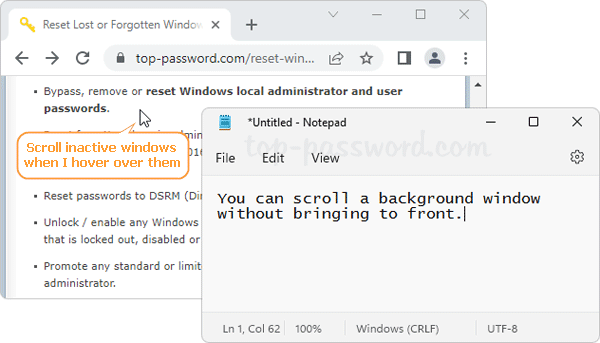
In Windows 11 / 10, you can scroll the background window without bring it to the front. Just hover the mouse pointer over it and then use the mouse wheel to start scrolling. This saves you a few clicks and you don’t need to frequently switch the focus back and forth. In this tutorial we’ll show you 2 methods to enable or disable inactive window scrolling in Windows 11.

Method 1: Enable or Disable Inactive Window Scrolling via Settings App

  1. Open the Settings app. Choose Bluetooth & devices on the left side, and click Mouse on the right pane.

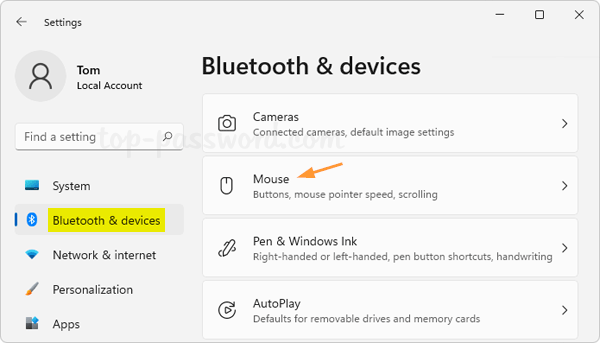
  2. Under the Scrolling section, you can turn on or off the option titled “Scroll inactive windows when I hover over them“.

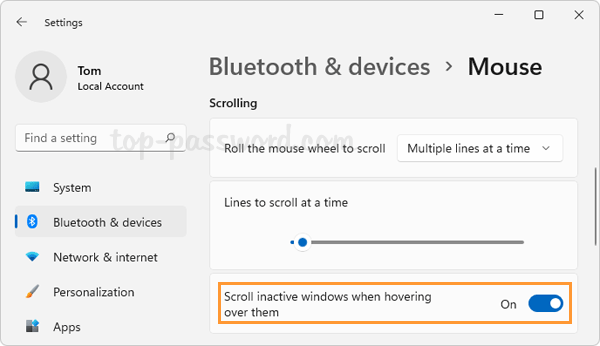
  3. This change will take effect immediately. Enabling this feature can help you quickly scroll inactive background windows without clicking or having input focus.

Method 2: Enable or Disable Inactive Window Scrolling via Registry Editor

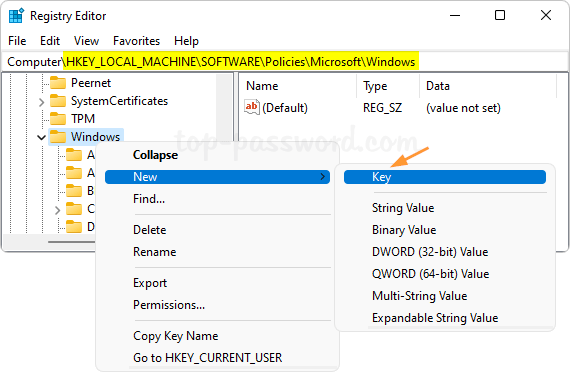
  1. Open Registry Editor and browse to: HKEY_CURRENT_USER\Control Panel\Desktop. Look for the 32-bit DWORD value named MouseWheelRouting, and then double-click it to modify.

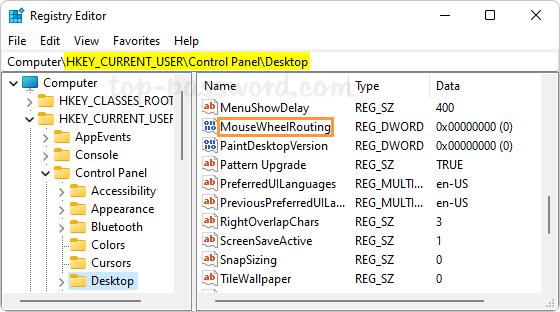
  2. Change its value data to 2 if you want to enable inactive window scrolling, or set it to 0 for turning off inactive window scrolling.

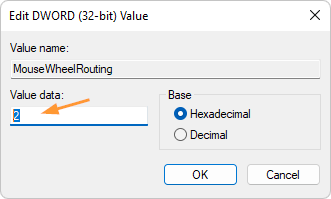
  3. Close Registry Editor. This change requires restarting the computer to take effect.

That’s it!

2 Methods to Change Drive Icon in Windows 11 / 10

April 26th, 2022 by Admin

Can I set a custom icon for a drive in File Explorer? Windows allows you to change individual folder icons with ease, but it doesn’t give you similar options to customize the drive icons. In this tutorial we’ll show you 2 simple methods to change drive icon for local disk or external USB drive in Windows 11 / 10.

Method 1: Change Drive Icon Using Registry Editor

  1. Open Registry Editor and navigate to: HKEY_LOCAL_MACHINE\SOFTWARE\Microsoft\Windows\CurrentVersion\Explorer\DriveIcons. Right-click the DriveIcons key and select New -> Key.

  2. Rename the new key to the drive letter of your desired local drive. In our example, we named the key to ‘D‘ as we’re going to set a custom icon for the D: drive.

  3. When the drive letter key is selected, use the similar method to create a subkey named DefaultIcon. Next, double-click the (Default) entry in the right pane.

  4. Click inside the “Value data” box, type the full path (surrounded by quotes) of the .ico file you want to use as your new drive icon. Click OK.

  5. Close Registry Editor. You’ll immediately see the new drive icon in File Explorer. If you want to reverse the changes, just delete the DriveIcons key and the default drive icon will come back.

Method 2: Change Drive Icon Using autorun.inf File

  1. Before getting started, you need to prepare or create an .ico file, and then copy that .ico file to the root of the drive where you want to use it as drive icon.
  2. Next, press the Windows key + R to launch the Run box. Type notepad and then press the CTRL + SHIFT + ENTER keyboard shortcut to open NotePad as administrator.

  3. Enter the following lines. Remember to replace drive.ico with the actual name of the .ico file that you’ve saved in the root of your target drive, and substitute drive_name with the actual new name.
    [Autorun]
    Icon=drive.ico
    Label=drive_name

  4. When finished, click the File menu and select Save. Next, browse to the root of your target drive, change the “Save as type” to “All files“, and enter autorun.inf in the “File name” box, click Save.

  5. You need to restart your computer to make the changes take effect. If the method doesn’t work with your computer, try to restore the local group policy to defaults.

Conclusion

If the Autoplay feature is disabled using group policy, then the second method doesn’t work. But the second method is a better choice if you want to change drive icon for external USB drive.

2 Methods to Disable Recent Search History in Windows 11 Taskbar

April 8th, 2022 by Admin

When you hover over or click the Search icon in the taskbar, Windows 11 will show you recent search history. For privacy reasons, you may want to clear the existing search history and let Windows not track your search activities in future. In this tutorial we’ll show you 2 simple methods to disable recent search history in Windows 11 taskbar.

Method 1: Disable and Clear Recent Search History via Settings App

  1. Press the Windows key + I to launch the Settings App. Select the “Privacy & security” category from the left sidebar, and then click “Search permissions” on the right pane.

  2. Turn off the toggle switch just below “Search history on this device” and it will prevent Windows from tracking your future search activities, but previously saved search history still remains on your PC.

    If you want the previous search history to be removed, then proceed to click the “Clear device search history” button. Windows 11 will no longer show recent searches when you hover over the search icon in the taskbar.

Method 2: Disable Recent Search History via Registry Editor

  1. Open Registry Editor and navigate to: HKEY_CURRENT_USER\Software\Microsoft\Windows\CurrentVersion\SearchSettings. On the right pane, double-click the DWORD IsDeviceSearchHistoryEnabled.

  2. Set its value data to 0 and click OK, Windows will then stop saving your future search history. Whenever you need to enable recent search history again, just change its value data back to 1.

  3. Close Registry Editor and the changes will take effect immediately.

That’s it!

Another Way to Create App Execution Alias in Windows 11

April 6th, 2022 by Admin

By default, Windows 11 allows you to enable Execution Aliases for UWP apps only. Previously we’ve covered how to create aliases for any programs using a registry tweak. In this tutorial we’ll show you another way to create App Execution Alias using Command Prompt in Windows 11.

How to Create App Execution Alias Using Command Prompt

  1. To get started, open the Command Prompt as administrator. Next, use the mklink command to create a symbolic link which points to the executable file of your target application. Remember to replace alias_name with your desired alias.

    mklink %LOCALAPPDATA%\Microsoft\WindowsApps\alias_name.exe "the_full_path_of_your_executable_file"

  2. Open File Explorer and type the following location in the address bar and press Enter. You’ll see the newly-created symbolic link which works almost the same as the other app aliases.
    %LOCALAPPDATA%\Microsoft\WindowsApps

  3. Now, you can use the new alias to start your program directly from the Run dialog box, Command Prompt or Windows PowerShell.

That’s it!

How to Remove “Look for an app in the Microsoft Store” Context Menu in Windows 11

April 4th, 2022 by Admin

When you right-click a file and select Open with -> Choose another app, the pop-up dialog allows you to change the default app or pick up the “Look for an app in the Microsoft Store” option. If you think the “Look for an app in the Microsoft Store” option is useless, you can hide or remove it.

In this tutorial we’ll show you 2 methods to remove “Look for an app in the Microsoft Store” context menu in Windows 11.

Method 1: Remove “Look for an app in the Microsoft Store” via Group Policy

  1. Open Local Group Policy Editor and browse to: Computer Configuration -> Administrative Templates -> System>Internet Communication Management -> Internet Communication settings​. On the right pane, find the “Turn off access to the Store” policy and double-click it.

  2. Select the Enabled option. Click Apply and then OK.

  3. Restart your system to see the changes. You’ll find the “Look for an app in the Microsoft Store” option disappears in Windows 11.

Method 2: Remove “Look for an app in the Microsoft Store” via Registry Editor

  1. Open Registry Editor and navigate to: HKEY_LOCAL_MACHINE\SOFTWARE\Policies\Microsoft\Windows. Right-click the Windows key in the left pane and select New -> Key.

  2. Name the new key “Explorer“, and then select it. On the right pane, right-click the blank area and select New -> DWORD (32-bit) Value.

  3. Name this new DWORD “NoUseStoreOpenWith“, and change its value data to 1.

  4. Close Registry Editor and reboot your computer. The next time you log in to your Windows account, you’ll no long see the “Look for an app in the Microsoft Store” option.

That’s it!