Archive for May, 2023

3 Steps to Make Windows 11 Show Seconds in System Tray Clock

May 29th, 2023 by Admin

How do I get the taskbar clock to show seconds? The “Show seconds in system tray clock” option is missing? Previously we’ve covered a registry trick which can set Windows 10 to display seconds on the taskbar, and that method also works with Windows 11.

Starting with Windows 11 build 22621.1778, there is a new option available in the Settings app, which allows you to easily make Windows 11 show seconds in the system tray clock.

How to Make Windows 11 Show Seconds in System Tray Clock

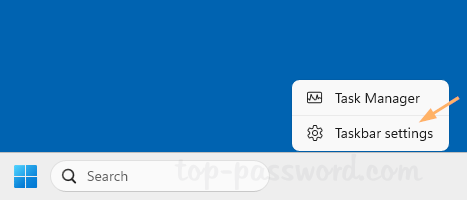
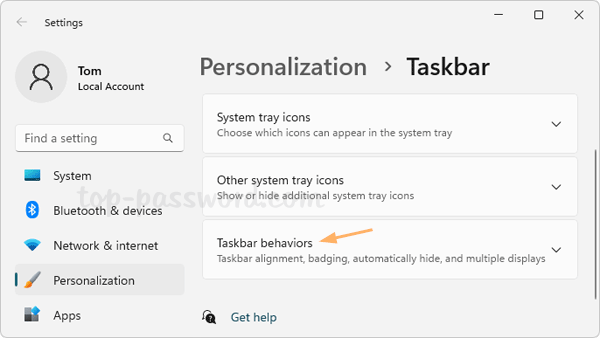
  1. Right-click any blank area in the taskbar and choose “Taskbar settings” from the pop-up menu.

  2. When the Settings app opens to Personalization -> Taskbar, click the “Taskbar behaviors” section in the right pane to expand it.

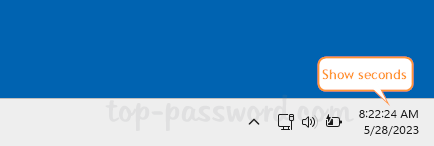
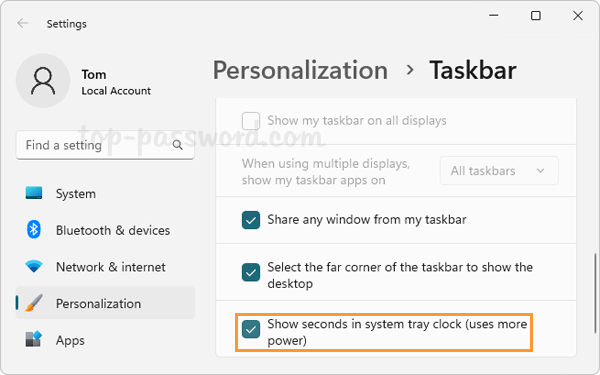
  3. Scroll down to the bottom and check the “Show seconds in system tray clock (uses more power)” option. The clock on the taskbar will show seconds immediately.

That’s it!

Tutorial: Install Active Directory in Windows Server 2022

May 23rd, 2023 by Admin

How can I set up a domain controller for small office? If you want to install Active Directory on Windows Server Core, you need to prepare a PowerShell script and it’s a bit challenging. For Windows Server with desktop experience (GUI), the setup procedure is much easier. In this tutorial we’ll show you how to install Active Directory in Windows Server 2022, and promote it to domain controller.

Part 1: Install Active Directory in Windows Server 2022

Before getting started, give your server a static IP address instead of letting DHCP assign the IP address automatically. Once logged in with the local administrator account, you can install Active Directory by following these steps:

  1. Click the Start button, and then click the “Server Manager” shortcut which should appear in the Start Menu and Live Tiles.

  2. Click the “Add roles and features” option.

  3. When the wizard starts, click Next.

  4. Choose the “Role-based or feature-based installation” type, click Next.

  5. Select the local server where the Active Directory role will be installed, and click Next.

  6. On the Server Roles page, check the “Active Directory Domain Services” role from the list.

  7. When a pop-up window prompts you to include all the necessary tools, click the Add Features button.

  8. You should now see a tickmark next to the “Active Directory Domain Services” role, click Next.

  9. On the Features page, the basic features for required role are already selected by default. Just click Next.

  10. Click Next.

  11. Click Install to confirm and begin the role features installation.

Part 2: Promote Windows Server 2022 to Domain Controller

  1. After the AD DS role is installed, open Server Manager again and you will see a notification flag next to the Manage menu. From there you need to click “Promote this server to a domain controller“.

  2. Choose the “Add a new forest” option, type a root domain name and click Next.

  3. Set up the DSRM password and click Next. DSRM password is used only when you need to boot the server into Directory Services Restore Mode to perform maintenance tasks.

  4. On the DNS Options page, click Next.

  5. The NetBIOS name is generated automatically based on your domain name. Just click Next.

  6. You’ll see the default paths for database, log files and SYSVOL folders. Click Next.

  7. Review your selections and click Next.

  8. A prerequisite check will be performed. If no error is detected, you can click Install to promote your server as domain controller. You server will restart automatically once the installation is complete.

That’s it!

How to Enable Inline AutoComplete in File Explorer and Run Dialog in Windows 11

May 22nd, 2023 by Admin

Inline AutoComplete is a useful feature which can help fill in the Run dialog or the address bar of File Explorer with less effort. While typing in the Run dialog box, inline AutoComplete will automatically append the rest of the command based on your history, and the auto-fill data is highlighted in light blue.

If the inline AutoComplete feature is disabled, the Run dialog box will not auto fill the rest of the command for you.

In this tutorial we’ll show you 2 methods to enable inline AutoComplete in File Explorer and Run Dialog in Windows 11. These methods also work with Windows 10/8/7.

Method 1: Enable Inline AutoComplete in Windows 11 via Control Panel

  1. Open the Control Panel and set the View by option to Large icons, then click Internet Options.

  2. Select the Advanced tab. Scroll down to Browsing section, and check the “Use inline AutoComplete” option.

  3. Click Apply and then OK. Open a new Run dialog or File Explorer window, and you should be able to use inline AutoComplete to type.

Method 2: Enable Inline AutoComplete in Windows 11 via Registry Editor

  1. Open Registry Editor and browse to: HKEY_CURRENT_USER\Software\Microsoft\Windows\CurrentVersion\Explorer\AutoComplete. Double-click the string “Append Completion” on the right pane.

  2. Change the value data from “no” to “yes“, and click OK. It will turn on the inline AutoComplete feature immediately.

  3. Close Registry Editor. Reopen the Run dialog box or File Explorer, and you can now enjoy the inline AutoComplete feature.

Conclusion

Inline AutoComplete is turned off by default, and you can turn it on using the above methods. However, if you’ve deleted or disabled the Run command history, the inline AutoComplete feature will not automatically fill the data for you, even if it’s enabled actually.

3 Ways to Open Microsoft Word in Safe Mode on Windows 11 / 10

May 20th, 2023 by Admin

MS word keeps crashing when saving a document? Always get the error message “There was a problem with Microsoft Word and your recent work might be lost” when opening any Word document? When you encounter these problems, you can start Office Word in Safe Mode which can help you identify the problem. In this tutorial we’ll show you 3 simple ways to open Microsoft Word in Safe Mode on Windows 11 / 10.

Method 1: Open Microsoft Word in Safe Mode via Run Command

  1. Press the Windows key + R together to bring up the Run dialog box, type winword /safe and press Enter.

  2. It will immediately launch Microsoft Word in Safe Mode, without loading any add-ins or extensions.

Method 2: Open Microsoft Word in Safe Mode via Holding the CTRL key

  1. Press and hold down the CTRL key, then double-click the Word shortcut on your desktop, or click its shortcut which appears in the Start Menu or taskbar.

  2. When you see a pop-up dialog which says “You’re holding down the CTRL key. Do you want to start Word in safe mode?“, release the CTRL key and click Yes.

  3. The Microsoft Word application will start in Safe Mode.

Method 3: Create a Desktop Shortcut to Always Open Microsoft Word in Safe Mode

If you need to open Microsoft Word in Safe Mode regularly, just make a few changes with the Word shortcut on your desktop and you can set it to start in Safe Mode by default.

  1. Right-click the Microsoft Word shortcut on the desktop, and then select Properties from the pop-up menu.

  2. Click inside the Target text box, place the cursor after the last quotation mark, add a blank space follow by the parameter /safe.

  3. Click Apply and then OK. Double-click the shortcut and it will always start Word in Safe Mode.

That’s it!

How to Restart Chrome, Edge and Firefox without Losing Open Tabs

May 17th, 2023 by Admin

When your web browser starts to lag or a tab is freezing, closing the web browser and reopening it may be the only choice, but you’ll lose all open tabs. Luckily, there is a hidden and simple way to restart Chrome, Edge and Firefox without losing open tabs.

Part 1: Restart Chrome, Edge without Losing Open Tabs

At the top of your web browser, click the plus (+) sign on the far right to open a new tab. If you’re using Chrome, type chrome://restart in the address bar.

For Microsoft Edge, enter edge://restart instead.

As soon as you press Enter, your web browser will restart immediately and reload your previous tabs automatically.

Part 2: Restart Firefox without Losing Open Tabs

Open a new tab in your Firefox browser and type about:profiles in the address bar, then press Enter.

It will open a page which gives you two options to restart Firefox: Restart with Add-ons Disabled, Restart normally. Simply click the “Restart normally” button, and it will restart Firefox without losing all running tabs.

That’s it!

How to Reset Lost SA Password for SQL Server 2022

May 15th, 2023 by Admin

Cannot authenticate using the sa account credential? The default sa password does not work? If you cannot establish a connection using SQL Server Management Studio or restore the master.mdf database, doing a password reset should be the fastest way to regain access to your SQL Server instance. In this tutorial we’ll walk you through the steps of resetting lost sa password for SQL Server 2022.

Part 1: Stop SQL Server Service

To get started, we need to stop the SQL Server service and find where the master.mdf database is located using File Explorer. Follow these steps:

  1. Click the Start button. When the Start menu appears, expand the “Microsoft SQL Server 2022” folder and click “SQL Server 2022 Configuration Manager“.

  2. In the left-hand side of the window, click the “SQL Server Services” entry. In the right pane, right-click “SQL Server (MSSQLServer)” or a named instance, and then choose Stop.

  3. Next, double-click the “SQL Server (MSSQLServer)” service to open the Properties dialog. Go to the “Startup Parameters” tab, and you’ll see the full path of the master.mdf file which is displayed in the “Existing parameters” list box.

    For SQL Server 2022, the default location is C:\Program Files\Microsoft SQL Server\MSSQL16.MSSQLSERVER\MSSQL\DATA.

  4. Open File Explorer and browse to the above location, and check if the master.mdf file can be found.

Part 2: Reset Lost SA Password for SQL Server 2022

  1. After opening the SQL Server Password Changer utility, click the Open File button in the right side.

  2. Choose the master.mdf file for your SQL Server 2022 instance, and then click Open.

  3. You’ll get the list of all database users. Simply choose the sa account and click the “Change Password” button.

  4. Enter a new sa password and click OK. Close the SQL Server Password Changer utility.

Part 3: Connect to SQL Server 2022 with New SA Password

Open the SQL Server 2022 Configuration Manager and start the SQL Server service, then launch the SQL Server Management Studio, you can then log in to the sa account with your new password!

If you get the error message “Login Failed for User (Microsoft SQL Server, Error: 18456)“, it’s possible that the authentication method of the SQL server is not properly configured. You need to use the second method descried in this article to enable mixed mode authentication.

That’s it!