Archive for December, 2017

2 Ways to Change or Add Language in Windows 10

December 28th, 2017 by Admin

Non-English text not displaying correctly? How can I change the display language for Windows 10? A language pack needs to be installed on your computer. In this tutorial we’ll show you 2 ways to change or add additional language in Windows 10.

Method 1: Change or Add Language from the Settings App

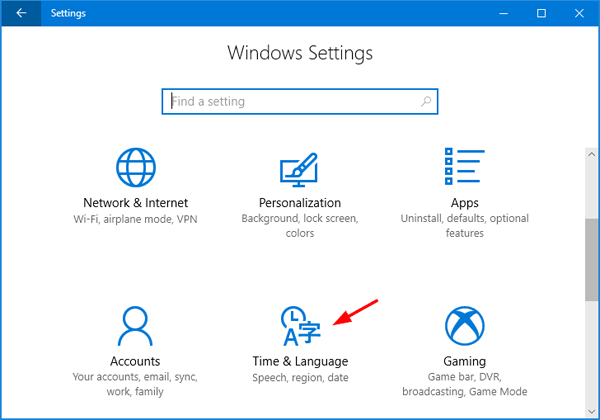
  1. Press Windows + I keys to open the Settings app and then click Time & Language.

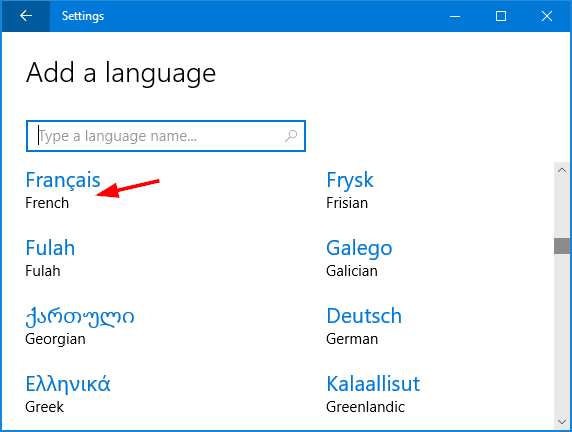
  2. Select the Region & language tab on the left, and then click Add a language on the right.

  3. It will show languages that are available to be installed on your PC. Choose the language you want to add.

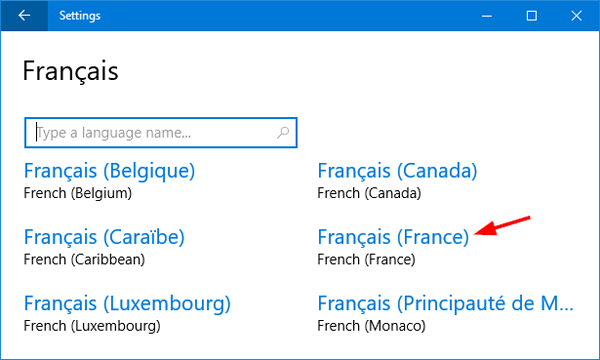
  4. Click on the particular language based on your region. When this is done, you can then type or read text in the new language.

  5. If you want to display all system text in the new language, go back to the Region & language tab. Select the newly added language and click the Options button.

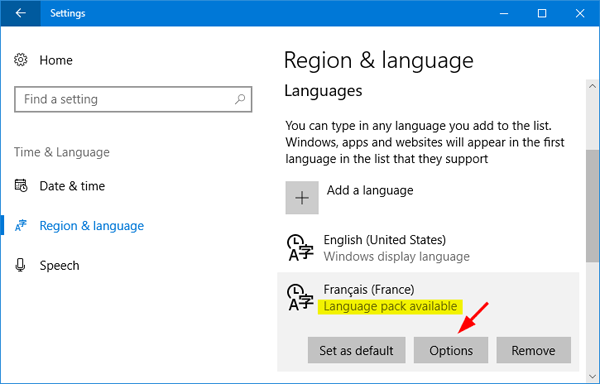
  6. Click the Download button beneath “Download language pack”.

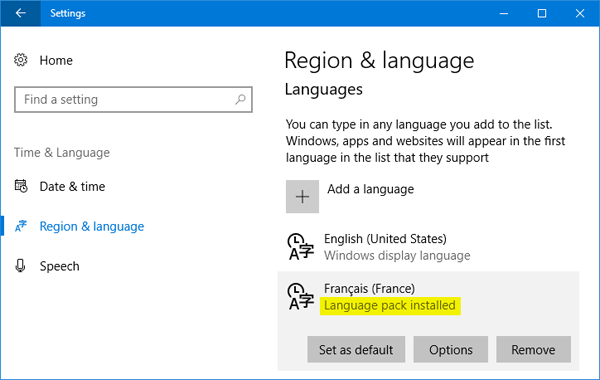
  7. When the language pack is installed, select the new language and click Set as default.

    Reboot your computer and the new language will be used as the display language for Windows 10.

Method 2: Change or Add Language from Control Panel

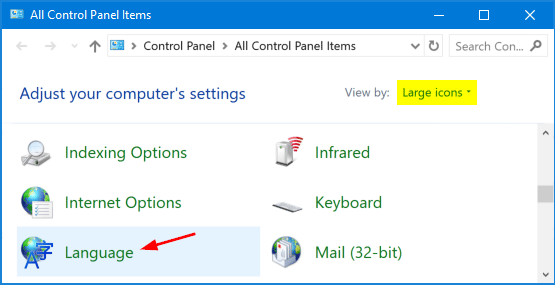
  1. Open the Control Panel, switch it to Large icons view. Click Language.

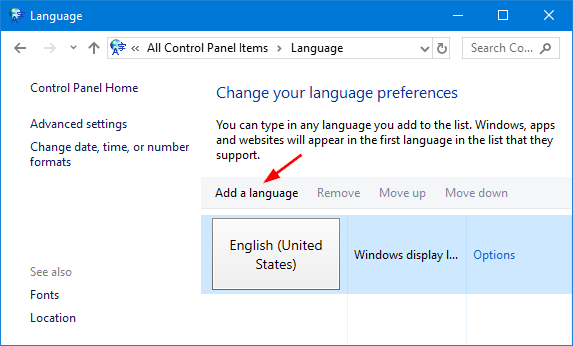
  2. In the Language window, click the Add a language button.

  3. Select a language you would like to install, and click Open.

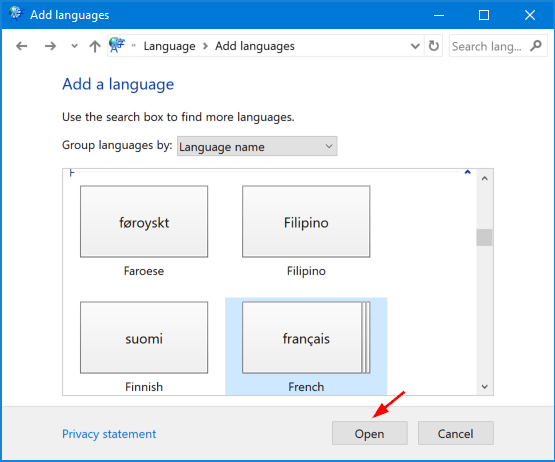
  4. Click the language specific to your region, and click Add.

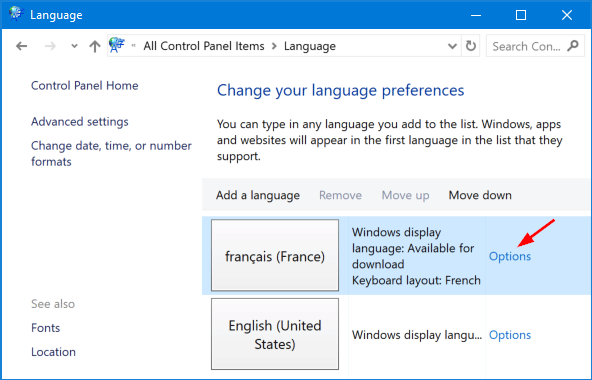
  5. The language that you selected is now added to the list of input languages for your keyboard. If you want to use the new language to display the user interface of Windows 10, click the Options link.

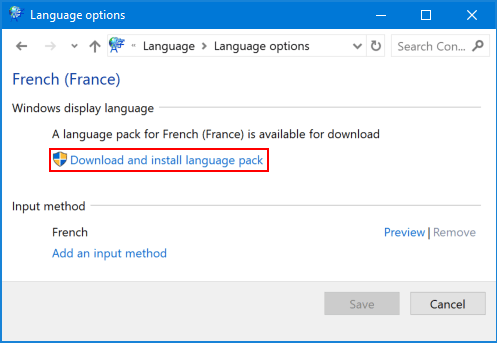
  6. Click Download and install language pack.

    The system will display all text in the new language the next time you sign into Windows 10.

2 Ways to Disable Online Tips for Settings App in Windows 10

December 25th, 2017 by Admin

Since Windows 10 Fall Creators Update, the Settings app will display online tips on the right side of the currently opened page. The online tips could be general advice, links to online help or video tutorials.

If the tips annoy you, you can easily turn them off using group policy or registry editor.

Method 1: Use Group Policy to Disable Online Tips for Settings App in Windows 10

  1. Press the Windows key + R together, type in gpedit.msc and hit Enter to access Local Group Policy Editor.

  2. Navigate to: Computer Configuration\Administrative Templates\Control Panel, and then double-click on the Allow Online Tips policy to edit it.

  3. Select Disabled, click Apply and then OK.

  4. Re-open the Settings app and the online tips should have gone.

Method 2: Use Registry Editor to Disable Online Tips for Settings App in Windows 10

  1. Press the Windows key + R together, type in regedit and hit Enter to access Registry Editor.

  2. Navigate to the following key:
    HKEY_LOCAL_MACHINE\SOFTWARE\Microsoft\Windows\CurrentVersion\Policies\Explorer

    Then right-click the empty space in the right pane, select New -> DWORD (32-bit Value).

  3. Name the newly created value as AllowOnlineTips and keep its value at 0.

  4. Close Registry Editor and reboot your computer to see the changes.

How to Remove Shadow Under Icon Text on Windows 10 Desktop

December 25th, 2017 by Admin

Is there any way to turn off or hide the shadows for desktop icon labels? On Windows 10 desktop, the text under icon text has a drop shadows effect by default, which can make the text illegible. Here’s how to remove shadow under icon text on Windows 10 desktop.

Disabling shadow will make your desktop icons’ text labels easier to read against your background:

How to Remove Shadow Under Icon Text on Windows 10 Desktop?

  1. Right-click the This PC shortcut on your desktop, and select the Properties from the drop-down menu.

  2. In the System window, click Advanced system settings on the left side.

  3. The System Properties window will open the Advanced tab. Click the Settings button under Performance.

  4. Under Visual Effects tab, uncheck the box marked “Use drop shadows for icon labels on the desktop“. Click Apply and then OK. If you can’t see the change, restart your PC.

    That’s it!

If you’re a fan of hacking the Windows registry, you can simply remove drop shadows for icon labels on the desktop using Registry Editor. Navigate to the following key:

HKEY_CURRENT_USER\Software\Microsoft\Windows\CurrentVersion\Explorer\Advanced

Double-click the ListViewShadow entry in the right pane, change its value from 1 to 0. Reboot your computer and you should no longer have the drop shadow under icon text on Windows 10 desktop.

How to Block ZIP/RAR Attachments in Outlook 2016 – 2007

December 21st, 2017 by Admin

Is there a way to block ZIP and RAR attachments from being opened or downloaded in MS Outlook? The spam email usually contains a .zip file attachment with virus. In this tutorial we’ll show you a simple way to block ZIP/RAR attachments in Outlook 2016 ~ 2007.

How to Block ZIP/RAR Attachments in Outlook 2016 – 2007?

  1. Press the Windows key + R together to open the Run dialog box, type regedit and press Enter.

  2. In the Registry Editor window, navigate to:
    HKEY_CURRENT_USER\Software\Microsoft\Office\16.0\Outlook\Security

    Note: If you’re using Outlook 2013, 2010 or 2007, the version number appeared in the above registry location should be 15.0, 14.0 or 12.0.

  3. Right-click the empty space in the right pane, and then select New -> String Value.

  4. Name the new String as Level1Add, and then double-click it to modify. When the Edit String dialog box pops up, enter the file extension of attachment file you want to block, and click OK.

    For example, type .zip;.rar into the Value data box if you want to block all .zip/.rar attachments.

  5. Close Registry Editor and restart Outlook application. The next time you receive an email message that contains a zip or rar attachment, you will get the warning saying “Outlook blocked access to the following potentially unsafe attachments“.

So this is how you can easily configure Outlook to block ZIP/RAR attachments. That’s it!

How to Turn On / Off Color Filters in Windows 10

December 20th, 2017 by Admin

My computer screen goes gray all of a sudden? It’s possible that you accidentally press a key combination that invokes color filters mode. Windows 10 now includes color filters, which lets you change the color of everything on your screen. This makes colors easier to distinguish for those with color blindness. This tutorial will show you 3 ways to turn on or off color filters in Windows 10.

Method 1: Turn On / Off Color Filters Using Keyboard Shortcut

Press the Windows key + Ctrl + C keys together and it will enable color filters and turn everything to shades of gray (greyscale mode). If you want to disable color filters again, just press that keyboard shortcut again.

Method 2: Turn On / Off Color Filters from Settings

  1. Open the Settings app, and then click Ease of Access.

  2. Select Color & high contrast on the left side. To turn on color filters, toggle the “Apply color filter” to On, and then select the desired filter under the “Choose a filter” box.

    If you want to turn off color filters, just toggle the “Apply color filter” to Off and you’re done.

  3. The selected filter will be applied instantly.

Method 3: Turn On / Off Color Filters Using Registry Editor

  1. Open the Registry Editor and navigate to the following key:
    HKEY_CURRENT_USER\Software\Microsoft\ColorFiltering
  2. Right-click the blank area on the right pane and create a DWORD (32-bit) value named Active. Change its value to 1 if you want to enable color filters, or set it to 0 for disabling color filters.
  3. Use the same method to create another DWORD (32-bit) value named FilterType. Set its value depend on which color filter you like best.
    • 0 = Greyscale
    • 1 = Invert
    • 2 = Greyscale Inverted
    • 3 = Deuteranopia
    • 4 = Protanopia
    • 5 = Tritanopia

  4. Close Registry Editor. Log off and then log back in to see the changes.

How to Stop Standard Users from Changing BitLocker Password

December 18th, 2017 by Admin

If you want to configure BitLocker in Windows 10 / 8, you have to log in as administrator. However, standard users are allowed to change BitLocker password by default. In this tutorial we’ll show you 2 ways to stop standard users from changing BitLocker password in Windows 10 / 8.

Method 1: Prevent Standard Users from Changing BitLocker Password via Group Policy

  1. Press the WIN + R keys to open the Run box. Type gpedit.msc and hit Enter.

  2. In the left pane of the Local Group Policy Editor, navigate to: Computer Configuration\Administrative Templates\Windows Components\BitLocker Drive Encryption\Operating System Drives.

    Next, double-click on the Disallow standard users from changing the PIN or password policy in the right pane.

  3. Select the Enabled option, click Apply and then OK.

  4. When the standard users try to change BitLocker password on a fixed drive, the UAC will prompt to enter an administrator’s password firstly.

Method 2: Prevent Standard Users from Changing BitLocker Password via Registry Editor

  1. Press the WIN + R keys to open the Run box. Type regedit and hit Enter.

  2. In the left pane of Registry Editor, navigate to the key: HKEY_LOCAL_MACHINE\SOFTWARE\Policies\Microsoft\FVE. If the FVE key doesn’t exist, right-click the Microsoft key and create a subkey named FVE.
  3. While the FVE key is selected, right-click blank area in the right pane and create a DWORD (32-bit) value named DisallowStandardUserPINReset, set its value data to 1.

  4. Close Registry Editor.

If you want to allow standard users to change BitLocker password, just change the value data of DisallowStandardUserPINReset to 0 and you’re done.

How to Change BitLocker Password in Windows 10 / 8 / 7

December 14th, 2017 by Admin

If you’ve turned on BitLocker encryption on a fixed or removable drive, you can choose to unlock the drive with a BitLocker password. When your BitLocker password is compromised, changing the password should be a top priority. In this tutorial we’ll show you 3 ways to change BitLocker password in Windows 10 / 8 / 7.

Method 1: Change BitLocker Password from Windows Explorer

  1. Right-click on the BitLocker encrypted drive in Windows Explorer, and select Change BitLocker password from the context menu.

    Note: if the encrypted drive shows a gold lock on the icon, then you can’t see the “Change Bitlocker password” option in the context menu, and you need to unlock the BitLocker drive firstly.

  2. Enter the old password, followed by the new password (entered twice), and then click Change password.

  3. You would be shown a message that the password has been changed successfully in the same window.

Method 2: Change BitLocker Password from Control Panel

  1. Open the Control Panel and select Large icons in the View by drop-down menu. Click BitLocker Drive Encryption.

  2. Expand the drive for which you want to change the BitLocker password, and click Change password from the list of options.

  3. When the Change Password window appears, type your old password and new password. Click Change password.

  4. Now you’ve changed your BitLocker password.

Method 3: Change BitLocker Password Using Command Line

  1. Open the Command Prompt as administrator.
  2. Assuming you’re going to change Bitlocker password for drive D:, type the following command and hit Enter.
    manage-bde -changepassword d:

  3. You’ll be prompted to enter the new password twice. Note: your password won’t be shown while you’re typing.
  4. When the password has been successfully changed, you can close Command Prompt. Every time you boot into Windows, you can unlock the BitLocker drive with the new password.

Manually Lock / Unlock BitLocker Encrypted Drive in Windows

December 13th, 2017 by Admin

Hot to lock the BitLocker encrypted drive without restarting system? By default, Windows will automatically unlock your BitLocker drive when you sign in to your account. If you’ve turned off auto-lock for BitLocker drive, you have to manually unlock it when your computer starts up. In this tutorial we’ll show you how to manually lock or unlock BitLocker encrypted drive in Windows 10 / 8 / 7.

Part 1: Manually Lock a BitLocker Drive

Before you can manually lock a BitLocker drive, make sure you’ve set up a BitLocker password for your hard drive and turn off the auto-lock feature. When your system is shut down, the drive will lock itself automatically.

If you want to manually lock a BitLocker drive, you have to do this through Command Prompt:

  1. Open the Command Prompt as administrator.
  2. Type the following command and hit Enter. Note: substitute d: in the command below with the drive letter of BitLocker drive you want to lock.
    manage-bde -lock d: -forcedismount

  3. Close Command Prompt. Your BitLocker drive is now locked and you’re unable to access it without providing your BitLocker password.

Part 2: Manually Unlock a BitLocker Drive

Unlocking a BitLocker drive is much easier than locking it. Follow these steps:

  1. Open Windows Explorer and right-click on the BitLocker encrypted drive, and then choose Unlock Drive from the context menu.

  2. You’ll get a popup in the upper right corner that asking for BitLocker password. Enter your password and click Unlock.

  3. The drive is now unlocked and you can access the files on it.

Of course, you can also unlock a BitLocker drive from an elevated Command Prompt. Just type this command and press Enter.
manage-bde -unlock d: -password

When prompted, type the BitLocker password for this drive and hit Enter. It will unlock your drive immediately.

How to Find if My Windows 10 PC Supports Miracast

December 11th, 2017 by Admin

How can I tell if my Windows 10 computer supports Miracast? Miracast is a wireless technology that lets you mirror your computer’s screen wirelessly on your TV or projector. Here is a simple way to check if the Miracast wireless streaming is available on your Windows 10 PC.

How to Find if My Windows 10 PC Supports Miracast?

Press the Windows key + R to bring up the Run box. Type dxdiag and hit Enter.

This will open the DirectX Diagnostic Tool. After this tool collects your PC’s information, click the Save All Information button.

Choose where you want to save the DxDiag.txt file on your computer.

Open the DxDiag.txt file with NotePad or your text editor, and find the line that begins with Miracast. If it says supported or available, then it means your PC supports the Miracast wireless streaming feature.

That’s it!

How to Hide Folders / Files from Search Results in Windows 10

December 7th, 2017 by Admin

How do I stop certain files from showing up in Windows search? By default, Windows automatically indexes everything stored in the most common locations (like Downloads, Documents and Desktop), so you can quickly find your files or applications through Windows Search box or Cortana box.

If you want to hide some folders/files from appearing in the search result, you need to change the indexing options in Windows 10.

How to Hide Folders / Files from Search Results in Windows 10?

  1. Open the Control Panel in Large icons view and then click Indexing Options.

  2. The Indexing Options window lists all folders that are included or excluded from indexation. To hide certain files and folders from Windows Search, click the Modify button at the bottom.

  3. In the folder tree, navigate to the folder you want to hide and uncheck the box for that folder. Click OK.

  4. When you’re back to the Indexing Options window, you can click the Advanced button if you want to hide certain file types from being indexed.

  5. Click the File Types tab. Navigate through the list of all file types and uncheck the file type that you wish to hide from search results, and click OK.

  6. Switch to the Index Settings tab and click Rebuild.

    Now, you should see the folders/files you chose to hide will never show up in the search results in File Explorer or in the Cortana box on the taskbar.

However, if you disable Search indexing completely, your folders/files will become searchable again but it may take longer to run search. The most secure ways of hiding folders/files from Windows Search is to use the professional utility like Protect My Folders.