Archive for March, 2020

How to Disable “Low Disk Space” Warning in Windows 10 / 8 / 7

March 29th, 2020 by Admin

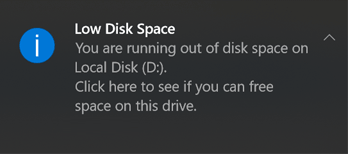
When any drive on your computer has less than 10% free disk space, a “Low Disk Space” warning will pop up at the bottom right side of the screen constantly. If this warning is not about the system (C:) drive and you want to get rid of it, here is a registry tweak to disable the annoying “Low Disk Space” warning in Windows 10 / 8 / 7.

How to Disable “Low Disk Space” Warning in Windows 10 / 8 / 7

  1. Press the Windows key + R to open the Run command box, type “regedit” (no quotes) and press Enter.

  2. This should open the Registry Editor window. Navigate to the following key:
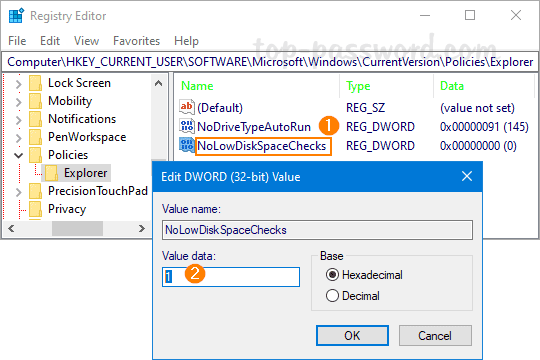
    HKEY_CURRENT_USER\SOFTWARE\Microsoft\Windows\CurrentVersion\Policies\Explorer

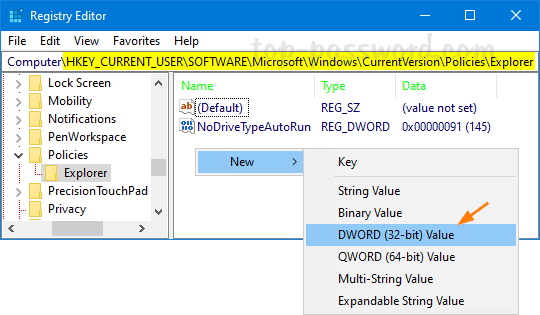
    Right-click the blank area on the right pane and select New -> DWORD (32-bit) Value.

  3. Name the value NoLowDiskSpaceChecks and double-click it to modify. In the Value Data box, type “1” (no quotes) and click OK.

  4. Close Registry Editor and restart your computer, Windows will stop giving you low disk space warnings. If you want to turn on the low disk space notifications later, just right-click on the NoLowDiskSpaceChecks value and delete it.

How to Add or Change Slide Number in PowerPoint 2016 / 2019

March 25th, 2020 by Admin

Is there an automated way to add slide numbers to your PowerPoint presentation? Numbering your slides can let you know which slide you’re currently on. In this tutorial we’ll walk you through the steps to add or change slide numbers for PowerPoint 2016 / 2019 presentation in Windows 10.

Part 1: Add Slide Number to PowerPoint Presentation

  1. To add slide numbers, open your PowerPoint presentation. Select the Insert tab on the ribbon, click the “Header & Footer” button.

  2. The “Header and Footer” dialog box will appear. In the Slide tab, check the box next to “Slide number“. If you want to disable slide numbers on the title slide, check the box “Don’t show on the title slide“.

  3. Click on “Apply to All“. PowerPoint will automatically add slide numbers to each of your slides in the bottom-right corner.

Part 2: Change the Starting Slide Number

By default, PowerPoint starts the slide number from 1. Here is how to change the slide starting number to 0 or any number of your choice:

  1. Select the Design tab on the ribbon. Click the “Slide Size” button and then choose “Custom Slide Size” from the drop-down menu.

  2. The Slide Size dialog box will open. You can change the number in the “Number slides from” box from 1 to a different number.

  3. Click OK. The slide numbers will update immediately.

Conclusion

So that is how you can easily add slide number to a PowerPoint presentation or change slide numbers to start with any number. If you want to show the total number of slides on every slide (such as “slide 2 of 16“), there is no automatic method and you have to do it manually by following this article.

How to Insert Page Number in Word 2019 / 2016 from Specific Page

March 20th, 2020 by Admin

Office Word lets you add page numbers to all the pages in your document easily. But if your document has a cover page and you want to start page numbers on page 2 or 3, the steps are a bit complicated. In this tutorial we’ll walk you through the steps to insert page number in Microsoft Word 2019 / 2016 from specific page.

How to Insert Page Number in Word 2019 / 2016 from Specific Page

  1. Click the page you want to start numbering from. Go to the Layout tab on the Ribbon and click the Breaks button, then choose the “Next Page” option.

  2. Switch to the Insert page. Click the “Page Number” button in the “Header & Footer” section, and then choose where you’d like the page numbers to appear.

  3. Proceed to choose the numbering style you would like to use.

  4. Under the Design tab, click the “Link to Previous” button in the Navigation section and make sure it is not highlighted.

  5. Next, scroll to each page you don’t want numbered and delete the page number from the header or footer. To delete a page number, click the “Page Number” button in the “Header & Footer” section, and then select the “Remove Page Numbers” option.

  6. Finally, select the number which appears on the page you want to start numbering from, click the “Page Number” button and select “Format Page Numbers…

  7. In the Page Number Format window, choose to start page numbering at 1, and click OK.

  8. Click the “Close Header and Footer” button on the Ribbon and you’re done.

How to See Command History from Previous PowerShell Sessions in Windows 10

March 15th, 2020 by Admin

Is there a way to see command line history across all PowerShell sessions? Windows PowerShell lets you view every command you’ve executed during the current session by using the Get-History command. But sometimes that is not enough. In this tutorial we’ll show you how to see the full command history from all previous sessions in Windows 10.

How to See Command History from Previous PowerShell Sessions in Windows 10

  1. In order to use the PowerShell command history functionality, you need to first install the PSReadLine module with the below command.
    Install-Module PSReadLine

    If you’re prompted to install NuGet Provider, type Y and press Enter.

  2. Next, type the following command to display the path to the file in which the PowerShell command history is saved.
    (Get-PSReadlineOption).HistorySavePath

    To view the full detailed command history on the PowerShell console, run this command:
    cat (Get-PSReadlineOption).HistorySavePath

  3. To clear all the history of PowerShell commands you’ve ever typed, type the following command:
    Remove-Item (Get-PSReadlineOption).HistorySavePath

    If you need to prevent PowerShell from saving command history, execute this command:
    Set-PSReadlineOption -HistorySaveStyle SaveNothing

    Whenever you want to configure PowerShell to track all executed commands again, run the following command:
    Set-PSReadlineOption -HistorySaveStyle SaveIncrementally

That’s it!

4 Ways to Disable or Enable Bluetooth in Windows 10

March 10th, 2020 by Admin

Many Windows 10 computers come with a Bluetooth chip, which you can use to connect most of your devices like smartphones and headphones. If you don’t use Bluetooth and leave it on, it will pose some security risks and also drain your PC’s battery. Whenever you don’t absolutely need it, you should turn it off. In this tutorial we’ll show you 4 easy ways to turn off / on Bluetooth in Windows 10.

Method 1: Disable or Enable Bluetooth in Bluetooth Settings

Press the Windows key + I together to open the Settings app. Navigate to Devices -> Bluetooth & other devices. On the right side, you can use the “Bluetooth” option to disable or enable Bluetooth.

Method 2: Disable or Enable Bluetooth in Airplane Mode Settings

Press the Windows key + I together to open the Settings app. Browse to Network & Internet -> Airplane mode. On the right pane, you can toggle the Bluetooth slider to the Off or On position.

Method 3: Disable or Enable Bluetooth in Action Center

Click the Action Center icon in the bottom-right corner of the taskbar, or press the Windows key + A shortcut to open the Action Center.

Next, click on the Bluetooth button in Action Center to toggle it on or off.

Method 4: Disable or Enable Bluetooth from Device Manager

Open Device Manager and expand the Bluetooth category. Right-click on your Bluetooth device and select “Enable device” or “Disable device”.

If your Bluetooth device is missing, try to expand the “Network adapters” category and you may find Bluetooth located there.

Easy Ways to Open Resource Monitor in Windows 10

March 8th, 2020 by Admin

Resource Monitor is a useful built-in tool in Windows that lets you track CPU, memory, disk and network usage in a simple way. It provides more information than Task Manager. In this tutorial we’ll show you quick ways to open Resource Monitor in Windows 10.

Method 1: Open Resource Monitor via Search

Click the Search box located in the left side of the taskbar, and type in “restore monitor“. Choose Resource Monitor from the result and you can start the app with admin rights.

Method 2: Open Resource Monitor via Run Command

Press the Windows key + R on your keyboard to open the Run command box. Type resmon and hit Enter, the Resource Monitor utility will launch.

Method 3: Open Resource Monitor with PowerShell

Open the PowerShell or Command Prompt, type resmon in the command line and press Enter. It will open up Resource Monitor immediately.

Method 4: Open Resource Monitor from Task Manager

Open Task Manager and go to the Performance tab. Click on the “Open Resource Monitor” link in the lower left hand corner. The Resource Monitor window will show up.

Method 5: Open Resource Monitor from Start Menu

Click the Start button in the lower left corner to bring up the Start Menu, then expand “Windows Administrative Tools” and you can find the Resource Monitor shortcut in the list.

That’s it!

3 Ways to Check if a Program is 32-bit or 64-bit on Windows 10

March 5th, 2020 by Admin

How to determine if an .exe file is 32-bit or 64-bit? If you have Windows 10 64-bit installed, you can run both 32-bit and 64-bit apps. However, you can run only 32-bit programs on Windows 10 32-bit installation. Here are a couple of ways to find out if a program is 32-bit or 64-bit on Windows 10.

Method 1: Check if a Program is 32-bit or 64-bit Using Task Manager

  1. Launch the target program you want to check if it’s 32-bit or 64-bit, then open Task Manager and go to the Details tab. Right-click on a column header and choose Select columns.

  2. Check the Platform box, and click OK.

  3. Under the Platform column, you can easily see if a particular program on you system is 32-bit or 64-bit.

Method 2: Check if a Program is 32-bit or 64-bit via Compatibility

  1. Find the launcher file (*.exe) of a program whose architecture you want to find out, then right-click on it and select Properties.
  2. Go to the Compatibility tab, check the “Run this program in compatibility mode for” option and click the drop-down list. If your list starts with “Windows Vista“, then your program is 64-bit. If the list starts with “Windows 95” then your app is 32 bit.

Method 3: Check if a Program is 32-bit or 64-bit Using Command Prompt

  1. To get started, download the free command-line utility called SigCheck from Microsoft Sysinternals. The download is a 799 KB ZIP file. After extracting, go to the extracted folder and open an elevated Command Prompt window.
  2. Type the following command and hit Enter. Remember to specify the full path to your target executable file.
    sigcheck.exe "full-path-to-EXE"
  3. At the right end of the output, a line called “MachineType” will tell you if the EXE is 32-bit or 64-bit.

That’s it!