Archive for March, 2023

2 Methods to Disable / Enable Slideshow on Windows 11 Lock Screen

March 29th, 2023 by Admin

Lock screen slideshow is not working in Windows 11? The options to set up a slideshow are greyed out? The slideshow feature allows you to set up a rotation of your album to display on the Windows lock screen. In this tutorial we’ll show you 2 methods to disable or enable the slideshow on the lock screen of Windows 11.

Method 1: Disable / Enable Slideshow on Windows 11 Lock Screen via Group Policy

  1. Open Local Group Policy Editor and browse to: Computer Configuration -> Administrative Templates -> Control Panel -> Personalization​, then double-click the “Prevent enabling lock screen slide show” policy on the right pane.

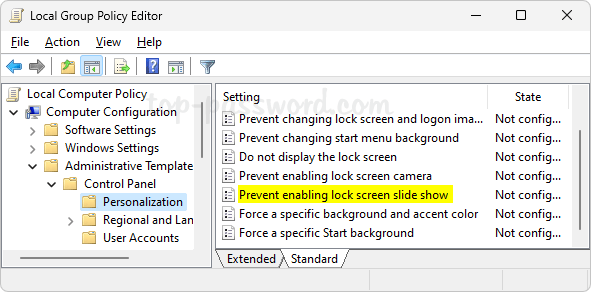
  2. Choose the Enabled option to turn off the slideshow feature, or select “Not Configured” if you don’t want to prevent the slideshow feature.

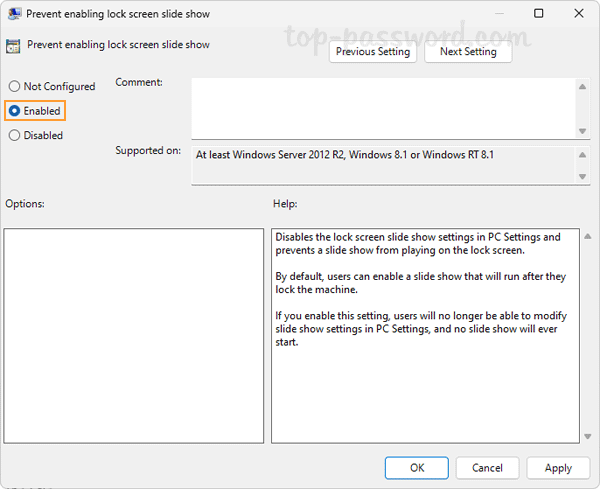
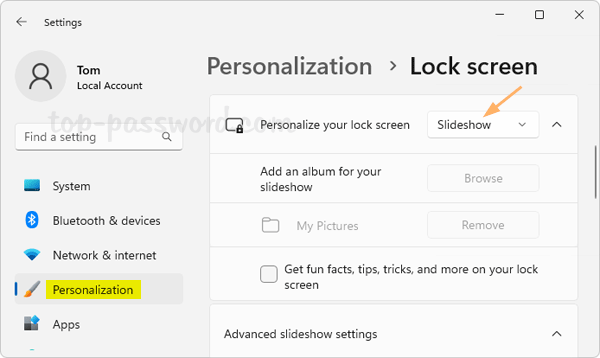
  3. Click Apply and then OK. The change will take effect immediately. If you’ve disabled the slideshow feature, open the Settings app and go to: Personalization -> Lock screen, you’ll find that many slideshow settings are greyed out and you’re unable to add an album for your slideshow.

Method 2: Disable / Enable Slideshow on Windows 11 Lock Screen via Registry Editor

  1. Open Registry Editor and navigate to: HKEY_LOCAL_MACHINE\SOFTWARE\Policies\Microsoft\Windows. Right-click the Windows key in the left sidebar and choose New -> Key.

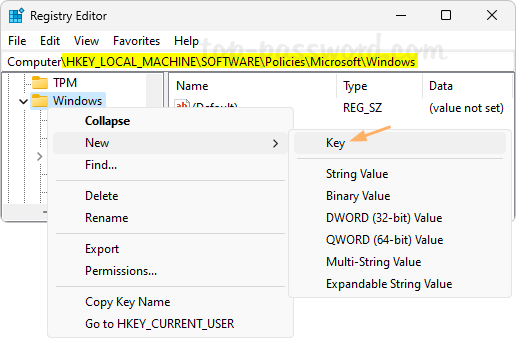
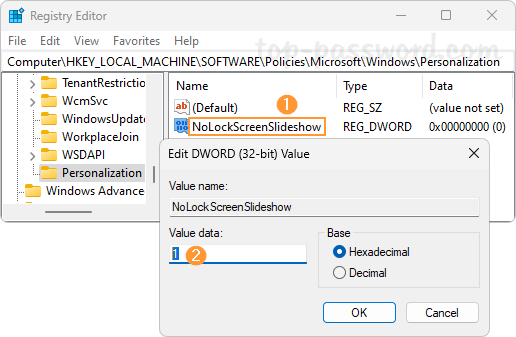
  2. Name the new key Personalization and select it. Next, right-click the blank area in the right pane and choose New -> DWORD (32-bit) Value.

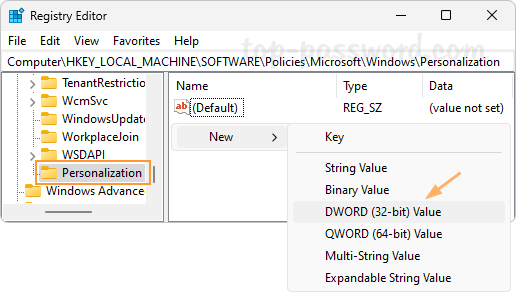
  3. Name the DWORD NoLockScreenSlideshow, and then double-click it and set its value data to 1. This will disable the slideshow feature and prevent a slide show from playing on the lock screen.

    Whenever you need to enable the slideshow feature, just delete the NoLockScreenSlideshow entry and you’re good to go.

That’s it!

Easy Ways to Find Duplicate Files in Windows 11 / 10 / 8 / 7

March 16th, 2023 by Admin

How can I find duplicate files or images on my computer? After using the computer for a while, duplicate files may accumulate or clutter up your photo albums. If you are tired of duplicate files, you can use the following methods to quickly find duplicate files in Windows 11 / 10 / 8 / 7 so you delete them to free up disk space.

Method 1: Find Duplicate Files Using File Explorer

A duplicate file usually has the same name as the original file, but with the word “- Copy” in the file name. Using File Explorer you can easily find such types of duplicate files on your computer.

  1. Open File Explorer and browse to the location (for example, “This PC”) where may contain duplicate files. Enter the keyword “copy” in the Search box in the upper right-hand corner.

  2. Click the “Search options” button in the toolbar, make sure the “File contents” menu is unchecked.

  3. The system will quickly locate all folders and files which contains the keyboard “copy” in the file names. Then you may need to manually verify which files are duplicate.

Method 2: Find Duplicate Files Using Batch

  1. Open Notepad or other text editor, copy and paste the following code, then save the file with .bat extension and close it.

    @echo off
    setlocal EnableDelayedExpansion
    
    rem Group all file names by size
    for /R %%a in (*.*) do (
       set "size[%%~Za]=!size[%%~Za]!,%%~Fa"
    )
    
    rem Show groups that have more than one element
    for /F "tokens=2,3* delims=[]=," %%a in ('set size[') do (
       if "%%c" neq "" echo [%%a]: %%b,%%c
    )
    
    echo Press any key to exit
    set /p input=


  2. Move the newly-created .bat file to the location where you would like to scan for duplicate files, and double-click it to run the batch.
  3. It will check each file in the current folder and subfolders by file size. If two or more files have the same size, the batch will treat them as potential duplicate files, and display their file names in the same line but separated by a comma.

Method 3: Find Duplicate Files Using Freeware

If you want to find identical files in one or more directories with 100% accuracy, the freeware SearchMyFiles could be of help. This software is distributed as zip archive.

  1. Download SearchMyFiles from Nirsoft website. After unzipping, double-click the executable file in the extracted directory to launch the program.
  2. When the Search Options dialog box pops up, click the Browse button to add a target folder for finding duplicate files. If you want to scan duplicates across multiple folders or drives, just click the Browse button to add the locations one by one.

  3. Click the Start Search button. It will compare all files with equal size. When it find two or more files with identical content, they are added to the duplicates list in the main window.

  4. If you want to delete duplicate files, just select them and right-click to choose “Delete Selected Files” from the pop-up menu.

That’s it!

2 Methods to Turn on / off Spatial Sound in Windows 11

March 6th, 2023 by Admin

How can I enable spatial audio for speaker or headphone in Windows 11? Spatial sound is a feature that creates an enhanced immersive 3D sound experience, making the sound like they’re coming from all around you. In this tutorial we’ll show you 2 methods to turn on or off spatial sound in Windows 11.

Method 1: Turn on / off Spatial Sound Using Settings App

  1. Right-click the Volume icon located at the bottom-right corner of your screen, and then choose “Sound settings” from the pop-up menu.

  2. The Settings app will launch and open to the Sound page. Click the “All sound devices” option under the Advanced section.

  3. Locate and click the headphone or speaker which you would like to enable / disable the spatial sound setting for.

  4. Scroll down to the bottom and you should see the Spatial audio drop-down list. Just click it to select Windows Sonic for Headphones for enabling spatial sound, or choose Off to disable spatial sound.

Method 2: Turn on / off Spatial Sound Using Sound Control Panel Applet

  1. Press the Windows key + R together to launch the Run dialog box, type control mmsys.cpl sounds and press Enter to open the Sound Control Panel applet.

  2. Go to the Playback tab, double-click the speaker or headphone you would like to enable/disable spatial sound for.

  3. Select the Spatial sound tab. Click the drop-down box under the “Spatial sound format” section, you can choose Windows Sonic for Headphones to turn on spatial sound, or set it to Off if you want to disable spatial sound.

That’s it!

How to Turn off Audio Enhancements in Windows 11

March 2nd, 2023 by Admin

How can I disable sound enhancements in Windows 11? What to do if the enhancements tab is missing from Sound/Control Panel? Audio enhancements are intended to enhance the performance and quality of your specific audio hardware. But this feature might also lower down the volume, cause echoes or other issues.

If you encounter similar sound problems with your speaker or microphone in Windows 11, follow this tutorial to turn off audio enhancements and it may solve your problem effectively.

How to Turn off Audio Enhancements in Windows 11

  1. Press the Windows + I keyboard keys at the same time to open the Settings app. Select the System category in the left sidebar, and then click Sound in the right pane.

  2. Scroll down to the Advanced section, Click “All sound devices“.

  3. You’ll see a list of playback devices such as microphones, headphones or speakers, which are connected to your computer. Simply click the device you want to disable audio enhancements for.

  4. To turn off audio enhancements, click the “Audio enhancements” drop-down box and change its setting from “Device Default Effects” to “Off”.

  5. Close the Settings app and you can play your audio device and see if unchecking audio enhancement works.

That’s it!