Archive for September, 2019

Easy Ways to Enable Telnet Client in Windows 11 / 10 / 8 / 7

September 29th, 2019 by Admin

Telnet is not recognized as an internal or external command on Windows 10? Starting with Windows 7, telnet is not enabled by default and you have to install it manually. In this tutorial we’ll show you 2 simple ways to enable telnet client in Windows 11 / 10 / 8 / 7.

Method 1: Enable Telnet Client Using Control Panel

  1. Open the Control Panel with Large icons view, and click on Programs and Features.

  2. Click the “Turn Windows features on or off” option in the left pane.

  3. In the Windows Features window, check the checkbox for Telnet Client and click OK.

  4. When complete, you’ll see the “Windows completed the requested changes” message.

  5. Now, you can start using the telnet command from the Command Prompt or PowerShell.

Method 2: Enable Telnet Client Using PowerShell or Command Prompt

  1. Open Windows PowerShell (or Command Prompt) as administrator.
  2. Type the following command and hit Enter. It will take a while to install telnet on your computer.
    dism /online /Enable-Feature /FeatureName:TelnetClient

    Whenever you need to disable or uninstall telnet, run the below command:
    dism /online /Disable-Feature /FeatureName:TelnetClient

That’s it!

How to Fix Secure Boot Violation on UEFI-Based Computer

September 27th, 2019 by Admin

When your computer boots from a Live CD or a installation disk, you may get a red square in the center of a black screen, with the following error message:

“Secure Boot Violation. Invalid signature detected. Check Secure Boot Policy in Setup”

Secure Boot is a feature included on UEFI-based computers, which ensure that only Microsoft-authorized software can be booted. If you try to boot from a trusted but “unauthorized” operating system, you’ll still receive the “Secure Boot Violation” error. To fix this issue, you have to temporarily disable Secure Boot in the UEFI BIOS firmware.

How to Fix Secure Boot Violation on UEFI-Based Computer

  1. When turning on your computer, quickly and repeatedly press a certain key (F2, DEL, F12, ESC, etc.) to enter into UEFI BIOS.
  2. Navigate to the Boot (or Security) tab, select the Secure Boot option and set it to disabled. If the Secure Boot option is greyed out, you may need to enable legacy / CSM support first.

    For ASUS computer’s UEFI BIOS, you have to press F7 to enter Advanced Mode. Go to Boot -> Secure Boot, change OS type from “Windows UEFI mode” to “Other OS”. Secure Boot is enabled when the OS type is set to “Windows UEFI mode” and disabled when it’s set to “Other OS”.

  3. Press F10 to Save the changes and reboot. Your computer should boot up as it is supposed to, without displaying the “Secure Boot Violation” error message.

2 Ways to Uninstall or Install WordPad in Windows 10

September 25th, 2019 by Admin

WordPad has been part of Windows for over decades, but it hasn’t been updated in any real way at all. Starting with Windows 10 build 18963, WordPad has become an optional feature and you can uninstall it with ease. In this tutorial we’ll show you 2 ways to uninstall or install WordPad in Windows 10.

Method 1: Uninstall or Install WordPad Using Settings App

  1. Open the Settings app and click on the Apps category.

  2. On the Apps & features page, click on the Optional features link in the right pane.

  3. When the Optional features page appears, select the WordPad entry in the list and click on Uninstall.

    After restarting Windows 10, you’ll find WordPad has gone.

  4. Whenever you need to install WordPad, open the Optional features page again. Click on the Add a feature button.

  5. Type WordPad and check the WordPad app, click on Install.

    Once that is done, you can use WordPad again.

Method 2: Uninstall or Install WordPad Using Command Prompt

  1. Open the Command Prompt as administrator.

  2. At the Command Prompt, type the following command to uninstall WordPad:
    dism /Online /Remove-Capability /CapabilityName:Microsoft.Windows.WordPad~~~~0.0.1.0

    Or run this command to install WordPad:
    dism /Online /Add-Capability /CapabilityName:Microsoft.Windows.WordPad~~~~0.0.1.0

That’s all!

Tutorial: Run PowerShell Commands on Remote Computer

September 23rd, 2019 by Admin

How can I run a PowerShell script from a remote computer? Are there any basic instructions for getting Powershell remoting to work through WinRM? In this tutorial we’ll walk you through the steps to run PowerShell commands on a remote computer.

Let’s say your local PC is called “PC01” and you’re going to use PowerShell remoting to manage a remote server called “Server01“. Before getting started, make sure the network profiles on both PCs are set to either Domain or Private. If your network profile is set to Public, you can change it to Private by following this article.

Part 1: Enable PowerShell Remoting

  1. On the remote server, open the PowerShell console as Administrator and run the following command which will start the WinRM service and create a firewall to allow incoming connections.

    Enable-PSRemoting -Force

  2. Next, you need to configure the TrustedHosts setting on the remote server so it will trust your local PC “PC01“. Type the following command and hit Enter.

    Set-Item WSMan:\localhost\Client\TrustedHosts -Value "PC01" -Force

  3. Restart the WinRM service to apply your new settings.

    Restart-Service WinRM

Part 2: Configure Your Local PC

  1. On the local PC, open the PowerShell with admin rights and start the WinRM service using this command:

    Start-Service WinRM

  2. Next, you can add the remote server “Server01” to the TrustedHosts list with the following command, so your local PC will also trust the remote server.

    Set-Item WSMan:\localhost\Client\TrustedHosts -Value "Server01" -Force

  3. Run the following command to restart the WinRM service:

    Restart-Service WinRM

Part 3: Test PowerShell Remoting

  1. Now when both computers have been configured, you can start a remote session by running the following PowerShell command on your local PC. Remember to replace “Tom” with the name of your remote server’s administrator account.

    Enter-PSSession -ComputerName Server01 -Credential Tom

  2. Enter the administrator password when prompted. Now, the session is established, all commands that are being entered in the PowerShell console are executed on the remote computer.

  3. To end the interactive session, type this command:
    Exit-PSSession

That’s all!

How to Enable Remote Desktop with Registry, PowerShell or Command Prompt

September 19th, 2019 by Admin

Is there a script to remotely enable remote desktop on Windows Server 2016? Previously we’ve covered how to turn on remote desktop protocol (RDP) using the GUI interface, but those methods don’t work in some scenarios where you do not have physical access to the computer on which you want to enable RDP. In this tutorial we’ll show you how to enable remote desktop remotely using Registry, PowerShell or Command Prompt.

Method 1: Enable Remote Desktop Using Registry Tweak

Once you are connected to the remote machine’s registry, navigate to the location: HKEY_LOCAL_MACHINE\SYSTEM\CurrentControlSet\Control\Terminal Server. In the right pane, double-click the DWORD fDenyTSConnections and change its value from 1 to 0.

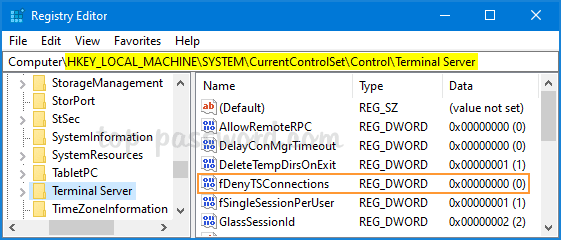
Reboot your machine and remote desktop should now be accessible. If you need to disable remote desktop in future, just set the value of fDenyTSConnections to 1.

Method 2: Enable Remote Desktop Using PowerShell

Before getting started, you need to establish a session with the remote computer using PowerShell. Once connected, run the following PowerShell commands to enable remote desktop:

Set-ItemProperty -Path 'HKLM:\System\CurrentControlSet\Control\Terminal Server'-name "fDenyTSConnections" -Value 0
Enable-NetFirewallRule -DisplayGroup "Remote Desktop"

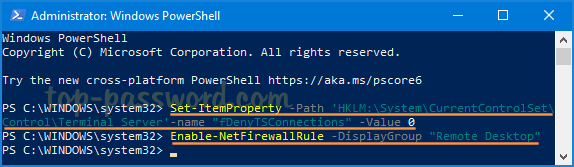
The first command will turn on remote desktop, while the second command will activate the firewall rules that allow remote desktop connections.

When you need to disable remote desktop later, run the following commands instead:

Set-ItemProperty -Path 'HKLM:\System\CurrentControlSet\Control\Terminal Server'-name "fDenyTSConnections" -Value 1
Disable-NetFirewallRule -DisplayGroup "Remote Desktop"

Method 3: Enable Remote Desktop Using Command Prompt

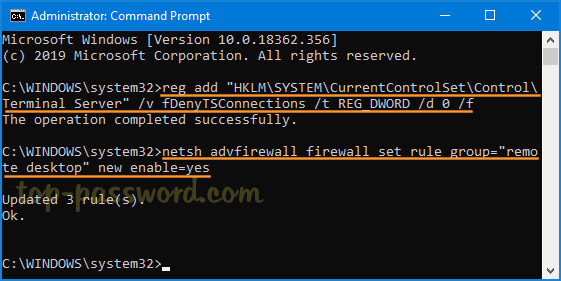
If you can open a remote Command Prompt window via SSH, PsExec or WinRS, run the following commands to enable remote desktop and configure Windows Firewall to allow remote desktop connections:

reg add "HKLM\SYSTEM\CurrentControlSet\Control\Terminal Server" /v fDenyTSConnections /t REG_DWORD /d 0 /f
netsh advfirewall firewall set rule group="remote desktop" new enable=yes

To disable remote desktop, execute the below commands:

reg add "HKLM\SYSTEM\CurrentControlSet\Control\Terminal Server" /v fDenyTSConnections /t REG_DWORD /d 1 /f
netsh advfirewall firewall set rule group="remote desktop" new enable=No

That’s all!

How to Speed Up Windows 10 Menu Animations with Ease

September 16th, 2019 by Admin

When you hover over an item in a menu, there is a delay for the submenu to pop up with an animation effect. To reduce that delay, you can use a registry tweak to speed up menu animations and make your Windows 10 apps more responsive.

How to Speed Up Windows 10 Menu Animations

  1. Press Windows + R to open the Run dialog box. Type regedit and hit Enter to open the Registry Editor.

  2. Navigate to the location below. In the right pane, double-click on MenuShowDelay to modify it.
    HKEY_CURRENT_USER\Control Panel\Desktop

  3. By default, the menu animations duration is set to 400 millisecond (1000 milliseconds = 1 second). In order to speed up the animation, you can change this value to a lower number such as 200. Setting the “MenuShowDelay” value to 0 will make the submenu pop up without any delay.

  4. When you are done editing, close Registry Editor and restart your computer. When you right-click any program or file on your desktop and hover over a context menu item with a right arrow, the submenu should pop up much faster than before.

Windows 10 also includes many other visual effects and animations that give you a smoother and a more modern interface. If you want to disable all animations to get a performance boost, please check out this article: 3 Ways to Turn off Visual Animations in Windows 10.

3 Ways to Turn off Visual Animations in Windows 10

September 10th, 2019 by Admin

Windows 10 comes with lots of animation effects to give you a more attractive and user-friendly feel, such as fading effects, when you maximize/minimize a window or open/close a menu. If you find these animations slow down your computer or you don’t like them at all, here are 3 ways to turn off visual animations in Windows 10 to boost performance.

Method 1: Turn off Visual Animations Using the Settings App

  1. Use the Windows key + I keyboard shortcut to open the Settings app, and then click on Ease of Access.

  2. From the left pane, select the Display category. In the right-side pane, slide the “Show animations in Windows” button to the left to disable the animations altogether.

Method 2: Turn off Visual Animations Using Control Panel

  1. Open the Control Panel with Large icons view, and click on Ease of Access Center.

  2. Scroll down to the “Explore all settings” section, click on “Make the computer easier to see“.

  3. Check the option “Turn off all unnecessary animations (when possible)” and click OK.

Method 3: Turn off Visual Animations Using System Properties

  1. Use the Windows key + R keyboard shortcut to open the Run dialog, type sysdm.cpl and hit Enter to open the System Properties window.

  2. Select the Advanced tab. Click on the Settings button under the Performance section.

  3. In the Performance Options dialog, you’ll see a long list of checkbox options which let you tweak your system’s visual effects. To disable animations, we recommend unchecking the following options:

    • Animate controls and elements inside windows
    • Animate windows when minimizing and maximizing
    • Fade or slide menus into view
    • Fade or slide ToolTips into view
    • Fade out menu items after clicking
    • Slide open combo boxes
    • Smooth-scroll list boxes

  4. When done, click OK and then Apply to make the changes take effect.

Disable Hardware Graphic Acceleration for Office 2019 / 2016 / 2013

September 9th, 2019 by Admin

Starting with Microsoft Office 2013, hardware graphics acceleration is enabled by default, which moves all graphics and text rendering from CPU to GPU (a chip on your graphics card) for getting better performance, but it may also increase the burden on the graphic card. If you experienced crash, slowness, blurred text and cursor hanging when running Office, turning off hardware graphics acceleration should solve the problem. Here are 2 ways to disable hardware graphics acceleration in Office 2019 / 2016 / 2013.

Method 1: Disable Hardware Graphic Acceleration from within Office Application

  1. Open any Office program like Word. Click the File tab and then choose Options in the left pane.

  2. Select the Advanced tab. In the right-hand pane, scroll down to the Display section and check the box that says Disable hardware graphics acceleration.

  3. Click OK to save the settings and restart your PC. After making these changes, the system will automatically turn off hardware graphics acceleration on all the other Office programs like Excel, PowerPoint, Outlook, etc.

Method 2: Disable Hardware Graphic Acceleration for Office with Registry Tweak

  1. Press the Windows + R key together, type regedit in the Run dialog box and hit Enter to open Registry Editor.

  2. Under the left-hand pane, navigate to one of the following registry keys depend on your Office version. If the Graphics key doesn’t exist, you have to create it manually.

    • Office 2010: HKEY_CURRENT_USER\Software\Microsoft\Office\14.0\Common\Graphics
    • Office 2013: HKEY_CURRENT_USER\Software\Microsoft\Office\15.0\Common\Graphics
    • Office 2016 / 2019: HKEY_CURRENT_USER\Software\Microsoft\Office\16.0\Common\Graphics
  3. On the right pane, create a new DWORD (32-bit) DisableHardwareAcceleration. Double-click it and change the value data from 0 to 1.

  4. Close the Registry Editor and reboot the machine to apply the changes.

How to Project Your Screen to Another Windows 10 Computer Through Wi-Fi

September 5th, 2019 by Admin

Is it possible to make the screen of one laptop appear on another laptop? How do you mirror desktop PC to laptop wirelessly? Windows 10 includes a useful feature that lets you turn your Windows 10 PC into a wireless display, so you can mirror another PC’s display with ease. In this tutorial we’ll walk you through the steps to project your screen to another Windows 10 computer through Wi-Fi.

Before getting started, make sure you have two Windows 10 computers that support Miracast, and they are connected to the same Wi-Fi network.

Part 1: Set Up The Receiver Computer

On the computer you want to use as a wireless monitor (which we’ll call it “receiver computer”), press the Windows key + I together to open the Settings app, navigate to System -> Project to This PC. By default the Projecting To This PC feature is turned off. You can turn it on by selecting “Available everywhere“.

If your PC needs to run on battery power only, just turn off the last option labelled “This PC can be discovered for projection only when it is plugged into a power source“. Now, your main computer can cast screen on this computer.

Part 2: Project Your Screen

On the main computer – the one you’re projecting the screen from, press the Windows key + P together. The Project menu will appear as a flyout to the right of your screen. Just click the “Connect to a wireless display” link.

It will take a while to scan around for wireless monitors. Once your receiver computer is found, just click it.

Now, a Connect permission prompt will display on your receiver computer. Go back to the receiver computer and click Yes to allow the connection.

Now, your receiver computer will merely mirror what’s on your main PC’s screen, and you can you can control it with your mouse and keyboard.

How to Enable iCloud Photo Library on Windows 10 PC

September 3rd, 2019 by Admin

iCloud Photo Library is an awesome feature for Apple users to store photos and videos in cloud, sync and share across all devices including iPhone, Mac or Windows PC. This tutorial will walk you through how to turn on iCloud Photo Library on your Windows 10 PC.

How to Enable iCloud Photo Library on Windows 10 PC

  1. To get started, you need to download Cloud for Windows from Apple, and then install it on your Windows-based computer.
  2. After installing, open the iCloud application and sign in with your Apple ID and password. If you’re prompted to decide whether to share usage information with Apple, click Don’t send.

  3. Click the Options button next to Photos.

  4. Check the box labeled iCloud Photo Library to upload and store your PC photo library in iCloud, and click OK.

  5. Finally click Apply to save your changes. After turning on iCloud Photo Library, iCloud Photos should automatically show up in File Explorer.

  6. Just open the iCloud Photos folder and you can click “Download photos and videos” in the file explorer navigation bar to download photos from iCloud to your Windows computer, or click “Upload photos and videos” to upload your photos to iCloud.

If you would like to view the iCloud photos on your iPhone, open the Settings and tap the Apple ID banner at the top of the screen, then navigate to iCloud -> Photos and tap the iCloud Photo Library toggle to On.