Archive for September, 2015

Fix “Create Password Reset Disk Link Not Working” in Windows 10

September 30th, 2015 by Admin

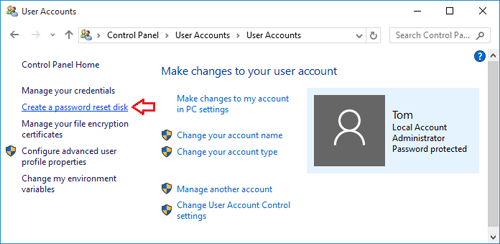
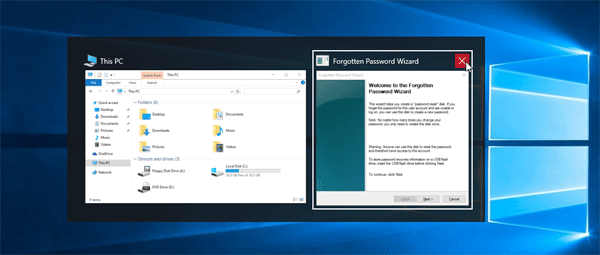
Just like previous versions of Windows, Windows 10 allows you to create a password reset disk from within the Control Panel. But when you try to click on the “Create a password reset disk” link, you might find out nothing happens. No wizard. No response at all. Doesn’t matter if I have a USB drive plugged in or not.

After searching online we find out this is really a bug in Windows 10. Here’s how do I troubleshoot this problem.

Actually, after clicking the “Create a password reset disk” link, the Forgotten Password Wizard will appear in the task switcher window (Press Alt+Tab keys together lets you open the task switcher window for switching between your running apps). But when I tab over to that task and let go of the keys nothing displays.

Now you need to close the Forgotten Password Wizard process. Here’re two ways to close it:

Method 1: Move your mouse cursor to the top-right corner of the Forgotten Password Wizard in the task switcher window, it will display the X button. Just click on X to close the process.

switch-between-apps

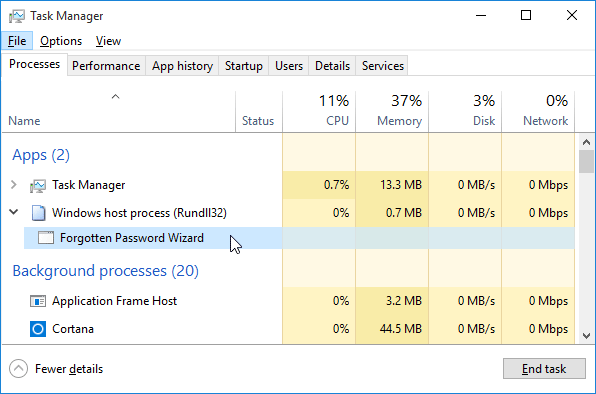
Method 2: Press the key combination CTRL+SHIFT+ESC to open the Task Manager directly. Find out the process named “Forgotten Password Wizard”. Select it and click on End task.

task-manager

After close the Forgotten Password Wizard process. Re-click on the “Create a password reset disk” from within the Control Panel, it will open the Forgotten Password Wizard successfully.

How to Turn On or Off Fast Startup Missing in Windows 10

September 30th, 2015 by Admin

How to enable / disable fast startup in Windows 10? The “Turn on fast startup (recommended)” option is missing from the Power Options? Fast Startup is a new feature of Windows 10/8, that allows a computer to boot faster than before. This article will explain how the Fast Startup works and walk you through the steps to turn on / off Fast Startup missing in Windows 10.

How Fast Startup Works?

When you shutdown a PC with Fast Startup turned on, Windows saves the current system state and the contents of memory to a file called hiberfil.sys and then it shuts down the computer. Later, when you turn on the computer, rather than performing a full load of the entire system, Windows reads only the contents of the hiberfil.sys and then restores the system state and memory to the exact same condition they were in. This restoration operation can occur much faster than a computer can boot up from a complete shut down.

How to Turn On or Off Fast Startup Missing in Windows 10?

  1. Press the Windows logo key + X on your keyboard and then select Control Panel from the drop-down menu.
  2. When you go to the control panel it shows up as the “Category” view option by default. Switch it to “Large icons” then click Power Options.

    control-panel

  3. Click on the “Choose what the power button does” link on the left side.

    power-options

  4. By default, the Shutdown settings options are greyed out. Click on “Change settings that are currently unavailable” to unlock the greyed out options.

    system-settings

  5. Now you can check / uncheck the “Turn on fast startup option” to enable / disable the fast startup feature.

    turn-on-fast-startup

  6. Click Save changes button. Done!

Fast Startup Missing from the Power Options window?

If the “Turn on fast startup (recommended)” option is missing in the Shutdown Settings, then you have to enable Hibernation on your computer as a big part of Fast Boot builds upon the Hibernate feature. Here’s how:

  1. Press the Windows logo key + X on your keyboard and then select “Command Prompt (Admin)“.
  2. At the command box type the following command and press Enter to enable hibernation:
    powercfg /hibernate on

    enable-hibernate

  3. Close the Command Prompt window and then re-open the Control Panel. Fast Startup should be there now.

Auto Shutdown Windows 10 / 8 As You Expect

September 25th, 2015 by Admin

Sometimes you might want to schedule Windows to shutdown automatically after a specified amount of time. For example, let’s say you’re downloading a big file at night. You know it will take about one hour for it to be complete, but it’s too late and you must sleep now. You don’t want to leave your laptop running overnight.

Here I’ll show you 2 methods to set up auto shutdown in Windows 10 and 8, and instruct your computer to automatically shutdown after a given amount of time, or at a specified time.

Method 1: Auto Shutdown Windows 10/8 After a Certain Amount of Time

  1. Press the Windows key + X opens the Quick Access Menu. Click on Command Prompt (Admin).

    win+x-menu

  2. Using the shutdown command you can set your computer to automatically shutdown after the amount of time you specified. For example, if you want to shutdown computer exactly after 120 seconds, type the command as follow:
    shutdown /s /t 120

    auto-shutdown

  3. Once you execute the command above, the system will force close all running applications and shutdown after 2 minutes.

Method 2: Auto Shutdown Windows 10/8 At a Specified Time

But sometimes you might want to schedule your Windows computer to shutdown at a specified time. For example, if you have a habit of listening music on your laptop before bed, you might have the tendency to fall asleep but forgot to turn off your computer. To avoid this, you can configure your PC to shutdown automatically at midnight. Here’s how:

  1. You’ll need to open up Task Scheduler to create a schedule task. Press the Windows key + R and type taskschd.msc in the Run box.
  2. The Task Scheduler window will come up. Select Create Basic Task from the Actions panel on the right.

    task-scheduler

  3. Enter a meaningful name and description of the task you are going to create, and then click on Next.

    create-basic-task

  4. Select the radio button “Daily” and click on Next to continue.

    task-trigger

  5. Now enter the starting date and time. Also, make sure that you are choosing for the task to reoccur every day.

    when-to-start-task

  6. Select the radio button “Start a program” and click on Next.

    task-action

  7. Click on Browse button to locate shutdown.exe under the system folder c:\windows\system32. Enter /s as the application argument which forces your Windows computer to shut down.

    shutdown-task

  8. Go through the summary, and if everything is fine, click on Finish.

    finish-task-creating

    Now you have successfully configured the automatic shutdown at night.

How to Reset or Remove Windows 10 PIN If You Forgot It

September 21st, 2015 by Admin

Have you set up a PIN login on your computer but forgot the PIN code? PIN is a convenient way for tablet users to log into Windows 10 without typing complicated password. This is really helpful especially if your tablet is not connected to a keyboard. If you’ve forgotten Windows 10 PIN, you can reset / remove it easily so long as you can log on with an alternative sign-in option – local account or Microsoft account.

Note: If you’re completely locked out of your Windows 10 PC and can’t login with any sign-in option, try to use PCUnlocker to reset your forgotten passwords of local / Microsoft account.

How to Reset or Remove Forgotten PIN in Windows 10?

  1. Click on the Windows icon in the left-hand corner of your screen, you’ll open up the Start menu. Next click on Settings.
  2. When the Settings app opens, click on Accounts.

    pc-settings

  3. Click on Sign-in options on the left pane. Under the PIN section, click on the “I forgot my PIN” link.

    forgot-my-pin

  4. The password reset procedures differ between Microsoft account and local account.

    For Local Account:

    1. If you’re using a local account, Windows will prompt you to verify your local account password. Enter your password and click OK.

      verify-local-account-password

    2. You’re now prompted to set up PIN again. Enter 4 digit number for your new PIN login and click OK. If you want to remove and disable the PIN, click Cancel.

      set-up-pin

    For Microsoft Account:

    1. If you PIN is for a Microsoft account, you’ll see this confirmation dialog. Click Continue to confirm that you really forgot your PIN.

      forgot-your-pin

    2. Microsoft will send you a security code to validate that you are the owner of the Microsoft account. Enter the recovery email address for verification and click on Next.

      verify-email-address

    3. Check your email account and look for a message from Microsoft account team. Copy the security code from the mail and paste it in the Code text box. Click on Next.

      enter-security-code

    4. Now you can either set up a new PIN or click Cancel to disable/remove the PIN login completely.

      set-up-pin