Archive for June, 2023

5 Quick Ways to Open the Services Applet in Windows 11

June 27th, 2023 by Admin

How do I access the Service Manager in Windows 11? The Services applet is a centralized place to start, stop, enable or disable any services installed on your Windows system. In this tutorial we’ll show you 5 quick ways to open the Services applet in Windows 11.

Method 1: Open the Services Applet via the Run Dialog

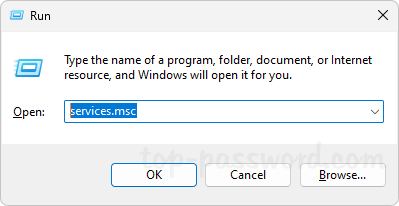
  1. Press the Windows key + R together to launch the Run dialog box, type services.msc in the text field and press Enter.

  2. This should be the most common and fastest way to access the Services tool in Windows.

Method 2: Open the Services Applet via Windows Terminal

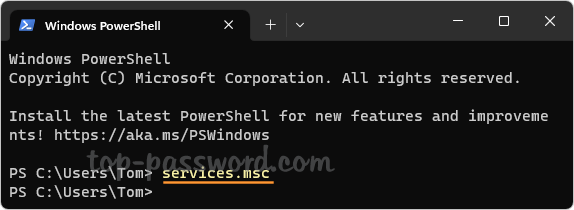
  1. Once you’ve launched Windows Terminal, enter the services.msc command and hit Enter.

  2. It will quickly open the Services tool.

Method 3: Open the Services Applet via Search

  1. Type services in the Search box on the taskbar. Next, click the Services app which appears under the “Best match” section.

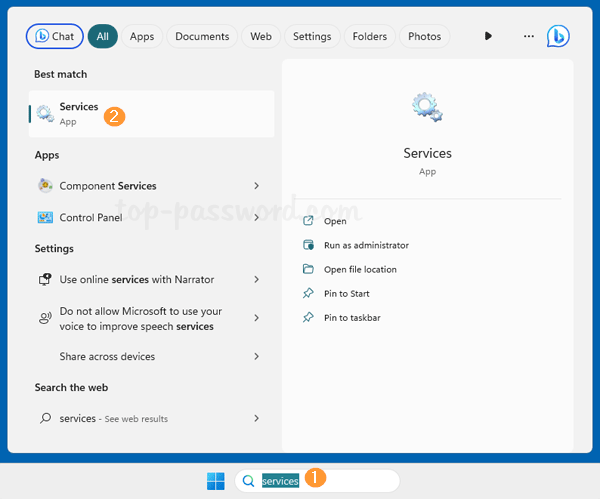
  2. The Services Manager tool will launch immediately.

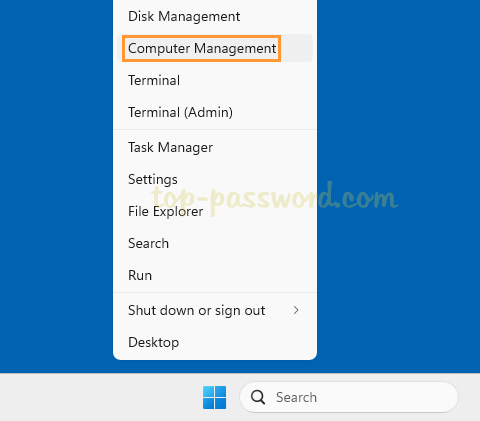
Method 4: Open the Services Applet via Computer Management

  1. Right-click the Start button on the taskbar, and then choose Computer Management from the pop-up menu.

  2. In the left pane, expand the “Services and Applications” folder and then click on Services.

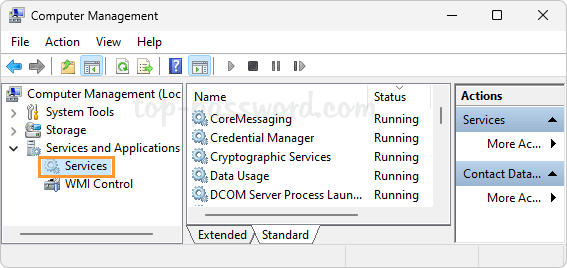
  3. You’ll see a list of services installed on your computer.

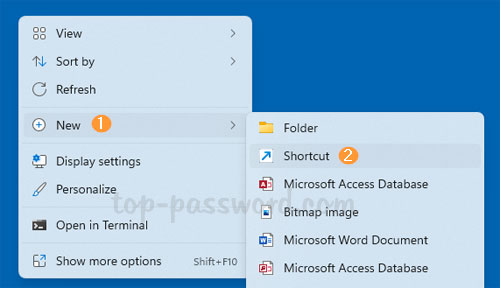
Method 5: Create a Desktop Shortcut to Open the Services Applet

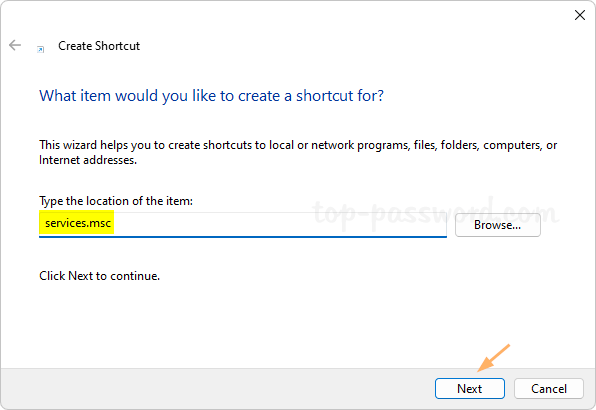
  1. Right-click the blank space on your desktop and then choose New -> Shortcut.

  2. Type services.msc in the shortcut location box and click Next.

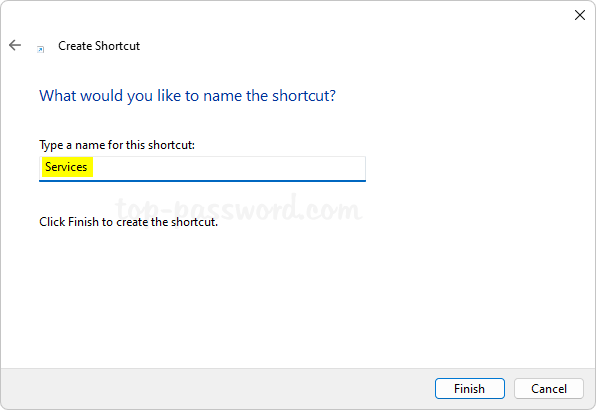
  3. Enter a name for this shortcut and click Finish.

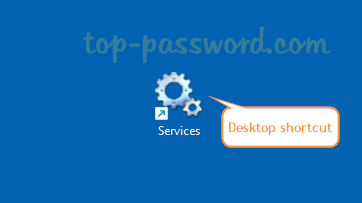
  4. Whenever you want to open Windows Services, you can double-click the desktop shortcut to quickly access it.

That’s it!

2 Methods to Reset Windows Terminal to Default Settings

June 26th, 2023 by Admin

How do I reset Terminal to initial settings in Windows 11? Windows Terminal lets you customize color schemes, fonts and profiles for Command Prompt and PowreShell. If you’ve played around with Windows Terminal settings and messed it up, here are 2 easy methods to reset Windows Terminal to default settings in Windows 11.

Method 1: Reset Windows Terminal to Default Settings via Terminal

  1. Right-click the Start button and choose “Terminal (Admin)“.

  2. When the Windows Terminal opens up, click the down-arrow icon in the title bar and select Settings from the drop-down list.

  3. Click the “Open JSON file” option at the bottom of the left navigation pane.

  4. Select the Notepad app to open the JSON file. Next, press Ctrl + A to select all the content in the JSON file, right-click them and choose Delete.

  5. Click the File menu and choose Save. Close Notepad. Windows Terminal will immediately regenerate the JSON file with default settings.

Method 2: Reset Windows Terminal to Default Settings via File Explorer

  1. Press the Windows key + R to bring up the Run box, type the following path and press Enter.
    %LocalAppData%\Packages\Microsoft.WindowsTerminal_8wekyb3d8bbwe\LocalState

  2. File Explorer will open and take you to the location where the settings.json file is stored. Just delete the settings.json file and it will reset Windows Terminal back to its default settings.

  3. The next time you open Windows Terminal, a fresh copy of the settings.json file will be created with all the default settings.

That’s it!

3 Methods to Disable Automatic Map Updates in Windows 11

June 25th, 2023 by Admin

How can I stop Windows 11 from automatically updating offline maps? By default, Windows will automatically update the offline maps when plugged in and on Wi-Fi. This may have an impact on the internet speed when you’re attending online class or meeting. In this tutorial we’ll show you 3 methods to disable automatic map updates in Windows 11 to boost your internet speed.

Method 1: Disable Automatic Map Updates in Windows 11 via Settings App

  1. Press the Windows key + I to launch the Settings app. Select the Apps category in the left, and then click on Offline maps.

  2. click on Maps updates to expand the settings. Next, uncheck the “Update automatically when plugged in and on Wi-Fi” option.

  3. This will prevent Windows 11 from automatically updating the offline maps. But you can still click on the “Check now” button underneath to update the offline maps manually.

Method 2: Disable Automatic Map Updates in Windows 11 via Group Policy

  1. Open Local Group Policy Editor and navigate to the location: Computer Configuration -> Administrative Templates -> Windows Components -> Maps​. Double-click the “Turn off Automatic Download and Update of Map Data” policy in the right pane.

  2. Choose the Enabled option. Click Apply and then OK.

  3. Close the Local Group Policy Editor. You’ll find that the “Update automatically when plugged in and on Wi-Fi” option under the “Maps updates” section in the Settings app is greyed out.

Method 3: Disable Automatic Map Updates in Windows 11 via Registry Editor

  1. Open Registry Editor and browse to: HKEY_LOCAL_MACHINE\SOFTWARE\Policies\Microsoft\Windows. Right-click the Windows key in the left sidebar and choose New -> Key.

  2. Name the new key as Maps, and select it. Next, right-click the blank area in the right pane and choose New -> DWORD (32-bit) Value.

  3. Name the DWORD as AutoDownloadAndUpdateMapData, and leave the data value as 0.

  4. Close Registry Editor and restart your system to apply the changes.

That’s it.

2 Methods to Make Task Manager Always on Top in Windows 11

June 12th, 2023 by Admin

Is there a way to keep Task Manager always stay on top of other windows? Task Manager comes with a built-in option which can make it show on top, without using third-party software such as AutoHotkey. In this tutorial we’ll show you 2 methods to make Task Manager always on top in Windows 11.

Method 1: Make Task Manager Always on Top via Task Manager Settings

  1. After opening Task Manager, click the Settings icon in the lower-left corner.

  2. Under the “Window management” section, check the “Always on top” option.

  3. The current Task Manager window will stay on the top. The next time you bring up Task Manager, it will launch and stay on top of all other windows by default.

Method 2: Make Task Manager Always on Top via System Tray

  1. When the Task Manager application is running, click the small upward arrow icon next to the Notification area. You’ll see all hidden icons for apps.

  2. Right-click the hidden Task Manager icon and choose “Always on top” from the pop-up menu.

  3. A check mark will appear beside the “Always on top” menu item. This will turn on “Always on top” for Task Manager in Windows 11.

That’s it!

How to Enable Kids Mode in Microsoft Edge

June 3rd, 2023 by Admin

How do I keep my children safe online while I’m away? Kids Mode is a nice feature available in Microsoft Edge, which allows you to prevent your kids from stumbling across harmful or inappropriate websites. In this tutorial we’ll show you how to enable Kids Mode in Microsoft Edge on Windows 11/10, so children can only access approved websites.

Part 1: Set up a Whitelist in Kids Mode

Parents can create a whitelist of websites that the children are allowed to visit. Follow these steps:

  1. Open Microsoft Edge and type the following in the address bar and press Enter. Next, click the “Manage allowed sites in Kids Mode” option.
    edge://settings/family

  2. Click the “Add website” button.

  3. Enter the URL of a website you allow children to access, and click Add.

    Repeat this to add more websites to the list. Note that Kids Mode blocks all websites that are not on this list.

Part 2: Enable Kids Mode in Microsoft Edge

  1. After opening up Microsoft Edge, click the Profile icon in the top right corner.

  2. Choose “Browse in Kids Mode” from the drop-down list.

  3. The Welcome pop-up window will appear. Click “Get Started“.

  4. Kids Mode opens in full-screen and now you can let your child to enjoy the kid-friendly browsing experience.

  5. When the child tries to access a website which is not in the whitelist, the action will be blocked but with the option to ask for permission.

  6. If you allow your child to temporarily access a blocked website, click the “Get permission” button and enter your Windows administrator password.

  7. To leave Kids Mode, click the Kids Mode banner at the top-right and then click the “Exit Kids Mode window” button. Next, enter your Windows admin password to confirm.

Conclusion

Kids Mode in Microsoft Edge can keep your kids away from harmful websites. The major drawback is that children can press the Windows logo key or hit the Alt+Tab keyboard shortcut to bypass the Kids Mode, and use other web browsers to surf the internet.