Archive for July, 2016

Windows 10 Fix: “Compressed (zipped) Folder” missing from Send To Menu

July 31st, 2016 by Admin

Windows 10 comes with native support for zip files. In File Explorer, select and right-click on the folders or files you want to zip, select “Send To” -> “Compressed (zipped) folder” from the context menu. This will compress your selected folders/files into a single .zip file.

send-to-compressed-folder

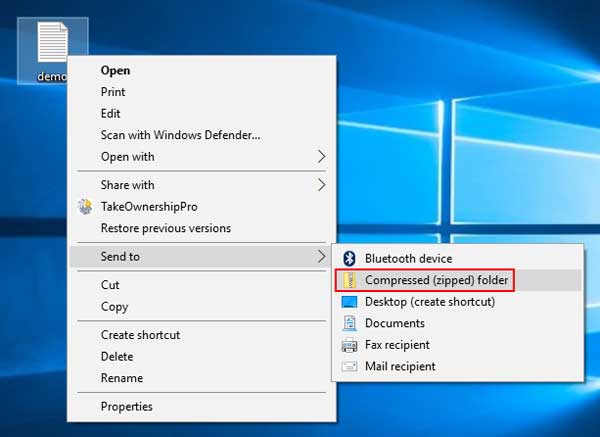
However, the “Compressed (zipped) folder” might be missing from the right-click context menu. In this tutorial we’ll show you how to restore the missing “Compressed (zipped) folder” option from the Send To menu in Windows 10.

Part 1: Restore Compressed (zipped) folder shortcut

There is a copy of this shortcut in the default user profile in Windows 10. You can just copy it from the default user profile back to your personal profile and you are done. Here is how.

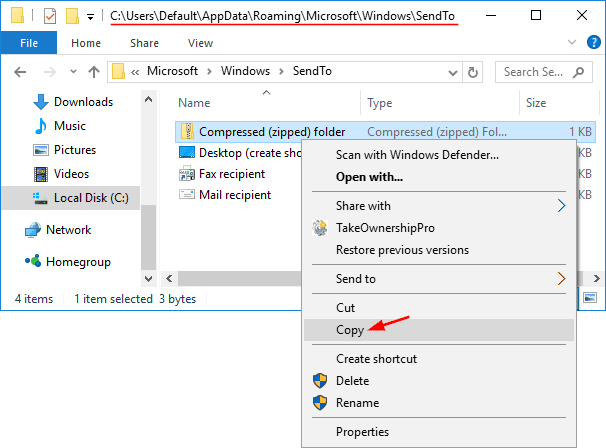
  1. Open the Send To folder of the default user profile. To do so, press Win + R to open the Run dialog, and type the following command and press Enter:
    %systemdrive%\Users\Default\AppData\Roaming\Microsoft\Windows\SendTo
  2. Right-click the Compressed (zipped) folder shortcut and select Copy from the context menu.

    copy-compressed-folder

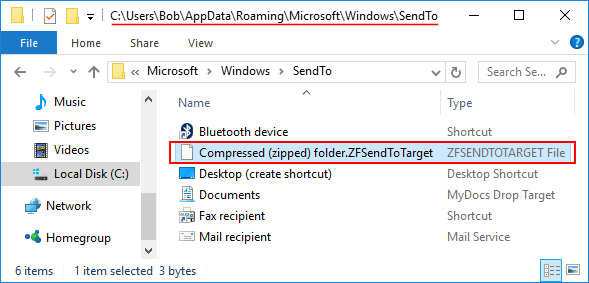
  3. Now, type the following path in File Explorer’s address bar. This will open the Send To folder of your current user profile.
    %userprofile%\AppData\Roaming\Microsoft\Windows\SendTo
  4. Paste the shortcut you previously copied there.

Part 2: Fix the .ZFSendToTarget file association

If the above method is still not working, it’s possible that the .ZFSendToTarget file association is corrupt. Normally, the “Compressed (zipped) folder” shortcut is shown with a zip icon. If its association settings are corrupt, it might show with a generic icon and display ZFSendToTarget in the Type column.

zfsendtotarget

Here’s how to fix it:

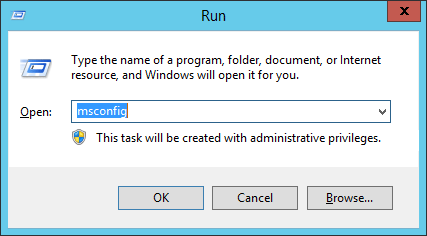
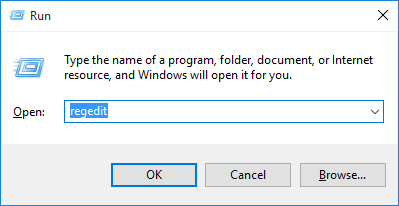
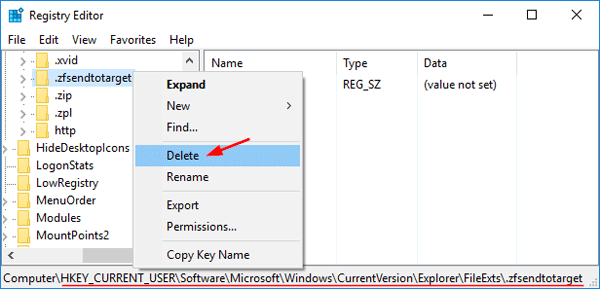
  1. Press Win + R and type regedit and press Enter.
  2. When the Registry Editor opens, navigate to:
    HKEY_CURRENT_USER\Software\Microsoft\Windows\CurrentVersion\Explorer\FileExts\.zfsendtotarget
  3. Right-click on .zfsendtotarget key in the left pane and select Delete.

    del-zfsendtotarget

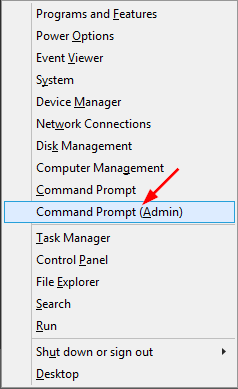
  4. Next open an elevated Command Prompt. This can be done by pressing Win + X and select “Command Prompt (Admin)” from the Power User Menu.
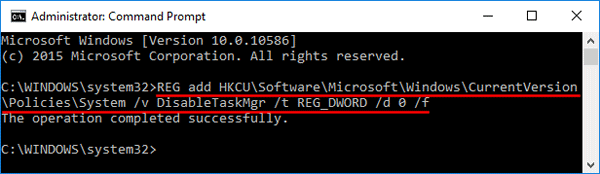
  5. Type the following command and press Enter.
    assoc .zfsendtotarget=CLSID\{888DCA60-FC0A-11CF-8F0F-00C04FD7D062}

    assoc

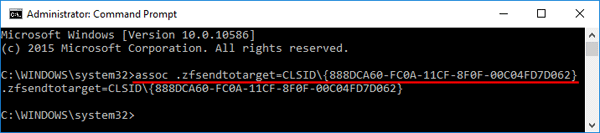
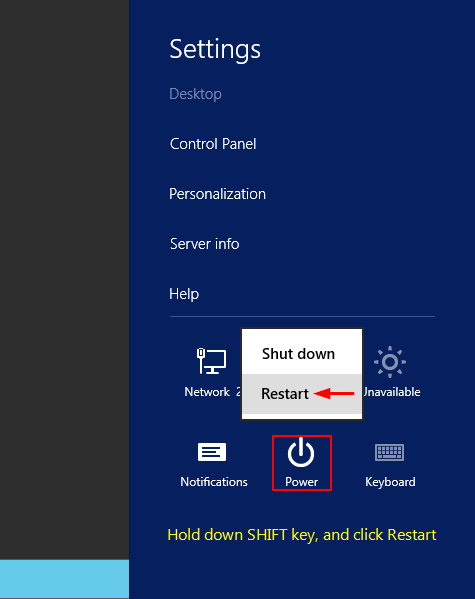
  6. Reboot your computer and the “Compressed (zipped) folder” shortcut should now appear in the Send to menu.

3 Ways to Stop Automatic Driver Updates in Windows 10

July 29th, 2016 by Admin

While plugging in a new device, Windows 10 automatically downloads and installs the device driver via Windows Update. Every time Windows 10 checks for OS updates, it will also update the device drivers. However, some drivers from Microsoft may not be fully compatible with the device driver you have installed and it might result in system instability.

In this tutorial we’ll show you 3 different ways to stop automatic driver updates in Windows 10. Note that the Local Group Policy Editor is not available to Windows 10 Home users.

Method 1: Stop Automatic Driver Updates Using Windows Settings

  1. Open a File Explorer window. Right-click This PC from the navigation pane and choose Properties.

    right-click-this-pc

  2. Click the Advanced system settings link located on the left hand side of the screen.

    advanced-system-settings

  3. When the System Properties window opens, select the Hardware tab, and click the Device Installation Settings button.

    device-installation-setting

  4. You will be asked whether you want to automatically download manufacturers’ apps and custom icons available for your devices. Select No and click Save Changes.

    stop-automatic-driver-download

    This should stop Windows from automatically downloading and installing device drivers from Windows Update.

Method 2: Stop Automatic Driver Updates Using Group Policy

  1. Press Windows key + R, enter gpedit.msc, and hit Enter to open Local Group Policy Editor.
  2. Navigate to Computer Configuration –> Administrative Templates –> System –> Device Installation –> Device Installation Restrictions. In the right hand pane, find the “Prevent installation of devices not described by other policy settings” policy and double-click on it to modify.

    device-installation-restrict

  3. To turn off automatic driver updates, select Enabled and click OK. This will disable all driver updates.

    prevent-device-installation

Method 3: Stop Automatic Driver Updates Using Registry Editor

  1. Press Windows key + R to launch the Run dialog, enter regedit, and hit Enter to open Registry Editor.
  2. Navigate to HKEY_LOCAL_MACHINE\SOFTWARE\Microsoft\Windows\CurrentVersion\DriverSearching. Double-click on the SearchOrderConfig entry on the right pane.

    driversearching

  3. Set the value data to 0 and it will turn off automatic driver updates. A value of 1 allows downloads of driver updates. Click OK and reboot your computer for the changes to take effect.

    searchorderconfig

3 Ways to Disable Windows Key Shortcuts (Hotkeys) in Windows 10

July 28th, 2016 by Admin

Did you ever play a game in full-screen mode and accidentally press the Windows key? This might cause your game to minimize or exit full-screen mode. What to do if the Windows keyboard shortcuts conflict with some software shortcuts? In this tutorial we’ll show you 3 simple ways to disable Windows key shortcuts (hotkeys) in Windows 10.

After testing, the first two methods seem to disable only these keyboard shortcuts: Windows + D, Windows + R, Windows + S, Windows + A. It won’t disable the shortcuts like Windows + X, Windows + L, Windows + PrntScr or Windows + Tab in Windows 10. If you want to disable the single Windows key on your keyboard, the 3th method is your choice.

Method 1: Disable WIN+ Keyboard Shortcuts in Using Group Policy

  1. Type edit group policy in the Search or Run box and press Enter. It will open Local Group Policy Editor.
  2. Navigate to User Configuration -> Administrative Templates -> Windows Components -> File Explorer. In the right-side pane, double-click on the Turn off Windows Key hotkeys policy to edit it.

  3. Select the Enabled option and click Apply and then OK.

  4. Reboot the computer to apply the changes.

Method 2: Disable WIN+ Keyboard Shortcuts in Using Registry Editor

If you’re unable to access the Local Group Policy Editor, you can take help of Registry Editor for the same task. Just follow these steps:

  1. Type regedit in the Search or Run box and press Enter. It will open Registry Editor.
  2. Navigate to the following key: HKEY_CURRENT_USER\Software\Microsoft\Windows\CurrentVersion\Policies\Explorer. In right-side pane, right-click on the empty space and select New -> DWORD (32-bit) Value.
  3. Rename the newly created entry as NoWinKeys and set its value to 1.

    NoWinkeys

  4. Close Registry Editor and restart your system. After reboot the WIN+ hotkeys will be turned off in your system. If you want to re-enable the WIN+ keyboard shortcuts, just delete NoWinKeys entry.

Method 3: Disable Windows Key Completely

This method allows you to completely disable the Windows logo key for all users in Windows 10, 8, 8.1 and Windows 7. Follow these steps to disable Windows key virtually:

  1. Type regedit in the Search or Run box and press Enter. It will open Registry Editor.
  2. Navigate to HKEY_LOCAL_ MACHINE\System\CurrentControlSet\Control\Keyboard Layout. In the right-side pane, right-click on the empty space and select New -> Binary Value.

    new-binary-value

  3. Rename the newly created entry as Scancode Map. Right-click on Scancode Map and click Modify. Type in the following value as the value data manually (copying and pasting will not work), then click OK.

    00 00 00 00 00 00 00 00
    03 00 00 00 00 00 5B E0
    00 00 5C E0 00 00 00 00

    disable-windows-key

  4. Close Registry Editor and restart the computer. When you boot back into Windows 10, press the Windows key and nothing will happen. If you want to re-enable the Windows logo key, open the Registry Editor again and delete the Scancode Map entry.

How to Fix “Task Manager is Disabled or Greyed out” in Windows 10

July 27th, 2016 by Admin

Unable to access Task Manager by pressing Ctrl+Shift+Esc? When you right-click on the taskbar, you might find that “Task Manager” option has been grayed out:

task-manager-greyed-out

Also when you press the Windows key + R and type taskmgr, you’ll receive the following error message:

“Task Manager has been disabled by your administrator.”

task-manager-disabled

Task Manager is probably disabled by an administrator or a virus or spyware. In this tutorial we’ll show you how to fix “Task Manager is disabled or greyed out” in Windows 10, by using Group Policy, Registry Editor or Command Prompt. Either way, you need to log in as administrator before following the steps.

Method 1: Fix ‘Unable To Access Task Manager’ Using Group Policy

  1. Press Win+R to open Run box, and type gpedit.msc command to start the Local Group Policy Editor.
  2. Navigate down to the following:
    User Configuration -> Administrative Templates -> System -> Ctrl+Alt+Delete Options
  3. Since you’re facing the issue that Task Manager has been disabled by administrator, you’ll see that the “Remove Task Manager” policy in the right pane is enabled. Double-click on it to modify.

    remove-task-manager

  4. To enable Task Manager, you should set this policy to Not Configured or Disabled.

    fix-disabled-task-manager

    Click Apply followed by OK. Reboot and your problem should be fixed now!

Method 2: Fix ‘Unable To Access Task Manager’ Using Registry Editor

  1. Press Win+R to open Run box, and type regedit command to start the Registry Editor.
  2. Navigate to the following keys:
    HKEY_CURRENT_USER\Software\Microsoft\Windows\CurrentVersion\Policies\System

    DisableTaskMgr

  3. In the right side panel, you’ll see a 32-bit DWORD value named DisableTaskMgr. In order to re-enable Task Manager, double-click and change the value to 0. (If you want to disable Task Manager, just change its value data back to 1.)
  4. Go ahead and reboot your computer for the changes to take effect.

Method 3: Fix ‘Unable To Access Task Manager’ Using Command Prompt

  1. Press Win+X shortcut keys on the keyboard and select “Command Prompt (Admin)” from the Power User Menu.
  2. At the Command Prompt, type the following command and press Enter. This will enable the Task Manager.
    REG add HKCU\Software\Microsoft\Windows\CurrentVersion\Policies\System /v DisableTaskMgr /t REG_DWORD /d 0 /f

    enable-task-manager-via-cmd

    If you want to disable Task Manager again, just run this command instead:
    REG add HKCU\Software\Microsoft\Windows\CurrentVersion\Policies\System /v DisableTaskMgr /t REG_DWORD /d 1 /f

Note: If you receive the “access denied” error, it’s likely that you’re running Command Prompt in non-Administrator mode.

3 Ways to Boot Windows Server 2012 into Safe Mode

July 24th, 2016 by Admin

How can I get into Safe Mode on the new Windows operating systems such as Windows 8, Windows 10 and Server 2012? Starting from Windows 8, the system boots very quickly and the time to press F8 key to access Safe Mode is smaller than 200 milliseconds, so it’s almost impossible to enter into the Safe Mode by pressing F8 during boot time.

In this tutorial we’ll show you 3 workable ways to boot Windows Server 2012 into Safe Mode. The methods should also work with Windows 10 and Windows 8/8.1.

Method 1: Boot Windows Server 2012 into Safe Mode Using Command Prompt

  1. Press the Windows key + X to open the WinX menu, select “Command Prompt (Admin)” from the list.

    winx

  2. In order to make Windows display the Windows Boot Manager, type the following command at the Command Prompt and press Enter. You will get a confirmation stating that The operation completed successfully.

    bcdedit /set {bootmgr} displaybootmenu yes

    enable-display-boot-menu

    If you want to stop displaying the Windows Boot Manager later, run this command instead:
    bcdedit /set {bootmgr} displaybootmenu no

  3. Now restart your computer and you’ll see the Windows Boot Manager screen. Just press F8 to bring up the Advanced Boot Options.

    windows-boot-manager

  4. Select Safe Mode and press Enter. This will open Windows Server 2012 in Safe Mode.

    advanced-boot-options

Method 2: Boot Windows Server 2012 into Safe Mode Using System Configuration

  1. Press the Windows key + R to open the Run box. Type msconfig and press Enter.

    msconfig

  2. Now the System Configuration dialog box will be opened. Under the Boot tab, check the Safe boot option and click OK.

    safe-boot

  3. Reboot your computer and it will boot directly into Safe Mode automatically. If you wan to stop Windows from booting into Safe Mode next time, you need to open the System Configuration utility (msconfig) again and uncheck the Safe boot option.

Method 3: Boot Windows Server 2012 into Safe Mode Using Settings App

  1. To get started, you need to open the Settings panel. This can be done by hovering your mouse to the top right-hand corner of the screen, or press the Windows key + I on your keyboard.
  2. Hold down the SHIFT key on your keyboard, and then click on Power icon and select Restart.

    shift-restart

  3. You will need to click on the Troubleshoot option.

    choose-an-option

  4. Click Startup Settings.

    advanced-options

  5. Click Restart.

    startup-settings

  6. The computer will boot automatically to the Advanced Boot Options screen. From there you can select Safe Mode to start Windows Server 2012 in Safe Mode.

    advanced-boot-options

Tutorial: How to Restore iPhone from Encrypted iTunes Backup

July 12th, 2016 by Admin

Lost your iPhone notes due to accidental deletion? How can I restore SMS messages from a backup previously made by iTunes? Or you need to restore iTunes backup to a new iPhone? In this tutorial we’ll walk you through the steps of restoring iPhone from encrypted iTunes backup.

How to Restore iPhone from Encrypted iTunes Backup?

Connect your iPhone to your computer and start iTunes. Wait until the little iPhone icon appears in the toolbar of iTunes. Click the iPhone icon and it will take you to the Summary page.

Under the Backups section, click the “Restore Backup…” button.

restore-backup

If you recently synced your iPhone with iTunes or performed an iPhone backup via iTunes, you will have several backup entries to choose from. Select the latest backup entry appearing under the most recent date and click Restore.

choose-itunes-backup

You’ll be prompted to enter the iTunes backup password. You are not be able to restore the encrypted backup to any device without the password. If you’ve forgotten it, you can crack the password with iTunesKey.

iphone-backup-password

Once your typed password is verified, iTunes will overwrite the iPhone contents and settings with the ones contained in the backup file. After the restore is complete, you’ll have your original iPhone data recovered.

Recover Forgotten iPhone Backup Password on Windows

July 11th, 2016 by Admin

Lost your iPhone backup password? How to unlock your iPhone backup if you forgot the password? The encrypted local backup will be unusable and unreadable without that password. In this tutorial we’ll show you 2 ways to recover forgotten iPhone backup password on Windows 10, 8 or 7.

Method 1: Try Possible Passwords

The most obvious advice is to try some of your possible passwords! Very few computer users actually create unique passwords for each account. Most people have one or two passwords that they use across all of their accounts. Check out the clues below and hope you can remember your iPhone backup password:

  • Try your iTunes Store password, which is most commonly the password to restore your backup.
  • Try your 4 digit passcode for unlocking your iPhone device.
  • Try the default password 0000 or 12345.
  • If you are using a Mac, check if your iTunes backup password is stored in Keychain access. First, open Applications -> Utilities -> Keychain Access. Double-click on the entry for “iPhone backup” and click “Show password”.
  • Try the Windows administrator password.

If you have managed to attempt all the steps and nothing has worked, it seems like you will have to crack your iPhone backup password with third party password cracking software.

Method 2: Recover iPhone Backup Password with iTunesKey

iTunesKey allows you to recover iPhone backup password using Brute-force attack, mask attack or dictionary attack. It works by try all possible password combinations or most common passwords. Follow these steps to crack iPhone backup password on Windows:

  1. Download and install iTunesKey on your local computer. After installing, launch iTunesKey and then click on the button.

    ituneskey

  2. When the File Open dialog opens, select the Manifest.plist file which is used by iTunes to store your iPhone backup password.

    open-manifest-plist

    If you don’t know where the Manifest.plist is located, please check out this article: How to Find iPhone Backup Location in Windows and Mac.

  3. Choose one of the recovery modes: Brute-force attack, Mask attack and Dictionary attack, and then click Next. In my example, I used Brute-force attack.
  4. Customize the password length and the characters your password may contains. Click Next.

    itunes-password-cracking-op

  5. Just wait for the program to try all possible combinations to guess your password. When the correct password is found, you’ll get a pop-up dialog box with your password shown on the screen.

    itunes-password-recovered

Tutorial: How to Encrypt Your iTunes Backup with Password

July 11th, 2016 by Admin

It’s a good practice to create a backup of your iPhone in iTunes in case you accidentally delete your iPhone data. One important problem with iTunes backup is that it’s not encrypted by default. If you create a local backup stored on a computer, your backup could be accessed by anyone who has physical access to your computer. To prevent data leakage or data loss, I would recommend you encrypt your iTunes backup with a password.

How to Encrypt Your iTunes Backup with Password?

  1. Connect your iPhone to a computer (or Mac) with iTunes installed. Launch iTunes and then click on the little iPhone icon in the upper toolbar. This takes you to the Summary page.

    iphone-icon

  2. Under the Summary page, you will see a section called Backups. Check This computer and also check Encrypt iPhone backup checkbox.

    encrypt-itunes-backup

  3. You will be asked to create a password that will used to encrypt your iTunes backup. Make sure you set a good password you won’t forget.

    set-itunes-backup-password

    If you’re running Mac OS X, there is an additional option lets you save the password in Keychain access, and I don’t suggest you ticking that option.

  4. Once you clicked the Set Password button, iTunes will encrypt all your local backup immediately.

    backing-up-iphone

  5. When it’s done, you can verify that your backup is encrypted. Within iTunes, click the Edit menu and select Preferences.

    itunes-preferences

  6. Once the Preferences window opens, click the Devices tab. If you spot a tiny lock icon in the row of your latest backup, it indicates your iTunes backup is encrypted successfully.

    itunes-encrypted-backup

After encrypting your iTunes backup with a password, nobody can restore a device from the backup without knowing your password. The data in the backup is encrypted too, and no need to worry about data leak even when your computer is stolen.