Archive for November, 2022

2 Ways to Disable the Settings App in Windows 11

November 29th, 2022 by Admin

The Settings app is the most used tool in Windows 11, which lets you control almost all aspects of the system. When you need to share your PC with others, you may want to disable access to the Settings app. In this tutorial we’ll show you 2 simple methods to disable the Settings app in Windows 11.

Method 1: Disable the Settings App Using Group Policy

  1. Open Local Group Policy Editor and browse to: User Configuration > Administrative Templates > Control Panel. On the right pane, locate and double-click the “Prohibit access to Control Panel and PC settings” policy.

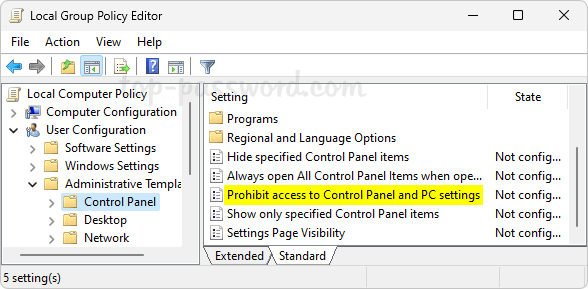
  2. Choose the Enabled option. Click Apply and then OK.

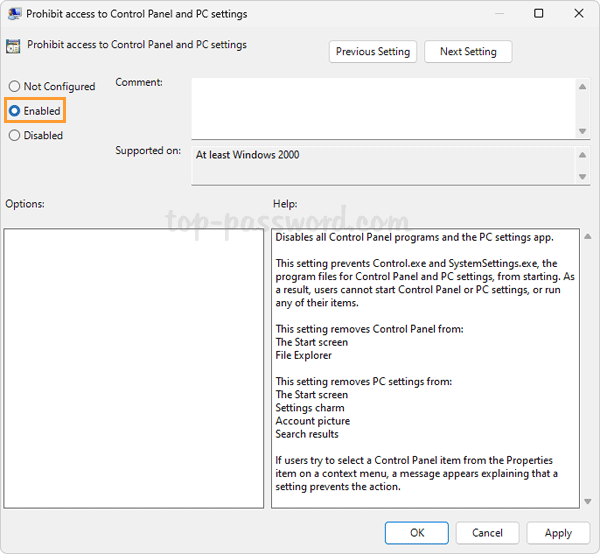
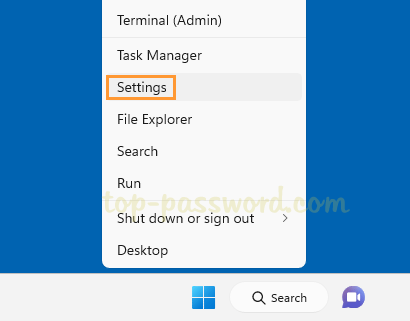
  3. Reboot your computer to apply the changes. The next time you right-click the Start button and choose Settings, the Settings app will no longer launch.

Method 2: Disable the Settings App Using Registry Editor

  1. Open Registry Editor and navigate to: HKEY_CURRENT_USER\Software\Microsoft\Windows\CurrentVersion\Policies\Explorer. In the right pane, right-click the blank area and select New -> DWORD (32-bit) Value.

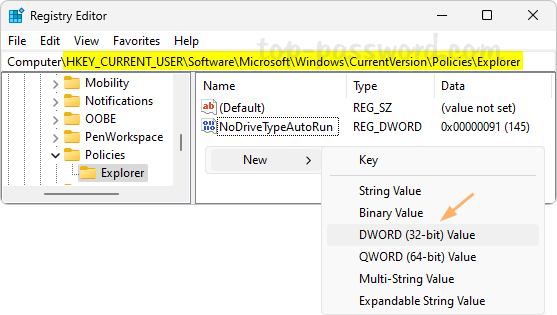
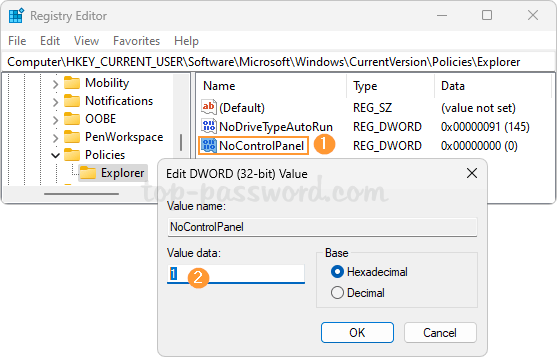
  2. Name the newly created DWORD as NoControlPanel, and set its value data to 1.

  3. Close Registry Editor and restart your system. The Settings app will no longer be accessible to anyone using your computer.

That’s it!

How to Backup and Restore PowerToys Settings in Windows 11

November 25th, 2022 by Admin

How can I transfer PowerToys settings to another Windows 11 computer? Need to create a backup of your PowerToys settings before reinstalling Windows? In this tutorial we’ll walk you through the steps to backup and restore PowerToys settings in Windows 11.

Part 1: Backup PowerToys Settings with Ease

Once you open PowerToys, select the General category. On the right-hand pane, scroll down to the bottom and you should see the “Backup & restore” section. Click the Browse button to choose the location where you want to save your backup, and then click the Backup button.

You’ll immediately get the message saying “Backup completed”.

The backup file ends with .ptb extension, which is actually self-extracting archive. If you rename the file extension to .zip and unzip it, you’ll see a bunch of .sqlite files.

Part 2: Restore PowerToys Settings on the Same or Different PC

Before getting started, transfer or copy the .ptb file you’ve backed up previously to your target computer. Next, follow these steps to perform the restore:

Open the PowerToys app and choose the General category. Under the “Backup & restore” section, click the “Refresh” link to make sure your target .ptb file is detected by PowerToys. If there are multiple .ptb files at the backup location, just the file with the latest date will be used for restoring.

Click the Restore button. PowerToys will automatically restart and apply your new settings.

Find out Which Process is Locking a File in Windows 11 / 10

November 21st, 2022 by Admin

Cannot delete file because it is being used by another process? When you try to delete a folder / file, you might get the error message saying “The action can't be completed because the file is open in another process.” If there are many processes running in the background, it’s really difficult to figure out which process is locking the file and preventing you from deleting it. In this tutorial we’ll walk you through the steps of using Microsoft PowerToys to find out which process is locking a folder or file in Windows 11 / 10.

How to Find out Which Process is Locking a File in Windows 11 / 10

  1. Open the Microsoft Store app. Type PowerToys in the search box at the top and the “Microsoft PowerToys” app will appear. You can then click it to install.

  2. After installing, you can use the Search button in the taskbar to launch the Microsoft PowerToys app.

  3. When the PowerToys Settings window opens, choose “File Locksmith” in the left sidebar. Click the “Enable File Locksmith” toggle switch to set it to On.

  4. Open File Explorer and right-click any file which is currently locked by another program, choose the “What’s using this file” option from the context menu. On Windows 11, you will first have to select the “Show more options” and then choose the required option.

  5. The File Locksmith dialog box will display the list of processes which are locking your chosen file. You can click the “End task” button to terminate the process.

That’s it!

2 Methods to Stop Apps from Opening on Startup in Windows 11

November 17th, 2022 by Admin

How can I stop Discord from running automatically when I start my computer? If your PC takes a long time to boot up, it could be the result of having too many startup programs. To speed up the boot process, you can disable unnecessary startup programs. Unlike previous versions of Windows, Windows 11 no longer allows users to disable startup apps using the System Configuration (msconfig) utility.

In this tutorial we’ll show you 2 methods to stop apps from opening on startup in Windows 11, without using third-party software.

Method 1: Disable Startup Apps in Windows 11 Using Task Manager

  1. To open Task Manager in Windows 11, right-click the Start button in the taskbar and choose “Task Manager“.

  2. In the left sidebar of Task Manager, click the “Startup apps” icon. Scroll through the list of apps and locate the app which you want to stop from opening on startup. Right-click it and choose Disable.

  3. The apps you have disabled will no longer automatically start up when you reboot your PC.

Method 2: Disable Startup Apps in Windows 11 Using Settings App

  1. Press Windows key + I keys to open the Settings app. On the left-hand sidebar, click on Apps. On the right pane, scroll down to the bottom and click Startup.

  2. You’ll see a list of apps which can be configured to launch at startup. To disable startup apps, turn off the toggle switch next to the apps you want to disable, it will no longer launch automatically once you restart your PC.

Conclusion

These are the most common ways to disable startup programs in Windows 11. Some apps (such as anti-virus software, Discord, Steam, instant messenger) also offer built-in settings to disable automatic launch at startup through the apps themselves.

Add a Context Menu to Permanently Delete Files in Windows 11 / 10

November 14th, 2022 by Admin

When you right-click a file and select Delete, or press the Delete key on the keyboard, Windows will move the file to the Recycle Bin by default. To permanently delete that file, you have to empty the Recycle Bin. In this tutorial we’ll show you how to add “Permanently delete” to context menu in Windows 11 / 10, which can help you permanently delete files without sending them to Recycle Bin.

How to Add a Context Menu to Permanently Delete Files in Windows 11 / 10

  1. Open Registry Editor and navigate to the location: HKEY_CLASSES_ROOT\AllFilesystemObjects\shell. In the left sidebar, right-click the shell key and select New -> Key.

  2. Name the new key Windows.PermanentDelete and select it. In the right pane, right-click the blank area and choose New -> String Value.

  3. Name the new DWORD ExplorerCommandHandler, and then double-click it and set its value data to {E9571AB2-AD92-4ec6-8924-4E5AD33790F5}.

  4. Use the same method to create another three different string values: Icon, Position and CommandStateSync. Set the value data of Icon to shell32.dll,-240. The value data of Position could be Top or Bottom, while leaving the value data of CommandStateSync to be empty.

  5. Close Registry Editor. When you right-click any folder or file, you’ll see the “Permanently delete” option appear in the top or bottom of the context menu.

  6. When you click the “Permanently delete” option, a pop-up dialog will ask you to confirm before permanently deleting your chosen folder or file.

That’s it!

2 Ways to Stop Taskbar Icons from Flashing in Windows 11

November 10th, 2022 by Admin

See the Microsoft Teams icon blinking orange to indicate you got a new message? When a background app needs your attention, the taskbar icon may start flickering 7 times. If you easily get distracted, you can stop taskbar icons from flashing or blinking in Windows 11.

Method 1: Change How Many Times Taskbar Icons Flash

  1. Open Registry Editor and navigate to: HKEY_CURRENT_USER\Control Panel\Desktop. In the right pane, double-click the DWORD ForegroundFlashCount to modify its value.

  2. Set its value to 1 so taskbar icons will only flash once. Keep in mind that setting the ForegroundFlashCount value to 0 won’t disable flashing.

  3. Close Registry Editor. Reboot your computer to see the changes.

Method 2: Disable Flashing on Taskbar Apps

  1. Right-click the empty space in the taskbar and choose “Taskbar settings“.

  2. When the Settings app launches, click the “Taskbar behaviors” option to expand it.

  3. Uncheck the “Show flashing on taskbar apps” option.

    This will completely prevent taskbar icons from blinking orange when apps need attention of the user.

That’s it!

Add the Task Manager option to Taskbar Context Menu in Windows 11

November 2nd, 2022 by Admin

When you right-click the taskbar in Windows 11, you may find that the Task Manager option is missing from the context menu. If you want to restore this reduced functionality, here’s a simple method to add the Task Manager option back to taskbar context menu in Windows 11.

How to Add the Task Manager option to Taskbar Context Menu in Windows 11

  1. Open Registry Editor and navigate to: HKEY_LOCAL_MACHINE\SYSTEM\CurrentControlSet\Control\FeatureManagement\Overrides\4. Right-click the 4 key in the left sidebar and select New -> Key.

  2. Name the new key as 1887869580, then select it. In the right pane, right-click the empty area and choose New -> DWORD (32-bit) Value.

  3. Name the DWORD as EnabledStateOptions, and leave its value data at 0 (unchanged).

  4. Create a second DWORD value and name it EnabledState. Double-click it and set its value data to 2.

  5. Close Registry Editor and reboot your computer to apply the changes. The next time you right-click the taskbar, the Task Manager option should appear in the context menu of the taskbar.

That’s it!