Archive for January, 2018

How To Enable or Disable Night Light in Windows 10

January 23rd, 2018 by Admin

Night Light, also known as “Blue Light”, is a new feature introduced since Windows 10 Creators Update, which makes your display use warmer colors at night to help you sleep better and reduce eyestrain. In this tutorial we’ll show you how to enable or disable Night Light mode in Windows 10, even when the Night Light setting is greyed out.

How To Enable or Disable Night Light in Windows 10?

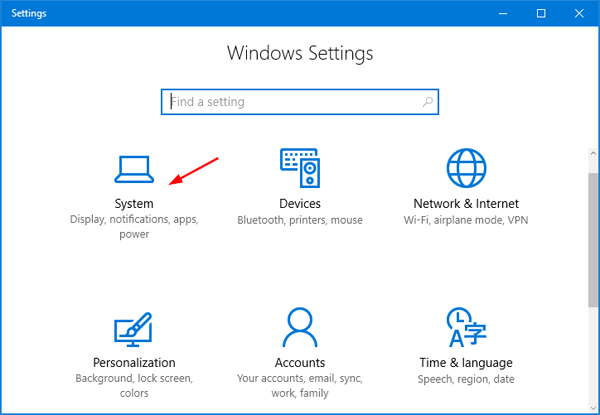
  1. Press the Windows + I keyboard shortcut to open the Settings app, and then click on the System icon.

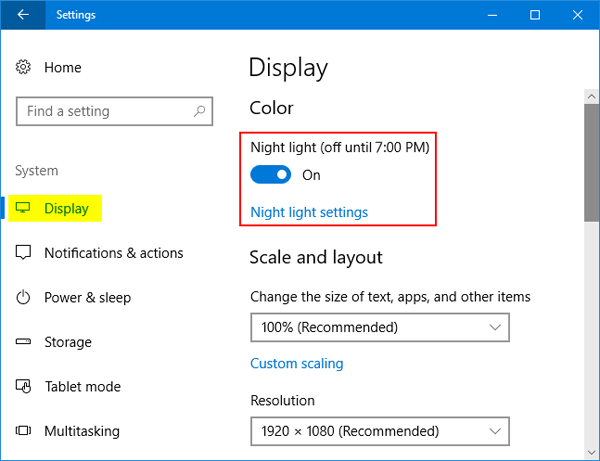
  2. Select the Display tab on the left side. You can then toggle the “Night light” button to On to enable it, or Off to disable it.

  3. If you enable the Night Light feature, you can configure it further by clicking the “Night light settings” link under the toggle.

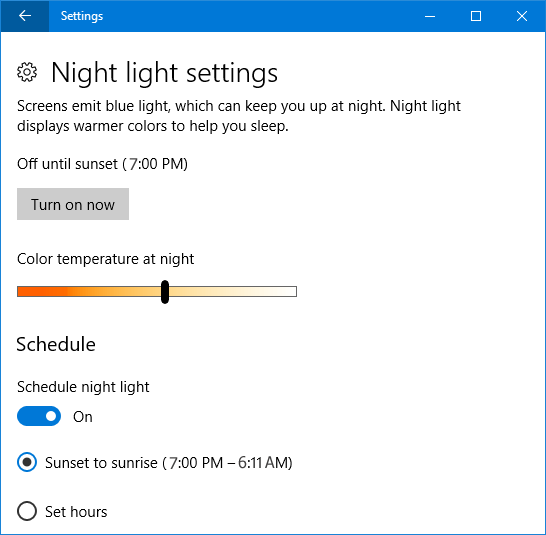
    There, you can adjust the color temperature by dragging the slider, and set Night Light to kick in when the sun sets and it will automatically get disabled during sunrise. When it’s done, you can click the “Turn on now” button to immediately enable the Night Light feature.

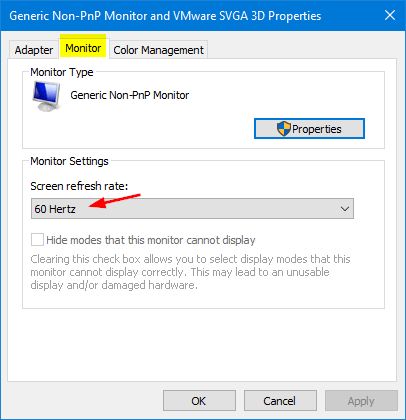
Can’t Enable or Disable Night Light?

Night Light settings is greyed out and you can’t disable or enable it? Here is a quick workaround to resolve this issue. Follow these steps:

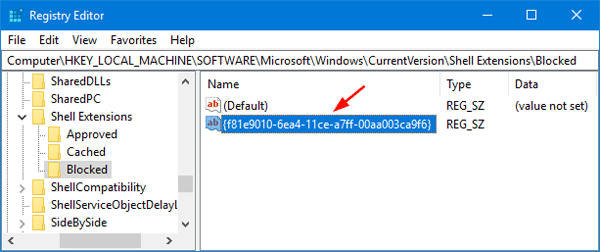
  1. Open the Registry Editor and navigate to the following key:
    HKEY_CURRENT_USER\Software\Microsoft\Windows\CurrentVersion\CloudStore\Store\Cache\DefaultAccount
  2. Expand the DefaultAccount key, then right-click and delete the following two subkeys:

    $$windows.data.bluelightreduction.bluelightreductionstate
    $$windows.data.bluelightreduction.settings

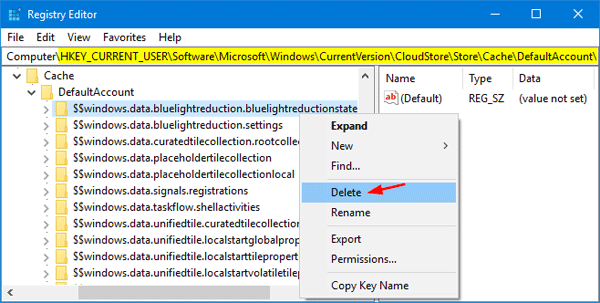
  3. When you’re done, close Registry Editor and reboot your computer. Open the Settings app and you should then be able to turn Night Light on or off.

How to Change Input Language Using Keyboard Shortcut in Windows 10

January 22nd, 2018 by Admin

Unable to change keyboard language in Window using hotkey? Is there any way to set keyboard shortcuts to quickly change to a different language / keyboard layout? Here’s how to enable a keyboard shortcut for changing the input language in Windows 10.

How to Change Input Language Using Keyboard Shortcut in Windows 10?

  1. Open the Control Panel. Switch it to Large icons view and then click Language.

  2. Click the Advanced settings link on the left sidebar.

  3. In the next window, scroll down to the “Switching input methods” section and click the “Change language bar hot keys” link.

  4. This will bring up the “Text Services and Input Languages” dialogue. Select the “Between input languages” action and click Change Key Sequence.

  5. Select the keyboard combination you would like to use for switching between languages, and click OK.

That’s it!

Change Mouse Pointer Size and Color in Windows 10 / 8 / 7

January 18th, 2018 by Admin

Mouse cursor is too small? How can I change the color of mouse pointer to make it easier to see? When you’re playing a game, you may find the mouse cursor is way too small for your screen. Here are 3 simple ways to change mouse pointer size and color in Windows 10 / 8 / 7.

Method 1: Change Mouse Pointer Size and Color from Settings (Windows 10 Only)

Press the Windows + I key combination to open the Settings app, and then click Ease of Access.

Select the Mouse tab. On the right side of the window, there are three different sizes and colors you can choose from for your mouse pointer. Click on one to select it.

Method 2: Change Mouse Pointer Size and Color from Ease of Access Center

Open the Control Panel in Category view, and then click Ease of Access.

On the next screen, click on the link that says “Change how your mouse works“.

Under the Mouse pointers section, you can check the option for the size and color of the mouse pointer that you want to use. Click OK to apply your changes.

Method 3: Change Mouse Pointer Size and Color from Mouse Properties

Open the Control Panel and switch to Large icons view. Click Mouse.

When the Mouse Properties window opens, select the Pointers tab. Select a mouse pointer scheme from the drop-down box. Click Apply and then OK.

If you want to restore the original mouse pointer scheme, click the Use Default button at the bottom.
That’s it!

Find If Your Drive is SSD or HDD in Windows 10 / 8 / 7

January 17th, 2018 by Admin

How can I know whether a disk is a solid-state drive (SSD) or hard disk? Is there a way to check if I have a SSD or HDD without having to open the laptop itself to see what’s inside it? Here are 2 easy methods to find if your drive is SSD or HDD in Windows 10/8/7, without using third-party software.

Method 1: Find If Your Drive is SSD or HDD Using Disk Defragmenter

Simply press the Windows key + R keyboard shortcut to open the Run box, type dfrgui and press Enter.

When the Disk Defragmenter window is shown, look for the Media type column and you can find out which drive is solid state drive (SSD), and which one is hard disk drive (HDD).

Method 2: Find If Your Drive is SSD or HDD Using PowerShell

Open the PowerShell as administrator, and type the following command and press Enter:

Get-PhysicalDisk

The command will list all physical disks connected to your computer. The MediaType parameter can help you identify what type is your disk drive, HDD or SSD.

That’s it!

5 Ways to Open Disk Defragmenter in Windows 10

January 16th, 2018 by Admin

Over time, files on your hard drive get scattered and they are spread to discontinuous clusters. This can increase the time required to read / write files. To have your computer run more efficiently, you can defragment the hard drive that will rearrange the files so that they occupy contiguous clusters. In this tutorial we’ll show you 5 ways to open Disk Defragmenter in Windows 10.

Method 1: Open Open Disk Defragmenter via Cortana

Simply type defragment in the Cortana’s search box. You can then click the “Defragment and Optimize Drives” search result to open Disk Defragmenter.

Method 2: Open Open Disk Defragmenter via Run or Command Prompt

Press the Windows key + R shortcut to bring up the Run box, type dfrgui and press Enter to launch Disk Defragmenter.

You can also access Disk Defragmenter by running the dfrgui command at Command Prompt.

Method 3: Open Open Disk Defragmenter via Start Menu

Click the Start button, then select All apps -> Windows Administrative Tools. Now choose Defragment and Optimize Drives.

Method 4: Open Open Disk Defragmenter via File Explorer

Open File Explorer. Right-click the drive you want to defragment, and then select Properties. When the Properties dialog opens, select the Tools tab and then click the Optimize button.

Method 5: Open Open Disk Defragmenter via Control Panel

Open the Control Panel in Large icons view. Click Administrative Tools.

You can now click the Defragment and Optimize Drives shortcut to start the Disk Defragmenter utility.

Set up Assigned Access to Restrict Local User to One App in Windows 10

January 15th, 2018 by Admin

Assigned Access is a useful feature in Windows 10 that allows you to restrict a local standard user to use only a single app that you choose. This makes it easy to create an Assigned Access app for use in a kiosk computer scenario. In this tutorial we’ll walk you through the steps of setting up Assigned Access in Windows 10.

How to Set up Assigned Access to Restrict Local User to One App in Windows 10?

This feature is available only in Windows 10 Pro, Education, and Enterprise. To set up Assigned Access, you must be logged into Windows 10 using an administrator account.

  1. Press the Windows key + I to open the Settings app. Navigate to Accounts > Family & other people. Click the Set up assigned access link at the bottom of the right pane.

  2. When you see the Set Up Assigned Access screen, you’ll be prompted to choose an account and an app. To begin, click Choose an account.

  3. Select the standard account for which you want to set up Assigned Access.

  4. After the user account is selected, click the Choose an app option.

  5. You’ll see a list of built-in apps or third-party apps installed from Windows Store. Just pick a single app for Assigned Access.

  6. When you’re done, restart your computer. After you log in with the Assigned Access account, the app you assigned to that account will start automatically in full-screen mode. You’re unable to switch or close the app. To exit the account, simply press Ctrl + Alt + Del and you’re out.

That’s it! When you no longer need Assigned Access on Widows 10, just bring up the Set Up Assigned Access screen again and click the “Turn off assigned access and sign out the selected account” link.

How would you use Assigned Access? Let us know in the comments section below.

3 Steps to Change DVD Region in Windows 10 / 8 / 7

January 13th, 2018 by Admin

“I just bought a DVD movie. When I tried to play it on Windows 10, I received a warning that the DVD was purchased in region 2, my computer DVD player was set for region 1, and I needed to change the region. I’ve never come across this before. Please help!”

Most commercial DVDs have a region code that ties the DVD to specific regions of the world, as a measure of copy protection. If a DVD’s region code doesn’t match the current region code of your DVD player, you’ll receive a warning that you need to change regions in order to play the DVD. The following tutorial will show you how to change the region code of your DVD player in Windows 10 / 8 / 7.

Note: The region code for a DVD player can only be changed five times. The fifth time you change the region, your DVD player is permanently locked to the last region you set.

How to Change DVD Region in Windows 10 / 8 / 7?

  1. Press the Windows key + R to open the Run box. Type in devmgmt.msc and press Enter.

  2. When the Device Manager window opens, expand DVD/CD-ROM drives. Right-click on your DVD player and then select Properties.

  3. Click on the DVD Region tab. Select the region in which you want to change to and click OK.

How to Set a Disk or Volume Read-Only in Windows 10 / 8 / 7

January 11th, 2018 by Admin

How to enable write protection for a disk drive or set your volume read-only? How can I prevent a hard drive from being formatted? In this tutorial we’ll show you how to set a particular disk or volume read-only in Windows 10 / 8 / 7, without using any third-party software.

Part 1: Set a Volume Read-Only

  1. Open the Command Prompt as administrator, and then run the diskpart command.

  2. Type list volume and press Enter. Next type select volume #, where # is the number of the volume you’re going to lock it as read-only.

  3. To make your selected volume read-only, type attributes volume set readonly and press Enter.

  4. Now, you’ll be unable to delete or modify the files on that volume. When you try to format that volume, you’ll get the error “The disk is write protected“.

If you want to clear ready-only attribute for your volume later, just repeat steps 1 through 2 above and then run this command:

attributes volume clear readonly

Part 2: Set a Disk Read-Only

If you want to set the entire disk read-only, follow these steps:

  1. Open the Command Prompt as administrator, and then run the diskpart command.
  2. Type list disk and press Enter. Next type select disk #, where # is the number of the disk you want to make read-only.

  3. To set your chosen disk read-only, type attributes disk set readonly and press Enter.

  4. Now your disk is write-protected and all its partitions turn into read-only.

When you want to clear ready-only attribute for your disk, just repeat steps 1 through 2 above and then run this command:

attributes disk clear readonly

That’s it!

How to Remove “Give access to” Context Menu in Windows 10

January 8th, 2018 by Admin

Since Windows 10 Fall Creators Update, the old “Share with” option in Windows Explorer’s context menu was renamed to “Give access to”. This option lets you quickly share folders with other users on a network. However, if you never use this feature, you can remove “Give access to” option from the right-click context menu in Windows 10 File Explorer.

How to Remove “Give access to” Context Menu in Windows 10?

  1. Press the Windows key + R key combination to launch Run dialog box, then type regedit and press Enter.

  2. In the Registry Editor, browse to the following key:
    HKEY_LOCAL_MACHINE\SOFTWARE\Microsoft\Windows\CurrentVersion\Shell Extensions

    Right-click the Shell Extensions key in the left pane, select New -> Key. Name it Blocked.

  3. Select the new key Blocked, and then right-click blank area on the right side, select New -> String Value.

  4. Name the new String {f81e9010-6ea4-11ce-a7ff-00aa003ca9f6} and leave its data value empty as shown below.

  5. Restart File Explorer or log out and then log in to see the change. Now the “Give access to” option is removed from the right-click context menu in the File Explorer. If you want to restore that option back, just open Registry Editor and delete the Blocked key you created.

How to Change Monitor Refresh Rate in Windows 10 / 8 / 7

January 3rd, 2018 by Admin

Do you have any trouble with flickering on the monitor when playing games? Most of screen flickering issues can be solved by adjusting the monitor’s refresh rate. The refresh rate refers to how many times per second the screen refreshes the image on it. Increasing the monitor’s refresh rate should reduce screen flicker, which results in less strain on their eyes. In this tutorial we’ll show you how to change monitor refresh rate in Windows 10 / 8 / 7.

Note: The refresh rates that you can set for your monitor are determined by the capabilities of the Graphic card and monitor.

Part 1: Change Monitor Refresh Rate in Windows 10

  1. Right-click an empty area on the desktop and select Display settings.

  2. This should open the Settings app and go to the Display tab. Click Advanced display settings at the bottom of the right pane.

  3. Click Display adapter properties.

  4. This will open the Monitor and graphics card properties. Go to the Monitor tab and you can select a higher or lower refresh rate and click Apply.

Part 2: Change Monitor Refresh Rate in Windows 8 / 7

  1. Right-click an empty area on the desktop and select Screen resolution.

  2. Click on Advanced Settings in the bottom right.

  3. When the Display adapter properties window opens, click the Monitor tab, and then select a Screen Refresh Rate from the drop down menu.
  4. Click Apply. That’s it!