Archive for June, 2014

Save Any Web Page To PDF File in Windows and Mac

June 30th, 2014 by Admin

Have you ever wanted to download one or more Web pages in a form that you could read on a PDA or an e-book reader? Every time I came across a great tutorial on the Web, I will convert the content to a pdf file and keep it for future reference. If you are like me, and are also using Google Chrome, you can save any Web page to PDF file in just a few mouse clicks, without using any PDF conversion software.

How to Save Any Web Page To PDF File in Windows and Mac?

  1. First of all, start the Chrome browse and access the web page that you want to convert into a PDF file format.
  2. Press Ctrl + P in Windows PC or Command + P if you are using a Mac to open the the Print dialog.

    save-webpage-to-pdf

  3. Click on Save button to save the current online web page to to PDF format.

This is the simplest way to convert a web page to PDF file in Windows and Mac. If you’re not always connected to the Web, you can save your favorite articles you find online so you can read them offline later.

Reset Forgotten Panasonic Toughpad Windows 8 Tablet Password

June 26th, 2014 by Admin

Can’t log into your Panasonic Toughpad Windows 8 tablet because you’ve forgotten the password? All your need is to create a PCUnlocker bootable USB drive with UEFI support, then boot your Panasonic Toughpad tablet from USB and it enables you to reset lost Windows 8 password quickly! This method works with Toughpad FZ-G1, Toughpad FZ-M1 and Toughpad 4K tablets.

How to Reset Forgotten Panasonic Toughpad Windows 8 Tablet Password?

  1. Download the PCUnlocker Enterprise and save it on an alternate PC. Extract the pcunlocker.iso file from the downloaded .zip archive.
  2. Burn the ISO image file to your USB flash drive using the freeware ISO2Disc or Rufus. Make sure you choose the “GPT” or “GPT partition scheme for UEFI computer” option while burning the USB drive.

  3. Once your USB drive has finished burning, insert it into the USB port of your Panasonic Toughpad tablet.
  4. Turn on the tablet while touching top left of the screen to enter the BIOS Setup Utility.
  5. Touch [Exit], then double-touch your USB drive in [Boot Override]. Double-touch [Yes], the computer will restart and then boot from your USB drive.
  6. The computer temporarily loads the Windows 8 PE OS from the USB drive. When it’s done, the PCUnlocker application will start and display a list of Windows 8 accounts detected from your Windows 8 SAM registry hive.

  7. Select your administrator account and click on “Reset Password” button. It will reset your forgotten Windows 8 tablet password quickly! Restart the computer and you can then log into your Panasonic Toughpad Windows 8 tablet without a password!

Bypass Windows 8/8.1 Password on Toshiba Satellite Laptop

June 23rd, 2014 by Admin

Lost Windows 8 admin password to your Toshiba Satellite laptop? You can use some bootable utilities like BartPE to reset your lost Windows password, but such disks are Windows XP based operating systems which can be used to unlock only Windows 7, Vista and XP (not including Windows 8 and 8.1).

The reason behind this is, most of Windows 8/8.1 laptop is configured in UEFI mode (Unified Extensible Firmware Interface). The UEFI mode does not allow to boot legacy OS like Windows XP, DOS etc. So to reset Windows 8/8.1 password, the conventional method does not work.

Luckily, the latest version of PCUnlocker came out that can boot in UEFI mode. This article will introduce how to make a PCUnlocker Live USB and then use it to bypass Windows 8/8.1 password on Toshiba Satellite laptop.

Create A PCUnlocker Live USB

If you can’t boot into your Toshiba Satellite Laptop, you’ll need to borrow one from a friend to make your own PCUnlocker Live USB drive, but other than that, all you really need is a USB flash drive. Here’s what you need to do:

  1. Download the PCUnlocker Enterprise and save it on your spare computer. Please note both the Standard and Pro editions don’t support UEFI booting. The downloaded file is a self-extracting .zip file which contains a UEFI bootable ISO image: pcunlocker.iso. Extract the ISO image file from it.
  2. Burn the ISO image file to your USB flash drive using the freeware ISO2Disc or Rufus. Make sure you choose the “GPT” or “GPT partition scheme for UEFI computer” option while burning the USB drive. If you don’t have a USB drive at hand, you can use a blank CD to make a PCUnlocker Live disc.

  3. Once your USB drive has finished burning, insert it into your Toshiba Satellite laptop.

Bypass Toshiba Satellite Windows 8/8.1 Laptop Password

Now that you’ve successfully created a PCUnlocker Live USB drive. It’s time to boot into the USB drive and bypass Windows 8/8.1 password. Here is what you need to do:

  1. Turn on your Toshiba Satellite laptop. As soon as the Toshiba logo appears, press F12 to get into Boot Menu. Using the arrow keys to select the DVD option and press Enter. In some Toshiba notebooks or laptops, in order to access the Boot Menu you might need to press the ESC key or the “C” key as you boot.
  2. Once you’ve booted into the PCUnlocker Live USB, you’ll be presented with the screen of PCUnlocker. This program automatically locates the SAM database file for your installed Windows operating system, and shows you a list of local user accounts.

  3. Choose your administrator account and click on “Reset Password” button. The program will remove your forgotten Windows 8/8.1 password quickly! If you’re using a Microsoft account as your computer’s login, make sure you choose the associated local account and the program will unlock your Microsoft account password locally.
  4. When it’s done, reboot your system and you can log back into your Windows 8/8.1 account. Besides bypassing Windows 8 password, you can also use PCUnlocker Live USB drive to reset Windows 7, Vista and XP passwords on your Toshiba Satellite laptops.

How to Prevent A Program from Ever Running in Windows

June 13th, 2014 by Admin

If you have kids you may don’t want them to run certain applications like Skype or BitTorrent on your computer. Today we take a look at a setting in Local Group Policy that allows you to prevent specified programs from ever running in Windows. This is also useful if you don’t want other people to open applications on your work computer.

How to Prevent A Program from Ever Running in Windows?

  1. The first thing you must do is open the Local Group Policy Editor. You won’t find a menu entry for this tool. Instead you start the tool by pressing Windows + R to bring up the Run box and then entering the command gpedit.msc.

  2. Navigate to User Configuration -> Administrative Templates -> System in the left panel, and double click on Don’t run specified Windows applications.

  3. In the pop up window, first set it to Enabled, then under the Options section click on the Show button next to List of disallowed applications.

  4. A Show Contents dialog comes up where you can type in the apps you want to block users from running. In the Value column, type the application executable name (don’t use the full path), e.g. firefox.exe, notepad.exe.

  5. The change takes effect immediate right after you click OK or Apply. From this point on, if a user tries to access an application that is not on the specified list they will get the following warning message.

This is a nice feature for preventing unwanted programs from running in Windows. However, Local Group Policy Editor is not available in Home versions of Windows 7/8/10. This trick only prevents users from accessing applications that are started by Windows Explorer process, but you can still run the disallowed programs in the Command Prompt. If you need a reliable and more secure solution, I would recommend you to use the professional privacy protection program – Protect My Folders.

Remove Forgotten BIOS / Administrator Password from Dell OptiPlex

June 12th, 2014 by Admin

Is there a way to clear or reset Dell OptiPlex BIOS password? How to get back into your Dell OptiPlex desktop after forgotten Windows system password? Here I’m going to explain how to remove forgotten BIOS password and reset lost Windows admin password from Dell OptiPlex desktop computer.

Part 1: Remove Dell OptiPlex BIOS Password

In most PCs you can clear the BIOS password by taking out the CMOS battery for a while. However, this is not exactly the case for Dell OptiPlex desktop PC. It happens to be that there’s an additional step for this Dell desktop, there’s a jumper called PSWD located close to the motherboard’s power supply connector.

After the jumper is removed, the BIOS password can be reset by just removing the CMOS battery (CR2032) from the motherboard for a few moments and then putting it back in. Before touching anything inside the motherboard, make sure you unplug the power cable and ground yourself with a wrist-grounding strap to dissipate static electricity from the motherboard.

If you need to remove BIOS on other brands of computers such as Acer, HP/Compaq, Toshiba, Asus, Lenovo, you can use the similar method to remove the BIOS password but the jumper settings might be different: How to Remove BIOS Password Using The Jumper Settings.

Part 2: Reset Dell OptiPlex Windows Admin Password

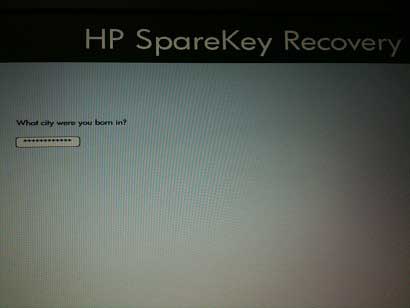
What to do if you forgot Windows 8 or 7 administrator password on your Dell OptiPlex computer? PCUnlocker is a password recovery tool that can run from a CD or USB and help you reset lost Windows user password in just a few steps:

  1. First of all, you need to use another PC to make a PCUnlocker Live CD or USB drive. Download the self-extracting ZIP archive of PCUnlocker which contains a bootable CD image. Burn the ISO image to a blank CD or USB drive using the ISO2Disc program.
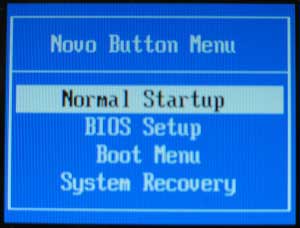
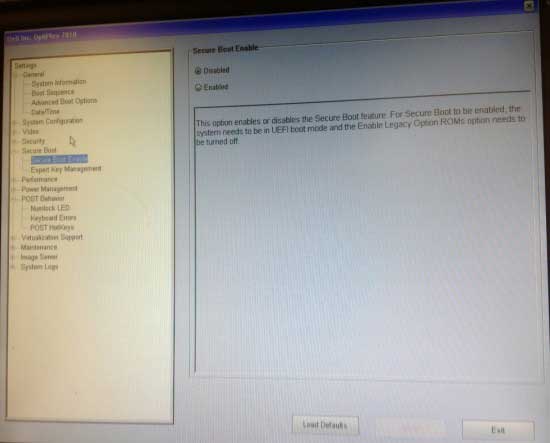
  2. Insert your burned CD or USB drive into your Dell OptiPlex computer. To get into the BIOS, turn on the computer and keep tapping the F12 key when you see the Dell Logo screen. From the boot menu select BIOS Setup and Press Enter. In order to boot from PCUnlocker Live CD or USB drive, we will need to configure the UEFI to use Legacy Mode, which emulates a traditional BIOS. There are three steps you need to change in order to enable Legacy Mode.
  3. Under Settings > Secure Boot > Secure Boot Enable, switch the option to Disabled and hit Apply.

    dell-secure-boot

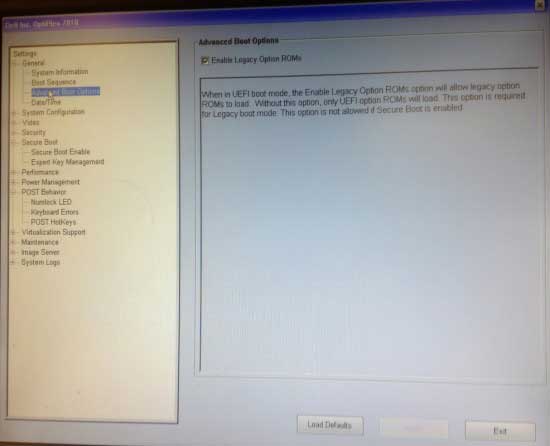
  4. Under Settings > General > Advanced Boot Options, check the box to Enable Legacy Option ROMs and hit the Apply button.

    dell-legacy-options

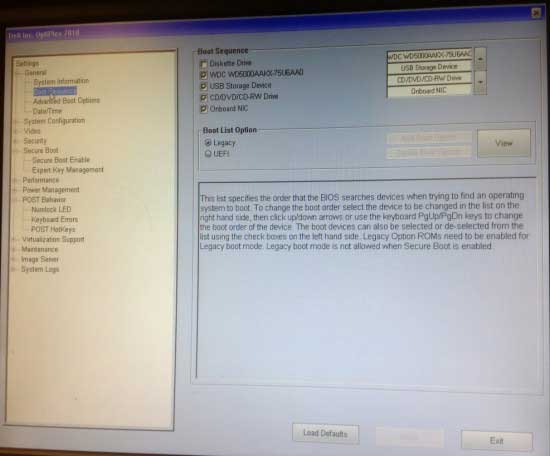
  5. The last change is also under General but in the Boot Sequence section. Switch the Boot List option from UEFI to Legacy and then hit Apply.

    dell-uefi-legacy

  6. Exit the BIOS Setup. Upon reboot, repeatedly press the F12 function key to bring up the boot menu again. Select the PCUnlocker Live CD or USB drive under the category of LEGACY BOOT.
  7. Once booting to the PCUnlocker program, select your administrator account and click on Reset Password button. The program will unlock / reset your forgotten Windows administrator password instantly.

  8. The last step is to restart your Dell OptiPlex computer and remove the CD or USB drive. Be sure to put your UEFI settings back to the original way they were before making the changes. Your computer will now reboot back to the Windows login screen and a password will no longer be needed to log in.

How to Find VMware License / Product Key

June 12th, 2014 by Admin

Where is my VMware Workstation license key stored? How to recover or find a lost VMware product key? Before you can install VMware Workstation you’ll need to find the license key that came with the software. If you’ve lost your license key, there is a way to find it as long as VMware Workstation is still installed.

With KeyFinder Plus you can find lost license key (product key) for all versions of VMware Workstation, including VMware Workstation 6, 7, 8, 9 and 10. Here is how can you recover VMware product key in just a few simple steps.

How to Find VMware License / Product Key?

  1. Download the KeyFinder Plus application on your local computer, and then install it.
  2. Start the KeyFinder Plus program. Click on Start Recovery button and then select From current system from the pop-up menu.
  3. It will automatically search your computer’s registry for your VMware Workstation license key and for product keys and serial numbers for your other software programs.

    find-vmware-product-key

  4. Once the product keys are recovered, click on Save To File button and you’ll get a save file dialog box, which allows you to export the product keys to a text file.

    save-product-key

Important: You may have come across VMware Workstation keygen programs or other kinds of VMware Workstation cracks but keep in mind that these are not legal ways of obtaining license keys or product keys. It’s legal to use the KeyFinder Plus program to extract the license key from a registered copy of your installed VMware Workstation.

How to Unlock Lenovo Miix Tablet If You Forgot Windows 8 Password

June 11th, 2014 by Admin

Locked out of Lenovo Miix tablet because your Windows 8 admin password is lost? How can you change or reset it without needing to reinstall it? The tablet is locked and you can not go thorough it. Hence you can not install any software to unlock it. As you already know you can just reset your tablet to factory. I think you don’t want to lost all your data for a simple password. Then you should realize we need to do something before Windows boot up the system. Most of these methods use a Live CD to crack the password.

Both Lenovo Miix 2 and IdeaTab Miix10 are using pure UEFI (32-bit) instead of traditional BIOS. Miix tablet only supports UEFI boot, does not support legacy boot. To reset the password you have to use a Windows password recovery tool that supports UEFI booting. PCUnlocker Enterprise is the right one that you’re looking for. In this tutorial I’ll show you how to use it to reset your forgotten Windows 8 password on Lenovo Miix tablet.

How to Unlock Lenovo Miix Tablet If You Forgot Windows 8 Password?

Use an alternate PC to download the bootable ISO image of PCUnlocker Enterprise and extract it. Burn the pcunlocker.iso file to your USB flash drive with the freeware ISO2Disc. Remember that you choose the GPT partition style. This will create a PCUnlocker Live USB drive with UEFI bootloader.

Plug the USB drive into your Lenovo Miix tablet. When the tablet is off, press and hold the volume up button and then press the Power button, until the Novo Button Menu appears on the screen. Choose the Boot Menu option, and then select your USB flash drive and press Enter.

novo-button-menu

Once it boots to the PCUnlocker program, select your Windows account and click on Reset Password button to remove your forgotten password. If you use a Microsoft account as your tablet login, there should be a local account that is linked to your Microsoft account. Choose that local account to proceed and this will also unlock your Microsoft account password locally.

Restart your tablet and remove the USB drive. You can then log back into your Lenovo Miix Windows 8 tablet without a password! This method works with all Windows 8 tablets of Lenovo Miix series.

ThinkPad Helix Windows 8 Tablet Password Reset

June 10th, 2014 by Admin

Forgot Windows 8 login password on your ThinkPad Helix tablet? How to obtain admin access to your tablet without restoring it to factory settings? ThinkPad Helix is preloaded with UEFI firmware instead of traditional BIOS. Legacy-based boot media will not boot successfully on UEFI based computer. So here I’m going to show you how to create UEFI bootable USB media and then use it to reset forgotten Windows 8 password on ThinkPad Helix tablet.

Part 1: Create A UEFI Bootable USB Media

  1. Before resetting ThinkPad Helix tablet password, you need to use another computer to make a bootable PCUnlocker USB drive. Simply download the trial version of PCUnlocker Enterprise, unzip the downloaded file and you’ll get an ISO image file called pcunlocker.iso.
  2. Next download and install the freeware ISO2Disc. Run the ISO2Disc program, click on Browse button to select the PCUnlocker ISO image, then choose your USB drive and select GPT partition style. Click on Burn.

    Create a GPT bootable PCUnlocker USB drive

  3. A UEFI bootable USB media will be created in minutes.

Part 2: Reset Windows 8 Password on ThinkPad Helix Tablet

  1. Insert the USB boot media into your ThinkPad Helix tablet.
  2. Turn on the tablet. While the “To interrupt normal startup, press Enter or tap here” message is displayed at the logo screen, press the F12 key or tap the message string to launch the Startup Interrupt Menu, then tap F12 to enter the startup selection menu.

    helix-boot-menu

  3. Select to boot from USB drive. The tablet will then boot from USB media. After a while, you’ll see the PCUnlocker program and it shows you a list of local accounts existing on your ThinkPad Helix tablet.

    Reset Windows Password

  4. Choose a local account and then click Reset Password button, it will reset your forgotten password immediately. If you’re using a Microsoft Account with your ThinkPad Helix tablet, choose the local account associated to your Microsoft account and then reset its password.

If the touchscreen doesn’t respond correctly, you’ll need to install the tablet into the keyboard dock or attach an external keyboard to the tablet. Using the keyboard to perform the password recovery steps conveniently.

How to Remove HP BIOS Password with HP SpareKey

June 9th, 2014 by Admin

How to reset BIOS Password on HP EliteBook 8530p? A forgotten BIOS password isn’t the end of the world. There are many ways to clear or reset a BIOS password, but the easiest method for HP users is to use HP SpareKey, which allows them to remove HP BIOS password without involving IT administrators.

What’s HP SpareKey?

HP SpareKey is a utility that helps you, or the administrator of the computer, recover lost system passwords, such as the power-on, drive lock, or BIOS passwords. When setting up the BIOS Administrator password, remember to enable the HP SpareKey Enrollment which prompts you to provide answers for a sequence of three predetermined personal identification questions.

sparekey-enrollment

The HP SpareKey uses these questions to identify you if you need to reset the passwords. Examples of the personal identification questions presented by HP SpareKey are listed below.

  • What is your mother’s maiden name?
  • What is the name of your first pet?
  • What is your father’s middle name?

How to Remove HP BIOS Password with HP SpareKey?

Forgot the BIOS password on your HP laptop? If you’ve set up HP SpareKey on your HP computer previously, now you can follow these step to remove your lost BIOS password easily:

  1. Turn on the computer and immediately press the ESC key to display the Startup Menu, and then press the F10 to enter BIOS Setup.

    hp-boot-menu

  2. If you have typed your BIOS password incorrectly three times, you’ll be presented with the screen prompting you to press F7 for HP SpareKey Recovery.

    hp-sparekey-recovery

  3. Press F7 key, the HP SpareKey wizard pops up and prompts you for the answers to the three personal identification questions.

    sparekey

  4. If you successfully answer the questions, you are granted access and you can reset the BIOS password.

    sparekey-bios-password

Note: HP SpareKey cannot help you recover a Windows 8/7/Vista administrator account password. It is intended solely to recover system-level passwords. If you need to reset forgotten Windows login password, I recommend you to use the PCUnlocker program.

How to Reset SQL Server 2008 Password without Reinstalling

June 7th, 2014 by Admin

What to do when the SA account password is lost in SQL Server 2008? You may have faced the issue of losing the SQL Server SA password. Perhaps you followed the security best-practice of removing the built-in\Administrators from the sysadmin server role and now you’ve lost admin access to your SQL Server instance. At this point you may think that the only option is to reinstall SQL Server and attache the database.

In this tutorial I’ll show you how to reset SQL Server 2008 (R2) password without reinstalling. SQL Server Password Changer is a great recovery utility that allows you to change SA password that is stored in the master database file (master.mdf). Here’s how.

How to Reset SQL Server 2008 Password without Reinstalling?

  1. Click here to download and install the SQL Server Password Changer program on your computer.
  2. Click the Open File button. Select the SQL Server 2008 master database file (master.mdf). Typically it is located in the folder: c:\Program Files\Microsoft SQL Server\MSSQL10_50.SQLEXPRESS\MSSQL\DATA\.
  3. The program will automatically decrypt the master database file and display all user accounts in your SQL Server. Select the SA account, click the Change Password button. Type a new password and click OK.

    SQL Server Password Recovery

  4. The program will replace the existing password with your new password, and also unlock your SA account if it’s already locked out or disabled. Now start your SQL Server 2008 instance again and you can then log into the SA account with the new password.