Archive for January, 2020

Turn off Hardware Acceleration in Chrome or Microsoft Edge

January 26th, 2020 by Admin

How do I disable hardware rendering in Edge? Chrome won’t load or play videos in the webpage, no sound upon playing? To resolve these problems, you can try to disable hardware acceleration. In this tutorial we’ll show you how to turn off hardware acceleration for the most popular web browsers – Chrome and Microsoft Edge.

Part 1: Disable Hardware Acceleration in Chrome

Open your Chrome browser and type “chrome://settings/system” in the address bar, hit Enter.

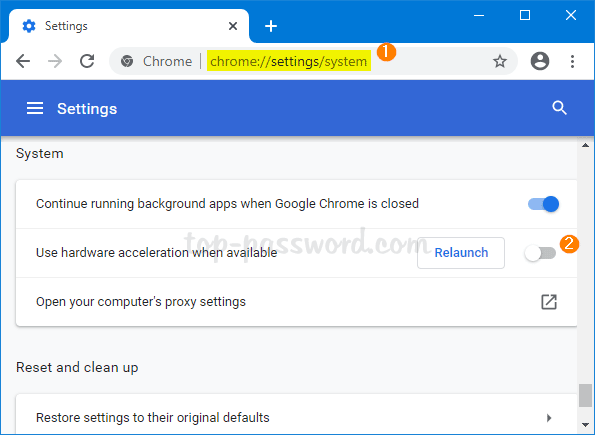
Uncheck the box of “Use hardware acceleration when available“. Click on the Relaunch button appeared just now to apply the change.

Part 2: Disable Hardware Acceleration in Microsoft Edge

The new Microsoft Edge is built on the same Chromium platform as Chrome, so you can use the similar method to disable hardware acceleration in Microsoft Edge Chromium:

Open Microsoft Edge and type “edge://settings/system” in the address bar, hit Enter.

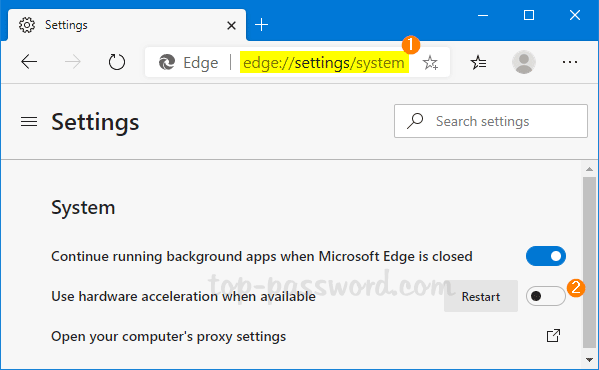
Turn off the toggle switch for “Use hardware acceleration when available“. Click on the Restart button to relaunch Microsoft Edge.

That’s it!

How to Show Different Time Zone Clocks on Windows 10 Taskbar

January 17th, 2020 by Admin

By default, Windows 10 will display a single clock with your local time in the system tray. If you want an additional clock, here is an easy way to make Windows 10 show different time zone clocks on the taskbar. This is really useful when you need to know if it’s a good time to call a friend or a colleague who lives in different time zones.

How to Show Different Time Zone Clocks on Windows 10 Taskbar

  1. Press the Windows key + I to open the Settings app, then click on Time & Language.

  2. Select the Date & time tab. Scroll down to the “Related settings” section and click on “Add clocks for different time zones“.

  3. Under the “Additional Clocks” tab, check the “Show this clock” box, choose the time zone you want and give it a name. Note that you can add up to two additional time zone clocks.

  4. After you’re done, click OK. Now move your cursor over the clock at the bottom right corner of the taskbar, and you will see two additional time zone clocks appearing right under the local time.

That’s it!

How to Check if a Process is Running as Administrator in Windows 10

January 15th, 2020 by Admin

When you try to run an program with admin privileges, a UAC prompt will ask for permission to continue. But there are some scheduled tasks or background applications which can run as admin without the UAC prompt. In this tutorial we’ll show you a simple method to check if a process is running as administrator in Windows 10.

How to Check if a Process is Running as Administrator in Windows 10

  1. Press the Windows key + R to open the Run box, type taskmgr and then hit Enter to launch Task Manager.

  2. Go to the Details tab. Right-click any column header and choose “Select Columns” from the popup menu.

  3. Scroll down until you see the Elevated option, check that box and click OK.

  4. Now, the Details tab of Task Manager will be showing a new “Elevated” column. You can easily see which process is launched with admin/elevated privileges.

That’s it!

2 Ways to Disable / Block Microsoft Edge Extensions in Windows 10

January 8th, 2020 by Admin

Browser extensions are third-party add-ons that provide extra functionality to Microsoft Edge. When your browser slows down or it doesn’t load webpage properly, a problematic extension may be the major cause. In this tutorial we’ll show you how to disable extension support and prevent users from installing any extension in Microsoft Edge on Windows 10.

Method 1: Disable Extensions in Microsoft Edge Using GPO

  1. Press the Windows Key + R together, type in gpedit.msc and hit Enter to open Local Group Policy Editor.

  2. Navigate to: Computer Configuration -> Administrative Templates -> Windows Components -> Microsoft Edge. In the right pane you will see the Allow Extensions policy. Double-click on it to modify.

  3. Select the Disabled option and click OK.

  4. After restarting your computer, you can no longer install extensions in the Edge browser, and the extensions that are already installed will also be disabled automatically. If you open the Settings menu in the Edge browser, you will see that the “Extensions” option is greyed out.

Method 2: Disable Extensions in Microsoft Edge Using Registry Editor

  1. Press the Windows Key + R together, type in regedit and hit Enter to open Registry Editor.

  2. In the left pane of Registry Editor, navigate to: HKEY_LOCAL_MACHINE\SOFTWARE\Policies\Microsoft. Right-click on the “Microsoft” key to create a new key named MicrosoftEdge. Next, right-click on the newly created key and create a new key named Extensions.

  3. Right-click on any blank area in the right pane to create a DWORD (32-bit) Value named ExtensionsEnabled, and make sure the value data is set to 0.

  4. Close Registry Editor and restart Windows, you won’t be able to use or install any extension on Microsoft Edge. Whenever you need to enable extension support again, simply delete the DWORD ExtensionsEnabled and you’re done.

How to Create System Restore Points with Command Prompt or PowerShell

January 6th, 2020 by Admin

By default, Windows will automatically create a restore point before you make a major change to the OS, such as installing a new driver or app. In order to make more frequent backup, you need to create restore points manually or schedule the task to run daily or weekly. In this tutorial we’ll show you how to create system restore points in Windows 10 using Command Prompt or PowerShell.

Part 1: Turn On System Protection

Before getting started, you need to check if system protection is enabled. Press the Windows key + R to open the Run box and type “sysdm.cpl” to open the System Properties window.

Go to the System Protection tab and click on the Configure button.

Select “Turn on system protection” and click OK.

Part 2: Disable System Restore Point Frequency

By default, Windows allows you to create only one restore point every 24 hours. To remove this limitation, open Registry Editor and navigate to: HKEY_LOCAL_MACHINE\SOFTWARE\Microsoft\Windows NT\CurrentVersion\SystemRestore. Right-click on the SystemRestore key in the left pane and select New ->DWORD (32-bit) Value.

Give the new DWORD a name SystemRestorePointCreationFrequency and leave its value data to 0.

Part 3: Create System Restore Point with CMD or PowerShell

Open an elevated Command Prompt and type the following command:
wmic.exe /Namespace:\\root\default Path SystemRestore Call CreateRestorePoint "MyRestorePoint", 100, 7

or launch Windows PowerShell as administrator and enter:
powershell.exe -ExecutionPolicy Bypass -NoExit -Command "Checkpoint-Computer -Description "MyRestorePoint" -RestorePointType "MODIFY_SETTINGS""

Once pressing Enter, a new system restore point will be created immediately. You can use Task Scheduler to make your system run the above command to create restore points automatically during startup.

3 Ways to Disable Clipboard History in Windows 10

January 3rd, 2020 by Admin

Is there a way to turn off the clipboard history feature? Starting with Windows 10 October 2018 Update, the clipboard can save multiple items (text and images) that were copied and sync them across devices. This may inevitably cause your sensitive data appear in the clipboard history. In this tutorial we’ll show you 3 easy ways to disable clipboard history in Windows 10.

Method 1: Disable Clipboard History in Settings App

Open the Settings app and click on the System category. Under the Clipboard tab, toggle the “Clipboard history” option to Off. This should disable clipboard history immediately.

Method 2: Disable Clipboard History Using Group Policy

Open the Local Group Policy Editor and browse to: Computer Configuration -> Administrative Templates -> System -> OS Policies. On the right pane, double-click on “Allow Clipboard History“.

Set the policy to Disabled. Click OK and reboot your computer. This will turn off clipboard history for all users on your system.

Method 3: Disable Clipboard History Using Registry Editor

Open Registry Editor and navigate to: HKEY_LOCAL_MACHINE\SOFTWARE\Policies\Microsoft\Windows\System. Right-click on the right pane and select New -> DWORD (32-bit Value).

Name the newly created DWORD as AllowClipboardHistory. Give it a value of 0 and reboot.

When you try to turn on the clipboard history option in Settings app, you’ll find it is grayed out. Whenever you need to enable clipboard history, just navigate to the same registry location and delete the AllowClipboardHistory entry.

That’s it!