Posts Tagged ‘windows 8’

How to Fix “Your PC is offline” Issue in Windows 8

October 7th, 2013 by Admin

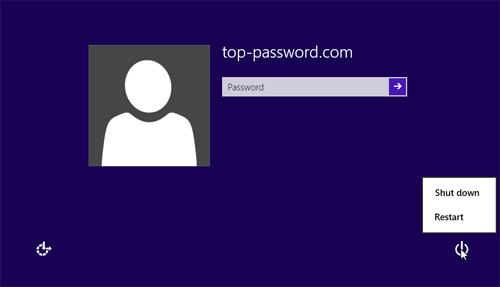
I’ve been using Windows 8 since it came out. I shut my computer down last night and I’ve gone to log in this morning and I get this message: “Your PC is offline. Please sign in with the last password used on this PC.” I’ve tried all of possible passwords and can’t log in to my Microsoft account.

This is a very rare error message you may get when you use Windows 8 with Microsoft account. When you first add a Microsoft account to Windows 8, Internet connection is required and your Microsoft account password will be cached locally. Afterwards you should be able to use it to log in to Windows 8, even when Internet connection is not available. But there are many reasons that can cause the logon error of “Your PC is offline”. Here are the steps you can use to fix the “Your PC is offline” issue in Windows 8.

How to Fix “Your PC is offline” Issue in Windows 8?

First of all, if your Microsoft account password includes an upper case character, try to enter the same password all in small case and you should be able to log in. This should be a Microsoft bug where sometimes the last saved password is recorded in the system all in small case irrelevant the original password.

“Your PC is offline” means that your machine is currently not connected to any network. Make sure the network on your tablet or computer is not disabled or not disconnected. Check if the WiFi is on, or physically plugin a network wire to ensure that the machine you are dealing with is connected.

But sometimes the chances are your account has probably disabled due to some unusual activities. If you are using Microsoft Account as your user account, go to Reset Your Microsoft Account Password web page, and follow the steps there to reset your account’s password and to re-enable the account. Once done, you should be able to get into your Windows 8 machine again.

If you already forgot your Microsoft account password, don’t worry! It’s very easy to reset the last saved password that is stored on your PC and regain access to your computer without data loss. PCUnlocker is a powerful yet easy-to-use password recovery utility that enables you to reset the last saved password of your Microsoft account. Just boot your computer from PCUnlocker Live CD or USB drive, select the local account which is linked to your Microsoft account, and click on the “Reset Password” button. Reboot your computer and you can then log back in to your Windows 8 Microsoft account with the new password: Password123.

Can’t Open CHM Files in Windows 8 64-bit System

September 15th, 2013 by Admin

Can’t open your chm files in Windows 8 64-bit operating system? CHM is a popular format for e-books and help documents and it’s natively supported on Windows. But when you double-click a .chm file in Windows 8, you may be prompted with selecting a program to open it and Windows 8 can’t automatically locate a program associated with .chm files. In this article we’ll show you a quick trick to fix this problem easily.

Can’t Open CHM Files in Windows 8 64-bit System? How to Fix It?

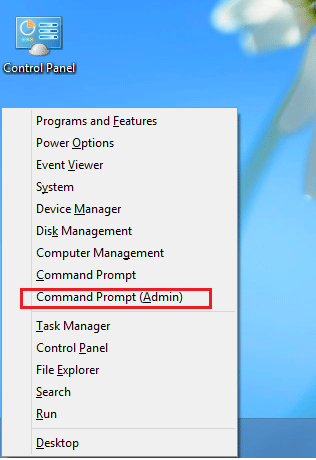
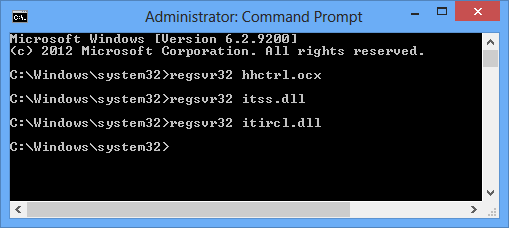
  1. Press the WINDOWS and R keys together to bring up the Power User menu, and then click on Command Prompt (Admin). This will open an elevated command prompt.
  2. Run the following commands:
    regsvr32 hhctrl.ocx
    regsvr32 itss.dll
    regsvr32 itircl.dll

    register-chmhelp-dll

  3. You’ll get a success dialog after each one. That’s all there is to it! No reboot required and everything was magically working as it should.

How to Prevent Users from Uninstalling Metro Apps in Windows 8

August 15th, 2013 by Admin

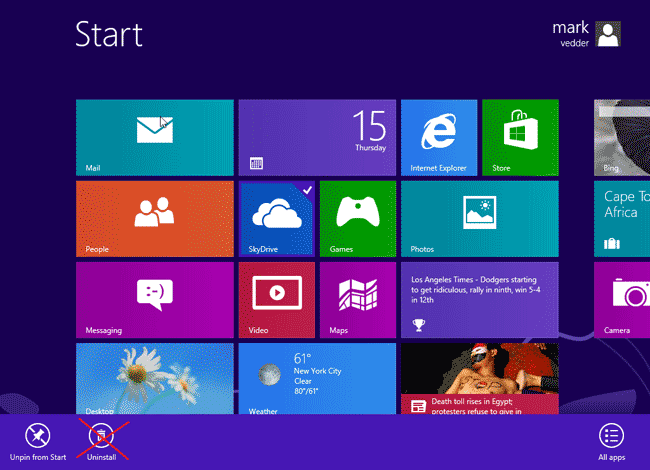
The Windows 8 Start screen comes with many useful metro apps such as Mail, Calendar, Photos, Weather, etc. There are also thousands of third-party metro apps that can be downloaded from the Windows Store, and many of them are very useful and great to have.

windows-8-uninstall

Removal of metro apps is very easy. Simply right-click on the metro app on your Start screen and you will see an icon to uninstall it in the bottom ribbon. The drawback is that even kids can uninstall your required apps in just a few mouse clicks. So if you want to prevent users from uninstalling metro apps in Windows 8, here is a quick trick!

How to Prevent Users from Uninstalling Metro Apps in Windows 8?

  1. Press Windows + R key combination to bring up the Run box. Type regedit and press Enter.
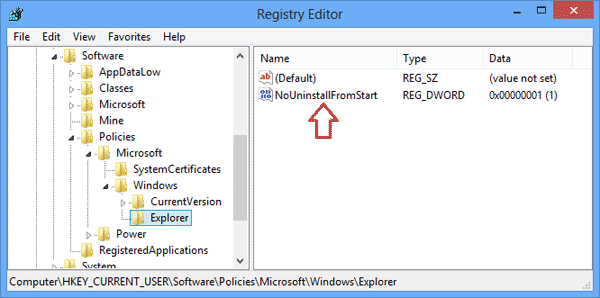
  2. In Registry Editor, navigate to the following key:

    HKEY_CURRENT_USER\Software\Policies\Microsoft\Windows

    Right-click the Windows key, point to New -> Key to create a sub key called Explorer.

  3. Click on the Explorer key. In the right panel, right-click in the empty space to new a DWORD item and name it NoUninstallFromStart.
  4. Double-click the NoUninstallFromStart. In the Edit DWORD Value dialog box, type 1 and then click OK.

    prevent-app-from-uninstall

  5. Exit Registry Editor. Sign out your Windows 8 user account and log in again.
  6. When you right-click on a metro app, the Uninstall option will no longer appear.

How to Fix Error 0x0000005D When Booting from Windows 8 Installation Disc

August 4th, 2013 by Admin

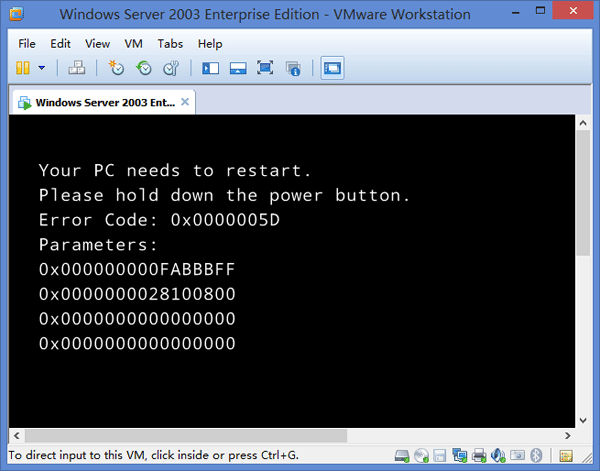
When installing Windows 8 on a new PC or in Oracle VM Virtual Box or VMware, many users are getting the error that says “Your PC needs to restart. Please hold down the power button. Error Code: 0x0000005D.” during the booting process.

Unlike Windows Vista and 7, Windows 8 is not compatible with all models of AMD/Intel processor. To fix the 0x0000005D error, you must have processor that supports Data Execution Prevention features. It has two different names. For, Intel processor its called “Execute Disable (XD)” and for AMD processor “No Execute (NX)”. Most CPUs have support for these features, so if you receive this error, it is likely because the XD or NX feature is not enabled on your system.

How to Enable Data Execution Prevention feature?

Once you enter in BIOS, go to Advanced Options and select Processor then No Execute Memory Protection, if not, then Security > Options and Select Execute Disable. Change this to ‘Enable’ or ‘On’.

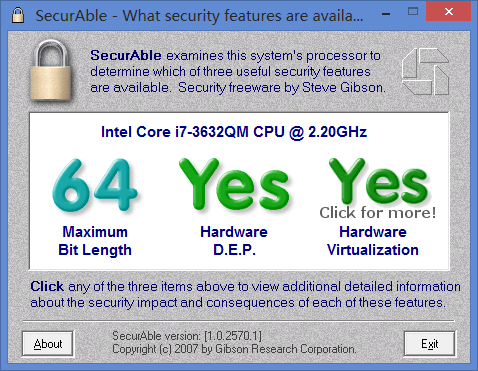
If the BIOS setting for the XD/NX support option is not available on your system, you may need to contact the manufacturer for updating the BIOS. Note that some older processors may not contain these features and will be incompatible with Windows 8. If you want to check if XD/NX is available or enabled in your system, you can download Securable which will tell you.

If your processor supports Virtualization Technology (VT) & Data Execution Prevention features, then you should see the following result in your screen:

securAble

Getting Error Code 0x0000005D during Booting Virtual Machine from Windows 8 Installation Disc?

When trying to boot a virtual machine from Windows 8 installation disc, you may also get the 0x0000005D error.

windows-8-boot-error

To fix this problem, you also need to follow the instructions above to enable Data Execution Prevention feature in the BIOS of your physical machine. Moreover, enable the “Virtualization Technology (VT)” feature in BIOS.

Here is how to enable VT option in DELL poweredge server:

Reboot your DELL poweredge server, press F12 to go to the BIOS, select “Processor Settings”, and set “Virtualization Technology” to “Enabled”.

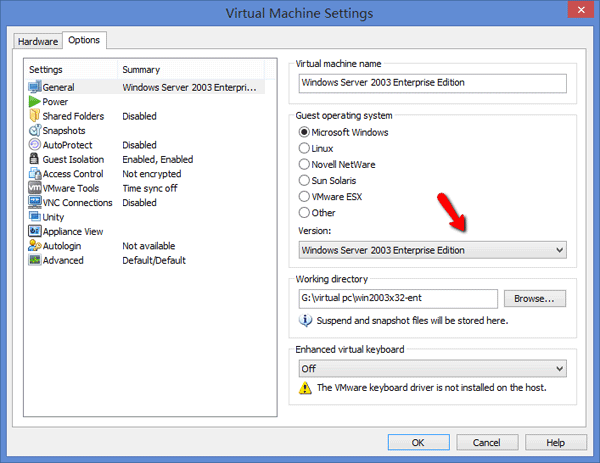
However, from my experience, even if I have enabled both the “Data Execution Prevention” and “Virtualization Technology (VT)” features in the BIOS of host OS, I still get the 0x0000005D error while booting a VMware virtual machine from Windows 8 ISO image. Eventually I fix the error by changing the operating system version under Virtual Machine Settings of VMware Workstation.

vmware-settings

As long as you change the version to any x64 edition, the 0x0000005D error will disappear immediately.

How to Run the Command Prompt as Administrator in Windows 8

June 11th, 2013 by Admin

There are many situations where you need to open up the Command Prompt as administrator. But in Windows 8 the classic Start Menu is replaced with a new Charm Bar, which doesn’t provide you an option to run the Command Prompt. So here we’ll show you 2 options to run the Command Prompt as administrator in Windows 8.

Note: If you have logged on as a standard or limited user, you’ll be prompted to enter the administrator password when trying to run the Command Prompt as administrator. If you’ve forgotten the admin password, you can reset it using a Windows Password Reset boot CD or USB drive.

Option 1: Win + X Menu

Right-click in the bottom left corner of your screen, or press the Windows + X keyboard combination. This will bring up a menu with many administrative options, including Command Prompt (Admin), Control Panel, Computer Management, Task Manager, Windows Explorer, etc.

win+x-menu

Simply click on the Command Prompt (Admin) option, it will open up a Command Prompt with administrator privileges. This Win + X menu is also know as Power User Menu. It should be the easiest way to run the Command Prompt as administrator in Windows 8.

Option 2: Search Charm

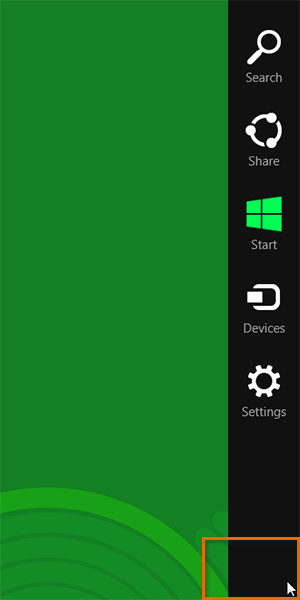
Move the mouse cursor to the bottom right corner of the screen, the charm bar will appear on the right side of the screen. Click on the Search icon. Type cmd in the Search box.

Windows 8 will show Command Prompt in search results page. Right-click on the shortcut and select “Run as administrator” option given at the bottom.

That’s it. These are many different ways to open Command Prompt as administrator in Windows 8, but the methods above should be the easiest ones.

Windows 8 Guide: The Hot Corners

February 27th, 2013 by Admin

Have you upgraded to Windows 8 yet? If you have, you’ve probably noticed how important the corners are to navigate in Windows 8. The corners on your screen are hot corners and give you access to different Windows features.

Bottom Left-hand corner

The bottom left-hand hot corner of the screen will allow you to access the Start Screen. When you move your mouse cursor to bottom-left corner, it shows you a small Start Screen thumbnail to go to Start Screen. With mouse left click, it toggles between the Desktop (if opened) and new Start Screen (Metro screen). Right-clicking in the left hand corner will bring up new Power User Menu with all admin tools like Device Manager, Control Panel, Command Prompt, etc.

Top-left corner of the screen

Moving the mouse to the top-left corner and then down will display all the apps running on the computer. Clicking and dragging any of these apps to the left or right-hand side of the screen will snap that app to that side of the screen. Each of these open app icons can also be right-clicked to close or snap.

Right-hand side of the screen

If you move your cursor to top-right corner or bottom-right corner, the new Charms Bar is shown containing direct shortcuts to Search, Share, Start Screen, Device Manager and Settings.

Hot corners make navigating in Windows 8 simpler, and even a little fun!

How to Turn Off App Notification in Windows 8

December 31st, 2012 by Admin

Windows 8 displays app notifications in the Metro-style Start Screen for installed apps, Calendar events, new email, and other app events. But you might not be interested in getting notifications for all apps, in such cases you can configure which apps can sent out notifications for you. In this article we’ll show you how to turn off app notifications in Windows 8.

How to Turn Off App Notification in Windows 8?

  1. Access the Charms bar by pressing Windows + C or moving your mouse to the bottom right of the screen and slowly moving the mouse up. When the Charms bar appears, click on the Settings.
  2. Click on More PC Settings link at the bottom of the sidebar.
  3. In the PC Settings screen, navigate to Notifications section in the left pane.
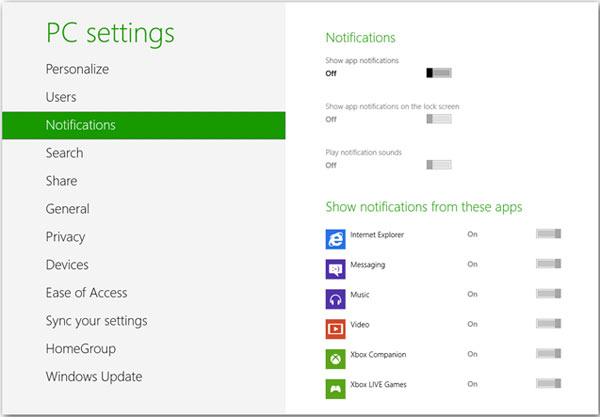
  4. In the right pane, there are ‘Show app notifications’, ‘Show app notifications on the Lock Screen’ and ‘Play notification sounds’ toggles. In order to complete turn off notifications for all apps, just turn off the Show app Notifications option.

  5. Other than turning off notifications for all installed apps, you can do so selectively as well. The lower part of the Notifications settings screen allows you to turn off notifications for individual apps of your choice.

3 Options to Access UEFI BIOS Setup in Windows 8 / 10

December 30th, 2012 by Admin

On Windows 10 or 8 operating systems that came pre-installed on the computer from the factory, the legacy BIOS has been replaced by UEFI (Unified Extensible Firmware Interface). This will cause the problem that bootable media from previous versions of Windows may not be recognized in Windows 10 / 8 computer. To resolve this problem, you need to switch your BIOS mode from UEFI BIOS to Legacy BIOS. No doing so would prevent the installation of Linux, Windows 7, or any other OS.

In this tutorial we’ll show you 3 ways to access UEFI BIOS Setup, even if you couldn’t login to Windows 10 or 8.

Option 1: Access UEFI BIOS Setup After Logging in to Windows 10/8

In previous post, we’ve covered how to set Windows 8 PC to boot with legacy BIOS mode instead of UEFI mode. Here we’ll show you another option to access UEFI BIOS Setup so long as you can log into Windows 10 / 8. Here are the steps:

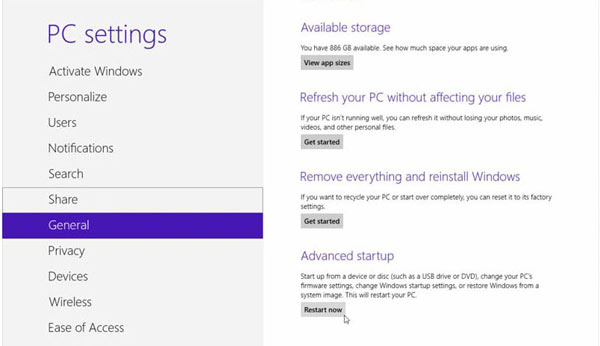
  1. In Windows 8/8.1, press the Windows key + C, or swipe in from the right edge of the screen to open your Charms. Click Settings -> Change PC Settings. In PC Settings, select General.

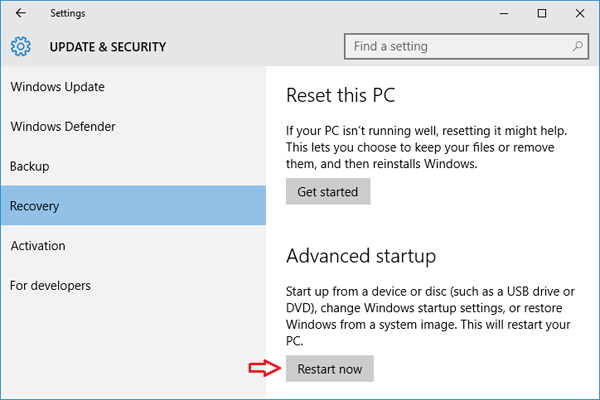
    If you’re running Windows 10, press the Windows key + I to open the Settings app. Click Update & Security. Select the Recovery tab on the left pane.

    update-security

  2. Under Advanced startup, click Restart now. The system will restart and show the boot menu.
  3. In the boot menu, select Troubleshoot.

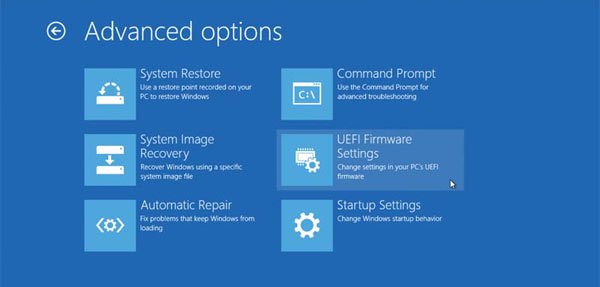
  4. In the Troubleshoot menu, select Advanced options.

  5. In the Advanced options menu, select UEFI Firmware Settings.

  6. Click Restart button to boot into UEFI BIOS Setup screen.

  7. When the computer restarts, the UEFI setup screen will be displayed. You can then disable UEFI BIOS and Secure Boot options, and enable legacy BIOS mode.

Option 2: Access UEFI BIOS Setup without Logging in to Windows 10/8

What to do if you forgot Windows user password and can’t login? Here is how you can access the UEFI BIOS Setup from Windows 10/8 login screen:

  1. From the login screen, click the Power icon in the lower right corner of the screen. While holding the Shift key, select Restart.

  2. The system will not actually restart but go into the boot options. click Troubleshoot.

  3. Afterwards, click Advanced options -> UEFI Firmware Settings -> Restart.
  4. The computer will reboot and take you into the UEFI BIOS setup.

Option 3: Access UEFI BIOS Setup from Command Prompt

You can also boot your computer into UEFI BIOS Setup by executing a simple command at the Command Prompt. Follow these steps:

  1. Open the elevated Command Prompt, then run the following command:
    shutdown /r /fw

  2. You’ll get a popup that says Windows is about to sign you out. Click Close.

  3. Your PC will now restart directly to UEFI settings.