Archive for June, 2019

How to Create Windows-Compatible ISO Image from CD / DVD / USB in Mac OS X

June 28th, 2019 by Admin

How can I make an ISO file from your physical disc on macOS Mojave? By default, macOS just uses its platform’s native file system HFS for ISO image. If you need to share the resulting ISO image with friends who use Windows, Linux or Ubuntu, then you have to save it in ISO-9660 format. In this tutorial we’ll walk you through the steps to create a Windows-compatible ISO image from CD, DVD or USB in Mac OS X.

How to Create ISO Image from CD / DVD / USB in Mac OS X

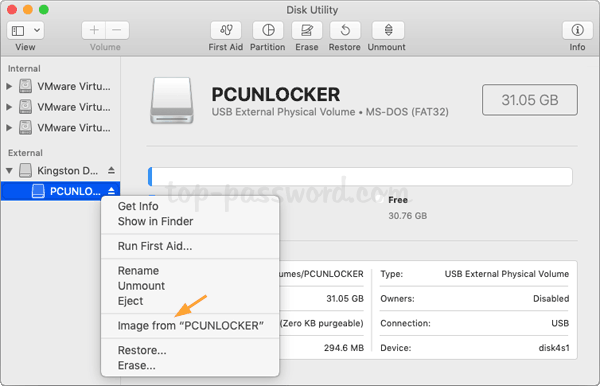
  1. Insert the CD/DVD or USB you want to create an ISO image from into your Mac and then launch Disk Utility. When your CD/DVD or USB appears in the left sidebar of Disk Utility, right-click on it and select Image from.

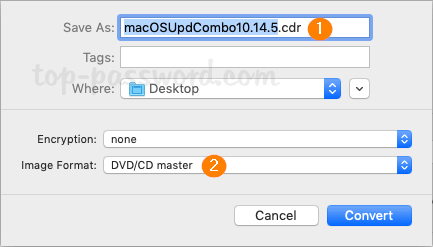
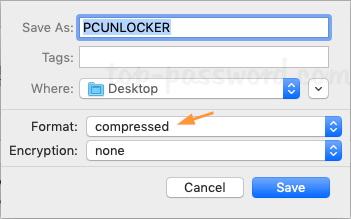
  2. In the Save As dialog, select Desktop as your destination and choose the compressed image format, then click on Save.

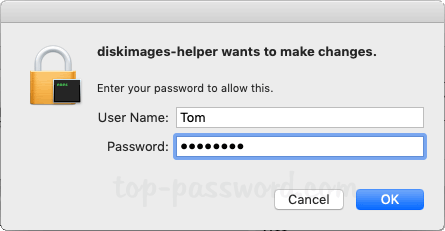
  3. When prompted that diskimages-helper wants to make changes, type your Mac password and click OK.

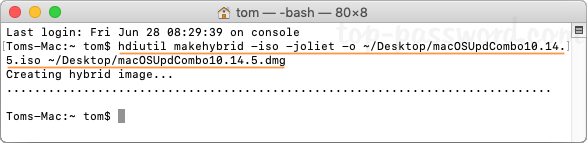
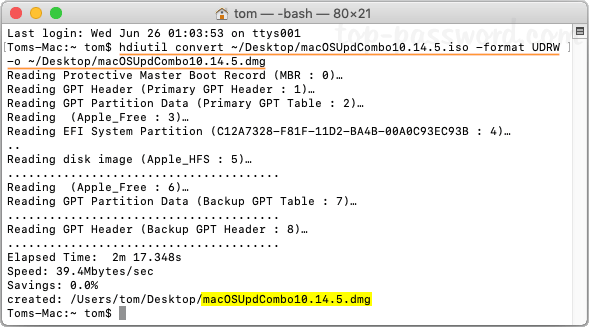
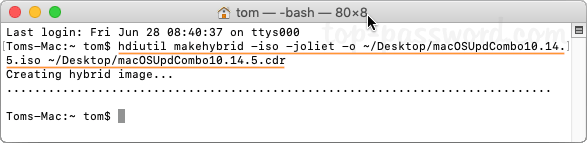
  4. Disk Utility will create a disk image with the .dmg extension and you can find it on your Desktop. Next, in order to convert the resulting .dmg to a Windows-compatible ISO file, open the Terminal and type this command:
    hdiutil makehybrid -iso -joliet -o ~/Desktop/filename.iso ~/Desktop/filename.dmg

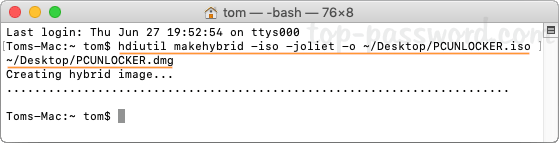
  5. When the process is complete, you can distribute the ISO image to your friends who use Windows, Linux, Ubuntu, Mac or other operating systems. Happy burning!

How to Convert Disk Image Between .DMG and .ISO Format on Mac OS X

June 27th, 2019 by Admin

So you downloaded an .iso image, and now you want to convert it to .dmg format? How can I convert .dmg to a Windows-compatible .iso on Mac? Don’t bother downloading any third party software, you can easily convert .dmg to .iso or .iso to .dmg format using the Terminal or Disk Utility on Mac OS X.

Method 1: Convert Between .DMG and .ISO Using Terminal

Mac OS X has a command line tool called hdiutil which allows you to create, mount and convert different types of disk image with ease. Here’s how to convert .dmg to .iso format using the Terminal:

  1. Just press Ctrl + Alt + T on your keyboard to open the Terminal.
  2. Enter the following command into the Terminal window, assuming that you’ve put the .dmg file on your desktop.
    hdiutil makehybrid -iso -joliet -o ~/Desktop/filename.iso ~/Desktop/filename.dmg

    When the process finishes, you’ll get an ISO image that is compatible with Windows, Linux, Ubuntu and Mac.

If you need to convert a disk image from .iso to .dmg, just execute the following command in the Terminal window:
hdiutil convert ~/Desktop/filename.iso -format UDRW -o ~/Desktop/filename.dmg

Sit back and wait for the process to complete.

Method 2: Convert Between .DMG and .ISO Using Disk Utility

  1. Just launch Disk Utility (in /Applications/Utilities). In the menu bar at the top of the screen, select Images -> Convert.

  2. Browse to the .DMG or ISO file you would like to convert, select it and click on the Choose button.

  3. In the pop-up window, select Desktop as your destination. In order to convert .dmg to .iso, make sure to choose DVD/CD master as the Image Format. Click on Convert.

    If you want to convert .iso to .dmg, set the Image Format to “compressed” instead. Click on Convert and you’ll have a .dmg file ready to use.

  4. Simply rename the converted .cdr file to .ISO and you’ll get a Mac-compatible .ISO image. However, a renamed file won’t work on Windows or Linux. To make a Windows/Linux/Mac compatible .ISO file, you have to convert the .cdr file to .iso format using this command:
    hdiutil makehybrid -iso -joliet -o ~/Desktop/filename.iso ~/Desktop/filename.cdr

Conclusion

DMG is a disk image format commonly used by Mac OS X, but it’s practically unusable on Windows or Linux platform. After converting .dmg to .iso on your MacOS, you can copy it to any Windows or Linux computer for burning or mounting.

How to Change Text Color in Windows 10 without Software

June 21st, 2019 by Admin

How do I change the color of the fonts in Windows 10? The text color in Windows is black by default and there is no GUI option available to change the text color for your current theme. In this tutorial we’ll show you how to change text color in Windows 10 using a registry tweak.

This method doesn’t change the text color of all windows. Before getting started, make sure you have turned off High Contrast in Windows 10.

How to Change Text Color in Windows 10 without Software

  1. Press the Windows key and R to bring up the Run box, type regedit and hit Enter to open Registry Editor.

  2. Navigate to the following key:
    HKEY_CURRENT_USER\Control Panel\Colors

    On the right pane, locate WindowText and double-click it to modify.

  3. Just enter the RGB (Red, Green, Blue) value for your desired color and click OK.

    For example, white is 255 255 255, black is 0 0 0. You can use an online color picker to find the RGB value of any color.

  4. After setting new color, changes will take effect on the next login.

If you also need to change the title bar text color, just use the same method to change the RGB values for the following registry settings:
HKEY_CURRENT_USER\Control Panel\Colors\ActiveTitle
HKEY_CURRENT_USER\Control Panel\Colors\TitleText
HKEY_CURRENT_USER\Control Panel\Colors\InactiveTitle
HKEY_CURRENT_USER\Control Panel\Colors\InactiveTitleText

That’s it!

How to Uninstall Windows 10 Updates When PC Won’t Boot

June 19th, 2019 by Admin

Windows 10 won’t boot after installing updates? A problematic update could render the computer unbootable, or get stuck in a infinite reboot loop. In this tutorial we’ll show you how to uninstall Windows 10 updates when your PC can’t boot any longer.

How to Uninstall Windows 10 Updates When PC Won’t Boot

Boot your computer with Windows 10 installation media. When the Windows Setup screen appears, choose your language, time and keyboard input method, then click Next.

Click the Repair your computer link in the bottom-right corner.

It will take you to the advanced startup screen. Just select the Troubleshoot option.

On the next screen, you can choose to uninstall Windows 10 updates using either the “Uninstall Updates” option or Command Prompt.

Method 1:

If you select the “Uninstall Updates” option, it will give you two options: Uninstall latest quality update, Uninstall latest feature update.

Feature updates are technically new versions of Windows 10, which become available twice a year. While quality updates (also known as “cumulative updates” or “Security update”) are pushed out every month.

Method 2:

If you choose the Command Prompt option, you can manually uninstall updates that were installed on a particular date, by following these steps:

  1. When you’re at the Command Prompt, use the DIR command to find the drive letter of the drive where Windows 10 is installed. In my case, Windows 10 is located on drive D:.

  2. Next, run the following command to list all the installed updates on your system. Make sure you use the drive letter that you found in the step above:
    dism /Image:D:\ /get-packages /format:list

    If you need to find detailed information (such as KB number) about a specific package, type this command:
    dism /Image:D:\ /get-packageinfo /PackageName:Package_Identity

  3. Now, you can uninstall the problematic update package using this command:
    dism /Image:D:\ /Remove-Package /PackageName:Package_Identity

That’s it!

How to Turn off Problem Reporting in Windows 10

June 18th, 2019 by Admin

Problem reporting is also known as “Error reporting”, which is a service turned on by default in all versions of Windows. When Windows detects a hardware or software error, it will automatically collect diagnostic data and report it to Microsoft. For privacy concern, you may want to disable it. In this tutorial we’ll show you 2 simple ways to turn off problem reporting for all user accounts in Windows 10.

Method 1: Turn off Problem Reporting in Windows 10 via Registry Editor

  1. Open Registry Editor and navigate to: HKEY_LOCAL_MACHINE\SOFTWARE\Microsoft\Windows\Windows Error Reporting. Right-click on the “Windows Error Reporting” key in the left side and select New -> DWORD (32-bit) Value.

  2. Name the new DWORD “Disabled“, and set its value data to 1. If you need to turn on problem reporting later, just change the value to 0.

  3. Close Registry Editor and you can now check if problem reporting is turned off. Open Control Panel in Large icons view and click on Security and Maintenance.

    Expand the Maintenance section and you should find the “Report problems” option is set to Off.

Method 2: Turn off Problem Reporting in Windows 10 via Group Policy

  1. Open Local Group Policy Editor and browse to: Computer Configuration -> Administrative Templates -> Windows Components -> Windows Error Reporting.

    In the right pane, locate the “Disable Windows Error Reporting” policy and double-click it to modify.

  2. Choose the Enabled option. Click Apply and then OK.

  3. You can now close out of the Local Group Policy Editor window, and restart your PC to apply the changes.

There is a registry key corresponding to the above group policy. If you’re unable to access Local Group Policy Editor, just open Registry Editor and navigate to HKEY_LOCAL_MACHINE\SOFTWARE\Policies\Microsoft\Windows\Windows Error Reporting, create a 32-bit DWORD Disabled and set its value to 1.

How to View or Clear Problem Reports in Windows 10

June 17th, 2019 by Admin

When an app crashes or freezes, the built-in Windows Reliability Monitor tool will automatically create a problem report for the event and send it to Microsoft for analysis. In this tutorial we’ll show you how to view or clear problem reports in Windows 10.

How to View or Clear Problem Reports in Windows 10

  1. To start, click the Cortana Search box in the taskbar (or press WIN + S) and type “problem reports“, then select the “View all problem reports” entry to open it.

  2. Now you can review all the problem reports. Scroll down through the list and locate the particular application crash you are looking for, then double-click it to view the problem details.

  3. When the Problem Details window opens, you can see the diagnostic data collected from an application and Windows at the time an application crashes, hangs, or stops working. Using this data, Microsoft can find bugs based upon the similarities in multiple crash reports for the same program.

  4. In order to delete a particular problem report, just right-click it and select Delete from the context menu. When you need to delete all problem reports, simply click on the “Clear all problem reports” button at the bottom and you’re done.

That’s it!

How to Change Desktop Icon Spacing in Windows 10 / 8 / 7

June 13th, 2019 by Admin

Windows 10 desktop icons too wide? How can I adjust the spacing of icons on the desktop with Windows 10? Is there a way to increase or decrease the horizontal and vertical spacing for desktop icons? In this tutorial we’ll show you a registry tweak to change desktop icon spacing in Windows 10 / 8 / 7.

Tips: If you want to make your desktop icons bigger or smaller, see this article on how to change taskbar & desktop icon size in Windows 10 / 8 / 7.

How to Change Desktop Icon Spacing in Windows 10 / 8 / 7

  1. Open Registry Editor and navigate to the following key:
    HKEY_CURRENT_USER\Control Panel\Desktop\WindowMetrics

    You’ll see two DWORD values named IconSpacing and IconVerticalSpacing on the right pane. The IconSpacing value lets you adjust the horizontal desktop icon spacing, while the IconVerticalSpacing value can control the vertical spacing between desktop icons. If you want to customize the horizontal spacing, double-click on IconSpacing to modify it.

  2. The default value is -1125. You can change it to anything between -480 and -2730, where -480 represents the minimum spacing and -2730 represents the maximum spacing.

  3. Click OK to save changes and close Registry Editor. After logging off or restarting your system, you can see the changes made to the icons on the desktop.

That’s it!

5 Ways to Reset Firewall Settings to Default in Windows 10

June 12th, 2019 by Admin

Mess up the firewall settings accidentally? Need to delete all the custom firewall rules to troubleshoot your network connectivity issue? In this tutorial we’ll show you 5 ways to reset / restore firewall settings to default in Windows 10.

Method 1: Reset Firewall Settings to Default via Control Panel

  1. Open the Control Panel and change the View by option from Category to Large icons. Click on Windows Defender Firewall.

  2. Click on the Restore defaults link on the left side.

  3. Click on the Restore defaults button.

  4. When the confirmation dialog box appears, click Yes and your Windows firewall settings will be restored to default immediately.

Method 2: Reset Firewall Settings to Default via Windows Defender

  1. Open the Windows Defender app and select Firewall & network protection on the left menu bar. Next, click the “Restore firewalls to default” option on the right side.

  2. Click on the Restore defaults button.

  3. You will be asked for confirmation once again. Click Yes to reset all Windows Firewall settings.

Method 3: Reset Firewall Settings to Default via Windows Firewall with Advanced Security

  1. Press the Windows key + R to open the Run box, type wf.msc and hit Enter to open the “Windows Defender Firewall with Advanced Security” console.

  2. Right-click on the top item “Windows Defender Firewall with Advanced Security on Local Computer” in the left pane and select “Restore Default Policy“.

  3. Click Yes when you see the following confirmation dialog box.

  4. All the firewall rules are now reset to their initial values, as they were when you first installed Windows 10.

Method 4: Reset Firewall Settings to Default via Command Prompt

  1. Open the Command Prompt as administrator, and type this command:
    netsh advfirewall reset

  2. Once pressing Enter, all the firewall settings are now reset to their default values.

Method 5: Reset Firewall Settings to Default via Windows PowerShell

  1. Open Windows PowerShell as administrator, and run the following command:
    (New-Object -ComObject HNetCfg.FwPolicy2).RestoreLocalFirewallDefaults()

  2. Your Firewall rules will be restored to defaults in no time, without any additional confirmation.

How to Change Default Font in Office Word and Excel 2016 / 2019 / 365

June 10th, 2019 by Admin

Starting with Office 2007, both Word and Excel use Calibri as the default font. In order to make your document or spreadsheet more readable, you may want to change the default font style or adjust the font size. In this tutorial we’ll show you the easy steps to change default font in Office Word and Excel 2016 / 2019 / 365.

Part 1: Change Default Font in Office Word

Open any document with your Office Word application. Click the Home tab in the ribbon menu, then click on the arrow icon in the bottom right-hand corner of the Font section.

Once the Font window appears, you can change the default font style, size, effects, and even the color if you want. When done, click the Set As Default button in the bottom left corner.

In the next dialog asking which default to set, select “All documents based on the Normal.dotm template” and click OK to confirm your changes.

Now, all new documents created with Word will use your font of choice by default.

Part 2: Change Default Font in Office Excel

Open any spreadsheet with Office Excel application. Click the File tab in the ribbon menu and then choose the Options tab.

When the Excel Options dialog appears, select the General tab. In the right pane, scroll down to the “When creating new workbooks” section and you can choose your desired font type and size.

Click OK when you’re done. Now every time you create a new spreadsheet in Excel, the default font size and style will be exactly what you set it to.

Conclusion

Are you frustrated by always having to change the font when you create a document in Word or Excel? Just follow the above procedure to change the default font in Office Word/Excel 2016, 2019 and 365, it will save you tons of frustration and time.