Archive for July, 2022

Easy Way to Disable Incognito Mode in Chrome on Windows 11 / 10

July 26th, 2022 by Admin

How can I stop my son from using Chrome’s Incognito mode? Incognito mode allows users to browse web privately without leaving a trace on the local disk of a computer. If you want to keep an eye on your child’s online activities and browsing history, you can turn off Incognito mode. In this tutorial we’ll walk you through the steps to disable Incognito mode in Chrome on Windows 11 / 10.

How to Disable Incognito Mode in Chrome on Windows 11 / 10

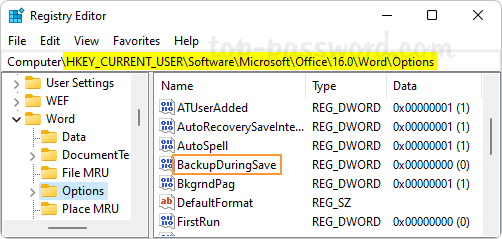
  1. Open Registry Editor and browse to: 
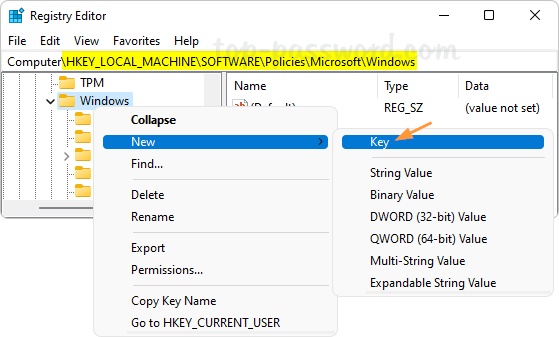
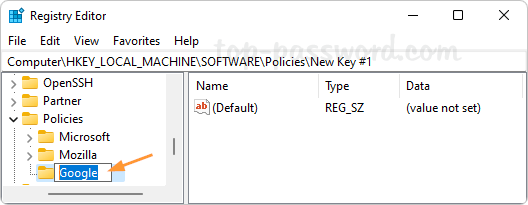
HKEY_LOCAL_MACHINE\SOFTWARE\Policies. Right-click the Policies key on the left pane, and choose New -> Key.

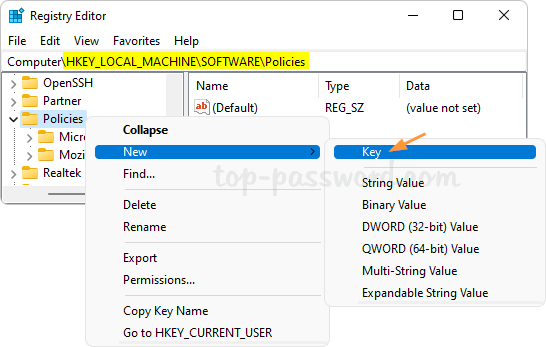
  2. Rename the newly-created key to Google.

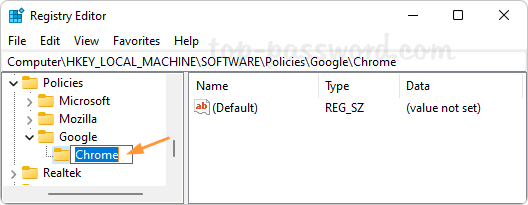
  3. Right-click Google and select New -> Key, then rename it to Chrome.

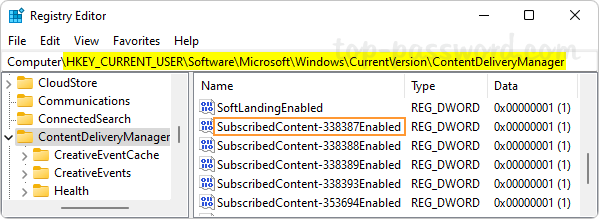
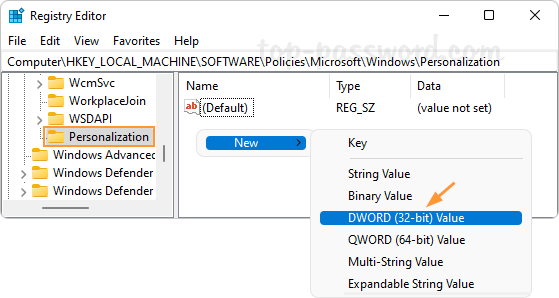
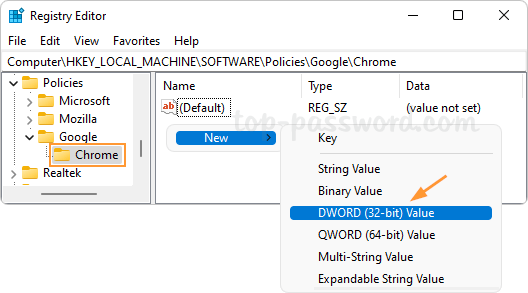
  4. While the Chrome key is selected, right-click the blank area on the right pane and choose New -> DWORD (32-bit) Value.

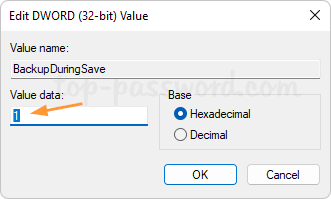
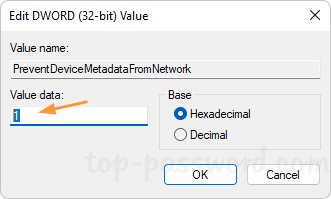
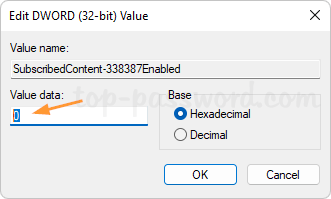
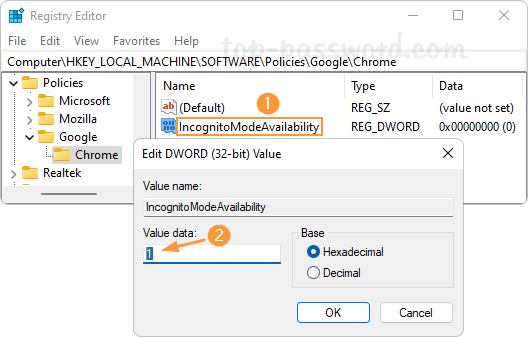
  5. Rename this DWORD as IncognitoModeAvailability, and then double-click it and change its value data to 1.

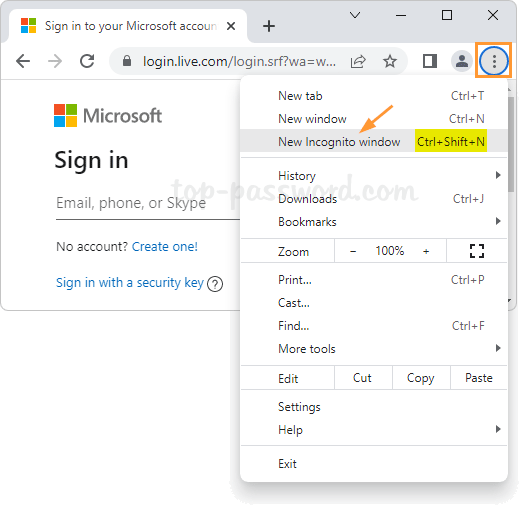
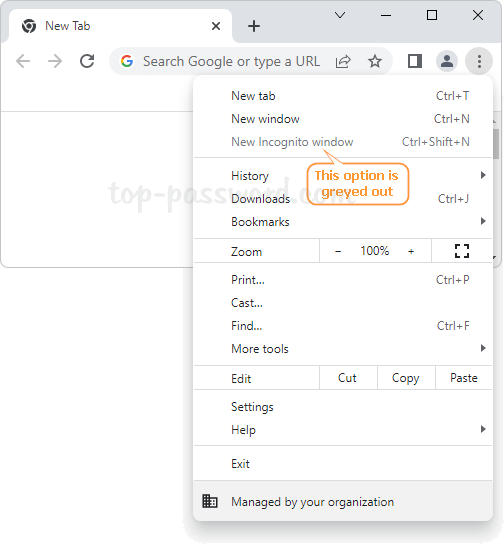
  6. Close Registry Editor. When you relaunch Chrome, you will notice that the option “New Incognito window” is greyed out and unclickable. You’re also unable to start Chrome in Incognito mode by default.

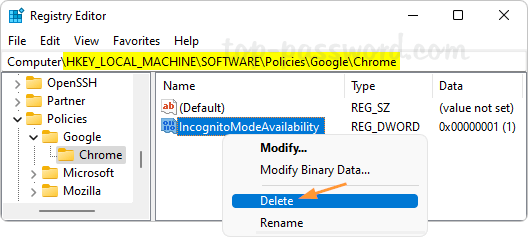
Whenever you need to enable Incognito mode again, just open Registry Editor and navigate to: HKEY_LOCAL_MACHINE\SOFTWARE\Policies\Google\Chrome, right-click the IncognitoModeAvailability value on the right pane and choose Delete.

That’s it!

2 Ways to Start Google Chrome in Incognito Mode on Windows 11 / 10

July 24th, 2022 by Admin

If you want to browse web without leaving history, cookies, site data, or any information you type in forms, you can start Chrome in Incognito mode. In this tutorial we’ll show you 2 methods to open Google Chrome in Incognito mode on Windows 11 / 10.

Method 1: Start Google Chrome in Incognito Mode via Three-dot Menu

  1. When using Google Chrome, click the three-dot menu icon in the browser’s upper-right corner and then select “New Incognito window“.

  2. It will immediately open a new Incognito window. You’ll see the Incognito icon at the right of the address bar, which indicates you’re browsing privately.

Another way of opening a Incognito window is to press the keyboard shortcut Ctrl + Shift + N.

Method 2: Make Google Chrome Always Start in Incognito Mode

  1. Right-click the “Google Chrome” shortcut on your desktop and then select Properties.

  2. It will open the Properties window. In the Shortcut tab, append -incognito to the end of the Target text box.

  3. Click Apply and then OK.
  4. Every time you double-click the Google Chrome shortcut and it will open in Incognito mode by default.

That’s it!

Configure Word to Create Automatic Backup Copy of a Document (2 Methods)

July 22nd, 2022 by Admin

Microsoft Word allows you to create an auto backup every time when you save a document. After turning on automatic backup feature, Microsoft Word will automatically make a copy of the last saved version in the same folder as your original document. When you change your mind about the last edits you made to your document, you can use the recent backup copy.

In this tutorial we’ll show you 2 methods to configure Microsoft Word 2021 / 2019 / 2016 to always create backup copy of a document in Windows 11 / 10.

Method 1: Using Word Options to Enable Automatic Backup

  1. When using Microsoft Word, click the File tab. Next, click the Options on the left navigation pane.

  2. It will open the Word Options window. Choose the Advanced tab on the left. On the right side, scroll down to the Save heading and check “Always create backup copy“. Click OK.

    Whenever you want to stop Word automatically saving a backup copy of your document, just uncheck the above option again.

Method 2: Using Registry Editor to Make Word Always Create Backup Copy

  1. Open Registry Editor and navigate to the following location, then double-click the DWORD BackupDuringSave on the right pane.
    HKEY_CURRENT_USER\Software\Microsoft\Office\16.0\Word\Options

    For Office Word 2021 / 2019 / 2016, the version number is 16.0. If you’re using an older version, the version number might be 15.0 or others.

  2. Change its value data from 0 to 1. Click OK.

    If you want to prevent Word from creating an automatic backup copy, change the value data back to 0.

  3. Close Registry Editor. Restart Microsoft Word and it will automatically begin backing up all your Word files in .wbk format in the same location where your original Word documents are saved.

That’s it!

2 Methods to Change Device Installation Settings in Windows 11 / 10

July 21st, 2022 by Admin

Windows Update keeps installing the same driver every day? How can I stop Windows from automatically overwriting drivers? If you want to prevent Windows Update from downloading and installing driver updates for devices installed on the computer, you need to change device installation settings.

Method 1: Change Device Installation Settings from System Properties

  1. Press the Windows key + R together to bring up the Run box, type sysdm.cpl and press Enter to open the System Properties window.

  2. Switch to the Hardware tab, and then click the “Device Installation Settings” button.

  3. The pop-up dialog will ask whether you want to automatically download manufacturers’ apps and custom icons available for your devices. Choose the “No (your device might not work as expected)” option and click Save Changes.

  4. This will disable automatic driver installation on your Windows 11 / 10 PC.

Method 2: Change Device Installation Settings from Registry Editor

  1. Open Registry Editor and navigate to the location: HKEY_LOCAL_MACHINE\SOFTWARE\Microsoft\Windows\CurrentVersion\Device Metadata. Double-click the DWORD PreventDeviceMetadataFromNetwork on the right pane.

  2. Change its value data from 0 to 1. Click OK.

  3. Windows will no longer automatically download and install the latest drivers for devices on your computer.

That’s it!

Reset Touchpad Settings and Gestures to Defaults in Windows 11

July 16th, 2022 by Admin

Accidentally messed up your touchpad settings? Touchpad gestures not working? If your Windows 11 laptop has a built-in touchpad, you can customize or reset touchpad gestures from the Settings app. In this tutorial we’ll walk you through the steps to reset touchpad settings and gestures to defaults in Windows 11.

How to Reset Touchpad Settings and Gestures to Defaults in Windows 11

  1. Open the Settings app by pressing the WIN + I keyboard shortcut. Select Bluetooth & devices on the left side, and then click Touchpad on the right side.

  2. Click the down arrow next to the Touchpad toggle switch.

  3. Click the Reset button and it will reset all settings under the “Gestures & interaction” section to defaults, including advanced gestures.

    If the Reset button is greyed out, it indicates that Windows 11 is currently using the default gestures settings.

That’s it!

How to Disable Fun Facts, Tips and Tricks on Windows 11 Lock Screen

July 4th, 2022 by Admin

Is there a way to remove the advertisements or tips from the lock screen in Windows 11? If your lock screen takes a long time to appear or it becomes extremely slow, you can turn off tips, tricks, and messages on the lock screen. In this tutorial we’ll show you 2 simple methods to disable fun facts, tips, tricks and more on your lock screen in Windows 11.

Method 1: Disable Fun Facts, Tips and Tricks on Lock Screen Using Settings App

  1. Open the Settings app by pressing Windows + I keyboard shortcut. Choose Personalization and then click Lock screen on the right pane.

  2. Click the drop-down box next to “Personalize your lock screen” and select either Picture or Slideshow. There is no option to get rid of ads and tips if you choose the “Windows Spotlight” option.

  3. Uncheck the “Get fun facts, tips, tricks, and more on your lock screen” option. You’ll no longer see fun facts, tips, tricks on your lock screen.

Method 2: Disable Fun Facts, Tips and Tricks on Lock Screen Using Registry Editor

  1. Open Registry Editor and drill down to the location: HKEY_CURRENT_USER\Software\Microsoft\Windows\CurrentVersion\ContentDeliveryManager. Double click the DWORD SubscribedContent-338387Enabled on the right side.

  2. Change its value data from 1 to 0. Click OK.

  3. Close Registry Editor. Windows 11 lock screen will never display fun facts, tips, tricks and it should work without lagging or freeze.

That’s it!

2 Ways to Turn off or Disable Lock Screen in Windows 11

July 1st, 2022 by Admin

How can I disable the lock screen so I can access the sign-in screen directly? If you’re the only person who uses your computer, there is no point in having the lock screen. In this tutorial we’ll show you 2 methods to disable or turn off the lock screen in Windows 11.

Method 1: Turn off or Disable Lock Screen Using Group Policy

  1. Open Local Group Policy Editor and drill down to: Computer Configuration -> Administrative Templates -> Control Panel -> Personalization​. In the right pane, locate and double-click the “Do not display the lock screen” policy.

  2. Choose the Enabled option. Click Apply and then OK.

  3. Close Local Group Policy Editor. When you press the Windows key + L keyboard shortcut to lock your computer, it will display the sign-in screen instead of the lock screen.

Method 2: Turn off or Disable Lock Screen Using Registry Editor

  1. Open Registry Editor and use the left-hand side to navigate to: HKEY_LOCAL_MACHINE\SOFTWARE\Policies\Microsoft\Windows. Right-click the Windows key and select New -> Key.

  2. Name the new key Personalization and then select it. On the right side, right-click the blank area and choose New -> DWORD (32-bit) Value.

  3. Name the new DWORD NoLockScreen, and then double-click it and change its value data to 1.

  4. Close Registry Editor. No matter which method you use to lock your Windows, it will no longer display the lock screen and you’ll see the login screen instead.

That’s it!