Archive for April, 2020

How to access and use Voice Recorder app in Windows 10

April 25th, 2020 by Admin

How can I record my own voice from a Windows 10 computer? Windows 10 comes with a built-in Voice Recorder app which lets you record audio from a microphone or headset. In this tutorial we’ll show you how to access and use Voice Recorder app in Windows 10.

Part 1: Open Voice Recorder App in Windows 10

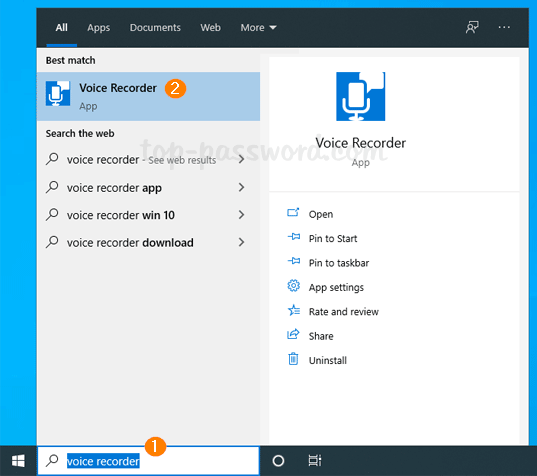
Click inside the Search box on the lower left side of your screen, and type “voice recorder“. Then you can click the app to open it.

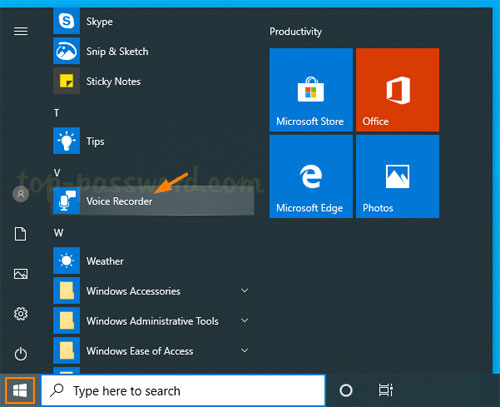
You can also access the Voice Recorder app from the Start Menu. Just click the Start button and scroll to the letter V, you can find the app and launch it quickly.

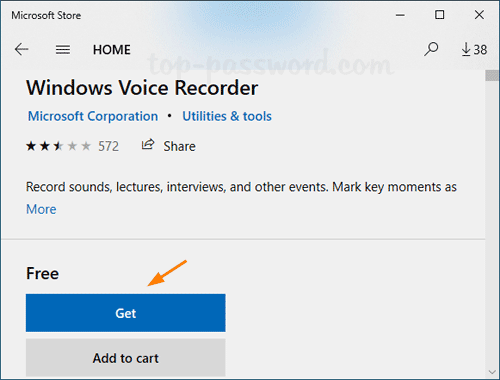
If the Voice Recorder app is missing or somehow disappears on your system, you can open the Microsoft Store. Search for Windows Voice Recorder, and click the app in the search result to install it.

Part 2: Use Voice Recorder App to Record Sound

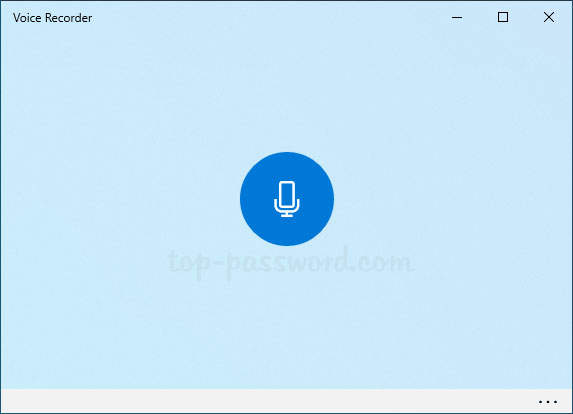
Once the Voice Recorder launches, click the Record button or press Ctrl + R to begin recording audio.

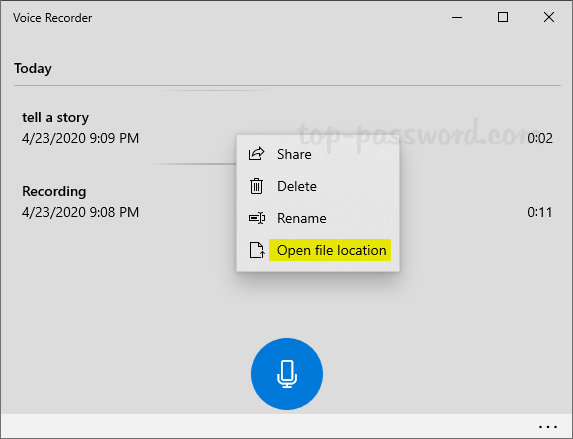
When you are finished, click the “Stop” button and a new window will appear showing the audio recordings you have created. You can listen to the recording or right-click it to rename, delete or find your voice recorded files.

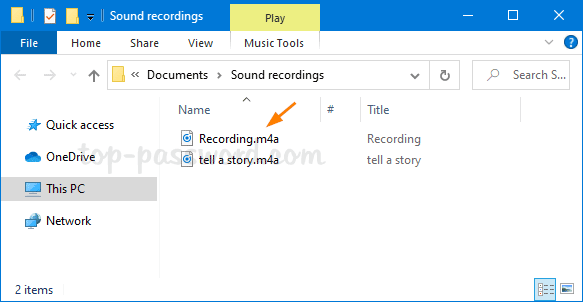
The voice recorded files are saved as .m4a format, and you can find them under the folder C:\Users\user_name\Documents\Sound recordings. If you need to convert them to mp3 or other audio formats, Video Converter Assist can be of help.

That’s it!

Fix: UAC YES Button is Gone or Grayed out in Windows 10

April 21st, 2020 by Admin

When you try to open a program as administrator, the User Account Control (UAC) dialog will pop up as normal but the Yes button might be missing or greyed out.

This problem usually happens when there is no other administrator account exists in the system and your account no longer has the admin rights. In this tutorial we’ll show you an easy way to fix such UAC privileges problem.

How to Fix: UAC YES Button is Gone or Grayed out in Windows 10

  1. Open a Command Prompt window without admin privileges. Type the following command and hit Enter.
    SHUTDOWN /R /O -T 00

  2. The computer will log you off and bring up the Choose an option screen. Click on Troubleshoot.

  3. Select Advanced options.

  4. On the next screen, click on Startup Settings.

  5. From the Startup Settings window, click on Restart.

  6. Once Windows restarts to the Startup Settings screen again, press 6 or F6 to choose “Enable Safe Mode with Command Prompt“.

  7. Although the built-in Administrator account is disabled and hidden, it will still show up on Safe Mode login screen. You can click it to login without a password.

  8. Once logged in, the Administrator Command Prompt will open. To fix the problem of “Yes button missing or grayed out in UAC”, type the following commands one by one to change your password, prompt your account to administrator and make it active.
    net user YOUR_USER_NAME YOUR_NEW_PASSWORD
    net localgroup Administrators YOUR_USER_NAME /add
    net user YOUR_USER_NAME /active:yes

  9. Reboot your computer as normal and everything should be good to go.

If you have previously set a password on the built-in Administrator account and you can’t remember it, the above method won’t work and you can use PCUnlocker to reset your password and account settings, which will also make the “Yes” button in UAC dialog become accessible.

2 Ways to Prevent NTLM Credentials from Being Sent to Remote Servers

April 14th, 2020 by Admin

When you try to access a web page which contains a file hosted on a SMB server, Windows automatically sends your user name and NTLM credentials to authenticate. Although the credentials are not sent in clear-text, the attacker can crack them to recover your Windows password. To avoid leaking your account credentials, you can block NTLM (allowing only Kerberos) so Windows will no longer send your NTLM credentials to remote servers.

Method 1: Restrict Outgoing NTLM Traffic Using Group Policy

  1. Open the Local Group Policy Editor and navigate to: Computer Configuration -> Windows Settings -> Security Settings -> Local Policies -> Security Options. On the right pane, double-click the “Network security: Restrict NTLM: Outgoing NTLM traffic to remote servers” policy.

  2. Select Deny all from the drop-download list, click Apply and then OK.

  3. Reboot your computer and Windows will no longer automatically send your NTLM credentials to a remote server when accessing a share.
  4. If you need to add some remote servers to a whitelist, double-click on the “Network security: Restrict NTLM: Add remote server exceptions for NTLM authentication” policy.

  5. Add the remote servers to the list of exceptions, click Apply and then OK.

Method 2: Restrict Outgoing NTLM Traffic Using Registry Tweak

  1. Open Registry Editor and browse to: HKEY_LOCAL_MACHINE\SYSTEM\CurrentControlSet\Control\Lsa\MSV1_0. Right-click on the MSV1_0 key, select New -> DWORD (32-bit) Value.

  2. Name the newly created DWORD RestrictSendingNTLMTraffic, then double-click it to set the value data to 2 and click OK.

  3. If you want to add certain servers that you wish to whitelist, use the similar method to create a new DWORD named ClientAllowedNTLMServers. Double-click it and add remote servers which you allow sending NTLM credentials to.

  4. Reboot your computer to apply the changes. You can continue accessing files on remote servers which are whitelisted while stopping Windows from potentially sending your NTLM credentials over the network.

4 Ways to Turn Off / On Thumbnail Previews in Windows Explorer

April 7th, 2020 by Admin

Is there any way to disable video and image thumbnail preview in Windows 10? Thumbnail previews are useful since they let you preview Windows files without opening them, but it might slow down folder navigation process. In this tutorial we’ll show you 4 ways to turn off or on thumbnail previews in File Explorer on Windows 10 / 8 / 7.

Thumbnail previews are enabled:

Thumbnail previews are disabled:

Method 1: Disable or Enable Thumbnail Previews via Folder Options

  1. Open Windows Explorer. Go to the View tab and click the Options button in the Ribbon menu.

  2. Click on the View tab and check the option “Always show icons, never thumbnails” to disable thumbnail previews, or uncheck it to enable thumbnail previews.

  3. Click OK to save your changes.

Method 2: Disable or Enable Thumbnail Previews via Performance Options

  1. Press the Windows key + R keyboard shortcut, then type SystemPropertiesPerformance in the Run box and press Enter.

  2. The Performance Options window will open. Uncheck or check the “Show thumbnails instead of icons” option under the Visual Effects tab, and click OK.

Method 3: Disable or Enable Thumbnail Previews via Registry Editor

  1. Open Registry Editor and navigate to HKEY_CURRENT_USER\SOFTWARE\Microsoft\Windows\CurrentVersion\Explorer\Advanced. On the right pane, double-click the DWORD value IconsOnly to modify.

  2. Change the value data to 1 to hide thumbnails or 0 to show thumbnails, and click OK.

  3. You only need to refresh your File Explorer to see the changes immediately.

Method 4: Disable or Enable Thumbnail Previews via Group Policy

  1. Open Local Group Policy Editor and browse to: User Configuration -> Administrative Templates -> Windows Components -> File Explorer. Double-click the “Turn off the display of thumbnails and only display icons” policy on the right pane.

  2. Select Enabled to turn off thumbnail previews, or select Not configured to turn on thumbnail previews. Next, click OK.

  3. You can see the changes by refreshing your folder in Windows Explorer. No need to restart Windows. After disabling thumbnail previews with group policy, it’s impossible to enable thumbnail previews using other methods above until you set this policy back to Not configured.