Archive for November, 2016

Display Full Path in Title Bar of Windows 10 File Explorer

November 26th, 2016 by Admin

By default, Windows 10 will display the folder name alone in the title bar of File Explorer. Sometimes you might need to know the absolute path of the location you are currently in. In this tutorial we’ll show you 2 ways to make Windows 10 display full path (file location) in the title bar of File Explorer.

Method 1: Make Windows 10 Display Full Path in Explorer Title Bar Using Folder Options

  1. Open File Explorer. Click the View tab on the ribbon. You’ll see the the Options button on the right-hand side. Click it to open the Folder Options dialog.
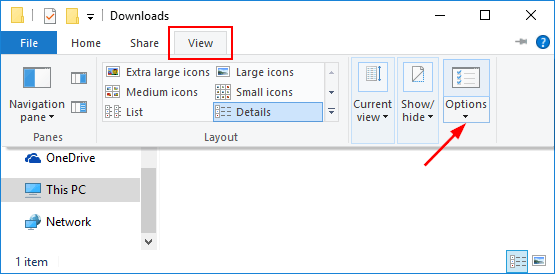
    open-folder-options

  2. Click the View tab. Locate and tick the checkbox named “Display the full path in the title bar“.
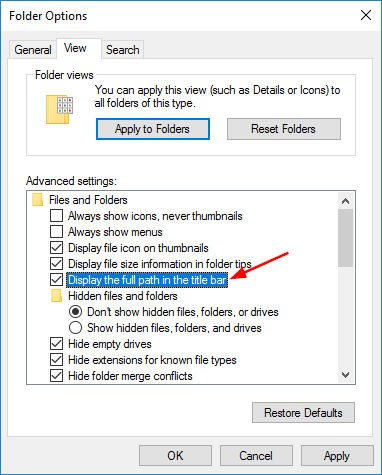
    display-full-path-in-the-title-bar

  3. Click Apply followed by OK. Log off your user or restart the computer. As you see, the File Explorer should now show the full file path instead of the folder name in the title bar.
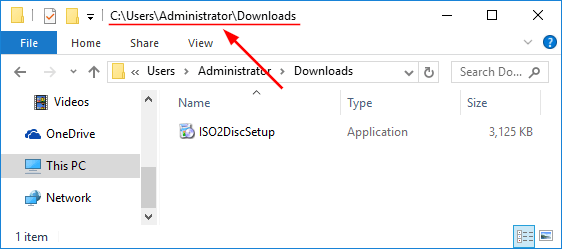
    file-explorer-display-full-path

Method 2: Make Windows 10 Display Full Path in Explorer Title Bar Using Registry Editor

  1. Press the Windows key + R to open the Run dialog box, type regedit and hit Enter.
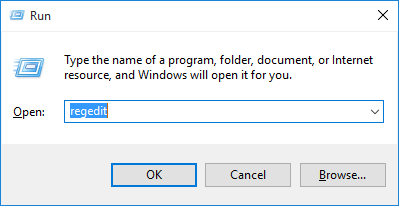
    regedit-via-run

  2. In the left pane of Registry Editor, navigate to the following key:
    HKEY_CURRENT_USER\Software\Microsoft\Windows\CurrentVersion\Explorer\CabinetState
  3. In the right pane, double-click the value entry FullPath and modify the value to 1.

    display-full-path-in-explorer-titlebar

    If FullPath doesn’t exist, you need to create it first. To do so, right-click on the empty space and select New -> DWORD (32-bit) Vaule, and name it FullPath.

  4. Close Registry Editor and reboot your computer. If you want to make Windows 10 not show full path in the title bar of File Explorer, just open Registry Editor and delete the FullPath value entry.
How to Create Shortcut to Shutdown / Restart Windows 10

November 25th, 2016 by Admin

In previous post we’ve covered 7 ways to shutdown / restart your Windows 10 computer. However, if those are not simple or quick enough for you, you can create a shutdown / restart shortcut on your desktop. The following tutorial will walk you through the steps of creating a shortcut to shutdown / restart Windows 10 more quickly.
Tips: If you want to schedule your computer to shutdown or restart at specified time, please check out this article: Auto Shutdown Windows 10 / 8 As You Expect

How to Create Shortcut to Shutdown / Restart Windows 10?

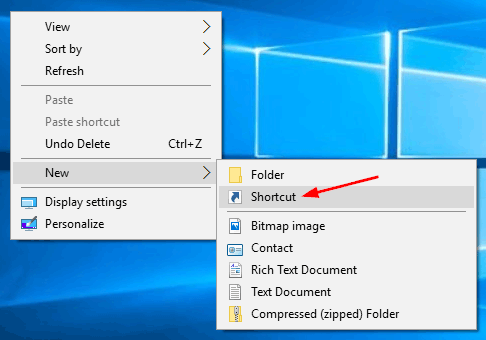
  1. Right-click any empty space on the desktop, select New and then Shortcut from the context menu.
    new-desktop-shortcut

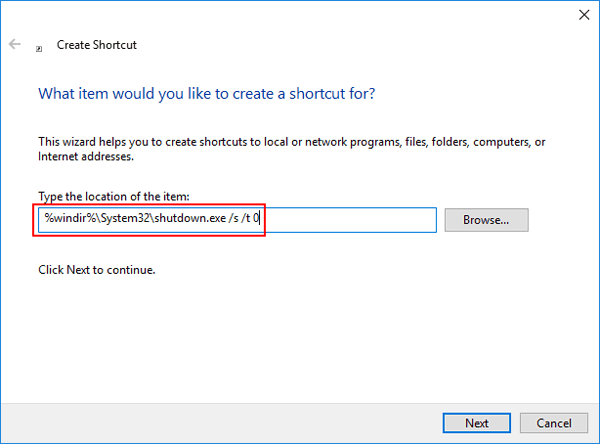
  2. When the Create Shortcut wizard appears, copy and paste one of following commands in the location box and click Next.

    • Shutdown Computer:
      %windir%\System32\shutdown.exe /s /t 0
    • Restart Computer:
      %windir%\System32\shutdown.exe /r /t 0
    • Lock Computer:
      Rundll32.exe User32.dll,LockWorkStation

    create-shutdown-shortcut

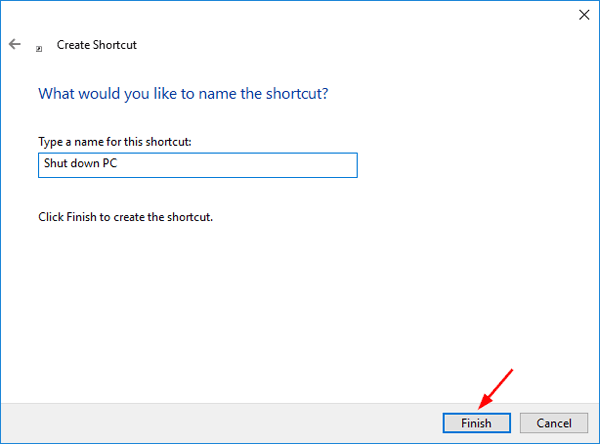
  3. You’ll be asked to name the shortcut. I suggest you name the shortcut to correspond to the action it will perform.

    name-a-shortcut

  4. When you’ve clicked Finish on the above dialog, you’ll see a shortcut on the desktop. You can double-click it to immediately shut down or restart your computer.

    shutdown-shortcut-icon

How to Disable Automatic Restart After Windows 10 Update

November 23rd, 2016 by Admin

By default, Windows 10 will reboot automatically with no warning after installing an important update. Yesterday when I left my computer for 5 minutes, I found Windows 10 automatically rebooted to finish updating itself, even when there are open applications and unsaved documents. Luckily I find out 2 methods to disable automatic restart after installing updates in Windows 10. Hopefully this will also save yourself the headache of lost work.

Method 1: Disable Automatic Restart After Installing Updates Using Group Policy

  1. Press Windows key + R to open the Run dialog, type gpedit.msc into it and press Enter.

    gpedit

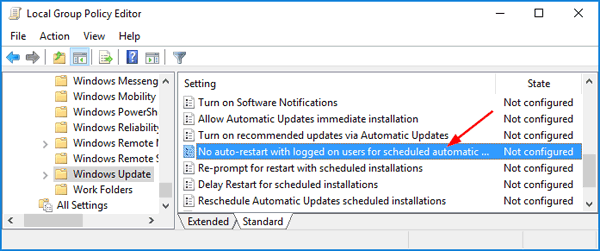
  2. When the Local Group Policy Editor opens, expand Computer Configuration -> Administrative Templates -> Windows Components -> Windows Update. In the right pane, double-click the “No auto-restart with logged on users for scheduled automatic update installations” setting.

    no-auto-restart-for-updates

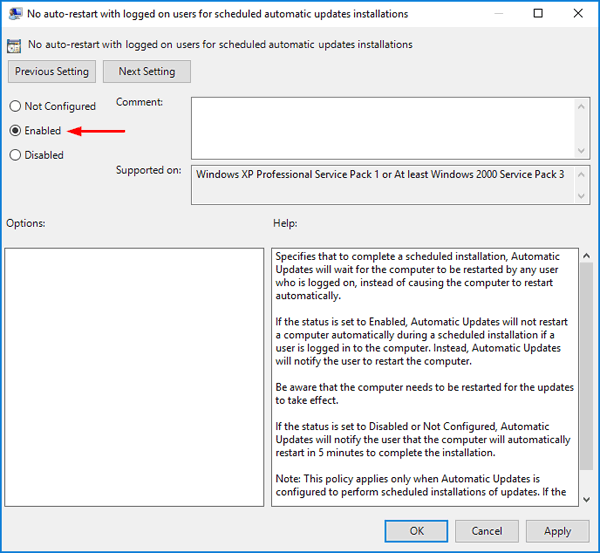
  3. Select Enabled and click OK. Reboot your computer to make the policy changes take effect immediately.

    disable-auto-restart-after-updates

Method 2: Disable Automatic Restart After Installing Updates Using Registry Editor

Since the Local Group Policy Editor is not included in Windows 10 Home edition, you may need to use this registry hack to prevent Windows 10 from automatically restarting after installing updates.

  1. Press Windows key + R to open the Run dialog, type regedit into it and press Enter.

    regedit-via-run

  2. When the Registry Editor appears, navigate to the following key:
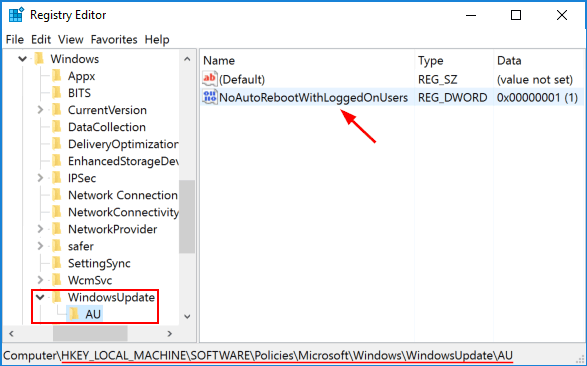
    HKEY_LOCAL_MACHINE\SOFTWARE\Policies\Microsoft\Windows\WindowsUpdate\AU

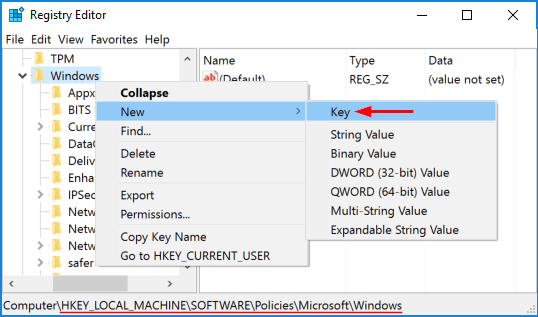
    By default, the last two keys (WindowsUpdate\AU) doesn’t exist and you need to create it manually. To do so, right-click the Windows key in the left pane, select New -> Key and name it WindowsUpdate. Next right-click the WindowsUpdate key you just created, and create a subkey named AU.

    new-windowsupdate-key

  3. With the AU key selected in the left pane, right-click any empty space in the right pane, and select New -> DWORD (32-bit) Value, name it NoAutoRebootWithLoggedOnUsers and set its value to 1.

    windows-10-no-auto-reboot

  4. Reboot your computer. Now your Windows 10 computer will never reboot automatically after installing updates.

2 Options to Disable BitLocker on Surface Pro 4

November 22nd, 2016 by Admin

Surface Pro comes with BitLocker encryption enabled by default. Many Surface Pro users don’t realize that BitLocker was turned on until they get locked out of Windows 10, or be asked for a recovery key during advanced boot up. In this tutorial we’ll show you 2 simple methods to turn off / disable BitLocker on Surface Pro 4 running Windows 10.

Option 1: Disable BitLocker from Settings

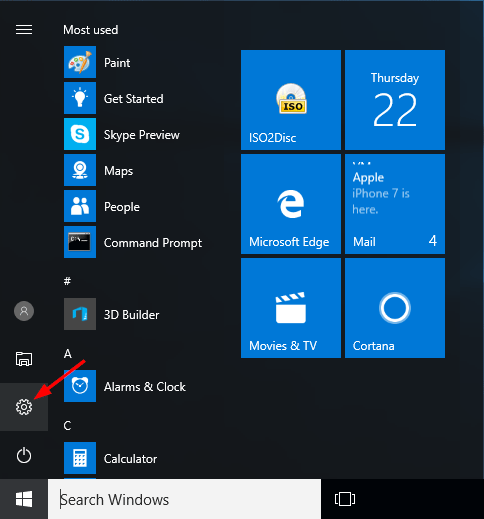
  1. Press the Windows key + I to open the Settings screen, or click the Settings icon from Windows 10 Start Menu.

    open-settings-app

  2. Click on System.

    system-settings

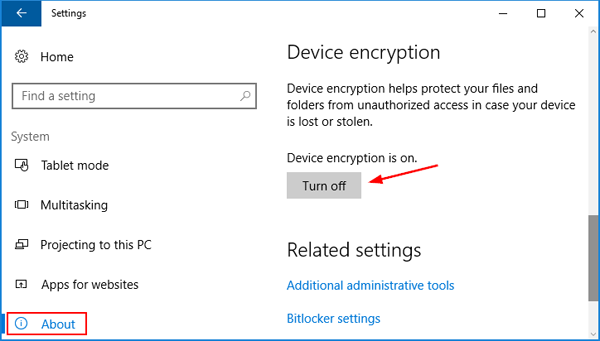
  3. Click About on the left side. From the right side, scroll down to the Device encryption section and click Turn off button.

    turn-off-device-encryption

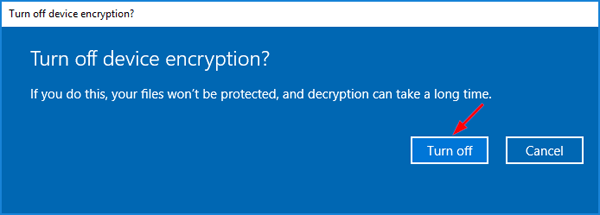
  4. A pop-up window will open, saying “If you turn off device encryption, your files won’t be protected, and decryption can take a long time“. Just click Turn off button to proceed.

    disable-device-encryption

Option 2: Disable BitLocker from Control Panel

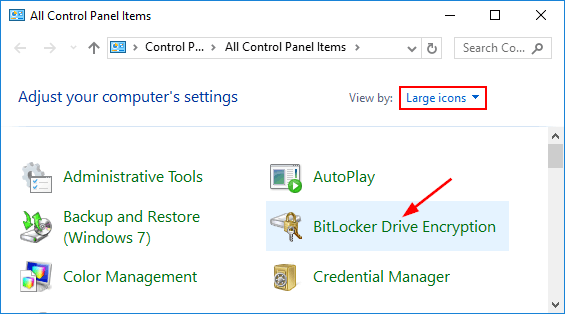
  1. Open the Control Panel in Large icons view. Click BitLocker Drive Encryption.

    bitlocker-drive-encryption

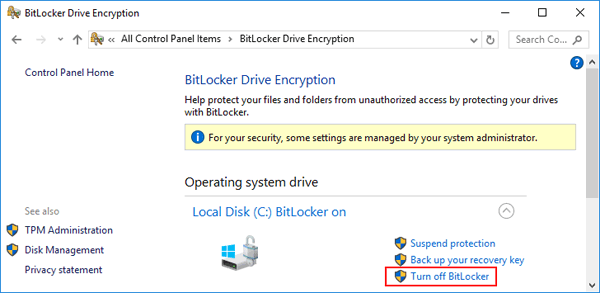
  2. Click the Turn off BitLocker link where it appears next to your drive.

    turn-off-bitlocker

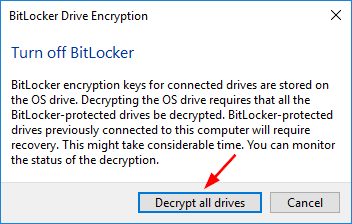
  3. Click Decrypt all drives to begin the decryption process.

    decrypt-bitlocker-drives

How to Know if Your Drive is Decrypted?

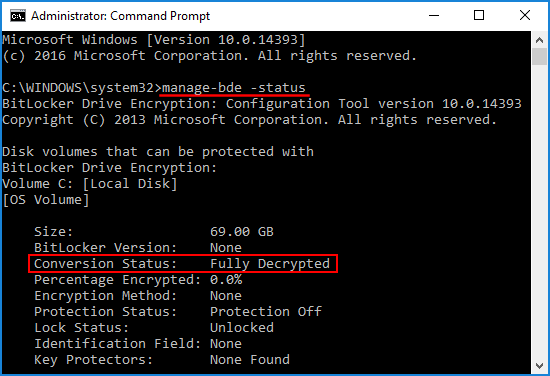
BitLocker decryption is running in the background and you won’t be informed when it’s complete. Depending on the amount of data on your drive, it can take several hours to get the job done. To check out the decryption progress, open an elevated Command Prompt and run the following command:

manage-bde -status

bitlocker-status

This will display the Bitlocker stauts for all disks. In this example, the conversion status shows my OS drive is fully decrypted. If the decryption is still in progress, the conversion status will shown as “Decrytpion in Progress”, and you need to wait for “Percentage Encrypted” reaches 100%.

Change PIN Complexity Requirements Policy in Windows 10

November 22nd, 2016 by Admin

PIN login was first introduced in Windows 8 that lets users to login with a four-digit number. The PIN is really short and simple that could be compromised easily by hackers.

Thankfully, Windows 10 includes the PIN complexity feature that allows to set up a complex PIN with special characters, uppercase / lowercase letters. The PIN isn’t restricted to four digits and it can be as complex as Windows text-based password. In this tutorial we’ll show you how to change / enable the PIN complexity requirements policy in Windows 10.

Part 1: Enable PIN Complexity Group Policy in Windows 10

  1. Press the Windows key + R keyboard shortcut, type gpedit.msc in the Run box and press Enter. This will open the Local Group Policy Editor.

    gpedit

  2. Navigate to the following location on the left side:

    Computer Configuration > Administrative Templates > System > PIN Complexity

    If you’re running Windows 10 Anniversary Update (version 1607) or earlier, navigate to:

    Computer Configuration > Administrative Templates > Windows Components > Windows Hello for Business > PIN Complexity

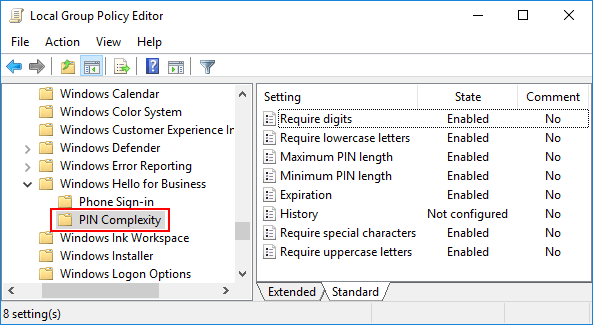
  3. On the right side, you can see 8 different policies to customize PIN complexity. Note that changing PIN complexity does not impact existing PIN login, only affects new PIN created.

    pin-complexity-policy

    • Require digits: Your PIN must contain at least one digit number.
    • Require lowercase letters: Your PIN must contain at least one lowercase letter.
    • Require uppercase letters: Your PIN must contain at least one uppercase letter.
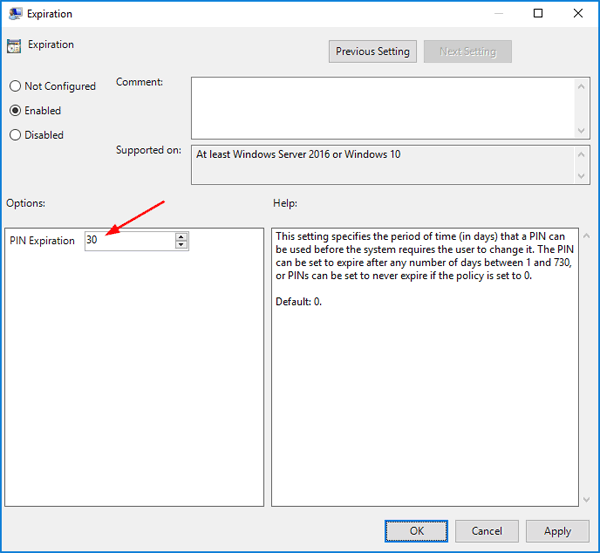
    • Expiration: This policy lets you set the number of days before the PIN expires and forces users to change PIN.

      pin-expiration

    • Maximum PIN length: This policy lets you set a maximum number of characters you can use to create a PIN.
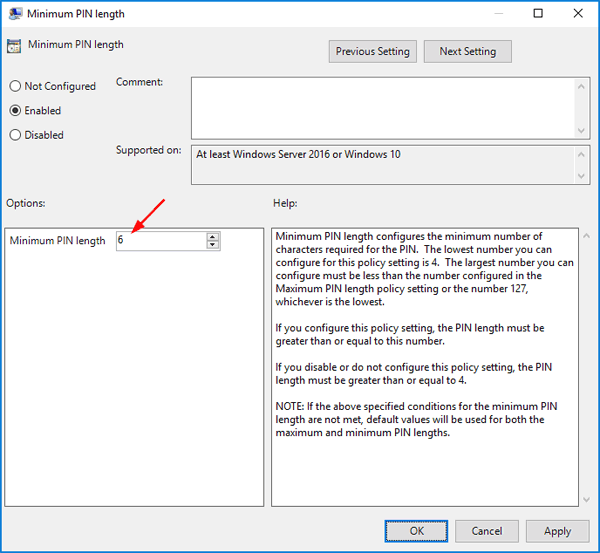
    • Minimum PIN length: Determine the least number of characters that a PIN may contain. This should be less than the Maximum PIN length.

      minimum-pin-length

    • History: Prevent you from reusing previously used PINs. You can configure Windows to remember 0 to 50 history PINs.
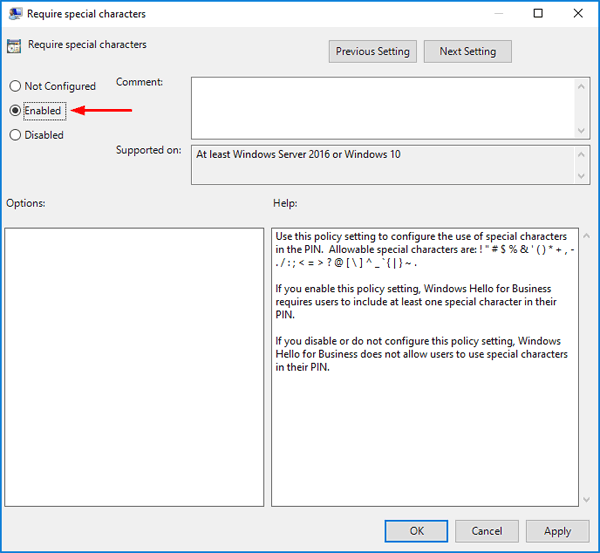
    • Require special characters: Your PIN must contain at least one of these special characters: ! ” # $ % & ‘ ( ) * + , – . / : ; < = > ? @ [ \ ] ^ _ ` { | } ~ .

      pin-special-chars

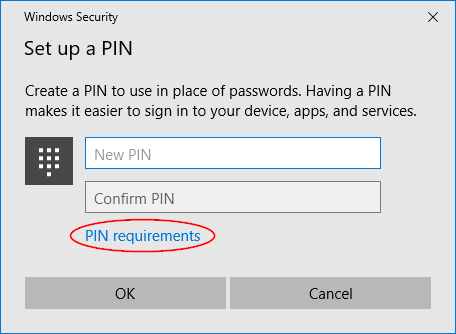
  4. Once you are done setting up the PIN complexity, restart Windows 10 to make your changes take effect. Now when you try to set up a new PIN, you can see the “PIN requirements” link under the PIN box. Click the link and you can view the PIN complexity requirements configured on your computer.

    pin-requirements

Part 2: Use Registry Editor to Enable PIN Complexity in Windows 10

If you are running Windows 10 Home edition, then you’re unable to access the Local Group Policy Editor. In that case you can use the Windows Registry Editor to enable PIN complexity.

  1. Press the Windows key + R keyboard shortcut, type regedit in the Run box and press Enter. This will open the Registry Editor.

    regedit-via-run

  2. Navigate to the following key on the left side:
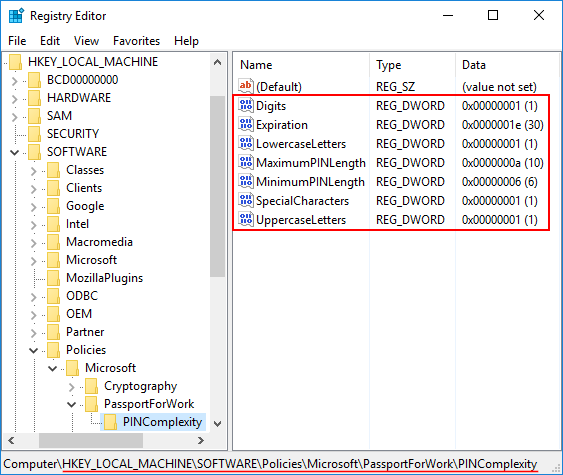
    HKEY_LOCAL_MACHINE\SOFTWARE\Policies\Microsoft\PassportForWork\PINComplexity

    If the PINComplexity key doesn’t exist, you need to create it manually.

  3. On the right side, you can create separate DWORD values for each PIN complexity policy. For example, if you want to set the PIN to expire after 30 days, right-click the empty space and select New -> DWORD (32-bit) Value, name the newly-created value as Expiration. Double-click on it, enter 30 (Decimal) in the Value Data box and click OK.

    PINComplexity

    • Digits: Require digits
    • Expiration: Expiration
    • UppercaseLetters: Require uppercase letters
    • LowercaseLetters: Require lowercase letters
    • MaximumPINLength: Maximum PIN length
    • MinimumPINLength: Minimum PIN length
    • SpecialCharacters: Require special characters
  4. If you don’t want to enforce one of PIN complexity policies, just delete the corresponding DWORD value and you’re done. After you complete editing the registry, reboot Windows 10 to apply the new PIN complexity policy.

How to Change File Ownership Back to TrustedInstaller in Windows 10

November 20th, 2016 by Admin

By default, most system files are protected by TrustedInstaller. Even a user logged in as administrator doesn’t have permissions to modify the system files. When you need to modify a system file, you need to change the owner of the file from TrustedInstaller to your current account. However, later on, you may want to restore the ownership back to TrustedInstaller but you’ll find TrustedInstaller is not present in the users/groups list. So here we’ll show you how to change the owner of your system files back to TrustedInstaller in Windows 10.

How to Change File Ownership Back to TrustedInstaller in Windows 10?

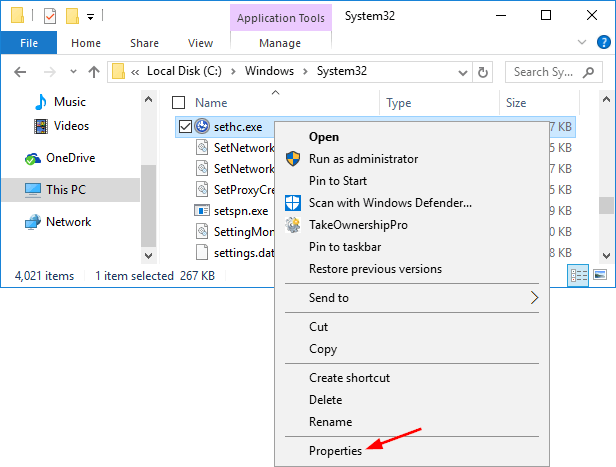
  1. Open Windows Explorer and locate the file (or folder) that you want to change ownership of. Right-click on the file and select Properties from the context menu.

    file-properties

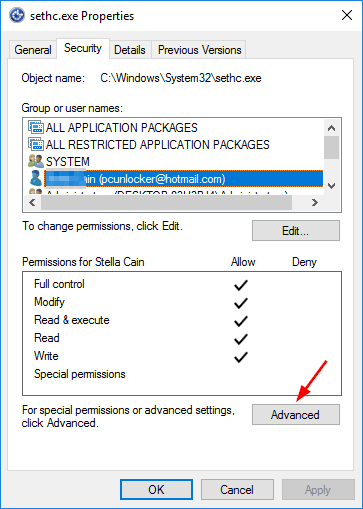
  2. This will open its Properties window. Now go to Security tab, and then click the Advanced button near bottom right corner.

    file-advanced-settings

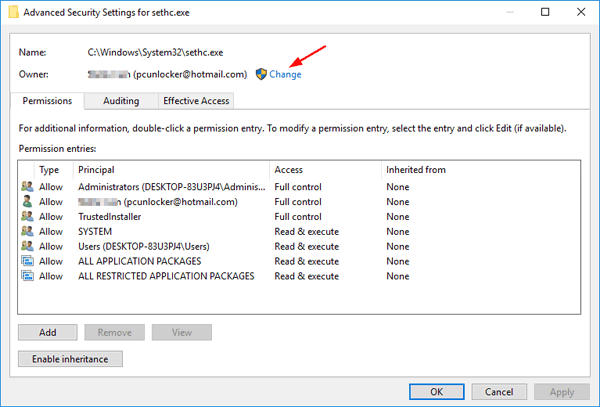
  3. Click on the Change link next to Owner appearing at the top of the Advanced Security Settings window.

    change-ownership

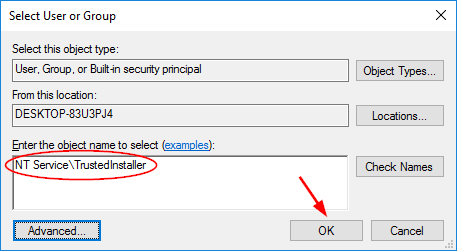
  4. This will open the Select User or Group window. Here, simply copy NT Service\TrustedInstaller and then paste it in the object name box and then click OK.

    enter-trustedinstaller-as-owner

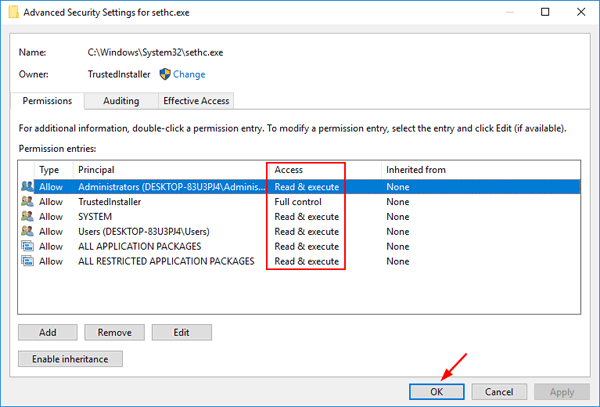
  5. Now you’ll be back at the Advanced Security Settings window. Under the Permission entries list, you can change or restore the file permission back to what it was. By default, all users (except TrustedInstaller) have only Read/Execute permissions over the system files.

    restore-file-permissions

  6. Click Apply and then OK. Now you have successfully restored TrustedInstaller as default owner of a system file or folder in Windows 10.

How to Set Low & Critical Battery Alarm in Windows 10

November 17th, 2016 by Admin

In previous post we’ve covered the way to change low & critical battery level and action, here we’ll show you how to configure Windows 10 to play alarm sound when your laptop or tablet reaches the low or critical battery level.

How to Set Low & Critical Battery Alarm in Windows 10?

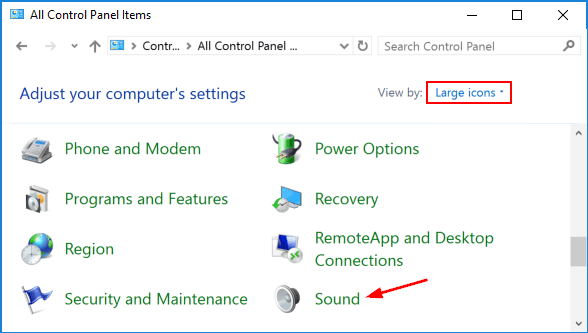
  1. Open the Control Panel and set the View by option to Large icons. Click Sound.

    sound-control-panel

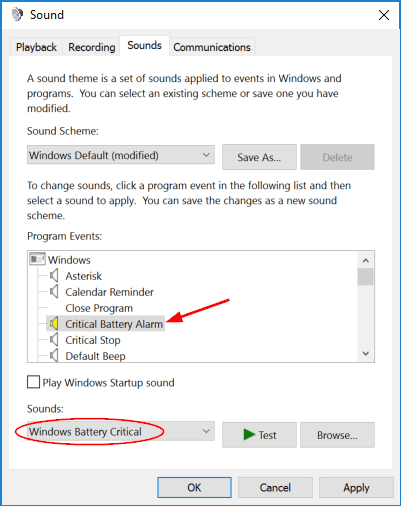
  2. When the Sound window opens, select the Sounds tab at the top. Under the Program Events section, scroll down and you can select the Critical Battery Alarm event.
  3. Under the Sounds section at the bottom, click the drop-down box and select the predefined alarm tone you want to play when your computer reaches the critical battery level. Or click on Browse button and choose your customized alarm tone (in .wav format).

    critical-battery-alarm

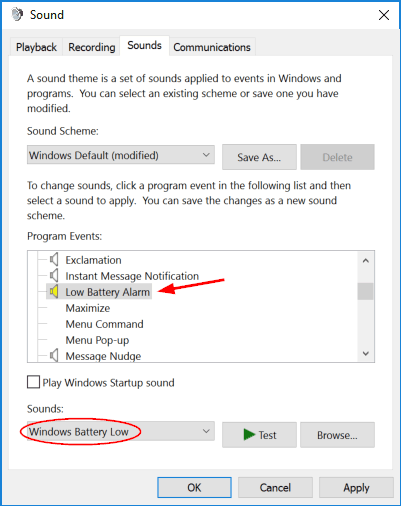
  4. Go back to the Program Events section and you can find the Low Battery Alarm event, and select an alarm sound you like. When it’s done, click Apply and then OK.

    low-battery-alarm

Customize Critical & Low Battery Level and Action in Windows 10

November 17th, 2016 by Admin

Need to change alert level of low battery on your laptop? No low battery level warning message and your computer always just shuts off? You won’t lose your unsaved documents if you set your computer to go into hibernation when reaching the critical-battery level. In this tutorial we’ll show you how to customize the critical & low battery level and action in Windows 10.

How to Customize Critical & Low Battery Level and Action in Windows 10?

  1. Open the Control Panel with Large icons view. Click Power Options.

    power-options

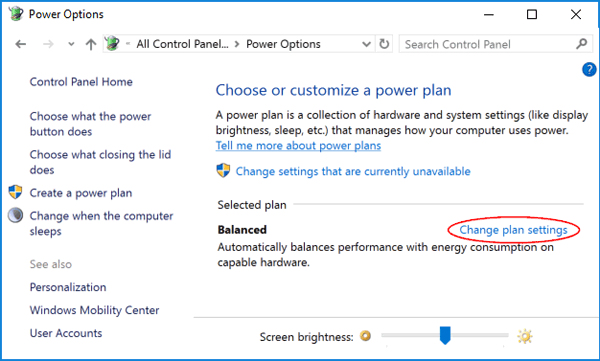
  2. Click the Change plan settings link next to the power plan that is currently selected for your laptop or tablet.

    change-power-plan

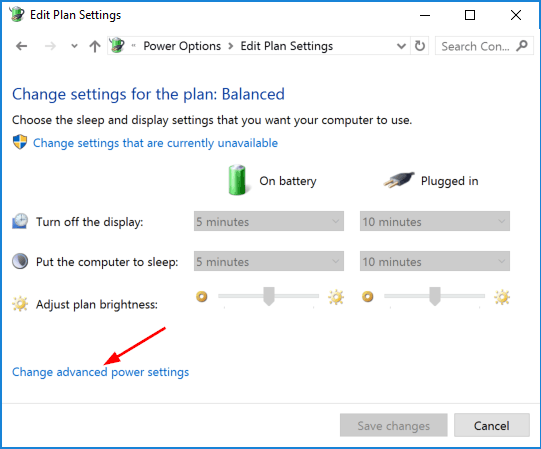
  3. Click the Change advanced power settings link at the bottom.

    advanced-power-settings

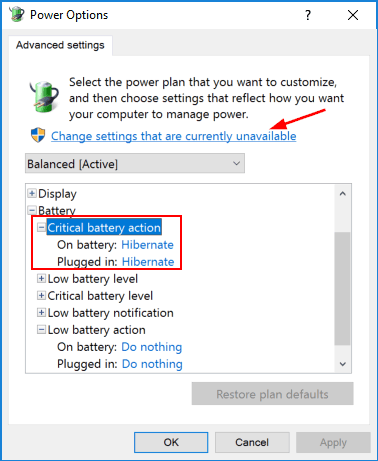
  4. When the Power Options dialog box shows up, click the “Change settings that are currently unavailable” link at the top to edit all power settings. Expand the Battery section in the list and you can find various battery settings.
  5. Expand the Critical battery action, you can select Hibernate, Sleep or Shutdown for both On battery and Plugged in. Expand the Low battery action and you can have the computer do nothing when the low battery level is reached.

    critical-battery-action

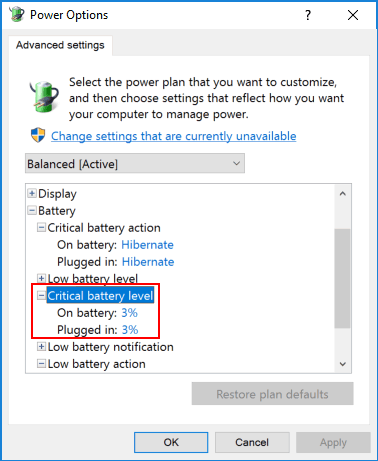
  6. Expand the Critical battery level, you can adjust the battery power percentage to 3% or higher. There is also corresponding option to change the low battery level.

    critical-battery-level

  7. When it’s done, click OK to save your changes. If you have messed up the settings, just click the Restore plan defaults button at the bottom and your critical & low battery level and action will be restored to default.