Posts Tagged ‘UEFI BIOS’

PCUnlocker: Support 32-bit UEFI and 64-bit UEFI Boot

May 29th, 2014 by Admin

uefiUEFI (Unified Extensible Firmware Interface) is a standard firmware interface for PCs, designed to replace legacy BIOS (basic input/output system). Many new computers are shipping with UEFI firmware instead of standard BIOS. Most of UEFI-based computers come with 64-bit UEFI but there are also some Windows 8 tablets that use 32-bit UEFI, such as Dell Venue 8/11 Pro, Toshiba Encore, Acer Iconia W3/W4, Lenovo MIIX 2, Lenovo ThinkPad Tablet 2 and ASUS Transformer Book T100/T300.

However, there is a limitation on installing Windows on devices with UEFI firmware. A 32-bit UEFI firmware core must be used to install a 32-bit OS and likewise 64-bit UEFI for a 64-bit OS. It is possible to have support for both 32-bit and 64-bit UEFI in one BIOS, but it requires additional work and ROM space, so this may not be commonly implemented.

If you forgot Windows administrator password for a UEFI-based computer, you can reset it easily with PCUnlocker. Just make a PCUnlocker Live CD and you can then use it to reset lost Windows password on any computer with EFI/UEFI/BIOS firmware. If your computer doesn’t have an optical drive, you can use the freeware ISO2Disc to make a GPT bootable USB drive from PCUnlocker ISO image.

PCUnlocker is available in two version (UEFI 64-bit version and UEFI 32-bit version). You can purchase the full version or try the trial version before deciding on making a purchase.

Download PCUnlocker with 64-bit UEFI Support

Download PCUnlocker with 32-bit UEFI Support

How to Know If Your Computer Supports UEFI

July 1st, 2013 by Admin

One of the largest underlying changes to Windows 8 is the long-overdue shift from BIOS to UEFI. Secure Boot is one of the new features introduced by UEFI and it has received by far the most attention, as it prevents Linux distributions from being installed on Windows 8 machines. In this article we’re going to tell you a few methods to know if your computer supports UEFI.

The simple way to tell if you have UEFI boot mode or not is to watch Windows starting up. If you see the Windows logo when it boots, you are in old fashioned BIOS boot mode. However if you see your manufacturer or custom BIOS logo remaining whilst Windows starts you are in UEFI mode! In my Windows 8 Dell computer which comes with UEFI BIOS, every time I turn on the machine, it will display a Dell logo with the looping circles at the bottom.

dell-boot-screen

Another method is to use the MSInfo command. Press Windows + R key combination to bring up the Run box in Windows 8. Type the “MSInfo” command and press Enter. It will display all your system information and hardware configuration in detail. From the System Information window, you’ll see BIOS Mode listed as UEFI if your computer supports UEFI.

msinfo

If you’re still uncertain if your computer comes with UEFI BIOS, you can check out the Secure Boot option by booting your computer into BIOS. Try to go through all your BIOS settings to look for an option such as “Secure Boot”, “Secure Boot Control”, “Attempt Secure Boot”, etc. If you can find that option, your computer is using the latest UEFI BIOS.

How to Know If Your UEFI is 32-bit or 64-bit?

If your UEFI computer comes with Windows 8 64-bit pre-installed, it uses 64-bit UEFI firmware. If your UEFI computer comes with Windows 8 32-bit pre-installed, it uses 32-bit UEFI firmware.

While in UEFI mode, the Windows version must match the PC architecture. A 64-bit UEFI PC can only boot 64-bit versions of Windows. A 32-bit PC can only boot 32-bit versions of Windows. If you want to run a 32-bit Windows on a 64-bit UEFI PC, you need to change the boot mode from UEFI to Legacy/CSM and disable the Secure Boot option in BIOS. However, not all UEFI computers provide with the compatibility support module (CSM) that enables UEFI firmware to emulate a legacy BIOS.

How to Create A Bootable USB Drive for UEFI Computers

June 25th, 2013 by Admin

Nowadays, most of the new Windows 8 laptops, desktops or tablets use the UEFI replacement for the traditional BIOS, such as Surface Pro, Samsung Slate or other UEFI systems. The problem with UEFI-based computers is that they can’t boot from bootdisk with NTFS partition. UEFI system requires that your bootdisk resides on FAT32 partition.

Most USB burning programs will format your USB drive as NTFS, which includes the Microsoft Store Windows USB/DVD download tool. Luckily there is a free ISO burning software that lets you create a bootable USB with FAT32 file system only. It’s called ISO2Disc. But here I’m going to show you how to use the Command Prompt to create a bootable USB drive for UEFI computers.

How to Create A Bootable USB Drive for UEFI Computers?

  1. Open the Command Prompt with administrator privileges, then start the diskpart utility:
    diskpart.exe
  2. List all the disks and identify your USB drive:
    list disk
  3. Select the disk number that is your USB drive.
    select disk 1
  4. Remove all existing partitions:
    clean
  5. Convert the partition table from MBR to GPT:
    convert gpt
  6. Create a new partition, make it active and format as FAT32, then assign a drive letter:
    create partition primary
    select partition 1
    active
    format quick fs=fat32
    assign
  7. Type “exit” and press Enter to quit diskpart utility.

The final step is to copy all the files from your physical boot CD to the USB drive. For example, you can copy all files from either your Windows 8 installation DVD or ISO image to your USB drive. After that, you can use the USB drive to boot your UEFI computer and perform system repairing or installation for your own purpose.

If you still are unable to boot your UEFI computer from the USB drive, you may need to disable the Secure Boot option in the BIOS. In my Samsung Slate tablet PC, I have to disable the Secure Boot by following these steps:

  1. Press and hold Volume-Up and Volume-Down, then power up or reboot the slate. It should go into BIOS setup.
  2. In “Advanced Configuration”, change “Attempt Secure Boot” to Disabled.
  3. Press Volume-Up and Volume-Down to exit, then “Save Changes and Reset”.
  4. Power off the machine.
  5. Plugin USB drive to slate. Press and Hold Volume-Up button, then power up the machine. It should boot into USB drive now.

How to Reset Lost Windows 8 Password for UEFI-based Samsung Laptop

June 12th, 2013 by Admin

Locked out of your Samsung laptop because you’ve forgotten Windows 8 password? How to reset lost administrator password on your UEFI-based Samsung laptop? If you’ve bought a Samsung laptop with Windows 8 pre-installed, you may find out there is no option to boot from a CD/USB drive. That is because the traditional PC BIOS has been replaced with UEFI, which is no long compatible with your boot CD/USB. So how to unlock a Windows 8 Samsung laptop using a password reset boot CD? In this tutorial we’ll walk you through how to reset lost Windows 8 password on UEFI-based Samsung laptop.

How to Reset Lost Windows 8 Password for UEFI-based Samsung Laptop?

  1. If you don’t have a password reset boot CD/USB drive, you can create one easily. Simply download the self-extracting archive of Reset Windows Password utility on your computer. Unzip the download file which contains a bootable CD image. Burn the ISO image to a blank CD or USB drive using ISO2Disc, BurnCDCC or ImgBurn program.
  2. Connect the boot CD/USB drive to your UEFI-based Samsung laptop. Upon powering on the laptop, press F2 to enter into BIOS. Navigate to the Advanced tab, disable the Fast BIOS Mode.

    samsung-bios-mode

  3. Switch to the Boot tab, and then disable the UEFI Boot Support. Press F10 to save your changes and exit.

    samsung-uefi-boot

  4. Turn on or restart your Samsung laptop. Press F10 when you see the Samsung logo. Now you’ll see the boot CD/USB drive shown in the list of Boot Menu. Highlight your CD/USB drive with the cursor keys and press Enter. The computer should now boot from the CD/USB drive.
  5. After a while, the system will launch the Reset Windows Password program, which displays a list of Windows 8 user accounts on your Samsung laptop.

  6. Choose a user account and click on Reset Password button. The program will quickly remove your forgotten Windows 8 login password and unlock your user account if it is disabled, locked out or expired.
  7. Restart your Samsung laptop and remove the boot CD/USB drive. When the computer is powered on again, press F2 to enter into BIOS and then enable the UEFI Boot Support option. When you boot to the Windows 8 login screen, you can successfully log back into your user account using a blank/empty password.

How to Reset Lost Windows 8 Password for UEFI-based ASUS Computer

June 7th, 2013 by Admin

My grandfather just bought an ASUS notebook PC with Windows 8 and set a password for the administrator account. However, he is up in age and forgot his password soon (did not write it down). Now he is trying to log in but of course it’s locked. How to unlock or reset a forgotten Windows 8 password on an ASUS laptop?

Forgot Windows 8 password and can’t log on your ASUS computer? How to unlock the administrator account without resetting your ASUS PC to factory settings? There are lots of bootable utilities which can help you reset Windows login password from a bootable CD, but most of them don’t support Windows 8 and they are also incompatible with UEFI BIOS.

If you’ve bought an ASUS computer with Windows 8 pre-installed, you’ll find that you can’t get it to boot from a Live CD as usual. That is because most of Windows 8 PCs use a new UEFI BIOS rather than the traditional BIOS, and you need to enable the Legacy BIOS support in BIOS. In this tutorial we’ll show you how to easily reset lost Windows 8 password for UEFI-based ASUS computer.

How to Reset Lost Windows 8 Password for UEFI-based ASUS Computer?

First of all, you need to create a Live CD (or USB flash drive) on another PC that you can access. Download the ZIP archive of Reset Windows Password utility and save it on your desktop. Open the ZIP file and extract it to a folder on your desktop. Within that folder, you’ll find a file called ResetWindowsPwd.iso. Burn the ISO image onto an empty CD using ISO2Disc, BurnCDCC or other ISO burning software.

Place the Live CD into the CD drive of your locked Windows 8 ASUS computer. Now we need to make some changes with the computer in order to get it to boot from the Live CD. Power off the computer. As soon as the ASUS logo appears, immediately press F2 key to enter the BIOS. Use the arrow key to select Boot tab and enable the Launch CSM option and disable the Fast Boot option.

enable-csm

Switch to the Security tab and disable the Secure Boot Control option. Save your changes and exit.

disable-secure-boot

Turn off your computer and power it on again. Quickly press ESC key to access the Boot Menu. This time the Live CD will show up in the Boot Menu. Choose your Live CD and press Enter. If you can’t bring up the Boot Menu, you can also press F2 key to enter into BIOS and set CD/DVD-ROM as the first boot option.

boot-menu

After successfully booting from the Live CD, the computer will open up the Reset Windows Password program after a few minutes. The program automatically searches the Windows SAM registry hive for your Windows 8 installation, and then display all of local user accounts on your ASUS PC.

Choose a user account and then click on “Reset Password” button. It will reset your forgotten Windows 8 password instantly.

Restart the computer and take out the Live CD from the CD drive. Remember to reset your BIOS settings to their factory defaults, otherwise Windows 8 will fail to boot. When the ASUS computer boots into the Windows 8 login screen, you can then log in to your user account with a blank/empty password!

How to Reset Lost Windows 8 Password for UEFI-based Toshiba Computer

June 6th, 2013 by Admin

Recently I got a UEFI-based Toshiba Satellite laptop which comes with Windows 8 pre-installed. But I have forgotten the administrator password and can’t log in. How can I recover or reset the password without re-installing the operating system?

Forgot Windows 8 password on your Toshiba laptop? How to unlock a UEFI-based Toshiba computer if you lost the administrator password? UEFI is intended to replace the traditional BIOS and nearly all Toshiba computers that come with Windows 8 pre-installed are shipped with UEFI. The problem is that most password cracking boot CDs are not compatible with UFEI so it’s difficult to get them to reset/recover your forgotten password. Luckily, there is a quick fix for this compatibility issue. In this tutorial we’ll walk you through how to reset lost Windows 8 password for UEFI-base Toshiba computer.

How to Reset Lost Windows 8 Password for UEFI-based Toshiba Computer?

Password Recovery Bundle can reset lost Windows 8 password with the help of bootable media such as CD/DVD or USB Flash Drive, which can be easily created using the app itself. To get started, you’ll need another PC for downloading and installing the app in order to create the bootable disk.

Once downloaded and installed, click on the “Windows Password” button to open the bootdisk creating window. Choose your target device (CD/DVD or USB flash drive) and click on “Start Burn” button to start creating the Windows password reset bootdisk for you. Once done, click the OK button and unplug the USB device or remove the CD/DVD.

Now insert the bootable CD/CD or USB drive into your locked Toshiba computer. Power on the system and while the TOSHIBA logo appears, press F2 key to enter the BIOS Setup Menu. Select Security tab and set the Secure Boot to Disabled. Select Advanced tab and go to System Configuration. Change the Boot Mode option from UEFI Boot to CSM Boot. Press F10 key to save and exit.

toshiba-uefi

Note: On some Toshiba computer, you may need to choose the Boot tab, then enable the Launch CSM option and disable the Fast Boot option, or disable the UEFI Boot option. Then switch to the Security tab, set Secure Boot Control to Disabled.

When the computer restarts, quickly press ESC or F12 key repeatedly until you see the Boot Menu. Choose the CD or USB drive you’ve created from the Boot Menu. Sit back and let the system load some required files that are necessary to complete the password reset operation.

Once you are presented with the Reset Windows Password window, choose your Windows 8 SAM registry file from the drop-down menu. This comes useful in case you’re running a dual boot machine. Once selected, the program will display a list of user accounts for your Windows 8 installation.

Choose the user account that needs a password rest, and click on “Reset Password” button. It will blank your Windows 8 password instantly. It’s simple as that! Now click Restart button to reboot your machine and remove the CD/USB drive. You can then log back into your Windows 8 Toshiba computer without a password!

Forgot Admin Password for Your HP PC with Windows 8 Pre-installed in UEFI Boot Mode

June 5th, 2013 by Admin

Forgot Windows 8 admin password on your HP laptop? How to reset HP login password to your Windows 8 system running in UEFI mode? If your HP computer comes with the new type of firmware UEFI instead of traditional PC BIOS, you will soon find out that most of boot CDs don’t support UEFI boot. However, there is a quick fix to this problem. In this tutorial we’ll walk you through how to reset forgotten administrator password on any HP computers with Windows 8 pre-installed in UEFI boot mode.

How to Reset Forgotten Windows 8 Admin Password on HP Computer with UEFI BIOS?

First of all, you need to create a Live CD (or USB flash drive) on another PC that you can access. Download the ZIP archive of Reset Windows Password utility and save it on your desktop. Open the ZIP file and extract it to a folder on your desktop. Within that folder, you’ll find a file called ResetWindowsPwd.iso. Burn the ISO image onto an empty CD using ISO2Disc, BurnCDCC or other ISO burning software.

Place the Live CD into the CD drive of your locked Windows 8 HP computer. Now we need to make some changes with the computer in order to get it to boot from the Live CD. Power off the computer. As soon as the HP welcome screen appears, immediately press F10 key to enter the BIOS. Use the arrow key to select Security tab and then choose Secure Boot Configuration.

hp-bios

When the Secure Boot Configuration warning displays, press F10 to continue. Enable the Legacy Support option if it is disabled, and then disable the Secure Boot option. change the boot order to CD/DVD-ROM and press F10 to save your changes.

secure-boot

Note: If you are using a HP notebook computer with UEFI BIOS, turn on your PC and repeatedly press Esc key until the Startup Menu opens. Choose the System Configuration menu, use the down arrow key to select Boot Options, then press Enter. Next disable the Secure Boot option.

After successfully booting from the Live CD, the computer will open up the Reset Windows Password program after a few minutes. The program automatically searches the Windows SAM registry hive for your Windows 8 installation, and then display all of local user accounts on your HP PC.

Choose the administrator account and then click on “Reset Password” button. It will reset your forgotten Windows 8 administrator password instantly.

Restart the computer and take out the Live CD from the CD drive. Remember to change your computer’s boot mode from Legacy back to UEFI, otherwise Windows 8 will fail to boot. When the HP computer boots into the Windows 8 login screen, you can then log in to the administrator account with a blank/empty password. It’s that easy!

Forgot Admin Password for Your Acer PC with Windows 8 Pre-installed in UEFI Boot Mode

June 3rd, 2013 by Admin

I have an Acer Aspire V5 laptop running Windows 8 with Phoenix BIOS running UEFI boot. I forgot the administrator password and now I am locked out. I’ve searched the web for how to reset Windows 8 password for computer which comes with UEFI BIOS, but there is no Live CD that supports UEFI-mode booting. So how do I reset my forgotten admin password?

If you’ve purchased an Acer computer with Windows 8 pre-installed, you’ll find that you are unable to boot up your PC using the Live CDs that you have ever used. This is because almost all Windows 8 PCs are shipped with UEFI BIOS, which replaces the traditional PC BIOS. The Secure Boot feature included in UEFI will prevent you from running operating systems other than Windows 8. So what to do if you’ve forgotten the Windows 8 administrator password on your Acer computer? In this tutorial we’ll walk you through how to reset lost administrator password on an Acer computer which comes with Windows 8 pre-installed in UEFI boot mode.

How to Reset Forgotten Windows 8 Administrator Password on Acer Computer with UEFI BIOS?

To get started, you need to create a Live CD (or USB flash drive) on another PC that you can access. Download the Reset Windows Password utility and save it on your desktop. Unzip the download file and you’ll get a bootable ISO image. Burn it onto an empty CD using ISO2Disc, BurnCDCC or other ISO burning software.

Place the Live CD into the CD drive of your locked Windows 8 Acer computer. Now we need to make some changes with the computer in order to get it to boot from the Live CD. Power off the computer. As soon as the Acer logo screen appears, immediately press F2 or Del key to enter the BIOS. Use the arrow key to select Boot tab. Choose the Boot Mode and press Enter to change the setting from UEFI to Legacy BIOS. Move to the Secure Boot option and disable it. Next change the boot order to CD/DVD-ROM and press F10 to save your changes.

Note: If you can’t find the UEFI boot mode in BIOS, try to switch to the Boot Options tab. With Launch CSM highlighted, press Enter and use the down arrow to select Always. Then switch to the Authentication tab, choose the Secure Boot option and press Enter to select Disabled.

After successfully booting from the Live CD, the computer will open up the Reset Windows Password program after a few minutes. The program automatically searches the Windows SAM registry hive for your Windows 8 installation, and then display all of local user accounts on your Acer PC.

Choose the administrator account and then click on “Reset Password” button. It will reset your forgotten Windows 8 administrator password instantly.

Restart the computer and take out the Live CD from the CD drive. Remember to change your computer’s boot mode from Legacy BIOS back to UEFI, otherwise Windows 8 will fail to boot. When the Acer computer boots into the Windows 8 login screen, you can then log in to the administrator account with a blank/empty password. It’s that easy!

How to Reset Forgotten Windows 8 Password on Sony Laptop with UEFI BIOS

June 1st, 2013 by Admin

I have a Sony Vaio laptop which comes with Windows 8 installed in UEFI mode. But I have forgotten the administrator password and can’t log in to the computer. Is there a way to override or reset the password without wiping the entire system?

Have you tried to log into your Windows 8 administrator account on your Sony laptop and it keeps saying that the password you’ve entered is incorrect? Whether you forgot the password, or or know it but still can’t log in because your account is locked out or disabled, there is always a way to unlock your Sonly laptop.

Since all computers that ship with Windows 8 use the UEFI replacement for the traditional BIOS, this will cause lots of bootable utilities to be unable to boot your Windows 8 computer. But there is also pretty easy fix. In this tutorial we’ll walk you through how to reset forgotten Windows 8 password on Sony laptop with UEFI BIOS.

How to Reset Forgotten Windows 8 Password on Sony Laptop with UEFI BIOS?

To get started, you need to create a Live CD (or USB flash drive) on another PC that you can log on as administrator account. Download the Reset Windows Password utility and save it on your desktop. Unzip the download file and you’ll get a bootable ISO image. Burn it onto an empty CD using ISO2Disc, BurnCDCC or other ISO burning software.

Place the Live CD into the CD drive of your locked Windows 8 Sony laptop. Now we need to make some changes with the computer in order to get it to boot from the Live CD. Power off the computer, press the Assist key to enter the VAOCare Rescue Mode Boot screen.

sony-rescue-mode

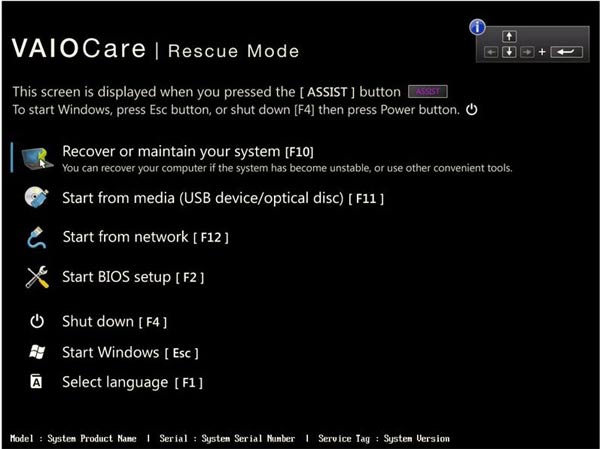
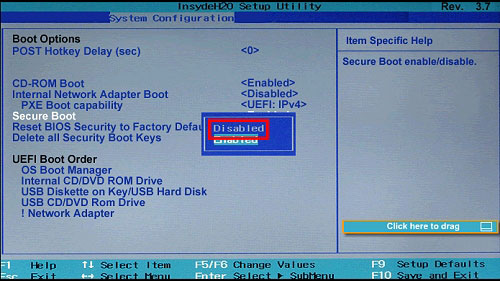
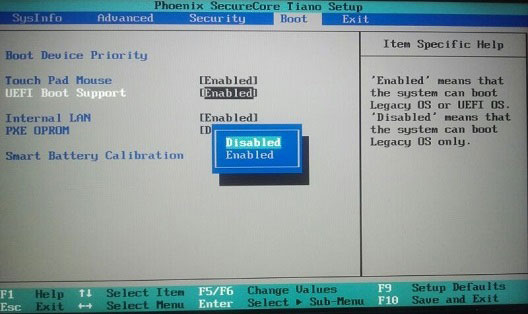
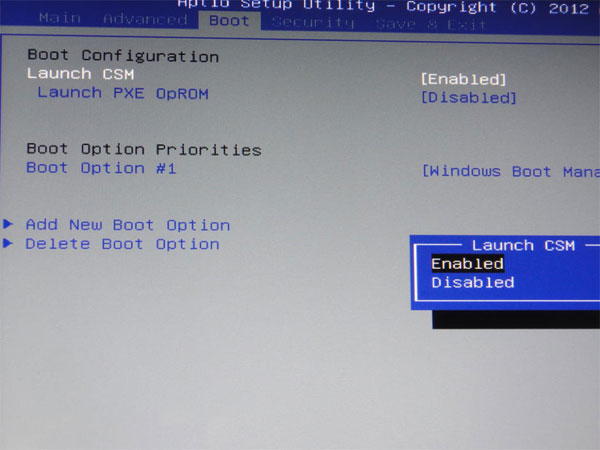
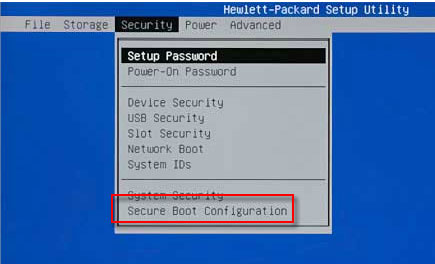
Select the Start BIOS setup [F2] option to proceed to the system BIOS. Once inside the BIOS Setup Utility, use the arrow keys to select the Boot tab. With the Boot Mode option selected, press Enter to change the setting from UEFI to Legacy. Next switch to the Security tab, disable the Secure Boot option, and save your changes.

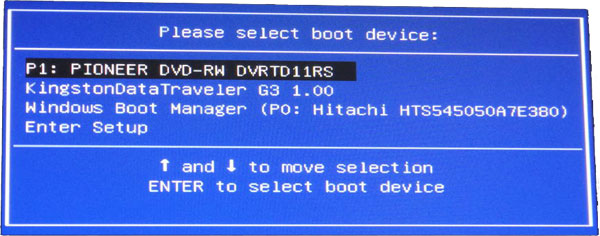
Turn off the computer again and press the Assist key to enter the VAOCare Rescue Mode Boot screen. Select the Start from media (USB device/optical disc) [F11] option to proceed. Now the computer starts to boot from the Live CD.

After one or two minutes, the computer will open up the Reset Windows Password program. The program automatically searches the Windows SAM registry hive for your Windows 8 installation, and then display all of local user accounts on your PC.

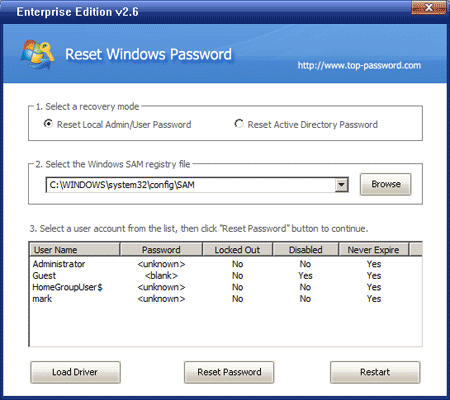
Choose a user account and then click on “Reset Password” button. It will unlock your account and blank/remove the forgotten Windows 8 password immediately, also enable the user account in case it was disabled.

Restart your laptop and take out the Live CD from the CD drive. Remember to change your computer’s boot mode from Legacy back to UEFI. Then you can log back into your Windows 8 Sony laptop without being asked to enter a password. It’s that easy!
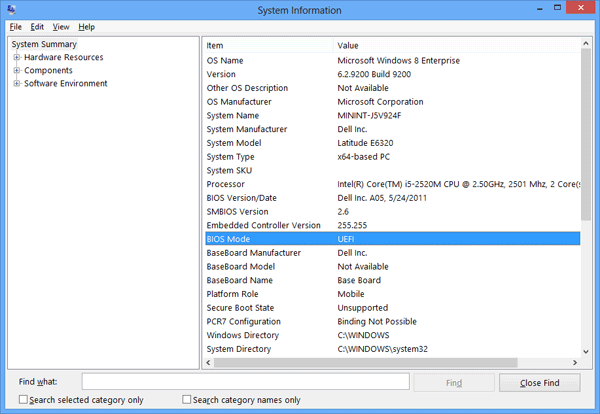
How to Reset Lost Windows 8 Password for ThinkPad Laptop with UEFI BIOS

March 11th, 2013 by Admin

Hi! I have a Lenovo Thinkpad laptop with Windows 8 pre-installed, I forgot my password for the administrator account because I haven’t used it in so long, now I can’t log in. How can I reset or bypass the password?

Nowadays most ThinkPad laptops are shipped with Windows 8 pre-installed, and the traditional PC BIOS is replaced by UEFI. It can become a big issue if you forgot or lost Windows 8 password on a ThinkPad Laptop. There are many password cracking tricks and tools out there that can be used to unlock Windows password, but they don’t work any longer when you use it on ThinkPad laptop with UEFI BIOS. So here I’ll explain the steps of resetting lost Windows 8 password for ThinkPad laptop with UEFI BIOS.

How to Reset Lost Windows 8 Password for ThinkPad Laptop with UEFI BIOS?

Password Recovery Bundle can reset lost Windows 8 password with the help of bootable media such as CD/DVD or USB Flash Drive, which can be easily created using the app itself. To get started, you’ll need another PC for downloading and installing the app in order to create the bootable disk.

Once downloaded and installed, click the “Windows Password” button to open the bootdisk creating window. Choose your target device (CD/DVD or USB flash drive) and click on “Start Burn” button to start creating the Windows password reset bootdisk for you. Once done, click the OK button and unplug the USB device or remove the CD/DVD.

Now insert the bootable CD/CD or USB drive into your locked ThinkPad laptop. Power on the machine and enter into BIOS. Navigate to the Startup tab. Change the UEFI/Legacy Boot option from UEFI to Both, and set the UEFI/Legacy Boot Priority option to Legacy First. Press F10 to save your changes.

When the computer restarts, quickly press F12 key repeatedly until you see the Boot Menu. Choose the CD or USB drive you’ve created from the Boot Menu. Sit back and let the system load some required files that are necessary to complete the password reset operation.

Once you are presented with the Reset Windows Password window, choose your Windows SAM registry file from the drop-down menu. This comes useful in case you’re running a dual boot machine. Once selected, the program will display a list of user accounts for your Windows installation.

Choose the user account that needs a password rest, and click on “Reset Password” button. It will blank your Windows 8 password instantly. It’s simple as that! Now click Restart button and reboot your machine.

Congratulations! You’ve successfully unlocked a Windows 8 Thinkpad laptop with UEFI BIOS.