Posts Tagged ‘UEFI BIOS’

Forgot Admin Password for Your Dell PC with Windows 8 Pre-installed in UEFI Boot Mode

January 17th, 2013 by Admin

I just bought my eleven year old daughter a Dell laptop with Windows 8 pre-installed. She changed the admin password, but didn’t write the new password down, and can’t remember what she changed it to. I have tried many Windows password reset bootdisk and can’t get it to boot up the laptop. How to recover or reset the forgotten password?

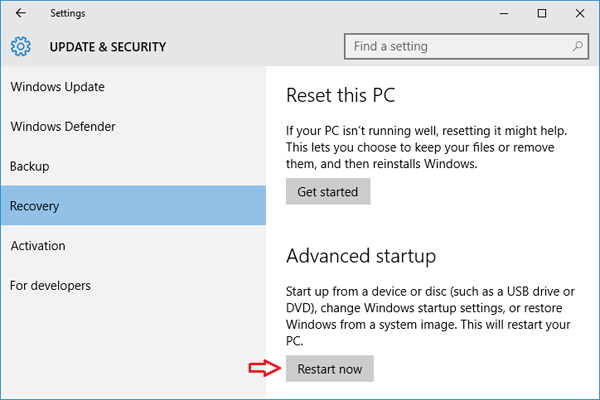
Can’t remember your Windows 8 administrator password and get locked of your Dell computer? How to reset a lost password on Dell laptop with UEFI BIOS? All new Windows 8 machines manufactured by Dell, HP, Microsoft, etc. will always ship with UEFI BIOS. UEFI is meant as a replacement for the legacy BIOS present in all Windows computers we used before. As a result, most Live CDs will fail to boot off UEFI-enabled computer.

In this tutorial we’ll explain the procedure of resetting forgotten administrator password on a Dell PC which comes with a Windows 8 pre-installed. Just create a Windows password reset CD or USB drive and you can then use it to remove Windows 8 password easily. Here I’ll use a Kingston USB flash drive to demonstrate the password recovery procedure on a Dell Inspiron 660 desktop computer.

Step 1: Create a Bootable Windows Password Reset USB Drive

First, downloaded the Zip archive of Reset Windows Password utility on to an alternative PC which you have full access. Right-click on the download file and then choose Extract All from the context menu. After extracting, you’ll find the ResetWindowsPwd.iso file. Just copy this file to a CD or USB and it won’t work! You need to burn it to USB flash drive using ISO2Disc tool.

Step 2: Boot Your Dell PC from Windows Password Reset USB Drive

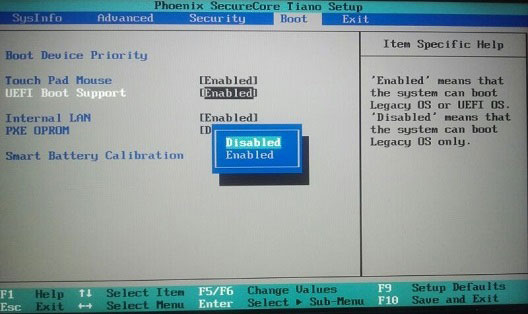
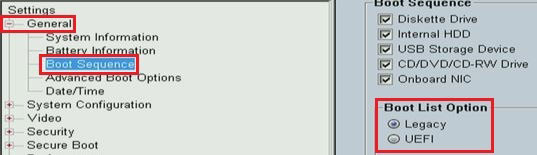
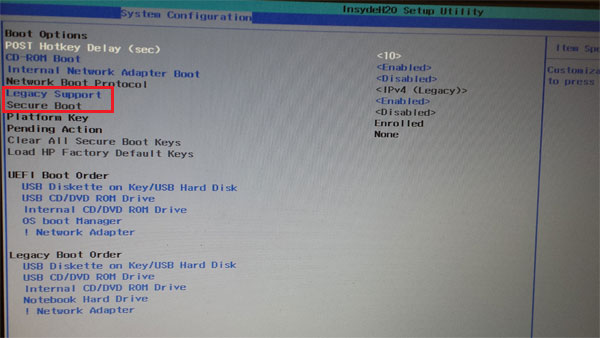
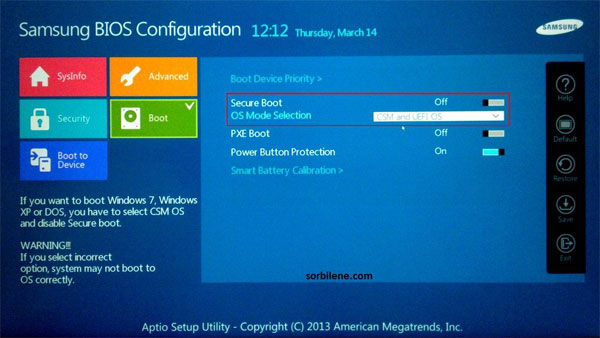
If Windows 8 came pre-installed on your computer, it almost certainly boots in UEFI mode. To get your computer to boot from Windows password reset bootdisk, you’ll need to switch the boot mode from UEFI to Legacy and then disable the Secure Boot option.

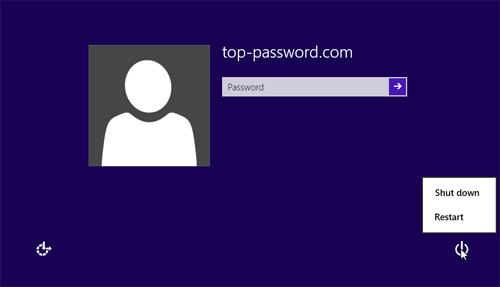
Insert the Windows password reset USB drive into your Dell PC. Power on the computer and press the F12 key to bring up the Boot Menu when you see the initial screen displaying the BIOS provider information. If using other models of Dell computer, try to press F2 or Del key instead of the F12 key.

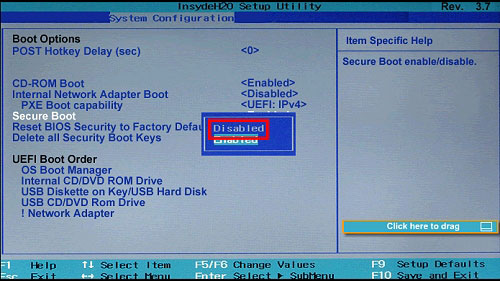
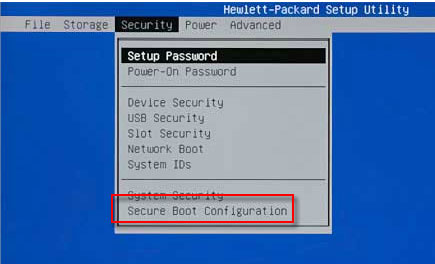
Use the arrow key to choose the BIOS Setup option. Under BIOS Setup Utility, move to the Boot tab and disable the Secure Boot Control option.

Next navigate down to the Boot Mode option. Press Enter key to switch the boot mode from UEFI to Legacy. Press F10 to save your changes.

Once your computer restarts, press F12 to bring up the Boot Menu again. This time you’ll see your USB flash drive show up in the boot list.

Just choose the USB flash drive and press Enter. The computer will boot off the USB flash drive immediately.

Step 3: Reset Forgotten Windows 8 Administrator Password

After you’ve booted from the Windows password reset USB drive, the Reset Windows Password program will launch automatically. The program will also display a list of user accounts existing in your Windows SAM registry hive. If you’re using a dual/multi-boot computer, just select the one for your Windows 8 installation.

Next choose the administrator account and click Reset Password button. It will remove/unlock your forgotten administrator password immediately. Restart your Dell computer and remember to go back into the BIOS and switch the boot mode back to UEFI, then your computer will boot normally from Windows 8 and you can log in to the administrator account with a blank password. It’s that simple.

3 Options to Access UEFI BIOS Setup in Windows 8 / 10

December 30th, 2012 by Admin

On Windows 10 or 8 operating systems that came pre-installed on the computer from the factory, the legacy BIOS has been replaced by UEFI (Unified Extensible Firmware Interface). This will cause the problem that bootable media from previous versions of Windows may not be recognized in Windows 10 / 8 computer. To resolve this problem, you need to switch your BIOS mode from UEFI BIOS to Legacy BIOS. No doing so would prevent the installation of Linux, Windows 7, or any other OS.

In this tutorial we’ll show you 3 ways to access UEFI BIOS Setup, even if you couldn’t login to Windows 10 or 8.

Option 1: Access UEFI BIOS Setup After Logging in to Windows 10/8

In previous post, we’ve covered how to set Windows 8 PC to boot with legacy BIOS mode instead of UEFI mode. Here we’ll show you another option to access UEFI BIOS Setup so long as you can log into Windows 10 / 8. Here are the steps:

  1. In Windows 8/8.1, press the Windows key + C, or swipe in from the right edge of the screen to open your Charms. Click Settings -> Change PC Settings. In PC Settings, select General.

    If you’re running Windows 10, press the Windows key + I to open the Settings app. Click Update & Security. Select the Recovery tab on the left pane.

    update-security

  2. Under Advanced startup, click Restart now. The system will restart and show the boot menu.
  3. In the boot menu, select Troubleshoot.

  4. In the Troubleshoot menu, select Advanced options.

  5. In the Advanced options menu, select UEFI Firmware Settings.

  6. Click Restart button to boot into UEFI BIOS Setup screen.

  7. When the computer restarts, the UEFI setup screen will be displayed. You can then disable UEFI BIOS and Secure Boot options, and enable legacy BIOS mode.

Option 2: Access UEFI BIOS Setup without Logging in to Windows 10/8

What to do if you forgot Windows user password and can’t login? Here is how you can access the UEFI BIOS Setup from Windows 10/8 login screen:

  1. From the login screen, click the Power icon in the lower right corner of the screen. While holding the Shift key, select Restart.

  2. The system will not actually restart but go into the boot options. click Troubleshoot.

  3. Afterwards, click Advanced options -> UEFI Firmware Settings -> Restart.
  4. The computer will reboot and take you into the UEFI BIOS setup.

Option 3: Access UEFI BIOS Setup from Command Prompt

You can also boot your computer into UEFI BIOS Setup by executing a simple command at the Command Prompt. Follow these steps:

  1. Open the elevated Command Prompt, then run the following command:
    shutdown /r /fw

  2. You’ll get a popup that says Windows is about to sign you out. Click Close.

  3. Your PC will now restart directly to UEFI settings.

How to Set Windows 10 / 8 PC to Boot with Legacy BIOS Mode Instead of UEFI Mode

December 29th, 2012 by Admin

Just got a new DELL laptop with Windows 8 pre-installed but it refused to boot from Ubuntu Live CD or even Windows 7 installation DVD? If you’re in similar situation, you should see the error message “Reboot and Select proper Boot device” or “No bootable device found” on the screen during boot. In order to fix this issue, all you need to do is to disable the UEFI mode and turn off the Secure Boot option in BIOS, which allows the EFI-based PC to operate in a legacy BIOS mode. Fortunately, nearly all modern EFI-based computers include a feature known as the Compatibility Support Module (CSM) that enables them to boot with legacy BIOS mode.

One of Microsoft’s new rules for Windows 10/8 is that any manufacturer that ships a windows 10/8 computer must enable UEFI secure boot by default. The UEFI BIOS is created for Windows 10/8 and if you need to use other system like Windows 7, Linux or any other OS, you have to disable the UEFI mode and Secure Boot options.

How to Set Windows 10 / 8 PC to Boot with Legacy BIOS Mode Instead of UEFI Mode?

When your computer is powered on, check the boot-screen for setup key (i.e. DELETE key, F8 key, F2 key) to enter BIOS Setup Utility. If you don’t know how to access your BIOS (UEFI) Setup, please check out this article: How to Set Your Computer to Boot from CD or USB Drive.

In the BIOS Setup Utility, change the boot mode from UEFI mode to legacy BIOS mode (or CSM boot mode), and disable the Secure Boot option. Here are steps of disabling UEFI secure boot in Toshiba laptop:

  1. Power on the system and while the “TOSHIBA” logo appears, press F2 key to enter the BIOS Setup Menu.
  2. Select Security tab and set the Secure Boot to Disabled.
  3. Select Advanced tab and go to System Configuration.
  4. Set the Boot Mode to CSM Boot.
  5. Press F10 key to save and exit.
  6. Press F12 key at “TOSHIBA” logo screen to toggle between the bootable devices and choose the medium which you want to boot from.

Note: Once you are finished and you want to return back to normal operation you need to revert the BIOS settings. The installed Windows 10/8 OS will not boot up, if you do not revert the BIOS settings!

The exact menu option in your motherboard’s BIOS may differ but look for phrases like “Boot Mode”, “Boot List Option”, “UEFI/Legacy Boot Priority”, “UEFI Boot”, etc. For example, in ASUS desktop or laptop computers, you need to enable the “Launch CSM” option and disable the “Secure Boot Control” or “Fast Boot” option.

hp-secure-boot

dell-latitude-uefi

hp-envy-uefi

samsung-uefi-secure-boot