I’m locked out of my computer because I forgot my Windows 8 password. What can I do? To help you out if (when) you forget your Windows 8 password, here we’ll show you a simple trick which allows you to reset forgotten Windows 8 login password without using third-party boot CD. No need to download or install anything on your computer.
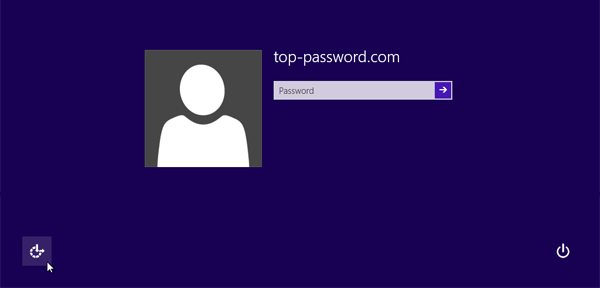
This trick requires you to replace the Ease of Access Center application (utilman.exe) with Command Prompt program. In the bottom-left corner of the Windows 8 logon screen sits the Ease of Access button. Click on it, you’ll find many Accessibility options such as the Magnifier, High Contrast Theme, Narrator and On Screen Keyboard. It’s a great feature for disabled people but it opens up a security hole that we can take advantage of to bypass Windows 8 password.
How to Reset Windows 8 Login Password without Using Third-Party Boot CD?
Before getting started, you need to create a Windows 8 Recovery Drive using another Windows 8 PC. If you don’t have another Windows 8 PC, you’ll have to bug one of your friends to use theirs.
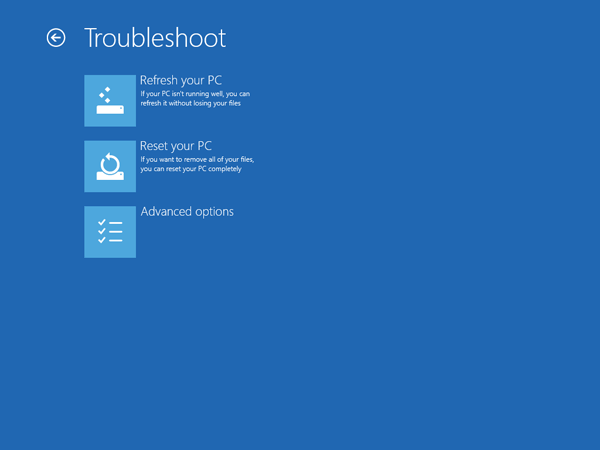
Boot your locked Windows 8 PC from the Windows 8 Recovery Drive (you might have to adjust the BIOS to allow booting from the CD). You’ll see the recovery screen. click on the Troubleshoot option.
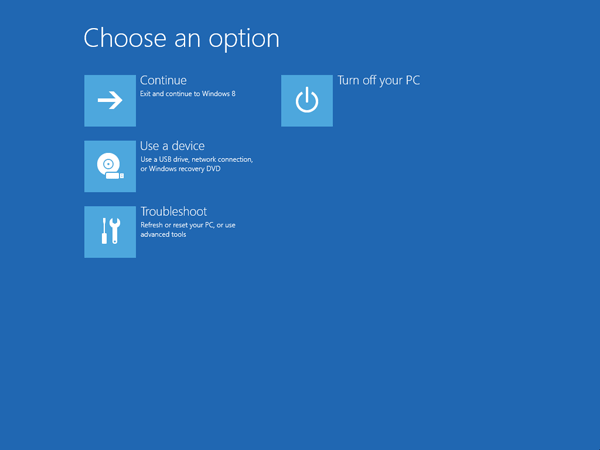
Now select Advanced Options.
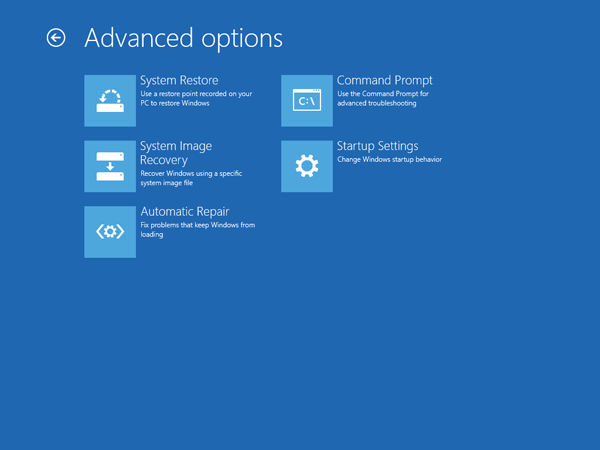
In a moment you’ll see the Advanced options screen, as shown below. Click the Command Prompt option to open up a Command Prompt window.
Type diskpart command and press Enter. Next type list vol and press Enter, you’ll see a list of your disk partitions, from which you can easily find your Windows 8 installation partition. In our case D is the drive letter of my Windows 8 installation.
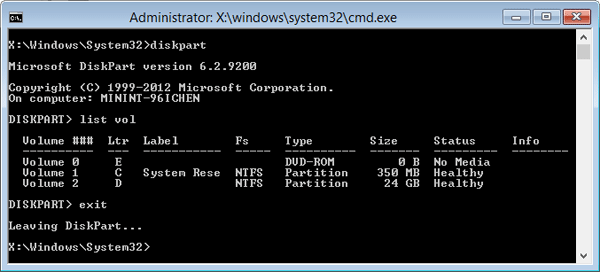
Type exit command to exit the DiskPart utility.
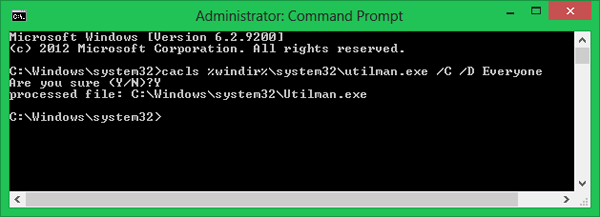
Next enter the following commands one by one. Make sure to replace D in the first command to the appropriate drive letter for your Windows 8 partition, if it’s different in your case.
D:
cd windows
cd system32
ren Utilman.exe Utilman.exe.bak
copy cmd.exe Utilman.exe
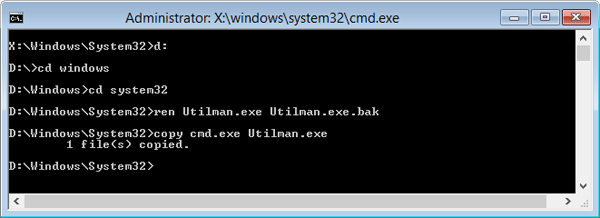
These commands will replace the Utilman.exe (Ease of Access) with the Command Prompt (cmd.exe). Now you can go ahead and reboot your machine.
Once booted to the login screen, click the Ease of Access button at the bottom left corner. It will open a Command Prompt window instead of the Ease of Access menu.
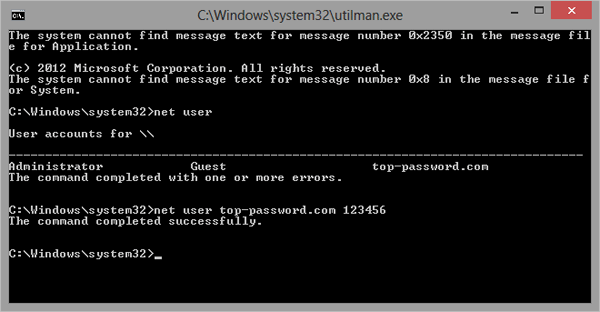
Type net user command and press Enter, it will list the exact names of all the user accounts available in your Windows 8 system.
Enter the command below to reset a lost or forgotten password. In this example, we will be changing top-password’s password to 123456.
net user top-password.com 123456
Replace top-password.com with the name of your user account.
Type exit command and press Enter. You’ll return back to the login screen.
Now you should be able to log into your PC using the new password.
After getting into Windows 8, please remember to rename the Utilman.exe.bak back to Utilman.exe. That’s it – you have successfully reset your forgotten Windows 8 password without using third-party boot CD.
Conclusion
While this trick works, there are other ways to reset lost Windows 8 password that are far easier. PCUnlocker, for example, is a powerful, WinPE-based tool that can blank Windows 8/7/Vista/XP password in fewer steps and much less time! PCUnlocker also supports password resetting for Microsoft account in Windows 8.