Archive for January, 2021

How to Add, Remove or Customize Quick Actions in Windows 10

January 23rd, 2021 by Admin

Quick Actions are a set of buttons which let you quickly access common functions, such as turning Bluetooth on or off, switching to tablet mode, adjusting screen brightness and so on. Just click the chat bubble icon in the notification area or press the Windows logo key + A to open the Action Center panel. From there you can see a list of quick action buttons at the bottom. In this tutorial we’ll show you how to add, remove, customize Quick Actions buttons in Windows 10.

Part 1: Enter into Editing Mode

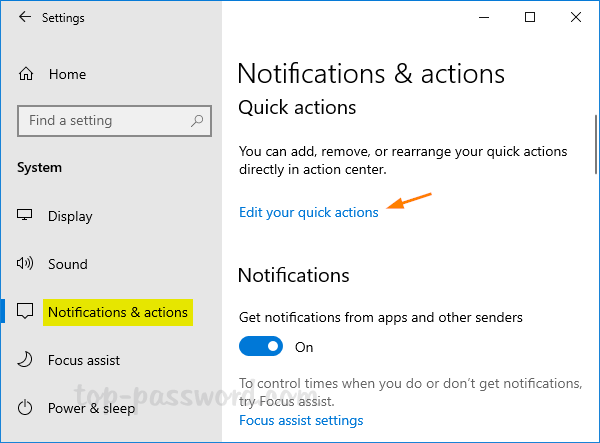
In order to customize Quick Actions, you need to open it in editing mode. Press the Windows logo key + I to open the Settings app, navigate to System -> Notifications & actions. On the right, click the “Edit your quick actions” option. The Quick Actions in the Action Center panel will appear in editable mode.

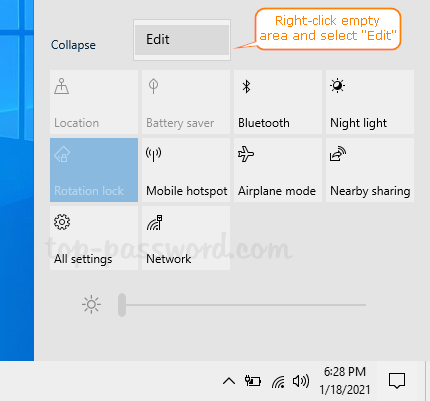
Another quick way to access the editing mode is to right-click any empty space in the Action Center panel and select Edit from the pop-up menu.

Part 2: Remove Quick Actions Buttons

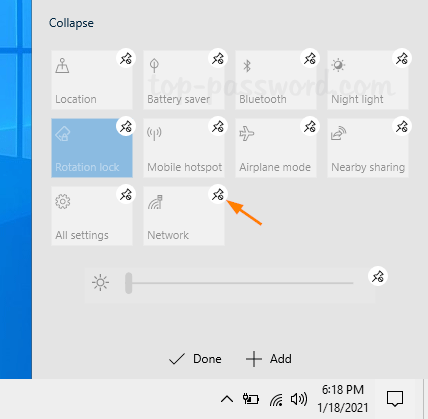
Simply click the unpin icon displayed in the upper-right corner of any Quick Actions button, and you can remove it from the Action Center.

Part 3: Add Quick Actions Buttons

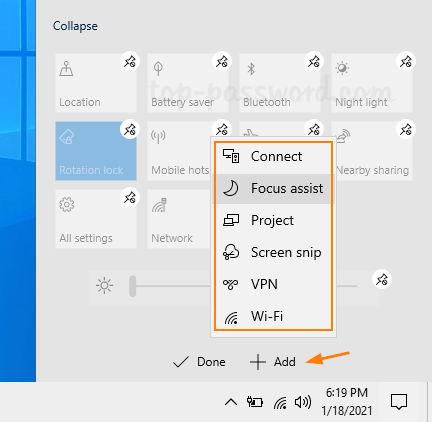
Click the Add button at the bottom and it will display all hidden quick actions. Select your desired quick action and add its button to the Action Center panel immediately.

Part 4: Rearrange Quick Actions Buttons

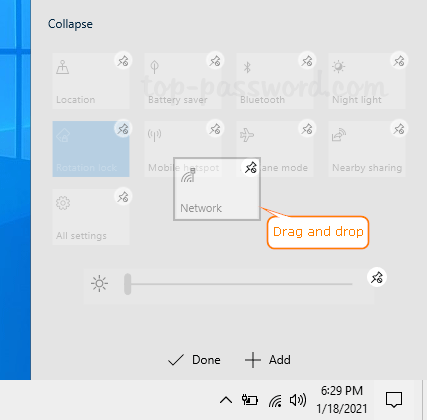
To rearrange the Quick Actions, you can drag any of the Quick action buttons and drop it to your desired position.

When everything is done, click the Done button at the bottom to save your changes.

Fix: Windows 10 Battery Indicator Shows “Plugged in Not Charging”

January 12th, 2021 by Admin

Battery stuck at the same percent all the time while plugged in? The battery indicator shows “plugged in, not charging” even when the AC power is connected? If you experience such issues with your Windows 10 laptop or tablet, here are some useful tips to get your battery back to charging when it’s plugged in.

Part 1: Restart Battery Device or Update Driver

  1. Press and hold the Windows key and then press R once, enter devmgmt.msc and click OK to launch Device Manager.

  2. Expand the Batteries category, right-click on the Microsoft ACPI Compliant Control Method Battery and select Disable from the pop-up menu. Click Yes to confirm.

  3. Restart your computer and then open up Device Manager again. Right-click on the Microsoft ACPI Compliant Control Method Battery and select Enable. If your battery still doesn’t charge, try to select the “Update driver” option and let Windows search automatically for newer driver.

Part 2: Using the Power Troubleshooter

  1. Press the Windows key + I to open the Settings app. Click on Update & Security.

  2. Select the Troubleshoot tab. On the right, click on the “Additional troubleshooters” link.

  3. Scroll down to the “Find and fix other problems” section, select the Power option and then click on the “Run the troubleshooter” button.

  4. The troubleshooter will fix all the issues related to the power supply and improve power usage.

Hopefully these tips could get your battery back to charging. If your Windows 10 PC still shows plugged in but the battery percentage not changing, it should be a hardware issue related to your power cord or battery.

Quickly Switch Between Windows by Hovering Your Mouse Over in Windows 10

January 8th, 2021 by Admin

Is there a quicker way to switch between open windows? Clicking on a window can bring it from background to foreground and make it active. But that method is not really fast. In this tutorial we’ll show you how to quickly activate a window by hovering over it with the mouse in Windows 10.

How to Activate a Window by Hovering over It with Mouse

  1. Open the Control Panel in Large icons view, and click on Ease of Access Center.

  2. Scroll down to the “Explore all settings” section and click on the “Make the mouse easier to use” link.

  3. Under the “Make it easier to manage windows” section, check the box that says activate a window by hovering over it with the mouse. Click OK and you’re done.

  4. If you have multiple windows open, just move the mouse pointer over any window and hold it for two seconds, that will become the active window.

How to Change Default Setting for Alt+F4 Shut Down Windows Dialog

January 4th, 2021 by Admin

When all open windows are minimized or the desktop is active, pressing Alt+F4 keys will open the Shut Down Windows dialog. The default option is Shut down. Today we will show you 2 methods to change the default setting to Restart, Sleep, Hibernate, Sign out, or Switch user in Windows 10.

Method 1: Change Default Setting for Alt+F4 Shut Down Windows Dialog via Group Policy

  1. Open Local Group Policy Editor and go to: User Configuration -> Administrative Templates -> Start Menu and Taskbar. On the right, double-click the policy called “Change Start Menu power button“.

  2. Click on Enabled. In the Options section, you can select Restart or other action from the drop-down list as the default setting.

  3. Click Apply and then OK. Restart your PC to see the changes.

Method 2: Change Default Setting for Alt+F4 Shut Down Windows Dialog via Registry Editor

  1. Open Registry Editor and navigate to: HKEY_CURRENT_USER\SOFTWARE\Policies\Microsoft\Windows\Explorer. On the right pane, right-click the blank space and select New -> DWORD (32-bit) Value.

  2. Name the newly-created DWORD as PowerButtonAction, then double-click it and change its value data to one of the following values (hex) depend on your choice:

    • 1 = Sign out
    • 2 = Shut down
    • 4 = Restart
    • 10 = Sleep
    • 40 = Hibernate
    • 100 = Switch user
  3. Close Registry Editor and reboot your computer.