Archive for February, 2019

How to Enable High-Performance GPU for Windows 10 Apps or Games

February 25th, 2019 by Admin

Is there a way to set preferred GPU for specific applications in Windows 10? Most Windows 10 computers come with 2 GPU (or graphics chips) installed – an integrated GPU and a dedicated GPU. For graphic intensive applications like games, you can force it to use the dedicated GPU to improve gaming performance. In this tutorial we’ll show you how to enable high-performance GPU for Windows 10 apps or games.

How to Enable High-Performance GPU for Windows 10 Apps and Games

  1. Open up the Settings app and navigate to System -> Display. Scroll down to the bottom and click on the “Graphics settings” link.

  2. Now, you can customize the graphics performance preference of any specific applications. For universal app, select the app from the list, and then click on Add.

    For classic app, just click on Browse to locate the .exe file of the desktop program you want to set default GPU for.

  3. Select the app you’ve added, and then click on the Options button to open the configuration dialog.

  4. Windows 10 considers the integrated GPU as the power-saving GPU, and the high performance GPU is the dedicated GPU or external GPU. Select High performance and click on Save.

  5. If your app or game is currently running, you may need to restart it to use the preferred GPU you just set. You can open Task Manager to view which GPU an application is using.

Best Ways to Password Protect Notepad Text Files in Windows 10

February 23rd, 2019 by Admin

Is there any simple way to protect a .txt file with password? Despite everybody knows how to encrypt a word file, most users don’t know how to password protect a plain text file. In this tutorial we’ll show you the best ways to password protect Notepad text files in Windows 10.

Method 1: Password Protect Notepad Text Files with EFS

EFS is the Windows built-in encryption tool which could be used to encrypt individual files and folders on NTFS drives. If you want to add an extra layer of security to your Notepad text files, here’s how to encrypt them with EFS in just a couple of clicks.

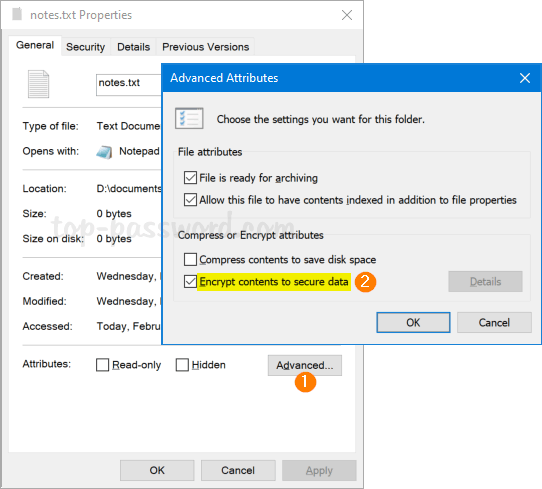
  1. Right-click on the Notepad text file you want to encrypt, and select Properties from the context menu.
  2. On the General tab, click Advanced. Next, check the box “Encrypt contents to secure data” and click OK.

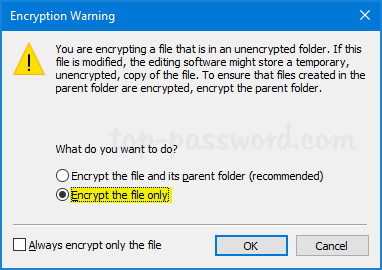
  3. A window will pop up asking you whether or not you want to encrypt the file and its parent folder. Select the “Encrypt the file only” and click OK.

  4. The text file you’ve encrypted with EFS will show its file name in green color.

Keep in mind that EFS is only available on Pro, Enterprise, and Education editions of Windows 10. If you’re using Windows 10 Home, you’re out of luck.

Method 2: Password Protect Notepad Text Files with 7-Zip

Notepad doesn’t offer a way to encrypt a .txt file, but you can save the text document into a password-protected zip archive. The freeware 7-Zip lets you password protect your Notepad text files easily.

  1. Click here to download 7-Zip. The file is only 1.4 MB big and installs quickly.
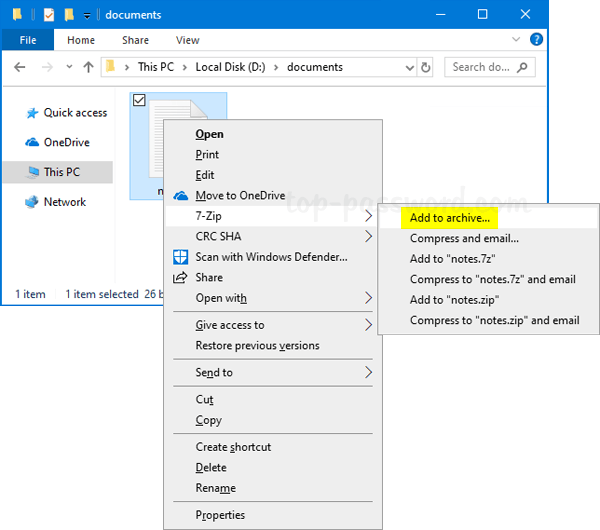
  2. Once installed, right-click on your Notepad text file from Windows Explorer, and then select 7-Zip -> Add to archive option.

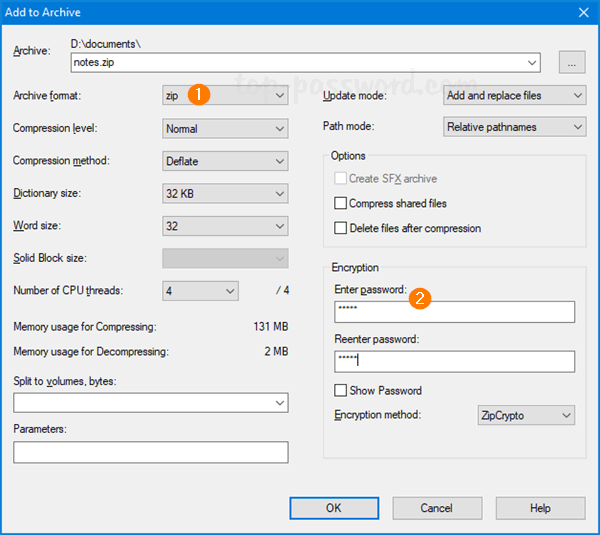
  3. When the Add to Archive window pops up, change the Archive format to Zip and enter the password that will protect your text files, and click OK.

  4. You’ll get a password protected .zip archive which contacting your text files. Make sure you remember the password to avoid losing access to the encrypted text files.

Method 3: Password Protect Notepad Text Files with Lock My Folders

If you often have to read or modify text files, Lock My Folders should be your perfect companion for password protecting your .txt file. Encryption is done on filesystem level and is transparent for both users and applications, including text editors.

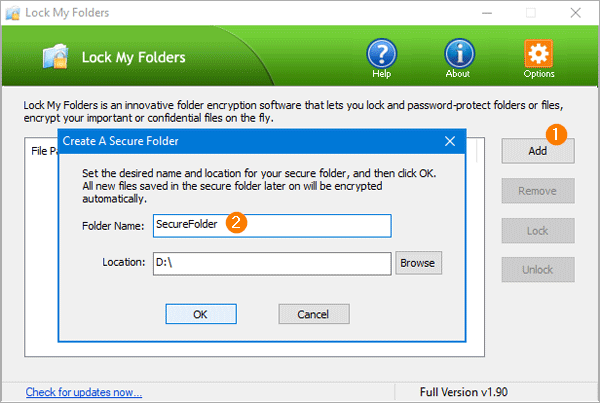
  1. To start, download and install Lock My Folders. After launching, you’ll be prompted to set a master password which will be used to encrypt / decrypt your files. In order to create an auto-encryption secure folder, click on the Add button. Type the folder name and choose a location for the folder to be created.

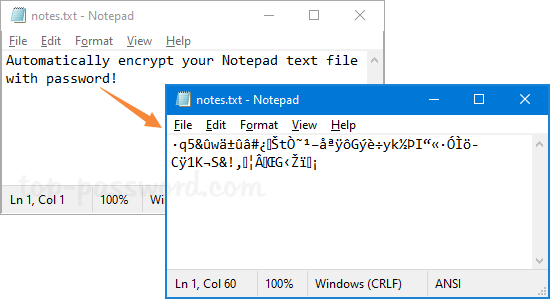
  2. Now you can open the secure folder from Windows Explorer. Any files you saved into this folder will be automatically encrypted before writing to physical disk.

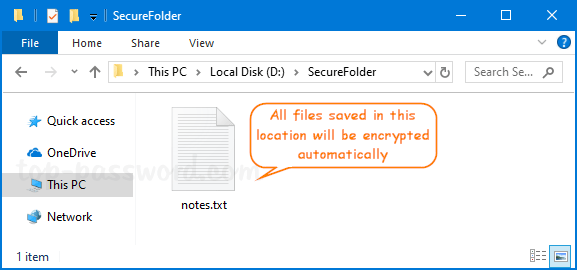
    If you use Notepad to open the encrypted .txt file inside the secure folder, it will get transparently decrypted without user interaction so you can view the plain text again.

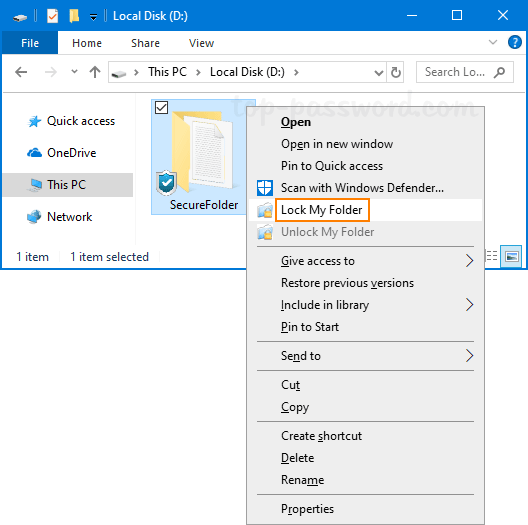
  3. After dealing with the text files, you can lock the secure folder to prevent it from being accessed. Just right-click on the secure folder in Windows Explorer and select “Lock My Folder“. Additionally, a system reboot or shutdown will put your secure folder into the locked status automatically.

  4. When you need to decrypt and access the secure folder again, you have to enter the correct master password.

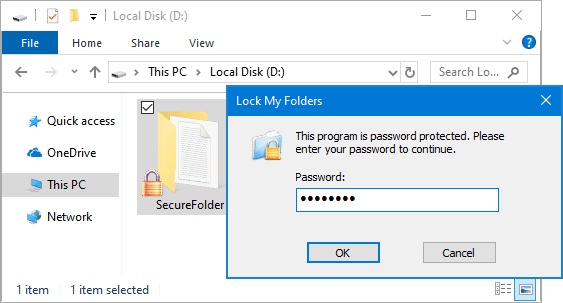
  5. If you forgot the master password, all files inside the secure folder remain encrypted and inaccessible. Not only does this stop outside parties from hacking their way into your text files, it also protects in the event that your PC is stolen.

Conclusion

Encryption is the most reliable way to protect your Notepad text files. There are many other tools that can be used to encrypt .txt files, but the above methods should be the easiest and most powerful.

Prevent Windows 10 from Disconnecting Network during Sleep

February 20th, 2019 by Admin

Windows 10 disconnects network during sleep? Is there a way to keep network connection active even when the PC is in sleep mode? In this tutorial we’ll show you 3 ways to prevent Windows 10 from disconnecting network during sleep.

Method 1: Keep Network Connection Active When in Sleep Mode (On Battery & Plugged in)

Open the Power Options. Locate and expand the “Network connectivity in Standby” setting. By default, this setting is hidden and you can make it shown with this trick.

Click to select Enable for both “On battery” and “Plugged in“. Once saving the changes, your computer should stay connected to the network when in sleep mode.

Method 2: Prevent Sleep Mode from Disconnecting Network to Save Battery Power

Open the Settings app and navigate to System -> Power & sleep. On the right-side pane, click the option “When my PC is asleep and on battery power, disconnect from the network” and change it to Never.

Note that this option is only available for Windows 10 laptops and tablets with built-in battery.

Method 3: Use GPO to Allow Network Connectivity during Connected-Standby

  1. Open the Local Group Policy Editor and browse to:
    Computer Configuration -> Administrative Templates -> System -> Power Management -> Sleep Settings
  2. On the right pane, you can find the two settings: “Allow network connectivity during connected-standby (on battery)” and “Allow network connectivity during connected-standby (plugged in)“. Double-click on each of them to modify.

  3. Select Enabled and click OK.

  4. Finally make a rebooting to apply the policy settings. Note: These changes will make the “Network connectivity in Standby” setting in the Power Options greyed out and you’re also unable to change the setting for “When my PC is asleep and on battery power, disconnect from the network” in the Settings app.

If your computer still loses network connection in sleep mode, open the Device Manager and access the Properties of your Ethernet/Wi-Fi adapter. Make sure the “Allow the computer to turn off this device to save power” option is unchecked.

Fix: “Network connectivity in Standby” Missing from Power Options in Windows 10

February 20th, 2019 by Admin

Lost network connectivity after your PC enters into standby mode? How can I prevent standby mode from disconnecting WIFI? If you want to take control over network connectivity in standby, just follow this tutorial to add the “Network connectivity in Standby” option to the Power Options in Windows 10.

Method 1: Add “Network connectivity in Standby” to Power Options Using Registry Editor

  1. Open Registry Editor.
  2. Paste the following path into the Registry Editor’s address bar and hit Enter, then double-click the DWORD Attributes on the right side pane to modify.

  3. In order to restore the missing option “Network connectivity in Standby”, you have to change its value from 1 (default) to 2. Click OK.

  4. Close Registry Editor and open the Power Options. If you enable “Network connectivity in Standby” for both “On battery” and “Plugged in“, Windows will keep internet connection active while in sleep mode.

Method 2: Add “Network connectivity in Standby” to Power Options Using Command Prompt

  1. Open the Command Prompt as administrator.
  2. Type the following command and hit Enter. This will add the “Networking connectivity in Standby” in Power Options immediately.
    powercfg -attributes F15576E8-98B7-4186-B944-EAFA664402D9 -ATTRIB_HIDE

    If you want to hide the “Networking connectivity in Standby” option later on, run this command instead:

    powercfg -attributes F15576E8-98B7-4186-B944-EAFA664402D9 +ATTRIB_HIDE

That’s it!

3 Steps to Change Default Font for Mail App in Windows 10

February 14th, 2019 by Admin

The default font in Windows 10 Mail is too small? Starting with Windows 10 version 1903, Microsoft added a new option for the Mail app (v16.0.11231.20082) that lets you customize the font for incoming and outgoing mail. In this tutorial we’ll walk you through the steps to change default font for built-in Mail app in Windows 10.

3 Steps to Change Default Font for Mail App in Windows 10

  1. Open the Mail app by clicking the Start button in the screen’s bottom-left corner and then choosing Mail.

  2. Click the gear icon to open its Settings pane, and then select Default Font.

  3. Select an account from the drop-down box and then customize the font face, font size, and color you wish to set as the default for the Mail app, and click Save.

    If you want to use the same font for all your email accounts, just check the “Apply to all accounts” option. The Reset button will restore the font settings back to the default.

That’s it!

Add User to Remote Desktop Users Group in Windows 10

February 13th, 2019 by Admin

By default, only the administrative users are allowed to remotely connect to your Windows 10 PC through remote desktop connection (RDP). In this tutorial we’ll show you different ways to add non-Administrative user to Remote Desktop Users group in Windows 10 and grant remote desktop access.

Method 1: Add User to Remote Desktop Users Group via Settings App

  1. Open the Settings app and go to System -> Remote Desktop. Click on the Select users that can remotely access this PC link on the right side.

  2. When the Remote Desktop Users dialog opens, click on Add.

  3. Click on Advanced.

  4. Click on Find Now and then select any user account you want to add to the “Remote Desktop Users” group, and click OK.

  5. Click OK and you’re done.

Method 2: Add User to Remote Desktop Users Group via lusrmgr.msc

  1. Press the Windows key + R to open the Run box, then type lusrmgr.msc and hit Enter.

  2. Expand Local Users and Groups -> Groups in the left pane, then double-click the “Remote Desktop Users” group in the right pane.

  3. In the Remote Desktop Users Properties window, click on Add.

  4. Click on Advanced.

  5. Click on the Find Now button, then select a user account you want to add as a member of the Remote Desktop Users group and click OK.

  6. Click OK and you’ve successfully added a non-Administrative user to Remote Desktop Users group.

Method 3: Add User to Remote Desktop Users Group via Command Prompt

  1. Open up the Command Prompt as administrator.
  2. Type the following command and hit Enter. Replace the “UserName” with the actual user account you want to add to Remote Desktop Users group.

    net localgroup "Remote Desktop Users" "UserName" /add

    If you need to remove a user from the Remote Desktop Users group, run this command:

    net localgroup "Remote Desktop Users" "UserName" /delete

Method 4: Add User to Remote Desktop Users Group via PowerShell

  1. Open up the elevated PowerShell.
  2. To grant Remote Desktop access to a user, you can add it to the Remote Desktop Users group by executing this command:

    Add-LocalGroupMember -Group "Remote Desktop Users" -Member "UserName"

    When you want to remove a user from Remote Desktop Users, run the following command:

    Remove-LocalGroupMember -Group "Remote Desktop Users" -Member "UserName"

That’s it!

3 Methods to Suspend or Resume BitLocker Protection in Windows 10

February 11th, 2019 by Admin

If you’ve enabled BitLocker with TPM, performing a firmware (BIOS or UEFI) update will be interpreted as a boot attack and the computer will require you to enter BitLocker recovery key during boot. To get around this issue, you can suspend BitLocker protection before updating BIOS/UEFI. When the update is complete you can resume BitLocker. That way, you won’t have to enter the recovery key at all. In this tutorial we’ll show you 3 ways to suspend or resume BitLocker protection in Windows 10.

Method 1: Suspend or Resume BitLocker Protection from Control Panel

  1. Open the Control Panel and set the View by option to Large icons, then click on BitLocker Drive Encryption.

  2. Click the Suspend protection link next to your desired BitLocker encrypted drive.

  3. Click Yes to confirm.

  4. Now, your drive will now list its status as suspended with a exclamation point inside a yellow triangle over the drive logo. When you need to resume BitLocker protection, right-click on your drive in File Explorer and then select Resume BitLocker protection.

Method 2: Suspend or Resume BitLocker Protection from Command Prompt

  1. To get started, open the Command Prompt as administrator.
  2. In order to suspend BitLocker protection, type the following command and press Enter. Replace C: with the drive letter of your BitLocker drive you want to suspend.

    manage-bde -protectors -disable C:

  3. When you need to resume BitLocker protection, execute the following command and you’re done.

    manage-bde -protectors -enable C:

Method 3: Suspend or Resume BitLocker Protection from PowerShell

  1. Open Windows PowerShell as administrator. Type the command below to suspend BitLocker protection for your desired drive.

    Suspend-BitLocker -MountPoint "C:"

  2. To resume BitLocker protection for your suspended drive, run the following command:

    Resume-BitLocker -MountPoint "C:"

That’s it!