Archive for March, 2017

How to Change, Disable or Move Pagefile in Windows 10

March 30th, 2017 by Admin

How can I move the pagefile to another drive when the C:\ drive runs out of space? Should I disable the pagefile if I have a large amount of RAM? In this tutorial we’ll show you how to change pagefile size, disable pagefile or move it to another disk drive in Windows 10.

What is Pagefile?

Windows uses a page file to store memory data that can’t be held by the RAM. When you run a program that needs more RAM than you have available, the system will move the least used memory data out to a hidden file named pagefile.sys to free up more RAM for the program you’re actually using.

windows-pagefile-location

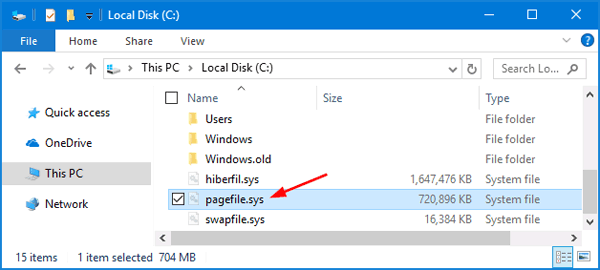
The page file, also known as the swap file, pagefile, or paging file, is a system file that is located at the root path of your drive, but you won’t see it unless you set Windows Explorer to show hidden files and protected operating system files.

show-protected-operating-system-file

In order to change, disable or move pagefile in Windows 10, you have to access the Virtual Memory settings. Follow these steps:

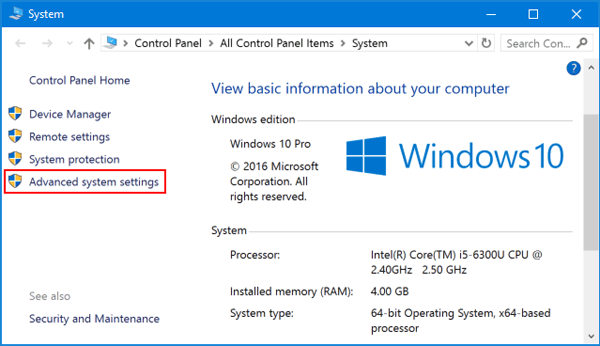
  1. Right-click on This PC icon on your desktop, and then select Properties.
  2. Once you get to the window as shown below, click on the “Advanced system settings” link on the left.

    advanced-system-settings

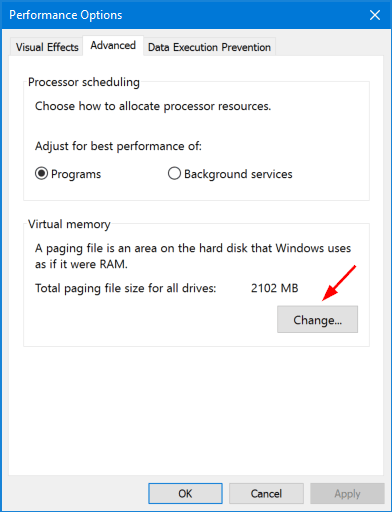
  3. In the System Properties window, select the Advanced tab, and then click the Settings button under the Performance section.

    system-properties

  4. Select the Advanced tab and then click the Change button under the Virtual memory section.

    change-virtual-memory

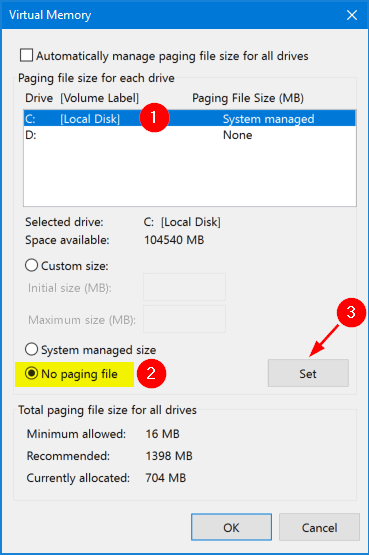
  5. Now you’ll see the Virtual Memory settings as shown below. By default, the Automatically manage paging file size for all drives box is checked. You need to uncheck this box if you want to configure page file for every drive individually.

    automatically-mange-paging-filesize

Option 1: Change Pagefile Size

Select a drive you want to change pagefile size for, click the Custom size option. Enter the initial size and maximum size for your pagefile and click the Set button to save the changes.

change-pagefile-size

Option 2: Disable Pagefile

Select a drive you want to disable pagefile for, click the No paging file option and click the Set button.

disable-paging-file

When programs start to use up all your available memory, they’ll start crashing instead of being swapped out of the RAM into your pagefile. While Windows can run without a pagefile if you have a large amount of RAM, there’s no performance benefit to disabling the pagefile.

Option 3: Move Pagefile to Another Drive

By default, the C: drive has a system managed paging set for itself. The pagefile can occupy as much as 8 GB of space at times and it is best to move this file out of the C: drive to save valuable space. Follow these steps to move pagefile from C: to another drive:

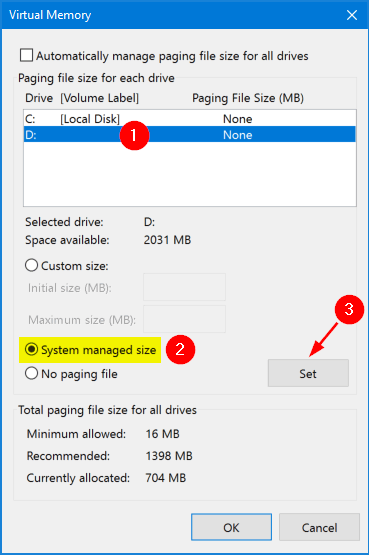
  1. Select the default paging file drive. Choose the No paging file option and click on Set.

    disable-paging-file

  2. Now specify a new page file on another drive you have. To do that, select the desired drive from the list and choose the System managed size option. Click Set to apply your changes.

    move-pagefile-to-another-drive

  3. Close all the windows and restart your computer. Windows will automatically delete C:\pagefile.sys, and then create a new pagefile on your desired partition. Now you have successfully changed Windows pagefile location.

How to Prevent Users from Changing Screen Saver in Windows 10 / 8 / 7

March 29th, 2017 by Admin

Is there a way to lock the screen saver settings so they cannot be changed by others? If you share your computer with other family members or friends, you might want to lock out your favorite screensaver so that nobody will be able to change it. In this tutorial we’ll show you 2 simple ways to prevent users from changing screen saver in Windows 10 / 8 / 7.

Note: Preventing users from changing screen saver doesn’t turn off or prevent the current screen saver from running. If you want to prevent screen saver changes for an individual user, just log on as that user and perform the following instructions.

Method 1: Prevent Users from Changing Screen Saver Using Group Policy

  1. Press the Windows key + R at the same time to open the Run command box. Type gpedit.msc and hit Enter.
  2. This will open the Local Group Policy Editor. Navigate to: User Configuration > Administrative Templates > Control Panel > Personalization, and then double-click on the Prevent changing screen saver setting on the right pane.

    prevent-changing-screen-saver

  3. In the properties window that opens, choose the Enabled option and then click OK. This change will take effect immediately, so you don’t need to restart your computer.

    lock-screen-saver-settings

  4. Now, if you try to change the screen saver settings, you’ll see an error message that says “Your System Administrator has disabled launching of the the Display Settings Control Panel“.

    unable-change-screen-saver

Method 2: Prevent Users from Changing Screen Saver Using Registry Hack

If you have the Home edition of Windows 10/8/7, Local Group Policy Editor is not available and you have to use the following registry hack to prevent users from changing screen saver.

  1. Press the Windows key + R at the same time to open the Run command box. Type regedit and hit Enter.
  2. In the left pane of Registry Editor, navigate to the following key:
    HKEY_CURRENT_USER\Software\Microsoft\Windows\CurrentVersion\Policies\System

    If the System key doesn’t exist, you’ll need to create one. Right-click the Policies key and choose New -> Key. Name the new key System.

    create-system-key

  3. Once the System key is selected in the left pane, right-click the empty space in the right pane and select New -> DWORD (32-bit) Value.

    new-dword-value

  4. Name the new value NoDispScrSavPage.

    NoDispScrSavPage

  5. Double-click on NoDispScrSavPage. In the properties window that opens, change the value from 0 to 1 in the “Value data” box and then click OK.

    edit-dword-value

  6. Close Registry Editor. The next time other users try to change the screen saver, the action will be denied by the system. To reverse the change later, just simply delete the NoDispScrSavPage value and you’re done.

How to Remove “Show Desktop” Button from Windows 10 Taskbar

March 28th, 2017 by Admin

The “Show Desktop” button is actually a small rectangular icon at the far right side of the taskbar in Windows 10. If you click it, it will minimize all open windows and take you to the desktop. I never use it because I just press the WIN + D keyboard shortcut instead. In this tutorial we’ll show you a simple way to hide / remove the “Show Desktop” button from Windows 10 taskbar.

windows-10-show-desktop-button

How to Remove “Show Desktop” Button from Windows 10 Taskbar?

7+ Taskbar Tweaker is a tiny freeware to completely tweak and customize the taskbar in Windows 10/8/7. Here’s how to use it to remove “Show Desktop” button from Windows 10 taskbar:

  1. Download the freeware 7+ Taskbar Tweaker (about 1.2Mb) and save it to your Windows 10 computer.
  2. After the download is complete, double-click the setup file to install it locally. When you get to the step of completing the installation, make sure you uncheck the box “Set 7+ Taskbar Tweaker to run at startup“, because there is no need to run the program each time you turn on the computer.

    install-taskbar-tweaker

  3. Once launching the program, you should see an checkbox called Hide the “Show desktop” button at the bottom-right corner under the Other section.

    hide-the-show-desktop-button

    Select this checkbox, and you’ll see the “Show Desktop” button is removed from the taskbar in Windows 10. (Deselect that box and the “Show Desktop” button will be back again.)

How to Pin Command Prompt (Admin) to Windows 10 Taskbar

March 21st, 2017 by Admin

If you use the Command Prompt frequently, you can pin the Command Prompt shortcut to the taskbar for easy access. The following guide will walk you through the steps to pin the Administrator Command Prompt to the taskbar in Windows 10.

How to Pin Command Prompt (Admin) to Windows 10 Taskbar?

  1. Click in the Cortana search box located in the taskbar, type cmd. Right-click on Command Prompt in the search result and then select “Pin to taksbar” from the menu.

    search-command-prompt

  2. Now you have pinned the Command Prompt to the taskbar but clicking it will open Command Prompt without admin rights. To make the Command Prompt to always run with admin rights, proceed to the next step.
  3. Right-click on the Command Prompt shortcut that you have pinned to the taskbar, you’ll see the Command Prompt option in the menu. Right-click on it and then choose Properties.

    command-prompt-properties

  4. The shortcut properties window will open. Click Advanced button under the Shortcut tab.

    shortcut-properties

  5. Mark the Run as administrator option and click OK.

    run-shortcut-as-administrator

    The Command Prompt shortcut on the taskbar will now open Command Prompt with admin rights whenever you click on it.

5 Ways to Open the Sound Settings in Windows 10

March 20th, 2017 by Admin

Sometimes you might have problem with your PC’s audio playback, or wonder why the sound is recording at too low volume. To adjust or customize the sound scheme, you have to access the Sound settings. In this tutorial we’ll show you 5 simple ways to open the Sound settings in Windows 10.

windows-sound-settings

Method 1: Open Windows 10 Sound Settings via Cortana Search

Click the Cortana Search box from the taskbar, type the word sound and then click on the Sound app in the result.

open-sound-via-cortana

Method 2: Open Windows 10 Sound Settings via Run or Command Prompt

Press the Windows + R key combination to open the Run box, or open the Command Prompt. Type control mmsys.cpl sounds and press Enter.

open-sound-via-run-command

Method 3: Open Windows 10 Sound Settings by Right-clicking Volume button

Right-click on the Volume system icon in the notification area at the bottom right corner area of the taskbar, click on Sounds from the list.

open-sounds-from-taskbar

Method 4: Open Windows 10 Sound Settings via Settings app

Open the Settings app in Windows 10, go to Personalization and then select Themes in the left menu. Click the Advanced sound settings link on the right side of the window.

advanced-sound-settings

Method 5: Open Windows 10 Sound Settings from Control Panel

Open the Control Panel in Windows 10. Set the View by option to Large icons, and then click Sound.

access-sound-from-control-panel

How to Tell If Windows 10 is Retail, OEM or Volume

March 19th, 2017 by Admin

How do I know if I have an OEM or retail copy of Windows 10? There are typically 3 different types of Windows licenses: Retail, OEM and Volume Licensing.

  • Retail – This is a boxed copy, which can be obtained from a retail store or online from the Microsoft Store. You can transfer the Windows 10 Retail copy to another PC.
  • OEM – If your computer comes with pre-installed Windows 10, then an OEM license is embedded in the UEFI/BIOS firmware. These types of Licenses are not-for-resale and is not transferable to another PC.
  • Volume – It’s used mostly for large businesses, government and educational institutions. It cannot be used on PCs other than those associated with the company. The Volume product keys are either used with a KMS server or Multiple Activation Keys (MAK) where a single key can be used on multiple PCs.

This tutorial will show you how to find if your Windows 10 is activated with a Retail, OEM, or Volume license type.

How to Tell If Windows 10 is Retail, OEM or Volume?

Press the Windows + R key combination to open the Run command box. Type cmd and press Enter.

cmd

When the Command Prompt opens, type slmgr -dli and press Enter.

slmgr

A Windows Script Host Dialogue box will appear with some information about your operating system, including the license type of Windows 10.

windows-license-type

That’s it.

How to Generate Battery & Energy Report on Windows 10 / 8 Laptop

March 16th, 2017 by Admin

Is there a way to check battery health in Windows 10? How to troubleshoot laptop battery drain issues? There is a hidden tool available in Windows 10/8 that can examine your laptop’s battery usage / health, and give you a detailed report for energy efficiency and battery life problems.

Part 1: Generate a Battery Report

  1. Press the Windows key + X to open the Power User menu, then select the “Command Prompt (Admin)” option.
  2. At the elevated Command Prompt, type the following command line and press Enter:
    powercfg /batteryreport /output "C:\battery_report.html"

    generate-battery-report

  3. It will generate a report file named battery_report.html under the root path of C: drive. Double-click on it to review the report in your default browser e.g. Microsoft Edge, Chrome or Firefox.
  4. The most important details in the battery report are the Design Capacity, Full Charge Capacity and Battery capacity history. If you have a new laptop or tablet, it may actually have a higher current Full Charge Capacity than its Design Capacity. That number will decrease over time as the battery chemistry changes.

    battery-report

  5. Under the “Battery capacity history” section, you can see how your battery’s full charge capacity gradually decreased over time compared to its design capacity. If you see a sudden drop, there’s probably a problem with your battery.
  6. battery-capacity-history

Part 2: Generate a Power Efficiency Diagnostic Report

The Power Efficiency Diagnostics will analyze your system for common energy efficiency and battery life problems, and report any errors, warnings, and informational details found.

  1. Press the Windows key + X to open the Power User menu, then select the “Command Prompt (Admin)” option.
  2. At the elevated Command Prompt, type the following command line and press Enter:
    powercfg /energy /output "C:\energy_report.html"

    generate-energy-report

  3. The program will analyze your computer for 60 seconds then produce an HTML report in the root path of C: drive. When it’s done tracing, you’ll see a generated report named engery-report.html, which shows you everything that’s going on with your power configuration, and gives you some ideas as to what prevents your laptop from automatically entering sleep.

    power-efficiency-diagnostic-report

Set Windows 10 Touch Keyboard to Pop up Automatically in Desktop Mode

March 13th, 2017 by Admin

Windows 10 touch keyboard not popping up automatically? If you use Windows 10 on a tablet, it will default to the touch-friendly tablet mode. When you tap inside a text field, the touch keyboard will pop up automatically. However, if you switch to desktop mode, the touch keyboard won’t display automatically even if there is no keyboard attached to your PC. In this tutorial we’ll show you how to set touch keyboard to pop up automatically in Windows 10 desktop mode.

How to Set Windows 10 Touch Keyboard to Pop up Automatically in Desktop Mode?

  1. Click the Start button in the bottom left corner of the screen. Next, click the Settings icon to open the app.

    open-settings-via-start-menu

  2. From the Settings window, click Devices.

    devices-settings

  3. Now choose Typing from the left-hand side. Scroll on the right-hand side until you locate the setting “Show the touch keyboard when not in tablet mode and there’s no keyboard attached“.
  4. The default setting is Off. Toggle the button to the On position.

    show-touch-keyboard-automatically

  5. Now you will now find that the touch keyboard will appear automatically even if your Windows 10 is running in desktop mode.

Customize or Add Items to Send To Menu in Windows 10

March 13th, 2017 by Admin

When you right-click on a folder or file in Windows Explorer, you’ll see the Send To menu in the context menu. If you need to send your files to a particular destination or application regularly, you can just add a shortcut item to this Send To menu. In this tutorial we’ll show you how to customize the Send To menu in Windows 10, by adding / removing or renaming the items.

How to Customize the Send To Menu in Windows 10?

  1. Press the Windows key + R to open the Run command box. Type shell:sendto and press Enter.

    shell-sendto

  2. This will open the following path in Windows Explorer:
    C:\Users\user_name\AppData\Roaming\Microsoft\Windows\SendTo
  3. Look at the screenshot below and you’ll see a list of items that you usually see in the Send To menu. To add a item, just copy its shortcut into the SendTo folder. For example, I like to open files with the text editor program – Notepad++, so I copy the shortcut to this location.

    sendto-folder-in-windows

  4. If you want to rename an item in your Send To menu, just rename the shortcut in the SendTo folder. To remove an item that you never use from the Send To menu, just delete its shortcut in the SendTo folder.
  5. After customizing, right-click on a file/folder and choose Send to, you’ll see the items you’ve added and the unwanted items you removed don’t show up.

    windows-send-to-menu

How to See Currently Logged in Users in Windows 10 / 8 / 7

March 11th, 2017 by Admin

How can I get a list of users currently logged on? If you’re wondering how to find out how many users are currently logged into your Windows 10 computer, there are several ways to view who’s logged on. In this tutorial we’ll explain 2 methods to get a list of currently logged in users in Windows 10 / 8 / 7.

Method 1: See Currently Logged in Users Using Query Command

  1. Press the Windows logo key + R simultaneously to open the Run box. Type cmd and press Enter.
  2. When the Command Prompt window opens, type query user and press Enter. It will list all users that are currently logged on your computer.

    query-user

Method 2: See Currently Logged in Users Using Task Manager

  1. Right-click on the taskbar and select Task Manager to launch Task Manager. If you’re using Windows 10/8, you might need to click the More details button at the bottom to see active processes.
  2. Click the Users tab at the top of Task Manager, you can see a list of currently logged in users and their status.

    view-currently-logged-in-users