Archive for December, 2020

How to Change Notepad Default Encoding in Windows 10

December 30th, 2020 by Admin

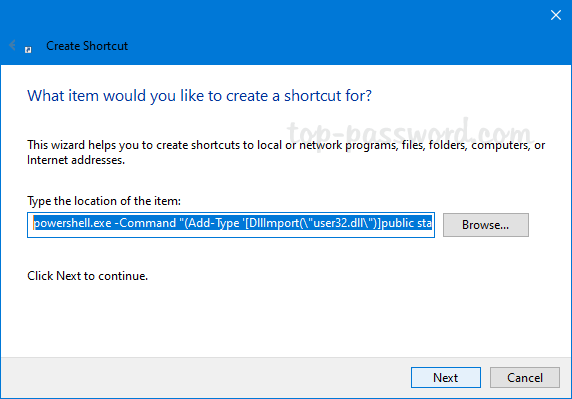
Is there a way to change Notepad default encoding to UTF-8 or ANSI in Windows 10? If you always save .txt file with ANSI or other encodings, it’s better to change the default encoding in Notepad so you don’t need to manually change the encoding via the Save As dialog. In this tutorial we’ll show you how to change Notepad default encoding in Windows 10.

How to Change Notepad Default Encoding in Windows 10

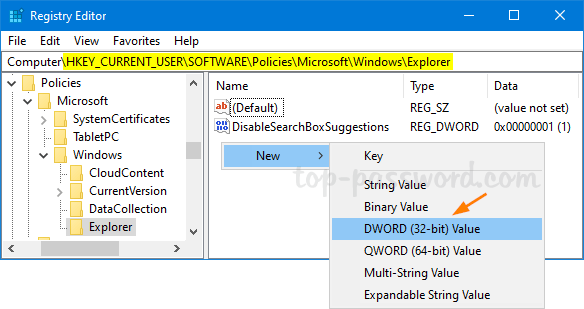
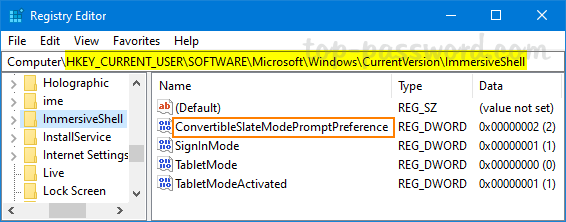
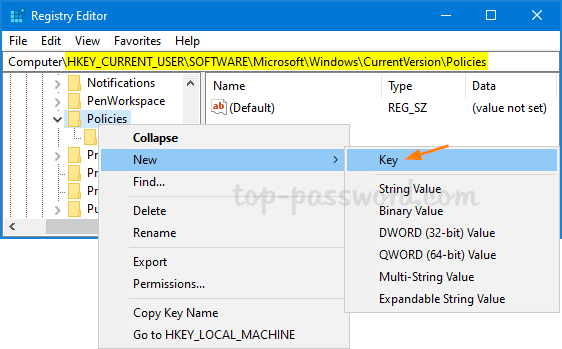
  1. Open Registry Editor and browse to: 
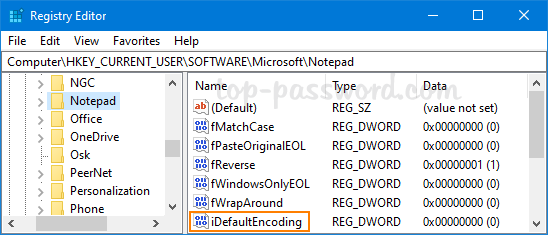
HKEY_CURRENT_USER\Software\Microsoft\Notepad. In the left pane, right-click on the Notepad key and select New -> DWORD (32-bit) Value.

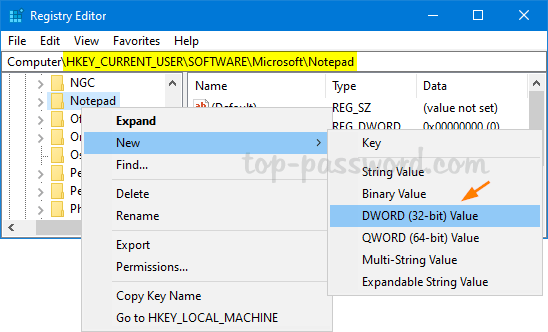
  2. Name the newly created DWORD as iDefaultEncoding, and then double-click it to modify.

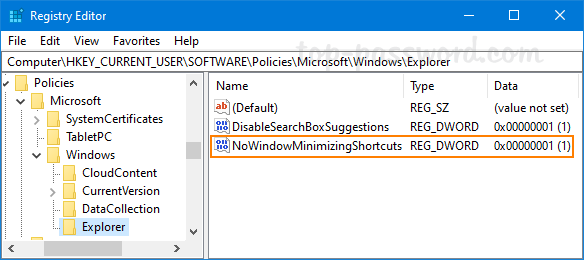
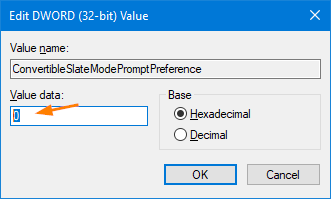
  3. In the Edit DWORD (32-bit) Value dialog, enter the value for your new default encoding and click OK. In our case, I type 1 for using ANSI encoding.
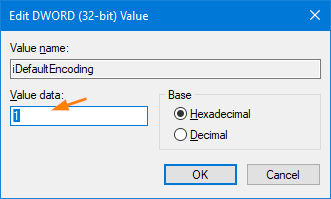
    • 1 – ANSI
    • 2 – UTF-16 LE
    • 3 – UTF-16 BE
    • 4 – UTF-8 with BOM
    • 5 – UTF-8
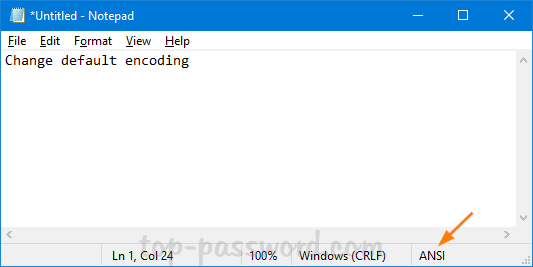
  4. Close Registry Editor. Open Notepad and you’ll see the new default encoding in the status bar.

That’s it!

How to Close a TCP / UDP Port Using Windows Firewall

December 29th, 2020 by Admin

Is it possible to block telnet access to port 23? Open ports can pose a security risk and it’s a good practice to close some unused ports. In this tutorial we’ll walk you through the procedure of closing a TCP or UDP port in Windows 10, without using any third-party software.

How to Close a TCP / UDP Port Using Windows Firewall

  1. Press the Windows key and R to bring up the Run box, enter wf.msc and hit Enter to open Windows Firewall.

  2. Right-click on Inbound Rules in the left pane, and then select New Rule.

  3. When the New Inbound Rule Wizard window opens, select Port as the rule type. Click Next.

  4. Choose the type of connection to apply, either TCP or UDP. For safety purposes, I’m going to block incoming connections through remote desktop services, so I choose TCP and enter the port 3389.

  5. Select the Block the connection option and click Next.

  6. Check all the profiles available (Domain, Private and Public) and click Next. Generally you should at least ensure “Public” is checked.

  7. Give a name for this new rule and click on Finish.

  8. Now you’ve successfully blocked / closed a port using Windows Firewall. Your system will block all the incoming connections on the port you specified. Whenever you need to open the port again, just delete the firewall rule you’ve created.

How to Find Which Process is Listening on a Given Port in Windows 10

December 28th, 2020 by Admin

Is there a way to determine which application is listening on a certain port? How do I see if a particular port is in use on a windows PC? In this tutorial we’ll show you how to find out which process is listening on a given port in Windows 10, by using Command Prompt or PowerShell.

Part 1: Find the ID of the Process Using a Given Port

To get started, open the elevated Command Prompt and run the following command:
netstat -aon

It will display a list of TCP and UDP ports currently listening on your computer. In our case, the TCP port 3389 is used by a process whose process ID (PID) is 1272.

You can also use PowerShell to find out which process is listening on the TCP port 3389. Just enter this command:
Get-Process -Id (Get-NetTCPConnection -LocalPort Your_Port_Number).OwningProcess

For UDP port, use this command instead:
Get-Process -Id (Get-NetUDPEndpoint -LocalPort Your_Port_Number).OwningProcess

Part 2: Get Process Name by its ID

In order to find the process name by its process ID, open Task Manager and go to the Processes tab. Sort the list of process by clicking the column header that is labeled “PID“. In our case, the process associated with the PID 1272 is Remote Desktop Services.

If you do not see a PID column, right-click the header of any column and select the PID option.

Conclusion

That’s how you can find out which process is listening on a given port in Windows 10, by using Command Prompt or PowerShell. If you would rather use a third-party software to check ports in use, TCPView should be your good choice.

3 Ways to Disable Aero Shake in Windows 10

December 23rd, 2020 by Admin

When you drag the title bar of an active window and shake it back and forth, Windows will minimize all other open windows. Shaking the title bar again will restore all the minimized windows. This is a handy feature called Aero Shake, which is introduced since Windows 7. If you tend to accidentally triggered Aero shake, here are 3 methods to disable it in Windows 10.

Method 1: Disable Aero Shake in Windows 10 via Settings App

  1. While holding the Windows key, press the I key to open the Settings app. Click on System.

  2. Select the Multitasking tab. On the right side, you can toggle Snap windows off to disable the Aero Shake feature.

Keep in mind this method also disables the Window snapping feature. If you just want to get rid of Aero Shake only, please try the following methods.

Method 2: Disable Aero Shake in Windows 10 via Group Policy

  1. Open Local Group Policy Editor and browse to User Configuration > Administrative Templates > Desktop. On the right-side, double-click on the “Turn off Aero Shake window minimizing mouse gesture” policy.

  2. Select the Enabled option to disable Aero Shake.

  3. Click Apply and OK, then restart your computer to apply the changes.

Method 3: Disable Aero Shake in Windows 10 via Registry Editor

  1. Open Registry Editor and navigate to: HKEY_CURRENT_USER\Software\Policies\Microsoft\Windows\Explorer. On the right pane, right-click the blank area and select New -> DWORD (32-bit) Value.

  2. Name the new DWORD NoWindowMinimizingShortcuts, then double-click it to change its value to 1 to disable Aero Shake. Whenever you need to enable Aero shake again, just set the value to 0.

  3. Close the Registry Editor app.

Conclusion

After disabling Aero shake, select the title bar of any window and shake it around or press the Windows key + Home, it should no longer minimize other open windows.

How to Create a Shortcut to Turn Off Monitor in Windows

December 21st, 2020 by Admin

How can I turn off display on tablet without sleeping? You can configure the Power button to turn off the display, but what to do if the “Turn off the display” option is missing on your PC. In this tutorial we’ll show you how to create a desktop shortcut to turn off the monitor in Windows 10/8/7, without using third-party software.

How to Create a Shortcut to Turn Off the Monitor

  1. Right-click on a blank area of the desktop and select New -> Shortcut.

  2. When the Create Shortcut wizard launches, copy and paste the following command into the location area, and then click Next.

    powershell.exe -Command "(Add-Type '[DllImport(\"user32.dll\")]public static extern int SendMessage(int hWnd,int hMsg,int wParam,int lParam);' -Name a -Pas)::SendMessage(-1,0x0112,0xF170,2)"

  3. Type a meaningful name for this shortcut and click on Finish.

  4. Double-click the new shortcut on your desktop and it will turn off the monitor immediately without putting your computer to sleep. If you move the mouse or tap on your keyboard (or press the Power button for 1 second), your monitor will immediately turn on again.

  5. If you would like to press a keyboard shortcut to turn off the monitor, right-click the newly-created desktop shortcut and select Properties. Click the Shortcut key text box and type your own keyboard shortcut.

That’s it!

How to Fix Keyboard Input Lag in Windows 10 / 8 / 7

December 14th, 2020 by Admin

Does your keyboard have input lag of about 0.5 second? If your keyboard responds too slowly, you may end up with missing letters unless you type really slow. If your keyboard responds too quickly, a keystroke may produce multiple letters. To fix such problems in Windows 10 / 8 / 7, you have to adjust the keyboard character repeat delay and rate.

How to Fix Keyboard Input Lag in Windows 10 / 8 / 7

  1. Open the Control Panel and switch to “Large icons” view, then click on Keyboard. It will open up the Keyboard Properties dialog.

    Another way of accessing the Keyboard Properties is to press the Windows key + R and then type “control keyboard” in the resulting Run box, and hit Enter.

  2. Under the Speed tab, you can move Repeat delay to Short and Repeat rate to Fast if you want to get the least input lag. You can use the text box with the caption “Click here and hold down a key to test repeat rate” to test the changes that you have just made.

    • Repeat delay: Configure how long you need to hold a key down for before it starts repeating.
    • Repeat rate: Configure how quickly the letter repeats itself once it starts.
  3. Click Apply and then OK.

Stop Windows 10 from Automatically Switching to Tablet Mode

December 9th, 2020 by Admin

How can I disable automatic tablet mode on Windows 10? Starting with the October 2020 Update, Windows 10 will automatically switch to tablet mode when you remove the keyboard from your convertible PC, and it doesn’t ask you before switching. If you want to change this behavior, here are 2 methods to stop Windows 10 from automatically switching to tablet mode.

Method 1: Disable Automatic Tablet Mode on Windows 10 Using Settings App

To get started, open the Settings app by pressing the Windows key + I on your keyboard. Click on the System category.

Select Tablet on the left. Now in the right section, click the drop-down list under “When I use this device as a tablet” and select either “Don’t switch to tablet mode” or “Ask me before switching modes.”

  • Don’t switch to tablet mode – This will keep your PC in desktop mode when disconnecting the keyboard.
  • Ask me before switching modes – You’ll get a prompt that lets you decide whether to switch to tablet mode when disconnecting the keyboard
  • Always switch to tablet mode – Windows will automatically switch into tablet mode when disconnecting the keyboard.

Method 2: Disable Automatic Tablet Mode on Windows 10 Using Registry Editor

Open Registry Editor and navigate to the following location:
HKEY_CURRENT_USER\SOFTWARE\Microsoft\Windows\CurrentVersion\ImmersiveShell

In the right pane, double-click the 32-DWORD value ConvertibleSlateModePromptPreference and change the value data to 0 or 1. If it doesn’t exist, you need to create it manually.

  • 0 = Don’t switch to tablet mode
  • 1 = Ask me before switching modes
  • 2 = Always switch to tablet mode

Close Registry Editor. Now Windows 10 should not automatically switch to tablet mode without asking for your permission.

How to Uninstall or Reinstall Notepad in Windows 10

December 7th, 2020 by Admin

How can I uninstall Notepad? Notepad is missing after upgrading to Windows 10 v2004? Since Windows 10 version 2004, Notepad becomes an optional feature and you can uninstall it with ease. In this tutorial we’ll show you how to uninstall or reinstall Notepad in Windows 10.

Part 1: Uninstall NotePad from Windows 10

  1. Open the Settings app by pressing the Windows logo key + I on the keyboard, then click on Apps.

  2. Under the Apps & features page, click on the Optional features link in the right-hand pane.

  3. You can quickly locate the Notepad app using Search. When it’s found, select it and Click on the Uninstall button.

  4. Notepad will be removed from Windows 10 after a while. When you open Notepad using the Run command box, you’ll get the following error message.

Part 2: Install Notepad on Windows 10

  1. Open the Settings app and navigate to Apps -> Apps & features. On the right side, click on the Optional features link.

  2. Click on the Add a feature button.

  3. Enter notepad in the Search box. Check the Notepad option from the search result and click on Install.

  4. After the installation is complete, you can access and use Notepad again. Additionally, you can also download and install Notepad from Windows Store.

How to Disable Calculator Graphing Mode in Windows 10

December 2nd, 2020 by Admin

Graphic mode is a new feature of Windows 10 Calculator, which is quite useful for students who want to learn linear algebra and plot equations on the graph. By default, graphic mode is turned on by default. You can disable Calculator graphic mode in Windows 10 using either group policy or registry editor.

Method 1: Disable Calculator Graphing Mode Using Group Policy

  1. Open the Local Group Policy Editor and browse to: User Configuration -> Administrative Templates -> Windows Components -> Calculator. Next, double-click the “Allow Graphing Calculator” policy on the right-hand side.

  2. Choose the Disabled option. Click Apply and then OK.

  3. Close Local Group Policy Editor and restart your computer. You’ll find the graphic mode is greyed out in the Windows 10 Calculator app.

Method 2: Disable Calculator Graphing Mode Using Registry Editor

  1. Open Registry Editor and navigate to: HKEY_CURRENT_USER\SOFTWARE\Microsoft\Windows\CurrentVersion\Policies. Right-click on the Policies key in the left-hand side, then select New -> Key.

  2. Name the new key Calculator, then right-click it to create a 32-bit DWORD value called AllowGraphingCalculator. To disable Calculator graphing mode, leave the value data to 0.

    Whenever you need to enable Calculator graphing mode again, just change the value data of AllowGraphingCalculator to 1.

  3. Close Registry Editor and reboot Windows 10 to apply the changes.