Archive for April, 2017

2 Ways to Move Taskbar Location on Screen in Windows 10

April 28th, 2017 by Admin

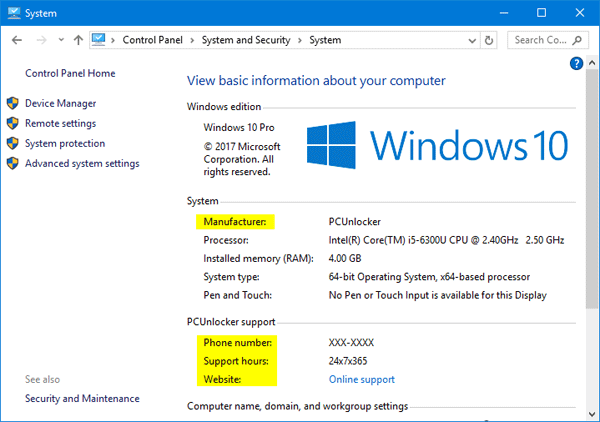
“My taskbar decided to go vertical instead of horizontal. How do I move the taskbar back to its horizontal position at the bottom of my screen?”

Is there a way to change taskbar location in Windows 10? By default, the taskbar is at the bottom of the desktop, but you can also move it to any edge of the screen. This tutorial will show you 2 simple ways to move taskbar to different locations (Bottom, Left, Right, Top) of your screen in Windows 10.

windows-10-taskbar-at-top

Method 1: Drag Taskbar and Move it to Any Edge of the Screen

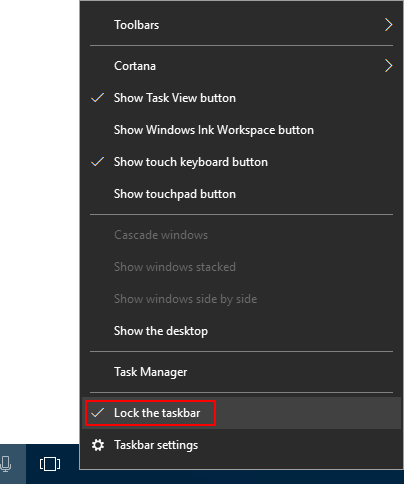
Right-click an empty space on the taskbar. If you see a check mark next to the “Lock the taskbar” option, the taskbar is locked and you’re unable to change its location. You need to click that option again to unlock the taskbar.

unlock-windows-taskbar

Next, click an empty space on the taskbar, and then hold down the mouse button as you drag the taskbar to one of the four edges of the desktop. When the taskbar is where you want it, release the mouse button.

Method 2: Change Taskbar Location from Settings App

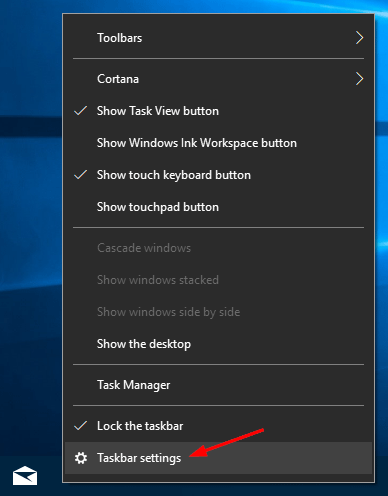
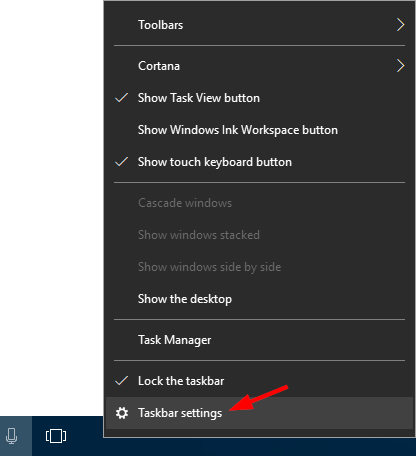
The other way to change the taskbar location is through the Settings app. Right-click an empty space on the taskbar, and then select Taskbar settings from the context menu.

windows-taskbar-settings

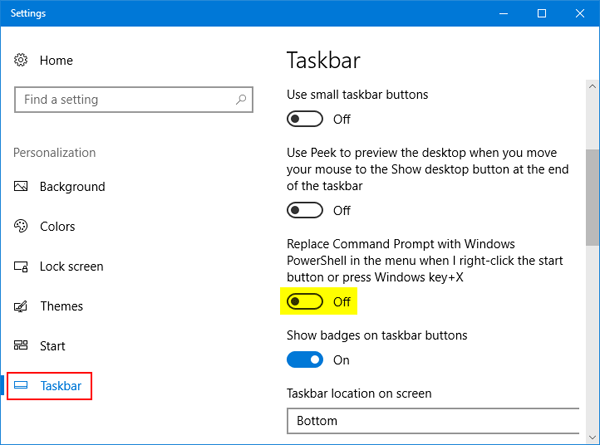
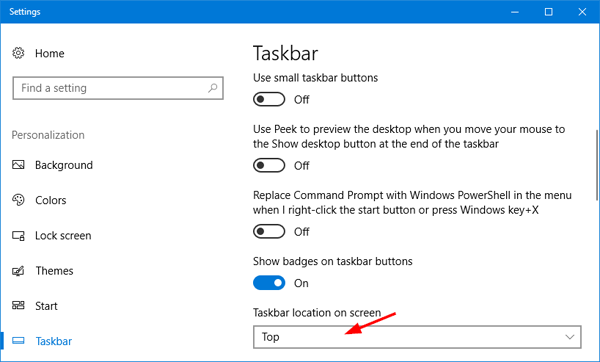
This will open the Taskbar page in the Settings app. Scroll down and find the “Taskbar location on screen” drop-down box. You can choose any of the four sides of the display from the list.

taskbar-location-on-screen

After changing taskbar location, you can lock the taskbar to stop you moving or resizing it accidentally.

3 Ways to Add Run Command to Start Menu & Taskbar in Windows 10

April 26th, 2017 by Admin

Most users prefer to open the Run command box by pressing the Windows + R key combination. But if you’re using a tablet or a PC without keyboard, the fastest way is to open the Run command by pinning the shortcut to Start Menu or taskbar. In this tutorial we’ll show you 3 ways to add Run command to Start Menu & taskbar in Windows 10, so it can always be seen and launched right away.

open-run-command-in-windows-10

Method 1: Using Cortana Search

Click the Cortana search box in Windows 10 taskbar and type Run. When you see the Run app showing up in the search result, right-click on it. You will see both Pin to Start and Pin to taskbar options in the context menu.

pin-run-to-start-menu-or-taskbar

Method 2: Using Start Menu

Click the Start button, and then browse to the Windows System folder at the bottom of Start Menu. Expand it and you’ll see the Run command there.

Right-click on the Run command and pick Pin to Start from the context menu.

pin-run-to-start

If you want to add Run to Windows 10 taskbar, just select More -> Pin to taskbar from the context menu.

pin-run-to-taskbar

Method 3: Right-click on Run desktop shortcut

To get started, you need to create a shortcut for the Run command on Windows 10 desktop. When it’s done, right-click on the Run shortcut and you can find the options to pin Run to Start Menu & taskbar.

run-command-dekstop-shortcut

How to Create a Run Shortcut on Windows 10 Desktop

April 26th, 2017 by Admin

Using the Run command in Windows, you can run quick commands and programs, open folders or files, etc. In previous post we’ve covered all kinds of ways to open the Run command box, here we’re going to show you how to create a Run shortcut on Windows 10 desktop.

windows-run-desktop-shortcut

How to Create a Run Shortcut on Windows 10 Desktop?

  1. Right-click any empty area on the desktop and select New > Shortcut.

    new-shortcut

  2. This will open the Create Shortcut wizard. Copy and paste the location below into the location area, and then click Next.
    explorer.exe shell:::{2559a1f3-21d7-11d4-bdaf-00c04f60b9f0}

    shortcut-location

  3. Name the shortcut as ‘Run‘ and click Finish.

    name-the-shortcut

  4. The default icon for your newly created shortcut is a folder icon. To change the icon, right-click on the new Run shortcut on the desktop, and then select Properties from the context menu.

    shortcut-properties

  5. Under the Shortcut tab, click the Change icon button.

    change-shortcut-icon

  6. In the Change Icon window, browse to select the file C:\Windows\System32\imageres.dll. Next choose the Run command icon and click OK.

    select-shortcut-icon

  7. Now, the Run shortcut should now show up on the desktop with the original Run command icon. You can double-click on it to open Run command box for quick access.

2 Ways to Reset Chrome to Default Settings without Reinstall

April 25th, 2017 by Admin

Have you messed up with your Chrome profile settings? Chrome is running slow and you have adware or pop-up ads problems? In this tutorial we’ll show you 2 ways to reset your Google Chrome settings and data to default without reinstall.

Method 1: Reset Chrome to default from Chrome settings

This will reset your homepage, new tab pages, and search engine, disable your extensions and unpin all tabs. It will also clear other temporary and cached data, such as cookies, content and site data. However, your saved bookmarks and passwords will not be cleared or changed.

  1. Open your Chrome browser, and then click the More icon (with three lines or dots) in the upper-right corner and select Settings.

    chrome-menu

  2. Chrome’s Settings should now be displayed in a new tab. Scroll down to the bottom of the page and click on the Show advanced settings link.

    chrome-settings

  3. Scroll down to the Reset settings section, as shown in the screenshot below. Click on the Reset settings button.

    reset-chrome-settings

  4. A pop-up window will come up and ask for confirmation the restoration process.

    confirm-resetting-chrome

    Once you click Reset, you will get clean and default Google Chrome.

Method 2: Reset Chrome to default by deleting the user profile

Another way of resetting Chrome to default settings is to delete your Chrome profile. This will completely reset all Chrome settings to default and delete your browser profiles, themes, extensions, bookmarks, history, cache, passwords, cookies, and web form auto-fill information. Here’s how:

  1. Open your Chrome browser, and then click the More icon (with three lines or dots) in the upper-right corner and select Settings.
  2. In the People section of the Settings page, select your current profile and click the Remove button underneath. After deleting, Chrome will automatically set up a new profile with default settings.

    delete-chrome-profile

  3. All of your chrome user data, bookmarks, history, cookies and cache will be cleared, and you will get fresh Google Chrome running on your computer.

If you want to remove data and settings for all Chrome profiles, just open Windows Explorer and go to the directory C:\Users\user_name\AppData\Local\Google\Chrome\User Data, delete all files in it. That’s it!

How to Restore Missing Command Prompt to Win+X Menu in Window 10

April 21st, 2017 by Admin

If you’ve installed Windows 10 Creators Update (build 1703), you may find that Command Prompt is missing from the context menu when you press WIN + X shortcut keys. Microsoft has replaced it with PowerShell, which is a bit annoying if you are a fan of Command Prompt. In this tutorial we’ll show you how to replace PowerShell with Command Prompt in Windows 10, so you can access Command Prompt in the Win + X menu again.

windows-10-replace-cmd-with-powershell

How to Restore Missing Command Prompt to Win+X Menu in Windows 10?

Right-click on any empty space on the taskbar, select Taskbar settings (or “Settings” for earlier build of Windows 10) from the context menu.

windows-10-taskbar-settings

The Settings app will be opened directly at the Taskbar page. Turn the “Replace Command Prompt with Windows PowerShell in the menu when I right-click the Start button or press Windows key+X” option to Off.

replace-cmd-with-powershell

This change will take effect immediately. When you right-click the Start button, or hit the Windows + X keyboard shortcut, the Power User Menu will pop up as usual but the PowerShell will be replaced with Command Prompt. That’s it!

Set Mouse Wheel to Scroll One Screen at A Time in Windows 10

April 20th, 2017 by Admin

When you roll the mouse wheel one notch, a webpage or a document will be scrolled up or down 3 lines. If this default scroll speed is too slow for you, you can increase the mouse wheel scrolling speed in Windows 10 and make it scroll one screen at a time.

How to Set Mouse Wheel to Scroll One Screen at A Time in Windows 10?

  1. To change mouse wheel scroll speed, you need to access the Settings app. To do so, click the Settings icon from Windows 10 Start Menu, or press the Windows + I keyboard shortcut to open the app.

    open-settings-via-start-menu

  2. When the Settings app launches, click on Devices.

    devices-settings

  3. Choose Mouse on the left, you’ll see various mouse configuration settings. Under the “Roll the mouse wheel to scroll” setting, you can choose between “Multiple lines at a time” or “One screen at a time“. The first is the default setting, which makes scrolling smoother and slower.
  4. If you choose the “Multiple lines at a time” option, you can use the slider underneath to choose the number of lines that are moved up/down with each notch of the wheel.

    scroll-multiple-lines-at-a-time

  5. If you choose the “One screen at a time” option, the slider below will gray out and when I roll the mouse wheel one click, the wheel will skip an entire page of content at once, rather than going through it line by line. This setting is drastic if you have a large monitor with a high resolution.

    scroll-one-screen-at-a-time

After changing the mouse wheel scroll settings, you can open a webpage or a document, and check which scrolling method you prefer, and adjust the scroll speed to what you want.

How to Pause the Windows Update Download in Progress

April 19th, 2017 by Admin

Is there a way to pause the downloading update without having to turn off completely the Windows updates? Sometimes Windows will force you to start downloading the critical updates, even when you use a mobile internet with slow and strict traffic limits. In this tutorial we’ll show you a simple way to pause a Windows Update download while in progress, so you can resume it later.

How to Pause the Windows Update Download in Progress?

This method works by stopping all the Windows update services temporarily, and you can then resume them when you’re ready to download the updates. Here’s how:

  1. To start, you need to open the Command Prompt as administrator. To do so, press the Windows key + X on your keyboard and select Command Prompt (Admin). Click Yes when you see the UAC prompt.
  2. The first thing we need to do is stop the Windows Update service. Execute the below command:
    net stop wuauserv
  3. Next, stop the Background Intelligent Transfer service and for that execute the below command:
    net stop bits
  4. Now, stop the Delivery Optimization service. Just execute the below command:
    net stop dosvc

    pause-windows-updates

  5. You’ve now successfully paused all the Windows update downloads.
  6. Whenever you want to resume the download, simply execute the below commands one by one, press Enter after each.
    net start wuauserv
    net start bits
    net start dosvc

    resume-windows-updates

You can also turn on the Metered Connection feature in Windows 10 to stop automatic updates. However, this command line method is the most direct way to pause and resume Windows Update downloads while in progress.

Add OEM Support Information to Your Windows 10 Computer

April 18th, 2017 by Admin

Windows 10 allows you to add OEM support information in the System Properties. The OEM information includes your company name, phone number, website URL, and even a custom logo. In this tutorial you’ll learn how to easily add OEM support information to a Windows 10 computer, with the sole purpose of assisting customers.

How to Add OEM Support Information to Your Windows 10 Computer?

  1. Press the Windows key + R to open the Run command box. Type regedit and press Enter.

    regedit

  2. Once Registry Editor is opened, navigate to below following location:
    HKEY_LOCAL_MACHINE\SOFTWARE\Microsoft\Windows\CurrentVersion\OEMInformation

    With the OEMInformation key selected on the left, right-click any empty space on the right side and choose New > String Value.

    OEMInformation

  3. Name the new value as Manufacturer, and then change its value to your company name or the vendor’s name.

    OEM-manufacturer

  4. Repeat the above step to add other OEM support information: Model, SupportHours, SupportPhone, SupportURL, Logo. The logo must be a BMP image file and cannot be bigger than 120×120 pixels in size.

    OEM-support-registry-values

  5. Now open System Properties by right-clicking on This PC icon on the desktop and selecting Properties, you’ll see your customized Manufacturer information listed under the System section. If you add a support telephone number or website, they’ll appear in a separate Support section of the window.

    add-oem-info-to-windows

With these simple steps, you can add completely custom OEM support information to a Windows 10 PC. This can come in handy if you’re building PCs for others, or if you just want to add a unique and custom aspect to your system.

2 Ways to Hide Certain or All Settings Pages in Windows 10

April 17th, 2017 by Admin

In Windows 10, most Control Panel features have been moved to the Settings app, and Settings will eventually replace the Control Panel. Starting with Windows 10 Creators Update (build 1703), there is a new feature that allows you to hide certain pages of the Settings app. In this tutorial we’ll show you how to use group policy or registry editor to hide certain or all pages of the Settings app in Windows 10.

Method 1: Hide Settings Pages in Windows 10 Using Group Policy

  1. Press Windows + R keys together on your keyboard, then type gpedit.msc and press Enter.

    gpedit

  2. When the Local Group Policy Editor opens, navigate to: Computer Configuration > Administrative Templates > Control Panel. In the right pane, you will find the option named Settings Page Visibility. It is a new policy in Windows 10 Creators Update.

    settings-page-visibility

  3. Double-click the Settings Page Visibility policy. Set it to Enabled. In the text box, you can specify a list of settings pages to show or hide. For example, if you want to hide the “Sign-in options” page from the Settings app, then type:
    hide:signinoptions

    hide-sign-in-options-page

    Note: signinoptions is the URI of the Sign-in options page. To look up URIs for every pages of the Settings app, please check this article.

    For example, to hide the the Bluetooth page and the Display page, type the value:
    hide:bluetooth;display

    If you want to specify that only About and Bluetooth pages should be shown and all other pages hidden:
    showonly:about;bluetooth

    If you want to hide all settings pages, type:
    showonly:

  4. Next click Apply and then OK. Re-open the Settings app to check if it takes effects. In my case, the Sign-in options page is disappeared.

    sign-in-options-page-hidden

    If you’ve configured the policy to hide all settings pages, you’ll see nothing after launching the Settings app:

    hide-all-settings-pages

Method 2: Hide Settings Pages in Windows 10 Using Registry Editor

  1. Press Windows + R keys together on your keyboard, then type regedit and press Enter.

    regedit

  2. When the Registry Editor opens, navigate to the following key:
    HKEY_LOCAL_MACHINE\SOFTWARE\Microsoft\Windows\CurrentVersion\Policies\Explorer

    If you don’t see the Explorer key, then just create it yourself.

  3. Right-click on the Explorer key in the left pane, and then select New > String Value. Name the value as SettingsPageVisibility.

    create-string-registry-value

  4. Double-click on SettingsPageVisibility. In the Edit String window, if you want to hide certain pages in the Settings app, use the code:
    hide:pageURI;pageURI;pageURI

    SettingsPageVisibility

  5. Close Registry Editor and relaunch the Settings app to see the changes.

Restore Windows Photo Viewer to Windows 10 “Open With” Context Menu

April 17th, 2017 by Admin

Just upgrade to Windows 10 and find Windows Photo Viewer is missing from right-click context menu? Windows 10 comes with a new default image viewer app – Photos, which is meant to replace the old Windows Photo Viewer. Though Windows Photo Viewer hasn’t been removed from Windows 10. It’s just hiding so well you might never ever find it.

In this tutorial we’ll show you how to restore missing Windows Photo Viewer in Windows 10, and set Windows Photo Viewer as default image viewer.

Part 1: Restore Missing Windows Photo Viewer in Windows 10

  1. To get started, download the restore_windows_photo_viewer.reg file and save it to your Windows 10 computer. Next, right-click this file and select Merge. If prompted by UAC, click on Yes.

    merge-registry

  2. Click on Yes to confirm that you want to add the registry keys.

    add-reg-to-registry

  3. This will register Windows Photo Viewer with Default Programs, and associate all image files types (.jpg, .jpeg, .bmp, .png, .tif, .dib, etc) to Windows Photo Viewer.
  4. Now, right-click on an image and select Open with from the context menu, you can then click Windows Photo Viewer to view your image.

    restore-windows-photo-viewer

Part 2: Set Windows Photo Viewer as Default Image Viewer

After restoring the classic Windows Photo Viewer in Windows 10, you can now set it as the default image viewer. Follow these steps:

  1. Open the Control Panel. Set the View by option to Large icons and then click Default Programs.

    default-programs

  2. Click Set your default programs.

    set-your-default-programs

  3. Select Windows Photo Viewer from the list, and then click Set this program as default on the right-hand side.

    set-windows-photo-viewer-as-default

  4. Now, double-click on any image files and Windows 10 will open them with Windows Photo Viewer by default.