Archive for April, 2017

Fix: Windows Defender is Turned off by Group Policy

April 12th, 2017 by Admin

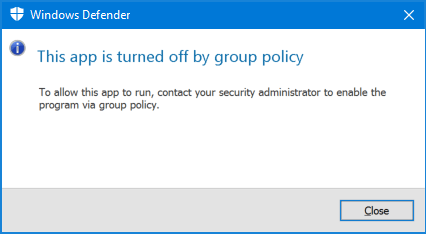
“This app is turned off by group policy.” This is the message I am getting when I am trying to access Windows Defender. How can I sort out this issue?

When your computer infected by any malware or virus, this may cause Windows Defender to be turned off. It’s also possible that Windows Defender gets automatically disabled after installing anti-virus software. In such situation, you’ll get the following error message when you open Windows Defender:

“This app is turned off by group policy. To allow this app to run, contact your security administrator to enable the program via group policy”

defender-turned-off-by-group-policy

In this tutorial we’ll show you 2 simple ways to fix the issue “Windows Defender is turned off by group policy” by enabling Windows Defender again in Windows 10 / 8 / 7.

Method 1: Fix “Windows Defender is Turned off by Group Policy” Using Group Policy

  1. Press the Windows key + R together to open the Run box. Type gpedit.msc and hit Enter.

    gpedit

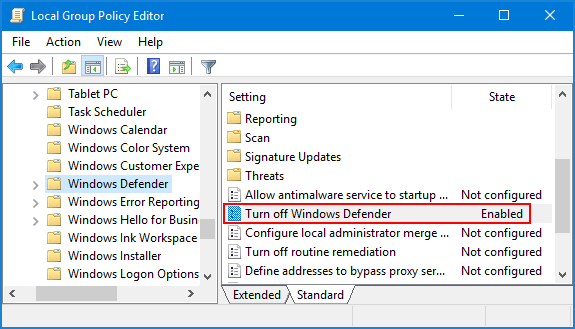
  2. When the Local Group Policy Editor window appears, navigate to: Computer Configuration > Administrative Templates > Windows Components > Windows Defender.
  3. Now locate the Turn off Windows Defender setting in the right pane, and double-click on it to modify.

    turn-off-windows-defender

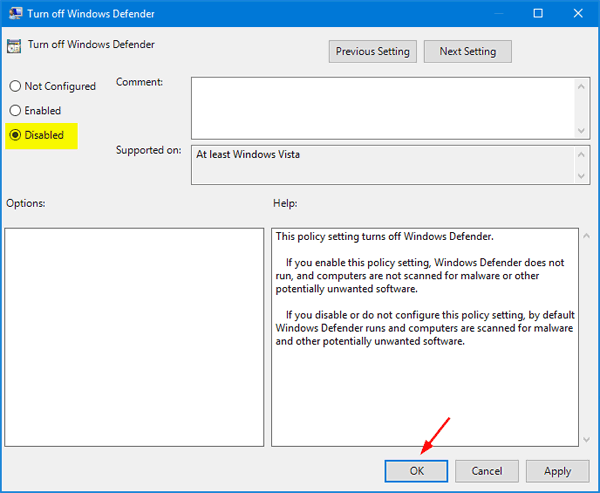
  4. In order to turn on Windows Defender, select Disabled and click OK.

    turn-on-windows-defender

    Reboot your computer. The next time you try to open Windows Defender and you should no longer get “This app is turned off by group policy” message.

Method 2: Fix “Windows Defender is Turned off by Group Policy” Using Registry Editor

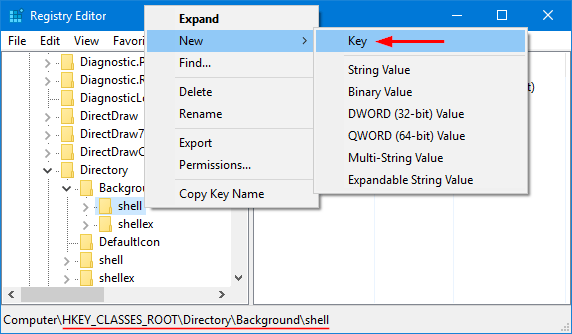
  1. Press the Windows key + R together to open the Run box. Type regedit and hit Enter to open Registry Editor.

    regedit

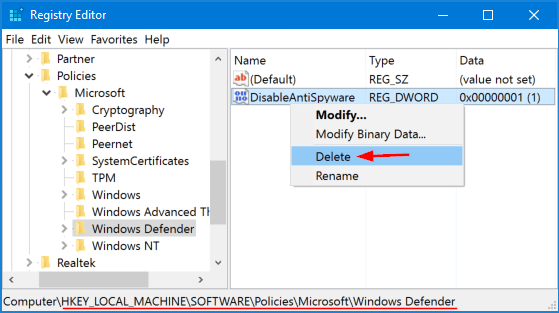
  2. In the left pane of Registry Editor, navigate to the key below:
    HKEY_LOCAL_MACHINE\SOFTWARE\Policies\Microsoft\Windows Defender
  3. Right-click on the DisableAntiSpyware value in the right pane, and then select Delete.

    DisableAntiSpyware

  4. Close Registry Editor and reboot your PC to take effect. Now you won’t receive the error “This app is turned off by group policy” when you try to launch Windows Defender.

How to Force a Windows 10 Emergency Restart

April 11th, 2017 by Admin

Emergency Restart is a hidden feature in Windows 10 that allows you to force an immediate reboot when the operating system or apps are hanging or freezing. When perform an Emergency Restart, Windows 10 will terminate any running application forcefully and you’ll not see any warning about saving your work. In this tutorial you’ll learn how to perform an emergency restart in Windows 10.

How to Force a Windows 10 Emergency Restart?

  1. Press Ctrl+Alt+Del key combination to bring the security options screen. This will display Lock this computer, Switch User, Log off, Change a password and Start Task Manager options.
  2. Press and hold down the Ctrl key on the keyboard, then click the Shutdown button at the bottom-right corner of the screen.

    ctrl-alt-del-screen

  3. On the next screen, Windows will display the following information:

    “Emergency restart. Click OK to immediately restart. Any unsaved data will be lost. Use this only as a last resort.”

    emergency-restart

  4. Click OK to do a emergency restart. Windows 10 will force the PC to immediately shut down without saving your work you’re doing, and then boot back up into Windows. That’s all there is to it.

Add Control Panel Shortcut to Right-Click Context Menu in Windows 10

April 6th, 2017 by Admin

Look for a quick way to open the Control Panel in Windows 10? If you need to frequently access Control Panel, you can put its shortcut in your desktop context menu. In this tutorial we’ll show you a registry trick to add “Control Panel” shortcut to right-click context menu in Windows 10. No matter if you’re on the desktop or in File Explorer, just right-click any empty space and you can access Control Panel from the context menu.

add-control-panel-to-windows-context-menu

How to Add Control Panel to Right-Click Context Menu in Windows 10?

  1. Press the Windows key + R to open the Run box. Type regedit and press Enter. That should open Registry Editor. Browse to: HKEY_CLASSES_ROOT\Directory\Background\shell.
  2. Right-click the shell key in the left sidebar, then select New -> Key.

    shell-new-key

  3. Name the new key “Control Panel“.

    control-panel-key

  4. Next, right-click on the newly-created “Control Panel” key and select New -> Key. Name the key command.

    new-command-key

  5. Select the command key in the left sidebar, and then double-click the (Default) value in the right pane. In the Edit String window that appears, paste the following text in the Value data box and click OK.
    rundll32.exe shell32.dll,Control_RunDLL

    add-control-panel-shortcut-menu

  6. Close Registry Editor. Now when you right-click any empty space on your desktop or in File Explorer, you’ll see the “Control Panel” shortcut in the context menu. Note that this shortcut wouldn’t appear when you right-click on a folder or file.

Stop Windows from Adding “- Shortcut” Text When Creating Shortcuts

April 6th, 2017 by Admin

In Windows 10/8/7, you can create a shortcut by right-clicking on an existing folder or file, and then selecting “Send To” -> “Desktop (Create shortcut)“. But this will automatically append the “- Shortcut” text to the end of the shortcut’s filename. If you want to keep the filename short, here’s a registry trick to stop Windows from adding “-Shortcut” text when creating shortcuts.

new-shortcut-with-shortcut-text

Tips: If you want to remove shortcut icon from your desktop shortcuts, please check out this tutorial: How to Remove Shortcut Arrow from Desktop Icons in Windows 10 / 8 /7.

How to Stop Windows from Adding “- Shortcut” Text When Creating Shortcuts?

  1. To get started, press the Windows key + R at the same time to open the Run dialog box. Type regedit and press Enter.

    regedit

  2. Once the Registry Editor loads, navigate to the following location in the left pane:
    HKEY_CURRENT_USER\SOFTWARE\Microsoft\Windows\CurrentVersion\Explorer
  3. On the right-hand side, double-click on the link value to modify. If you don’t see that value, right-click on empty space and select New -> Binary Value, then name the new value link.

    explorer-link-registry

  4. In the Value data box, replace the current value with 00 00 00 00 and click OK. Note that the current value you see will vary based on the specific version of Windows you’re running.

    edit-binary-value

  5. Close Registry Editor and restart your computer (a logoff is not sufficient to make the registry changes take effect). This time, you’ll see that your new shortcut is created without the “-Shortcut” text appended to the end.

How to Auto Hide Windows 11 / 10 / 8 / 7 Taskbar with Ease

April 4th, 2017 by Admin

Windows Taskbar has an auto-hide feature that can hide the taskbar when not in use. When this feature is turned on, the taskbar disappears whenever you click elsewhere, or whenever your cursor moves away from it. To make the taskbar appear again, you have to move your cursor to the bottom of the screen or press Windows + T keyboard shortcut. In this tutorial we’ll show you how to automatically hide the taskbar in Windows 11, 10, 8 and 7.

hide-windows-taskbar

Part 1: Auto Hide Taskbar in Windows 11

Right-click the empty space on the taskbar and select Taskbar settings.

The Settings app will launch to the related page. Click Taskbar behaviors to expand the settings.

Check the “Automatically hide the taskbar” option.

Part 2: Auto Hide Taskbar in Windows 10

Right-click a blank spot on the taskbar, and then click Settings from the context menu.

open-settings-from-taskbar-menu

This will open the Taskbar panel in the Settings app. You’ll see two options: Automatically hide the taskbar in desktop mode, and Automatically hide the taskbar in tablet mode. Toggle one or both of these options.

hide-taskbar-in-desktop-tablet-mode

Part 3: Auto Hide Taskbar in Windows 8 and Windows 7

Right-click a blank spot on the taskbar, and then select Properties in the context menu.

taskbar-properties

This will open the “Taskbar and Start Menu Properties” window. Under the Taskbar tab, check the “Auto-hide the taskbar” option and click Apply.

auto-hide-the-taskbar

That’s it!

Show or Remove Touch Keyboard Icon on Windows 10 Taskbar

April 3rd, 2017 by Admin

How can I remove the touch keyboard icon from the taskbar? Or you might want to get the missing keyboard icon back to system tray? In this tutorial we’ll 3 methods to show or remove touch keyboard icon on the taskbar notification area for your account in Windows 10.

windows-10-touch-keyboard-icon

Note: If you want to permanently disable or remove touch keyboard from Windows 10 taskbar, please refer to this method: How to Turn Off or Disable Touch Keyboard in Windows 10

Method 1: Show or Remove Touch Keyboard Icon in Taskbar Context Menu

Right-click an empty area of the taskbar, check or uncheck the Show touch keyboard button option from the context menu, this will show or remove the keyboard icon from the taskbar.

show-touch-keyboard-button

Method 2: Show or Remove Touch Keyboard Icon via Settings

  1. Open the Settings app by pressing the Windows key + I keyboard shortcut. Click Personalization.

    Personalization

  2. Select Taskbar on the left side, and then click the Turn system icons on or off link under the Notification area section on the right side.

    turn-system-icons-on-or-off

  3. Toggle Touch keyboard to On and this will put the touch keyboard icon back on the taskbar. Or toggle Touch keyboard to Off if you want to get rid of the touch keyboard icon.

    show-or-hide-touch-keyboard

Method 3: Show or Remove Touch Keyboard Icon with Registry Trick

  1. Press the Windows key + R to open the Run command box. Type regedit and press Enter.
  2. This will launch Registry Editor. Navigate to the following key:
    HKEY_CURRENT_USER\SOFTWARE\Microsoft\TabletTip\1.7
  3. Double-click on the TipbandDesiredVisibility entry on the right side, set its value to 1 if you want to show touch keyboard icon on the taskbar, or set its value to 0 if you want to hide & remove touch keyboard icon from the taskbar.

    TipbandDesiredVisibility

  4. To apply the registry changes, close Registry Editor and sign out of your Windows account.