Archive for January, 2015

Repair Your Corrupted Outlook Personal Folders (PST) File

January 30th, 2015 by Admin

PST (also known as Personal Folders File, or Outlook Data File) is a file where Microsoft Outlook stores your mail messages, calendar events, contacts, tasks and other. If you can’t open your .pst file, or you supect the data file is damaged or corrupted, you can use the Inbox Repair tool (scanpst.exe) to diagnose and repair your pst file for any problems.

Scanpst.exe is a built-in tool in Outlook. The location of scanpst.exe depends on your version of Outlook and whether or not you are using a 64-bit version of Windows.

Outlook 2013
32-bit Windows: C:\Program Files\Microsoft Office\Office15\
64-bit Windows: C:\Program Files (x86)\Microsoft Office\Office15\

Office 365 / Outlook 2013
any Windows: C:\Program Files\Microsoft Office 15\root\office15\

Outlook 2010
32-bit Windows: C:\Program Files\Microsoft Office\Office14\
64-bit Windows: C:\Program Files (x86)\Microsoft Office\Office14\

Outlook 2007
32-bit Windows: C:\Program Files\Microsoft Office\Office12\
64-bit Windows: C:\Program Files (x86)\Microsoft Office\Office12\

How to Repair A Corrupted Outlook Personal Folders (PST) File?

Before you start the repair process, make sure you have a backup of your pst file.

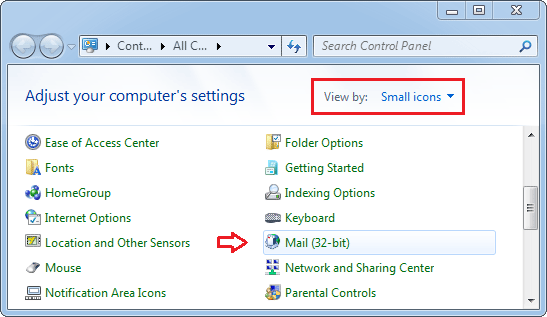
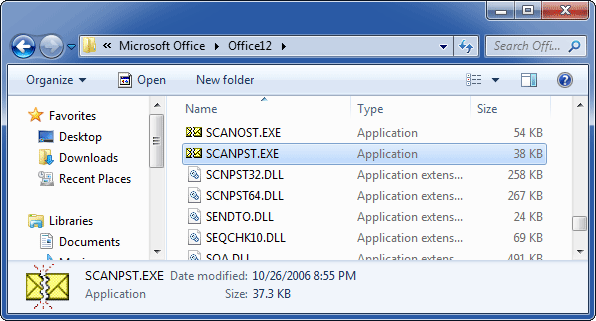
  1. Open up Windows Explorer and then locate the scanpst.exe file. In my example, it is located in this folder C:\Program Files (x86)\Microsoft Office\Office12\.

    scanpst

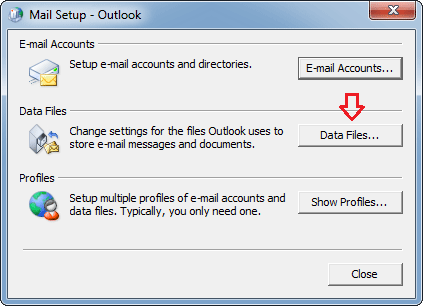
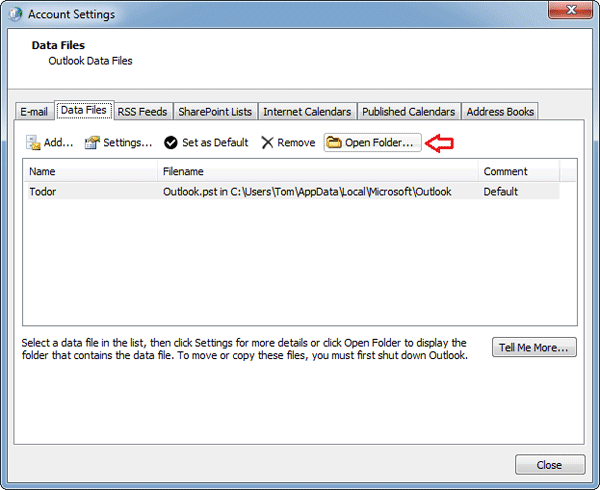
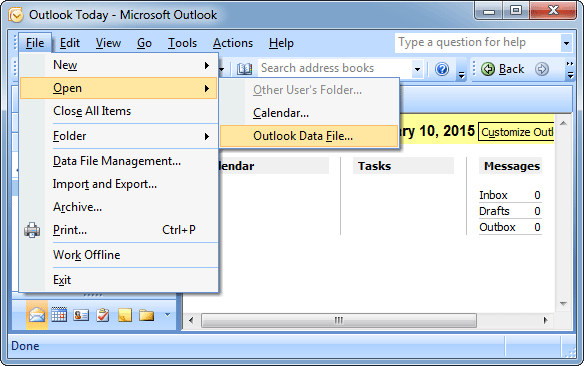
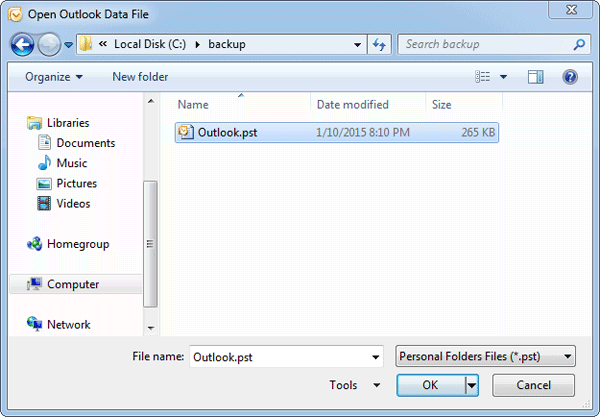
  2. Once you open up the scanpst.exe utility, you’ll have to find the location of your damaged PST file by clicking the Browse button. If you can’t figure out the location, please check out this article: Introduction to Outlook Personal Folders File (.pst).

    inbox-repair-tool

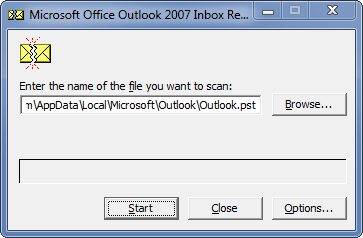
  3. Click on the Start button to scan. At this point, nothing will happen to your pst file yet. Scanpst will do an analysis first. This analysis consists out of 8 phases of which some can take quite a bit longer to complete than others depending on the size and level of corruption of the file.

    repair-pst

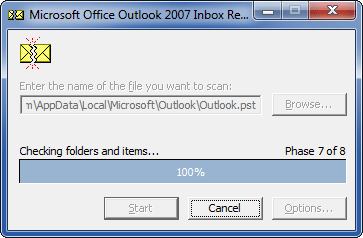
  4. After the analysis scan has completed, it will present you with a scanning report and options for the next step. You can press the Details button for more information about the type of corruption.

    outlook-pst-repair

  5. Click on the Repair button, and after a while you’ll finally get the “Repair complete” message. Assuming that all succeeds, you can now re-open Outlook and hopefully the errors will have been resolved.

How to Boot An Existing VirtualBox VM from USB Drive

January 23rd, 2015 by Admin

How can I get a VirtualBox virtual machine to boot from a physical USB drive? The problem is that the GUI of Oracle VirtualBox does not have an option to set boot from USB. Luckily there is a workaround to boot a VirtualBox virtual machine from USB drive.

Just create a new virtual hard disk (VMDK) file and use it as a raw disk that VirtualBox maps to your USB drive. When you boot your virtual machine from the newly-created virtual hard drive, it will load the operating system on your USB stick. Here’s how.

How to Boot An Existing VirtualBox VM from USB Drive?

  1. Before doing anything, make sure you’ve created a bootable USB drive and plugged it into your computer. Now we need to find the disk number of your physical USB drive.
  2. Press Windows Key + R to bring up the Run box, type diskmgmt.msc and press Enter to open the Disk Management window. Locate your USB drive and note its disk number. In my case, the USB drive is listed as “Disk 1“, so the disk number is 1.

    disk-management

  3. Once you have the disk number, open up the Command Prompt as administrator. Use the cd command to navigate to VirtualBox’s installation directory. If you have installed VirtualBox in any other directory or drive, then change the command accordingly.

    cd %programfiles%\Oracle\VirtualBox

  4. Enter the following command while replacing # with the actual disk number you found above.

    VBoxManage internalcommands createrawvmdk -filename C:\exusb.vmdk -rawdisk \\.\PhysicalDrive#

    create-virtual-hard-drive

    You can replace C:\extusb.vmdk with any file path you want. This command creates a virtual machine disk (VMDK) file that points to the physical USB drive.

  5. Now open up the VirtualBox with administrative rights. If not, VirtualBox will fail to boot from the USB drive. In the VirtualBox main window, select your target virtual machine and click Settings.

    virtualbox-manager

  6. Click on the Storage tab. Under the Storage Tree section, highlight Controller:IDE and then click on the “Add Hard Disk” icon to the right.

    virtualbox-settings

  7. In the popup box, click Choose existing disk and then choose the VDMK file (C:\exusb.vdmk in the example) you created in step 4. When this is done, click OK to save your changes.

    add-virtual-hard-drive

  8. Now starts Virtual machine and you’ll see that it starts booting from your physical USB drive. As you can see from the image below, I’ve successfully booted into my PCUnlocker Live USB drive.

    pcunlocker

With this method you can install the operating system from the USB stick, or boot your existing VirtualBox virtual machine from other third-party rescure & recovery USB drives.

How to Reset Windows 7 to Factory Settings without Install Disc

January 23rd, 2015 by Admin

How do I reset or restore a Windows 7 PC to factory settings? As we all know, Windows 7 doesn’t have the built-in refresh and reset options like Windows 8/8.1 and you have no other way to restore your computer to factory settings unless you have a manufacturer-provided install media or recovery disc.

Many computer manufacturers are pre-installing Windows without giving you the actual installation media to go with it. Instead, they create a hidden recovery partition for users to perform a factory reset. If your hard drive has such a recovery partition, you can then reset your Windows 7 system to factory settings without needing any discs or external drives. Here’s how.

How to Reset Windows 7 to Factory Settings without Install Disc?

  1. Click Start, then choose Control Panel. Click System and Security.

    control-panel

  2. Next choose Backup and Restore.

    system-and-security

  3. In the Backup and Restore window, click on the Recover system settings or your computer link.

    backup-and-restore

  4. Next, choose Advanced recovery methods.

    recovery

  5. Now you’ll be presented with two options: “Restore files from a system image backup” and “Return Your Computer to Factory Condition“. Click on “Return Your Computer to Factory Condition”.

    Note: If your computer doesn’t have a recovery partition, then the factory reset option is not available and you’ll see the “Reinstall Windows (requires Windows installation disc)” option instead.

  6. Select to either create a Back up now, or to Skip it and continue the factory reset without backing up any of your current files.

    user-file-backup

  7. Click the Restart button to reboot your computer and to start the factory reset process.

    restart

Bypass Windows Password with Freeware UBCD4Win

January 20th, 2015 by Admin

Locked out of a computer but need to be able to log in as a local admin? What you need to do is set up a UBCD4Win (also known as Ultimate Boot CD for Windows) live CD, boot up the computer with it and run the NTPWEdit tool to clear forgotten Windows password.

UBCD4Win is based on BartPE, and it requires the Windows XP CD (with SP1 or SP2). This article we’ll walk through the steps required to create a UBCD4Win bootable CD and then use it to bypass Windows administrator password.

Note: UBCD4Win is a freeware so don’t expect it to work with domain controllers. If you want to find a more powerful yet easy-to-use password recovery software, try the PCUnlocker Live CD.

Part 1: Create A UBCD4Win Bootable CD

  1. Download the freeware UBCD4Win from its official website. The download is pretty big (about 269Mb), so expect to wait a while if your network connection is slow.
  2. After installing, start the UBCD4Win (UBCD4WinBuilder.exe) program. Point the “Source” path to your Windows XP setup CD or Windows 2003 installation CD. However, Vista is not yet supported as a source.

    UBCD4Win-PE-Builder

  3. Insert a blank CD, select “Burn to CD/DVD” and click Build. The whole process will take a little while.

Part 2: Bypass Windows Admin Password

  1. Once the CD has been created, go to the BIOS and make sure your CD-ROM is set as the first boot device. Start up the computer with UBCD4Win in the CD-ROM and you will have some boot options. Choose the “Launch The Ultimate Boot CD for Windows” option.

    ubcd4win-boot-menu

  2. It will take a few minutes to load fully, but when it does you should see a Windows XP like interface. Once there, go to Start > Programs > Password Tools > NTPWEdit.

    ubcd4win

  3. Once the utility is open, you need to click the (Re)open button to open up the SAM file which should show you the list of local system accounts for your Windows installation. Select the Administrator account and click on Change Password.

    nwpwedit

  4. Type your new password twice, or leave the password fields blank if you want to clear the password. Click OK.

    change-admin-password

  5. Restart the computer, remove the UBCD4Win Live CD from the drive, and you should be able to log into Windows administrator account with the new password you’ve set.

Forgot Windows XP Domain Password and Can’t Login

January 16th, 2015 by Admin

Locked out of Windows XP domain machine and can’t log into the domain user account? Need to gain access to your computer after the domain controller is no longer available or you forgot the password?

forgot-xp-domain-password

In this article we’ll explain how to reset forgotten Windows XP password and then remove your computer from a domain that no longer exists, or which you no longer have access.

Part 1: Reset Forgotten Windows XP Password

Before removing your computer from the domain you need to first log in as a local administrator. If you’ve forgotten your password, you can reset it easily with the PCUnlocker program. Here’s how:

  1. Use a spare PC to download the PCUnlocker ISO image and burn it to a CD or USB flash drive using the ISO2Disc program.
  2. Boot your locked Windows XP machine from PCUnlocker Live CD/USB drive.
  3. Once the PCUnlocker program starts, you can see a list of local accounts for your Windows XP system.

    reset-xp-password

  4. Choose the built-in Administrator account and click on Reset Password button. It will remove the local administrator password immediately.

Part 2: Remove Windows XP from Domain

Once you’ve reset the local administrator password, you can then log on your computer locally and remove Windows XP from a non-existent domain, by following the steps below:

  1. Boot your Windows XP machine as usual. When you get to the Welcome screen, press Ctrl + Alt + Del twice to get the classic Windows logon box.
  2. Type Administrator in User name box, and leave the password box empty as you’ve reset the local administrator password. Make sure that in the Log on to field, you have pulled down to “this computer” rather than a domain. Click OK and you should be able to log on successfully.

    logon-to-xp-locally

  3. After getting into Windows XP, right-click the My Computer icon on your desktop and select Properties.

    right-click-my-computer

  4. In the System Properties window, go to the Computer Name tab and click the Change button.

    system-properties

  5. In the Member of section, choose Workgroup and then type something, anything in the Workgroup field.

    remove-xp-from-domain

  6. When you click OK, you will be prompted to provide the login credentials for an account with permission to remove this computer from domain. Just type Administrator in User name box, and leave the password box empty. Click OK.

    computer-name-changes

  7. Reboot your computer for the change to take effect. Now you’ve successfully removed Windows XP from a domain.

How to Reset Forgotten Windows Password with Ultimate Boot CD (UBCD)

January 15th, 2015 by Admin

In this tutorial we’ll show you how to crack and reset Windows password when you forget it or want to unlock a computer with an unknown password. There are tons of recovery tools available to bypass password, but here I’ll use the freeware Ultimate Boot CD (UBCD).

Ultimate Boot CD is a Linux-based bootable disc with loads of useful software for repairing or fixing almost any Windows problem. The built-in chntpw utility could be used to wipe windows passwords and view/edit the registry. Here’s how.

Note: Ultimate Boot CD is a freeware so don’t expect it to work with domain controllers. If you want to find a more powerful yet easy-to-use password recovery software, try the PCUnlocker Live CD.

How to Reset Forgotten Windows Password with Ultimate Boot CD?

Before getting started, you need to download the Ultimate Boot CD (about 588Mb) from its official website, and then burn it to a CD. With the CD you can follow the steps below to reset forgotten Windows 8/7/Vista/XP password:

  1. Boot your locked computer from Ultimate Boot CD. On the boot menu of Ultimate Boot CD, choose Parted Magic and press Enter.

    ultimate-boot-cd

  2. The next screen you have to select your graphic settings. Just select option 1 and press Enter to use the default settings.

    parted-magic

  3. Once you are presented with the Parted Magic desktop, go to the left bottom corner of the screen and choose System Tools -> Change Windows Password.

    change-windows-password

  4. A new small window will open. It lists all Windows partitions detected on your local hard drive. Click on the correct drive and it will start the chntpw utility in the console.

    select-windows-installation

  5. You will now be presented with the chntpw Main Interactive Menu. Type 1 and press Enter.

    chntpw

  6. This will list out all of the Windows users on the system. Type the name of your desired user and press Enter.

    enter-username

  7. You will now be given the option to blank out the password, as well as several other ways to promote or unlock the user account. Type 1 and press Enter, it will remove the existing password.

    user-edit-menu

  8. If you don’t want to reset other user password, type ! and press Enter.

    quit-edit-menu

  9. Type q and hit Enter at this point to quit the User Edit Menu.

    quit-chntpw

  10. You will then be asked to write the registry hive to disk. Type y to confirm and save your changes.

    write-hive-files

  11. Now you can reboot, and you can log into your Windows account with a blank password. Once you’re logged in, you can go to the Control Panel to change your password to something else — something you can remember.

How to Backup and Restore Outlook Mail Messages

January 11th, 2015 by Admin

When you use Microsoft Outlook as your email client, your email messages, contacts, appointments, task, notes are automatically saved in a personal storage folder (also known as a .pst file). Backing up your Outlook data is an important job especially if your computer crashes or if your want to transfer them to a new computer.

In this article, I explain how to easily backup Outlook mail messages and then restore (or transfer) them to another Windows-based computer.

Part 1: Backup Outlook Mail Messages

  1. Click Start, and then click the Control Panel.
  2. In the upper right corner of the Control Panel, click the pull-down menu and choose Small Icons. Double-click on Mail.

    control-panel

  3. The Mail Setup window should be open now. Click on the the Data Files button.

    mail-setup

  4. In the Account settings window, select a mail account (in case of multiple ones) and click on the Open Folder button.

    open-pst-folder

  5. Windows Explorer will open to the Outlook .PST file that contains mail messages for your selected mail account.

    backup-pst-file

  6. With Outlook closed and the folder open, copy the .PST file to a safe location, such as an external hard drive. Better yet, make sure that your regular backup routine includes this folder.

Part 2: Restore Outlook Mail Messages

Here is how to import the .PST file back into Outlook to gain access to your mail messages again.

  1. In Outlook application, click the File menu. Navigate to the Open sub-menu, then click Outlook Data File.

    import-outlook-pst

  2. Navigate to wherever your .PST file is located. Select the PST file you backed up previously and click OK.

    choose-backup-pst

  3. Once restored, you’ll be able to browse and view all items including mail messages inside your selected PST file.

How to Lock Chrome with Password and Enable Guest Browsing

January 8th, 2015 by Admin

There are times when you have to share your PC with others. Of course, this also means that you’re allowing others to open your web browser to surf the Web. The main issue here is that you may not want them to have access to your bookmarks, browsing histories, or more scary, the saved passwords.

In Chrome, there is hidden secret feature called “Profile management system” that lets you password protected the browser and allow you to manage multiple accounts. One pre-made user account is for guests in specific. The guest account keeps no record of history or other personal data.

How to Lock Chrome with Password and Enable Guest Browsing?

  1. Open your Chrome browser. Type chrome://flags in the address bar and press Enter. Press Ctrl+F and search for “Enable new profile management system”. Next select Enable from the drop-down menu.

    enable-chrome-profile-management

  2. Once changed, click on the Relaunch Now button appearing at the bottom of the screen so that the changes made will take effect. If you don’t see the relaunch button just close and re-open the browser.
  3. Once you relaunch the Chrome browser, you will find a new button in the upper-right corner just before the minimize button which is labelled as first user. Now click on it, a small panel will open where you can log in to your Google account.

    chrome-first-user

  4. After signing into your Google account, you will notice at the title bar Chrome is displaying your account name instead of a icon. Click on your name to reveal your user card where you can select the Lock option to lock the Chrome browser. By locking the browser, you can prevent others from assessing your browsing history, bookmarks and other private data.

    lock-chrome

  5. Once locked, the browser will vanish and the User Manager window will appear and others can still use the browser as a guest user by selecting the option Browse as Guest located at the bottom left corner.

    chrome-user-manager

    Keep in mind that the User Manager window will remain active until you re-enter your password, even after restarting Chrome or rebooting the operating system.

Note: You must remember to lock your profile before closing Chrome because closing the browser won’t automatically lock your profile. Since Chrome reloads all the tabs when you unlock, don’t forget to save any of your unsaved work.

Be aware that this new Chrome profile management feature is not yet enabled by default and is still in the testing phase. This feature only locks the Chrome app itself and it doesn’t actually add an extra layer of protection to your browsing histories. The saved passwords in Chrome can always be revealed with the password tool such as Password Recovery Bundle.

Recover Stored Passwords from Chrome Canary, Chromium and Chrome

January 7th, 2015 by Admin

Have tons of passwords saved in the Chrome browser and need to recover them? Maybe you want to stop using Chrome, or you want to transfer the saved passwords to a new PC? With Password Recovery Bundle you can quickly recover cached logins and passwords to Web sites stored in Chrome, Chrome Canary and Chromium browsers.

How to Recover Stored Passwords from Chrome Canary, Chromium and Chrome?

Download and install Password Recovery Bundle on your computer. After installing, start the program and then click on Start Recovery.

As soon as you click on the Start Recovery button, you’ll see a drop-down list that displays all supported passwords. In order to recover Chrome saved passwords, select the Chrome Password option.

The program will automatically locate the browser profiles for Chrome Canary, Chromium and Chrome you have installed on your computer. Quickly decrypt and reveal cached login credentials, including the URL of the website, username / email address and password.

You can then select more than one password, copy them to the clipboard and save them to a text file.