Archive for April, 2015

How to Add Safe Mode to Boot Menu in Windows 10 or 8

April 28th, 2015 by Admin

Safe Mode is a special Windows boot mode used for troubleshooting and system diagnostics. Since Windows 8, there is no straight-forward method to access the Safe Mode and the traditional F8 key also doesn’t work any longer. In this tutorial we’ll show you how to add the Safe Mode option to Boot Menu in Windows 10/8.1/8.

How to Add Safe Mode to Boot Menu in Windows 10 or 8?

  1. Open an elevated Command Prompt by pressing the Windows key + X and then selecting “Command Prompt (Admin)“.
  2. Enter the following command or copy and paste the command in the Command Prompt window, and press the Enter key.
    bcdedit /copy {current} /d "Safe Mode"

    bcdedit

    This command clones the current OS boot settings to a new boot entry named “Safe Mode”. Close the Command Prompt after the command above is executed.

  3. Press the Windows key + R to bring up the Run box. Type msconfig and press OK.
  4. In the System Configuration window, click on the Boot tab, select the newly-created boot entry “Safe Mode” from the list. Check the box labelled Safe boot (under Boot options), and set the Timeout to 30 seconds.

    msconfig

  5. Click OK, then apply changes. Restart your PC and the Safe Mode option would now appear in the boot selection menu.

    windows-8-safe-mode-boot

    The boot screen menu will automatically disappear after 30 seconds to boot into Windows. Note that, when you select the Safe Mode option, your PC will reboot once again and bring you to Safe Mode automatically.

How to Create A Windows To Go USB Drive with Freeware

April 27th, 2015 by Admin

Windows To Go is a new feature introduced since Windows 8, which allows you to install and run Windows 8 from a USB drive. It’s officially available only for Enterprise edition of Windows 8, but using the freeware ISO2Disc you can create a Windows To Go USB drive with any edition of Windows 8, 8.1 or 10.

Requirements:

  • A USB thumb drive (USB 3.0 is preferrable) or external USB hard drive with at least 16GB of space.
  • Windows 8, 8.1 or Windows 10 ISO image
  • The free ISO burning tool: ISO2Disc

How to Create A Windows To Go USB Drive?

  1. Click here to download the latest version of ISO2Disc and install it on your computer.
  2. Plug the USB drive into your PC. Note the steps below will wipe out the entire USB drive, including all partitions! If there is important data, backup now before continuing.
  3. Launch the ISO2Disc application. Click on Browse to select your Windows 8/8.1/10 ISO image.

    iso2disc

  4. Click on Burn to USB Flash Drive and then select your attached USB drive. Make sure the correct USB drive is selected (any content on the USB drive will be wiped during the creation process so this is a vital step).
  5. If you’re going to use the Windows To Go drive with GPT partition scheme, select “GPT (required for UEFI boot)“. MBR partition scheme should be selected if your target PC can boot in Legacy BIOS or CSM mode only.
  6. Under the Bootdisk Type, there are two options: Create Windows installation USB and Windows to Go (install Windows to USB). Select the second option as we need to make a Windows To Go USB drive.

    windows-to-go

  7. Click on Start Burn, you’ll see “Your USB drive will be erased” warning. Click OK to prepare the Windows To Go USB drive.

    create-windows-to-go-usb

    This is the longest part so be patient. The process only took 15 minutes for me, even though I used an external hard drive with a slower USB 2.0 connection. But it could take more than one hour if a USB 2.0 thumb drive is used.

  8. Once you’ve created a Windows To Go USB drive, you can bring it to boot up any computers. The first time you boot from a Windows To Go USB drive, you’ll have to go through the same first-time setup process you’d see after installing Windows on a computer normally. That’s it!

ISO2Disc 1.08 Release

April 13th, 2015 by Admin

Today we are happy to announce the release of ISO2Disc 1.08 – A lightweight freeware to create a bootable CD/USB from your CD ISO image. We’ve significantly improved this app and it now also supports Linux distributions.

Here is a list of supported Linux-based bootdisks we’ve tested and ISO2Disc works perfectly:

Ubuntu Live CD, Debian, Linux Mint, Puppy Linux, Avira Rescue CD, GParted Live CD, Ultimate Boot CD, Hiren’s Boot CD, Trinity Rescue Kit, System Rescue CD, Offline NT Password & Registry Editor, Ophcrack, PCLoginNow, SystemRescueCd, UBCD4Win, etc.

We highly appreciate all the feedbacks from our users and go out of our way to deliver you the products that meet all your needs.

Thanks everyone who helped us beta-testing and improving ISO2Disc!

How to Turn Off SmartScreen Filter in Windows 10 or 8

April 9th, 2015 by Admin

SmartScreen Filter is a useful security feature introduced since Windows 8. When trying to download or run a specific program, SmartScreen might show you a warning that “it is not commonly downloaded and could harm your computer“, “running this program might put your PC at risk” or “This unsafe download was blocked by SmartScreen Filter“.

smartscreen

download-blocked-by-smartscreen

If a program is already used by a reasonably large number of people, it will be considered to be safe and SmartScreen will allow you to download or install it without warnings. If the program is rarely downloaded, SmartScreen will warn that it might not be a safe choice. If you are sure that the downloaded program is safe, you can continue by clicking Run Anyway button.

This can be annoying, when downloading less popular applications. SmartScreen is not an anti-virus software and it won’t scan your PC for threats at all. SmartScreen may occasionally prevent a legitimate application from running. If you don’t like that feature, here’s how to disable it separately from Control Panel, Microsoft Edge and Internet Explorer.

Part 1: Turn Off SmartScreen Filter from Control Panel

  1. Press the Windows key + X to bring up the Power User menu, and then click Control Panel.
  2. After opening the Control Panel, select System and Security option as it has been shown in the image below.

    control-panel

  3. Now select the Action Center option, or click on Security and Maintenance in Windows 10.

    system-and-security

  4. In the left pane, click on the Change SmartScreen settings link.

    change-smartscreen-settings

  5. Now SmartScreen Settings window will appear. You will see three options there. Check the last option
    Don’t do anything (Turn Off Windows SmartScreen)” and press OK to disable SmartScreen.

    disable-smartscreen

  6. Now you are done with it. SmartScreen is disabled now. It will no more irritate you until you re-enable it.

Part 2: Turn Off SmartScreen Filter for Microsoft Edge

However, even if you’ve turned off SmartScreen Filter in Control Panel, Microsoft Edge browser still uses the SmartScreen Filter to check for malicious website or download. Here is how to disable SmartScreen Filter protection in Microsoft Edge:

  1. Open Microsoft Edge. Click on the More actions button at the top right corner, and then select Settings from the drop-down menu.

    microsoft-edge-settings

  2. Scroll down the settings and click on “View advanced settings” button.

    view-advanced-settings

  3. Toggle the “Help protect me from malicious sites and downloads with SmartScreen Filter” switch Off.

    disable-smart-filter-protect

Part 3: Turn Off SmartScreen Filter for Internet Explorer

If your downloaded is blocked by Internet Explorer, here is how to turn off SmartScreen Filter in Internet Explorer:

  1. Open Internet Explorer. Click the Gear icon in the upper-right corner and then select Internet Options.

    internet-options

  2. Select the Advanced tab. Scroll down to the Security section and then uncheck the “Enable SmartScreen Filter” setting.

    uncheck-smartscreen-filter

  3. Click Apply and then OK.

How to Create An Encrypted and Locked Folder in Windows

April 4th, 2015 by Admin

There are many folder locking programs out there that allow you to password protect and set different access rights to your files. But most of these programs don’t encrypt your files at all. Someone can easily bypass this protection to access your files by booting your PC with a Linux or WinPE Live CD, or removing your hard drive and connecting it to another PC.

If you’re a bit more conscious of privacy, encrypting your files is a better solution. Lock My Folders is an on-the-fly encryption software to lock and encrypt all kinds of pictures, videos, documents, files and folders. In this article we’ll explain how to use this program to create an encrypted and locked folder in Windows 10, 8, 7, Vista and XP.

Part 1: Set Password

Click here to download the Lock My Folders application and install it on your computer. The first time you launch the program, it will prompt you to set a master password that will be used to encrypt your files later on.

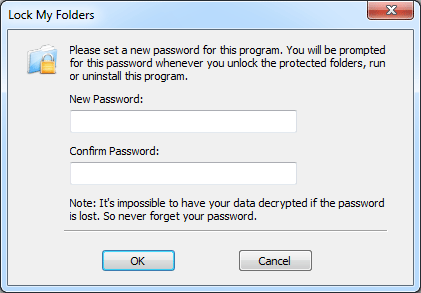
Enter a password that you can remember as you’ll need it to open and use the program next time.

Part 2: Create An Encrypted Folder

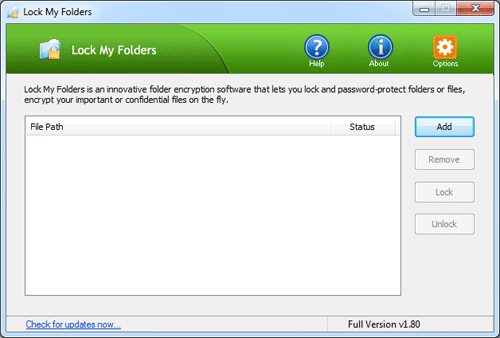
To create an encrypted folder, click on Add button from within the Lock My Folders program.

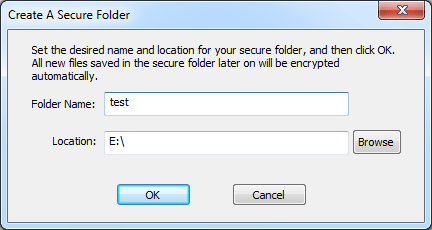
In the popup window, type your desired folder name and specify the location where you would like your new secure folder to be created. Click OK. You can create a secure folder in your local hard drive or USB flash drive.

Now your secure folder should have been created. You can then copy all your private photos, documents & videos into this folder, or create or edit a confidential file in the secure folder. All your files stored in this folder will be encrypted automatically on the fly.

Part 3: Manage Your Encrypted Folders

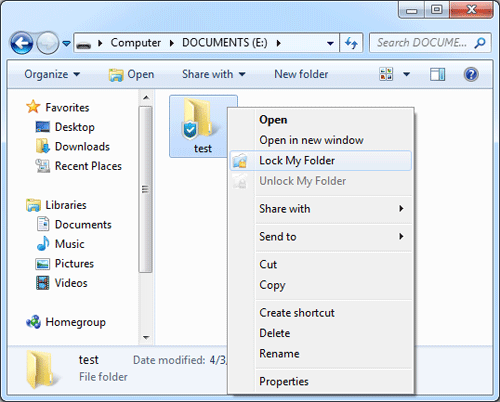
With the steps above you can create as many secure folders as you want. You can lock your secure folder after you finish working with it. Just right-click on the secure folder and select “Lock My Folder“.

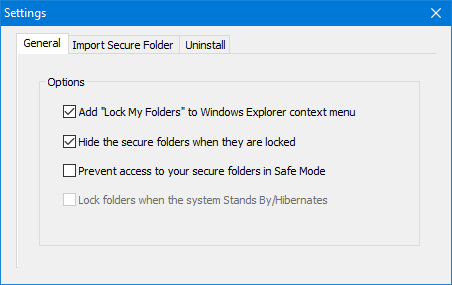
When a secure folder is locked, everyone couldn’t access all files in it without knowing your password. You can also set your locked secure folders to be invisible from Windows Explorer and Command Prompt, by following these steps:

  1. Start the Lock My Folders program.
  2. Click on the Options icon from the top right corner of the main screen, and then select Settings.
  3. Check the “Hide the secure folders when they are locked” box.

If you shutdown or restart your PC, all your secure folders will be locked out automatically.

The next time you need to open or access the secure folder, you need to unlock it firstly. Right-click on the secure folder and select “Unlock My Folder“.

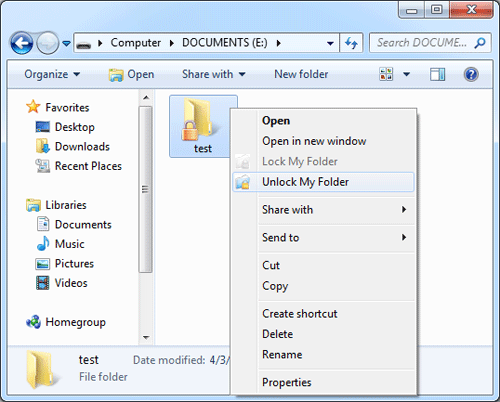
The program will ask you to enter your password. Upon successfully verifying the password, the program will open the secure folder in Windows Explorer.

If you need to reinstall your operating system or transfer your secure folders to another machine, just backup the secure folders to an external storage device and you can then import them to the Lock My Folders program again. It’s that simple!