Archive for June, 2020

2 Ways to Remove Properties from Recycle Bin Context Menu in Windows 10

June 30th, 2020 by Admin

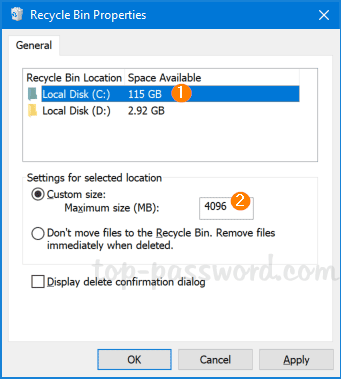
When you right-click the Recycle Bin icon on the desktop, you can choose the “Properties” option to customize Recycle Bin size or change the action of file deletion.

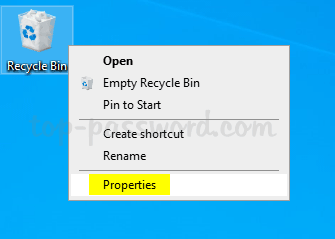
If you don’t allow others to access the Properties menu, you can hide or remove it. In this tutorial we’ll show you 2 methods to remove Properties from Recycle Bin context menu in Windows 10.

Method 1: Remove Properties from Recycle Bin Context Menu via Group Policy

  1. Open Local Group Policy Editor and browse to: User Configuration -> Administrative Template -> Desktop. On the right pane, double-click on a policy called “Remove Properties from the Recycle Bin context menu“.

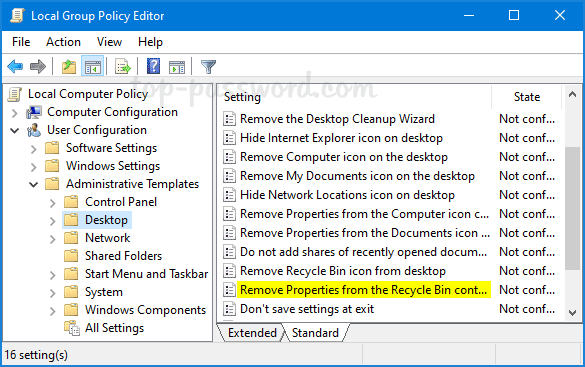
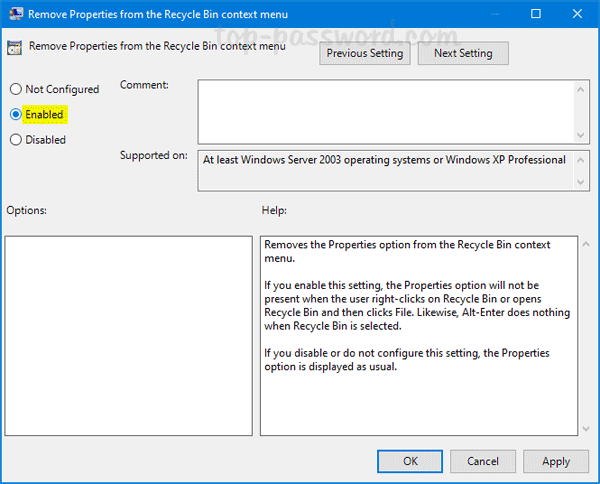
  2. Select the Enabled option and click OK.

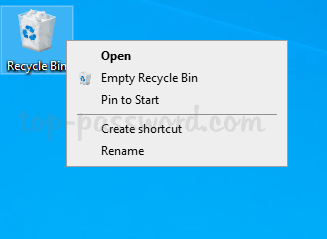
  3. After restarting Windows, you’ll find the “Properties” option is missing from the context menu when you right-click the Recycle Bin desktop shortcut.

Method 2: Remove Properties from Recycle Bin Context Menu via Registry Editor

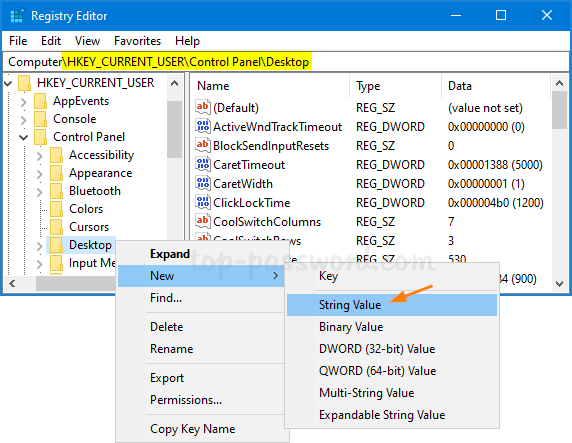
  1. Open Registry Editor and navigate to HKEY_CURRENT_USER\Software\Microsoft\Windows\CurrentVersion\Policies\Explorer. Right-click the Explorer key and select New -> DWORD (32-bit) Value.

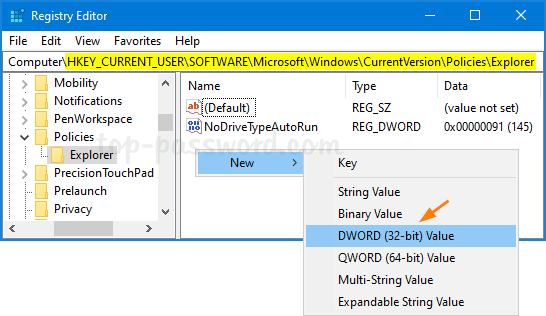
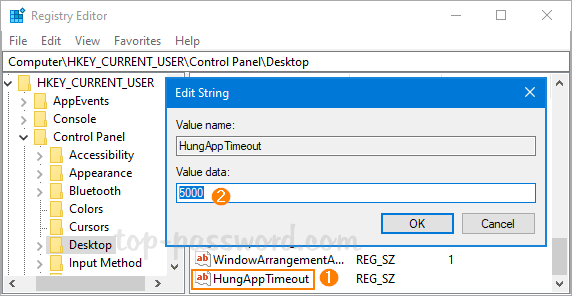
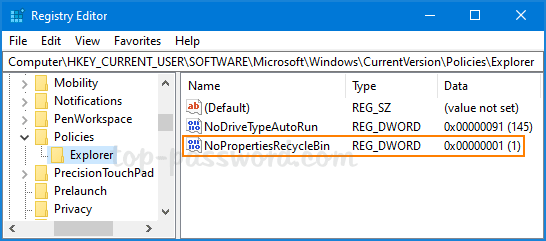
  2. Rename the DWORD to NoPropertiesRecycleBin, and then double-click it. Change its value data to 1.

  3. Reboot your computer. When you right-click the Recycle Bin desktop icon, you’ll see the Properties option is gone. If you want to restore the Properties option later, just change the value data of NoPropertiesRecycleBin to 0 and you’re done.

Fix: Windows 10 Stuck at Spinning Circle During Restart or Shutdown

June 29th, 2020 by Admin

When you restart or shut down Windows 10, it may be stuck on a blue screen for a long time with a spinning circle.

Actually, Windows 10 is waiting for running applications to exit. If they don’t respond within 30 seconds, you’ll get the following screen and you can proceed with a forced shutdown.

To speed up the shutdown or rebooting process, you can reduce the timeout for unresponsive applications so Windows 10 doesn’t stuck at spinning circle for a long time.

How to Change Timeout for Unresponsive Applications in Windows 10

  1. Press the Windows key + R to open the Run dialog. Type regedit and hit Enter to launch Registry Editor.

  2. In the left pane, navigate to the following key. Right-click on the Desktop key and select New -> String Value.
    HKEY_CURRENT_USER\Control Panel\Desktop

  3. Name the new string “HungAppTimeout“, and then double-click it to modify. Enter a number between 1000 and 20000 in milliseconds and click OK. A low number means the app will be considered as unresponsive shortly.

  4. Navigate to HKEY_LOCAL_MACHINE\SYSTEM\CurrentControlSet\Control and create a new string named WaitToKillServiceTimeout, which works the same as “HungAppTimeout”, but it applies to services instead of applications. Don’t set this value below 2000 milliseconds.
  5. Close Registry Editor when you’re done. You’ll have to restart Windows for the change to take effect.

How to Change Storage Capacity for Recycle Bin in Windows 10 / 8 / 7

June 24th, 2020 by Admin

Recycle Bin is a hidden folder in Windows which can store deleted files. Once the maximum storage size for the Recycle Bin is reached, Windows will automatically delete the oldest files permanently to make space for newly deleted files. If your Recycle Bin’s storage capacity is too small to hold a large file, you’ll get the following warning.

“This file is too big to recycle. Do you want to permanently delete it?”

To get rid of this warning, you need to increase the maximum storage size for the Recycle Bin. In this tutorial we’ll walk you through the steps to change storage capacity for Recycle Bin in Windows 10 / 8 / 7.

How to Change Storage Capacity for Recycle Bin in Windows

  1. Right-click the Recycle Bin icon on your desktop and then select “Properties” from the context menu.

  2. In the Recycle Bin Properties window, select a drive listed in the box and click the Custom size option, then specify the maximum size that it can hold deleted files. Each drive has its own Recycle Bin folder so you can set the storage capacity differently.

    The default maximum storage size of a Recycle Bin location is about 5% of its space available.

  3. Click OK to save your changes.

That’s it!

Use Nearby Sharing to Transfer Files between Windows 10 PCs

June 23rd, 2020 by Admin

Is there a simple way to share files with my roommates or colleagues? Nearby Sharing makes it super easy to send files over Bluetooth or Wi-Fi to nearby Windows 10 PCs. In this tutorial we’ll explain how to use Nearby Sharing to transfer files between two Windows 10 computers.

How to Transfer Files Easily Using Nearby Sharing

  1. Before getting started, you need to connect two Windows 10 PCs via Bluetooth or make sure they are on the same Wi-Fi network. Next, turn on the Nearby Sharing feature on both computers.

  2. In order to share a file, open File Explorer and locate the file you need to transfer. Right-click it and select the Share option from the context menu.

  3. The Share window will pop up and search for all nearby Windows 10 PCs. Select the computer that you want to send your file to and wait for the recipient to accept the share request.

  4. On the receiving computer, a notification will appear in the lower-right corner of the taskbar. You can click “Save” or “Save & open” to save the file immediately, or click “Decline” to decline the transfer.

Besides File Explorer, both Microsoft Edge and the Photos app also have a Share button, so you can share a photo or a link to any web page using the Nearby Sharing feature.

That’s it!

How to connect two Windows 10 PCs with Bluetooth only

June 22nd, 2020 by Admin

Bluetooth is a convenient way which lets you connect to nearby device for sharing files wirelessly. This is really useful if you have neither Ethernet nor wireless network. In this tutorial we’ll explain how to connect two Windows 10 computers with Bluetooth only.

How to connect two Windows 10 PCs with Bluetooth only

First of all, you need to turn on Bluetooth on both computers. On the right end of the taskbar, click the Action Center icon. Look for the Bluetooth option and toggle it on.

On either computer, open the Settings app and head to Devices -> Bluetooth & other devices. On the right side, click the “Add Bluetooth or other device” button.

Once the “Add a device” window opens, select the Bluetooth option.

It will start searching for the device. When your second Windows 10 computer appears in the list, click it and a PIN code will show up on both computers. If the PIN matches, click on Connect.

On your second Windows 10 PC, you’ll see the “Pair Device” window. Click Yes to accept the pairing.

Now the pairing is completed. You can transfer files between your Windows 10 computers, by right-clicking the Bluetooth icon in the system tray and selecting “Receive a File” or “Send a File“. But I recommend you use the Nearby Sharing feature to send or receive files and it’s much easier.

That’s it!

3 Ways to Enable Nearby Sharing in Windows 10

June 19th, 2020 by Admin

Nearby Sharing is a new feature in Windows 10 that lets you effortlessly transfer files to nearby devices using Bluetooth or Wi-Fi, without having to use network file sharing or even a USB drive. It works much similar to Apple’s AirDrop. In this tutorial we’ll show you 3 simple ways to turn on or enable Nearby Sharing in Windows 10.

Method 1: Turn on Nearby Sharing via Action Center

Click the Action Center icon in the right corner of your taskbar, and you can then click the “Nearby sharing” tile to toggle it on. If you don’t see this tile, click the Expand option to show the entire quick actions.

Method 2: Turn on Nearby Sharing via Settings App

Use the keyboard shortcut Windows + I to open the Settings app, and then click on the System category and select Shared experiences. On the right side, you can turn on the “Nearby sharing” toggle.

Method 3: Turn on Nearby Sharing via File Explorer’s Context Menu

In File Explorer, right-click any file and select the Share option from the pop-up context menu.

When the Share dialog box pops up, click the “Select to turn on nearby sharing” option to enable Nearby Sharing and it will show all the nearby PCs.

That’s it!

How to Uninstall or Reinstall Cortana in Windows 10 Version 2004

June 18th, 2020 by Admin

Is there a way to uninstall Cortana permanently? We’ve previously shared a method to uninstall Cortana from Windows 10 but it’s a bit tricky. Starting with Windows 10 version 2004 (also known as Windows 10 May 2020 Update), Cortana is no longer integrated with the Search feature and it becomes a standalone app. You can now uninstall, remove or reinstall Cortana with ease.

Part 1: Uninstall Cortana from Windows 10

Press the Windows logo key + X to open Quick Link menu and then select “Windows PowerShell (Admin).

Copy and paste the following command into PowerShell and press Enter:
Get-AppxPackage -allusers Microsoft.549981C3F5F10 | Remove-AppxPackage

This will uninstall Cortana completely for all user accounts on your system, but the Cortana button is still sitting there, do nothing when clicked. To hide the Cortana button, simply right-click the taskbar and uncheck the “Show Cortana button” option.

Part 2: Reinstall Cortana from Windows Store

Open the Microsoft Store app. Click the Search button in the top-right corner and type “cortana“. Choose the Cortana app from the search results.

Click on the Get button and Cortana will install on your Windows 10 PC.

If the Cortana buttion is hidden from the taskbar, just right-click the taskbar and check the “Show Cortana button” option to make it visible.

Scheduling Automatic Creation of System Restore Points in Windows 10

June 17th, 2020 by Admin

How can I get system restore points created on a schedule? A system restore point can roll back Windows to an earlier working state if it becomes unstable or unbootable. In this tutorial we’ll show you how to create automatic system restore point on a daily schedule in Windows 10.

How to Create System Restore Point on a Daily Schedule in Windows 10

Before getting started, you need to turn on System Protection and disable system restore point frequency. This can be done with the methods described in our previous article. Afterwards you can use the Task Scheduler to schedule automatic creation of system restore points daily.

  1. After opening Task Scheduler, right-click the item “Task Scheduler Library” in the left pane and then select Create Task.

  2. On the General tab, enter a descriptive name for the task. Choose the “Run whether the user is logged on or not” option and tick the checkbox named “Run with highest privileges“.

  3. Go to the Triggers tab. Click on the New button.

  4. Under the “Begin the task” drop-down list, select “On a schedule“. Choose the Daily option and specify a time for the creation of the restore point. Click OK.

  5. Go to the Actions tab. Click on the New button.

  6. Choose “Start a program” by clicking the Action drop-down list. Enter the powershell.exe command in the Program/script field. In the “Add arguments” field, type the following and then click OK.
    -ExecutionPolicy Bypass -Command "Checkpoint-Computer -Description \"My Daily Restore Point\" -RestorePointType \"MODIFY_SETTINGS\""

  7. Go to the Conditions tab. Uncheck both “Stop if the computer switches to battery power” and “Start the task only if the computer is on AC power“. Click OK.

  8. Enter the password of your current Windows account when prompted, and then click OK.

Now, system restore points should be created automatically at your specified time every day. You can check if new restore points are created successfully by following this tutorial.

How to View All Available System Restore Points in Windows 10

June 16th, 2020 by Admin

How can I view a list of system restore points available in Windows 10? To prevent your PC from crashing or freezing, make sure you have created at least one system restore point recently. In this tutorial we’ll show you easy ways to view all available system restore points in Windows 10.

Method 1: View Available System Restore Points via System Properties

  1. Press Windows + R keys together on the keyboard. When the Run dialog box opens, type rstrui and hit Enter.

  2. In the System Restore window, click on Next.

  3. This will list all available system restore points. Based on the description and the creating date, you can identify the restore point you’ve created.

  4. When finished reviewing your restore points, click on Cancel to close System Restore.

Method 2: View Available System Restore Points via PowerShell

  1. Right-click the Start button or use the Windows key + X keyboard shortcut to open the Power User menu, and then select Windows PowerShell (Admin).

  2. Run the following command and all available restore points will be listed with Creation Time, Description , SequenceNumber and other information.
    Get-ComputerRestorePoint

That’s it!

How to Create Special Characters in Windows 10 without Third Party Software

June 15th, 2020 by Admin

Unable to type a special character using your keyboard? Can’t find the symbol you need in the Character Map utility? In this tutorial we’ll show you how to create your own special characters using Windows built-in tool – Private Character Editor, and insert the custom characters into a Word or any other document.

Part 1: Create Special Characters in Windows 10

  1. Press the Windows key + R to bring up the Run dialog. Type eudcedit and hit Enter to open up the Private Character Editor utility.

  2. First, click any empty box in the grid and it will generate a hexadecimal code that is used to identify your custom character uniquely. Click OK.

  3. You will then be presented with a drawing board. Click on the Tools menu and select Item, you can find different tools which you can use to design your own character.

  4. To save your character, click on the File menu and select Font Links.

  5. When you are asked if you want to save this character. Click Yes.

  6. Select the “Link with All Fonts” option and click OK, you’re done.

Part 2: Insert Your Created Characters into Any Document

  1. Press the Windows key + R to bring up the Run dialog. Type charmap and hit Enter to open up the Character Map utility.

  2. Click on the Font drop-down list and select “All Fonts (Private Characters)” from it.

    Move your cursor over a character in the grid and you can see its associated hexadecimal code. Just find and click your created character.

  3. Your selected character should appear in the “Character to copy” field below. Click on Select and then click on Copy.

  4. Now, you can use Ctrl + V to paste that character into Microsoft Word and Notepad.

With Private Character Editor you can create your own special characters easily. However this tool doesn’t have options to export or import characters, so you might be unable to transfer your created characters to another computer.