Archive for October, 2018

Configure Windows 10 to Prompt for BitLocker PIN During Startup

October 31st, 2018 by Admin

Setting up BitLocker PIN can add an additional layer of security to your computer as it acts as a second authentication factor, which can prevent DMA attacks and unauthorized access to Windows logon screen. In this tutorial we’ll show you how to configure Windows 10 to prompt for BitLocker PIN during startup.

How to Enable BitLocker Startup PIN in Windows 10

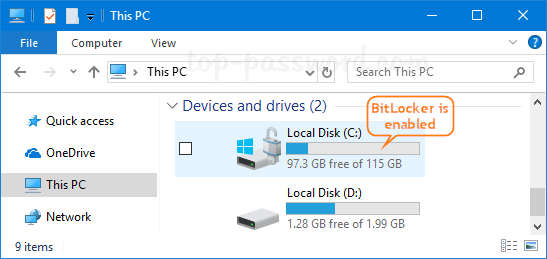
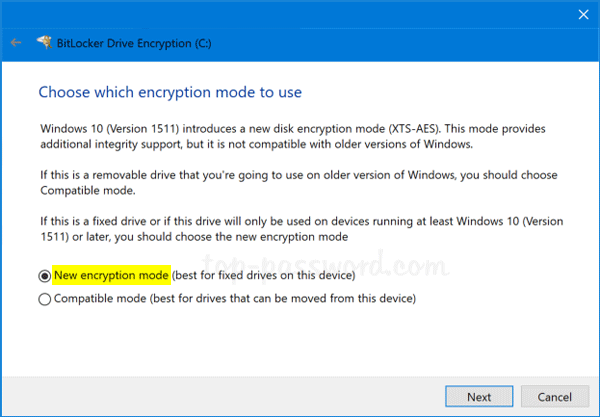
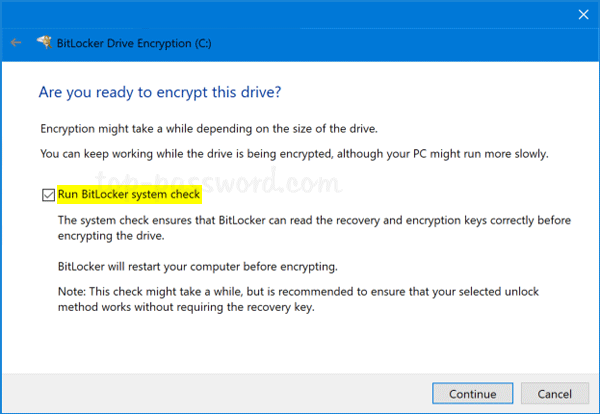
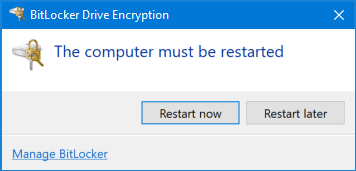
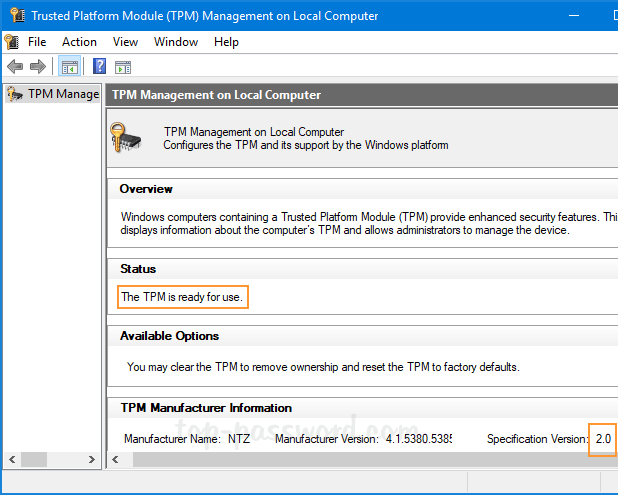
Before proceed, you have to turn on BitLocker Drive Encryption for your system drive with TPM. Once you’ve enabled BitLocker, follow these steps to set up a pre-boot PIN:

  1. Open the Local Group Policy Editor and browse to:
    Computer Configuration > Administrative Templates > Windows Components > BitLocker Drive Encryption > Operating System Drives

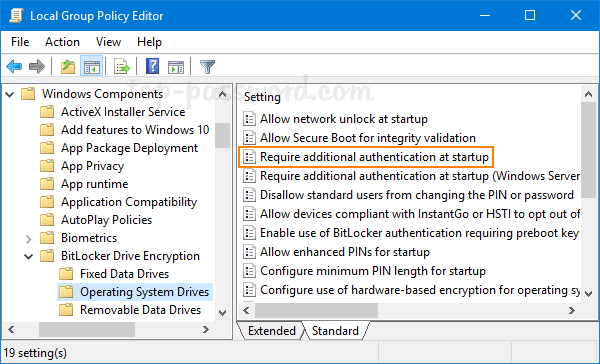
    In the right pane, double-click on the “Require additional authentication at startup” the policy.

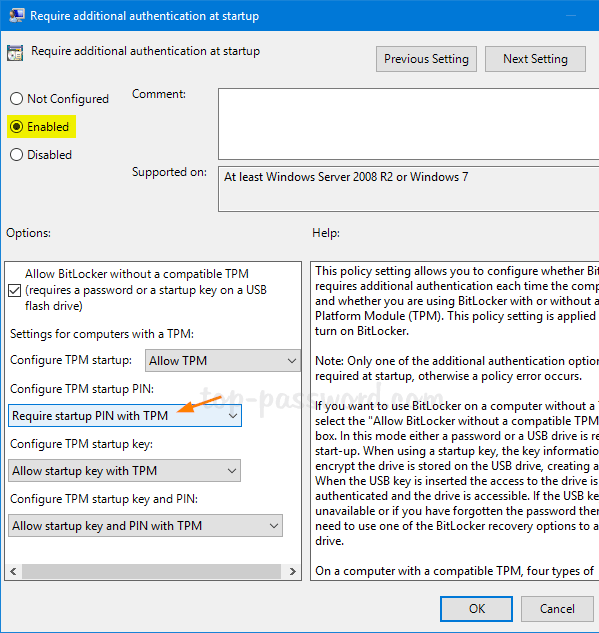
  2. Now you should select Enabled. Under “Configure TPM startup PIN”, select Require startup PIN with TPM. Click OK and then reboot the system.

  3. Open an elevated Command Prompt and run the following command to add a pre-boot PIN for your BitLocker-encrypted OS drive. Make sure you set a strong PIN that you can remember.
    manage-bde -protectors -add C: -TPMAndPIN

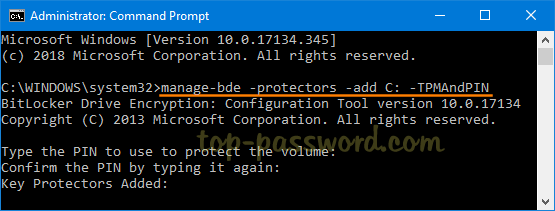
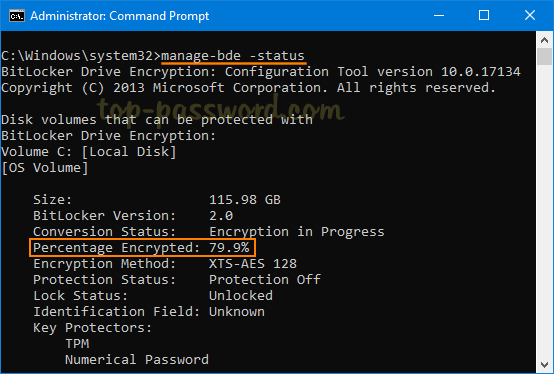
  4. Next, type manage-bde -status to check whether the TPMAndPin protector has been added.
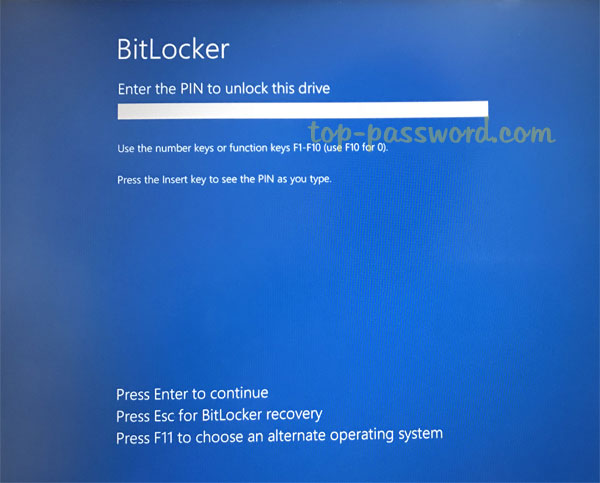
  5. After all that is done, you’ll need to enter the BitLocker PIN each time you turn on your PC, before Windows boots up.

That’s it!

Step-by-Step Tutorial to Enable BitLocker on Windows 10 OS Drive

October 29th, 2018 by Admin

BitLocker offers the easiest and most secure way to encrypt your partition or hard drive in Windows. In order to prevent most offline physical attacks and firmware-level malware, you can encrypt the operating system drive with BitLocker. In this tutorial we’ll walk you through the steps to turn on BitLocker drive encryption on Windows 10 OS drive.

Note: BitLocker is only available in the Pro, Enterprise and Education editions of Windows 10. Before getting started, you need to find out if your computer has a TPM chip installed. When TPM is not available, you have to use group policy to enable additional authentication at startup.

How to Enable BitLocker on Windows 10 Operating System Drive

  1. Open the Control Panel in Large icons view, and then click BitLocker Drive Encryption.

  2. Click the Turn on BitLocker link to the right of your operating system drive.

  3. The system will check whether your PC meets the system requirements for using BitLocker. If everything’s OK, you’ll be prompted to save the BitLocker recovery key just in case you have problems unlocking your PC.

  4. In my case, I chose to save the recovery key to a file on external USB drive. Afterwards, click Next to continue.

  5. You’re asked to choose how much of your drive you want to encrypt: encrypt the used disk space only, or encrypt the entire drive to ensure no one can recover previously-deleted files.

  6. Next, you need to choose the encryption mode. New encryption mode is introduced since Windows 10 version 1511, so its encrypted drive can only be used on computers running Windows 10 (version 1511) or later.

  7. Make sure to check the “Run BitLocker system check” option, and click Continue.

  8. Restart your computer when asked.

  9. After the PC boots back up, Windows will encrypt your drive in the background. To check out the encryption progress, you can run the following command at an elevated Command Prompt:
    manage-bde -status

  10. You can continue using your computer while the OS drive is being encrypted, but things may be running a little more slowly than usual.

If you’ve bought a brand-new computer with BitLocker turned on by default, make sure you recover and backup the BitLocker recovery key before you have trouble logging into Windows or you’re prompted for the recovery key during boot.

4 Ways to Find out if Your Windows PC Has a TPM Chip

October 26th, 2018 by Admin

How can I determine if my computer has TPM available? Need to check if the TPM on a Windows machine is enabled or activated? TPM (Trusted Platform Module) is a security chip that is soldered to the motherboard on most new PCs. It provides a hardware-based approach to store cryptographic keys and ensure it is tamper-free. In this tutorial we’ll show you 4 ways to find out if your Windows PC has a TPM chip, and check out TPM version and status.

Method 1: Check if Your PC has TPM Using TPM Management Tool

Press Windows + R to open the Run dialog window. Type tpm.msc into it and press Enter.

This opens the built-in utility – Trusted Platform Module (TPM) Management. If TPM is installed, you can see the manufacturer information about the TPM in the PC. In my case, the TPM version is 2.0.

If you see a “Compatible TPM cannot be found” message instead, your computer does not have a TPM or it’s turned off in the BIOS/UEFI.

Method 2: Check if Your PC has TPM Using Device Manager

Open the Device Manager and look for a node called “Security devices“. Expand it and see if it has a “Trusted Platform Module” listed.

Method 3: Check if Your PC has TPM Using Command Prompt

Open the elevated Command Prompt and run the following command:
wmic /namespace:\\root\cimv2\security\microsofttpm path win32_tpm get * /format:textvaluelist.xsl

This will let you view the current status of the TPM chip: activated or enabled. If there is no TPM installed on your computer, you’ll get the message “No Instance(s) Available“.

Method 4: Enter into UEFI/BIOS to Check if Your PC has TPM

If you’re unable to find any TPM on your PC using the above methods, it’s possible that the TPM is disabled in the UEFI/BIOS firmware. To check for this, restart your PC into the UEFI / BIOS screen. Navigate to the Security tab or the Advanced tab, look for a setting called “TPM Support“, “Security Chip“, “TPM Security” or something like that. Make sure it’s enabled.

If there is no such setting, your computer probably doesn’t have TPM chip.

How to Change Another User’s Password in Windows 10 / 8 / 7

October 25th, 2018 by Admin

How can I change other user password without logging in as that user? Provided you are the administrator, you have many ways to reset any Windows user password. If you try to change another user’s password from a standard account, you may receive the “access denied” error message.

Here we’re going to show you several ways to change another user’s password from standard account in Windows 10 / 8 / 7. Privilege elevation is required for this task.

Method 1: Change Another User’s Password from Control Panel

  1. Open the Control Panel in Large icons view, and click on User Accounts.

  2. Click on the Manage another account link as shown in the image below.

  3. If you’re logged on as a standard account, a UAC prompt will ask you for the administrator password in order to gain elevated privileges.

  4. Select another user that you want to change password for.

  5. Click the “Change the password” option.

  6. Type new password and confirm it, then click on the “Change password” button on the lower right hand side.

Method 2: Change Another User’s Password from Elevated Command Prompt

  1. Click on Start, and begin typing “cmd“. You’ll see the Command Prompt appear at the top of the search results. Right-click on it and select “Run as administrator“.

  2. In the UAC elevation prompt, enter your administrator password and click Yes.

  3. In order to change another user’s password, type net user user_name * and press Enter. It will ask you to type a new password twice. For security purpose, the new password you typed won’t appear on the screen.

If you’re still unable to change another user’s password, follow our tips for promoting your standard account to administrator in Windows 10 / 8 / 7. That’s it!

How to Open Elevated Command Prompt from Standard User in Windows

October 25th, 2018 by Admin

Is it possible to run an elevated Command Prompt from standard account? Though Standard account has limited privileges as opposed to administrator account, most people still like to use it for everyday computer use in order to lower the risk of being infected with malware. When an administrative task needs to be performed, they would do it from an elevated Command Prompt. In this tutorial we’ll show you different ways to open elevated Command Prompt from standard user in Windows 10 / 8 / 7.

Method 1: Open Elevated Command Prompt from Standard User via Run or Command Line

Use the Windows key + R keyboard combination to open the Run dialog box. Type the following and press Enter.
powershell -Command "Start-Process cmd -Verb RunAs

Or run the above command in a Command Prompt window that has already been opened with normal privileges.

A pop-up window will appear asking to enter your administrator password.

Once you’ve entered the correct password and click Yes. It will run an elevated Command Prompt immediately.

In addition, the command “runas /user:Administrator cmd” can also let you run Command Prompt using an administrator profile, but note that the cmd is still running without elevated privileges.

Method 2: Open Elevated Command Prompt from Standard User via Windows Search

Click on the Start button and then type “cmd” in the search box that appears. Right-click on the Command Prompt in the result and select “Run as administrator“.

You will see a UAC pop-up window asking you to type the administrator password before opening up the elevated Command Prompt.

Method 3: Open Elevated Command Prompt from Standard User via Start Menu

Click on the Start button. In the Start Menu, scroll down to the “Windows System” folder and expand it. There you can right-click on the Command Prompt shortcut, and select More -> Run as administrator.

These are all the methods we know of running elevated Command Prompt from standard user. If you need to access elevated Command Prompt frequently, it’s a good idea to pin the Administrator Command Prompt to the Windows taskbar. That’s it!

Automatically Log off Idle Remote Desktop Sessions in Windows

October 24th, 2018 by Admin

How can I force the server to log off idle RDP session automatically? An idle or inactive session will also consume precious CPU resources and memory. When the number of concurrent connections has reached the limit, your best bet is to kick out idle users. In this tutorial we’ll show you how to use group policy to configure Windows to automatically log off idle remote desktop sessions.

Automatically Log off Idle Remote Desktop Sessions in Windows

  1. Open the Local Group Policy Editor and browse to:
    Computer Configuration > Administrative Templates > Windows Components > Remote Desktop Services > Remote Desktop Session Host > Session Time Limits

    In the right panel, double-click the “Set time limit for active but idle Remote Desktop Services sessions” policy.

  2. Change it to Enabled, then set the desired amount of time in the drop-down list right below. Click Apply and then OK. Reboot your computer to put the policy into effect.

  3. When any RDP user is idle for the group policy specified amount of time, they will receive the following warning:

    “Session has been idle over its time limit. It will be disconnected in 2 minutes. Press any key now to continue session.”

    You have the chance to click OK to extend the session. Otherwise, the idle session will log off automatically two minutes later.

That’s it!

Reset Forgotten MateBook Laptop Password with Bootable USB

October 22nd, 2018 by Admin

Forgot your Windows 10 password on Huawei MateBook X Pro? If you find yourself in a situation in which you can’t remember your MateBook password, then you’re in the right place. In this tutorial we’ll show you how to reset forgotten MateBook laptop password with a bootable USB.

Part 1: Create a Bootable USB with PCUnlocker

Since UEFI is required for booting MateBook to a USB, we’ll choose the Windows password recovery utility – PCUnlocker Enterprise. After you’ve got a copy of PCUnlocker ISO image, download a third-party utility Rufus – which allows you to transfer an ISO image to USB and make the USB drive bootable.

Prepare a USB flash drive that’s at least 1 GB and plug it into your PC. Open up Rufus and click the Select button to locate the downloaded ISO file. Make sure the Partition scheme is set to GPT. Finally click on Start.

Part 2: Change Boot Order on MateBook Laptop

Once you have created a bootable USB with PCUnlocker, you have to boot it. When you turn on your MateBook laptop, press the F2 key to access the UEFI menu. If you don’t have a keyboard, hold down the volume-up button while powering on the MateBook, this will also take you to UEFI.

In the UEFI screen, select the “Boot Order” and hit Enter to choose “USB -> SSD“. Save your changes and exit. Now your laptop will boot from USB.

Part 3: Reset Forgotten MateBook Password

After loading a very light copy of Windows Recovery Environment (WinRE), you’ll get to the PCUnlocker utility. Just select one of the user accounts found on your MateBook laptop, and click on Reset Password.

The program will get rid of your forgotten password in seconds. Reboot and you can access your MateBook laptop without entering a password.

Conclusion

So this is how you can boot MateBook laptop with USB and reset your forgotten password conveniently and securely. However, if you don’t mind losing all files on your system, factory reset is a good alternative way to erase your lost Windows password. Just hold down the F10 key when powering on your computer to access the system recovery screen. From there, you can start the factory reset process.

How to Hide / Remove the “All apps” List in Windows 10 Start Menu

October 18th, 2018 by Admin

Windows 10 has changed the Start Menu layout, and you can access the list of installed apps on the left and the tiles on the right. As I almost never use the list of all apps, I prefer to have the list collapsed. In this tutorial we’ll show you how to hide the All apps list from Windows 10 Start Menu, or even disable the “All apps” button as well.

Method 1: Hide All Apps List from Start Menu via the Settings

  1. Press the Windows key + I to open the Settings app, click the Personalization category and then select the Start tab in the left sidebar.
  2. You’ll see the “Show app list in Start menu” option in the right-side pane. If you turn it off, you’ll see only live tiles in the Start Menu.

  3. However, you can still click the “All apps” button at the top left of the Start Menu to expand the apps list you’ve hidden.

Method 2: Using GPO to Hide or Disable All Apps List in Start Menu

  1. Open the Local Group Policy Editor and browse to:
    User Configuration -> Administrative Templates -> Start Menu and Taskbar

    Then, double-click on the policy “Remove All Programs list from the Start menu” appearing in the right pane.

  2. Click the Enabled option. Under the “Choose one of the following actions” drop-down list, you can choose:
    • None
    • Collapse
    • Collapse and disable setting
    • Remove and disable setting

    The “Collapse” option is equivalent to turn off the “Show app list in Start menu” in the Settings app. If you’ve selected the “Collapse and disable setting” option, the “Show app list in Start menu” in the Settings app will be greyed out as well.

    If you’ve chosen the “Remove and disable setting” option, it will also disable the “All apps” button so you have no option to access the apps list from the Start Menu.

That’s it!

How to Open Notepad as Administrator in Windows 10

October 17th, 2018 by Admin

When you open a system file with Notepad, make few changes and try saving it, you may get the following error message:

“You don’t have permission to save in this location. Contact the administrator to obtain permission”

To fix this permission issue, you have to run Notepad as an administrator. In this tutorial we’ll show you 3 ways to open Notepad as administrator in Windows 10.

Method 1: Open Notepad as Administrator via Cortana Search

  1. Type “notepad” in the Cortana search box on the taskbar. Right-click on the program that appears in the search results, and select “Run as administrator“.

  2. When the User Account Control dialog appears, click Yes. It will launch Notepad as administrator rights.

Method 2: Create a Desktop Shortcut to Always Open Notepad as Administrator

  1. Right-click on the empty space on the desktop, and select New -> Shortcut.
  2. In the Create Shortcut wizard, type in the full path of the Notepad executable file, and click Next.
    %windir%\system32\notepad.exe

  3. Give a descriptive name for the new shortcut and click Finish.

  4. Right-click the newly created shortcut on the desktop and select Properties.

  5. In the Shortcut tab, click Advanced.

  6. Check the “Run as administrator” box and click OK.

  7. Just double-click the Notepad desktop shortcut and it will open it always as administrator.

Method 3: Add “Open Notepad as Admin” to Right-click Context Menu

  1. Open Registry Editor and navigate to the following location:
    HKEY_CLASSES_ROOT\*\shell

    Right-click on the shell key in the left pane, and select New -> Key from the pop-up menu.

  2. Name the new key runas.

  3. Select the runas key, and then double-click on “(Default)” in the right pane and change its value to “Open with NotePad (Admin)“.

  4. Right-click on the runas key and create a new subkey named command. Next, double-click on “(Default)” in the right pane and set it to “notepad %1“.

  5. Close Registry Editor. When you right-click any file in Windows Explorer, you’ll see a new option to open Notepad as admin from the context menu.

That’s it!

How to Open Phone Dialer on Windows 10 / 8 / 7

October 15th, 2018 by Admin

The Phone Dialer is a built-in app in Windows that lets you use a modem to dial people on the Internet. By default Phone Dialer is not added to the Start Menu and you’re unable to access it easily. In this tutorial we’ll show you 3 quick ways to open Phone Dialer on Windows 10 / 8 / 7.

Method 1: Open Windows Phone Dialer from the Run Command

Press the Windows key + R together to open the Run command, type dialer and press Enter. This will launch Windows Phone Dialer immediately.

Of course, you can also open Phone Dialer by running the above command at Command Prompt or PowerShell.

Method 2: Open Windows Phone Dialer via Search

In Windows 10, type dialer into the Cortana Search box next to the Start button, and you can launch the Phone Dialer utility from the result.

If you’re running Windows 8 or Windows 7, just click the Start button and type dialer in the search box to access Phone Dialer.

Method 3: Create a Desktop Shortcut to Open Phone Dialer

Right-click any blank place on the Desktop, and choose New -> Shortcut.

Type the following in the box marked Type the location of the item, and click Next.
%windir%\System32\dialer.exe

Give the shortcut a name, and click Finish.

A new shortcut will appear on your desktop. You can double-click it to open Windows Phone Dialer every time you need to access it.